HP Jetdirect External Print Server Products - External USB Compatibility
Page 2
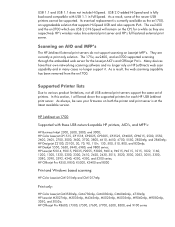
... and Officejet Pro's. HP Officejet Pro K550, K850, K5300, K5400 and 8000 Print and Windows based scanning: HP Color LaserJet CM1015mfp and CM1017mfp Print only: HP Color LaserJet CM3530mfp, CM4730mfp, CM6030mfp, CM6040mfp, 4730mfp; As a result, the web scanning capability has been removed from the en1700. HP Deskjet 5550...on both the printer and print server is fully backward compatible with these USB network-capable HP printers, AIO's, and MFP's: HP Business Inkjet 2300, 2600, 2800, and 3000; HP Officejet Pro K8600, L7300, L7500, L7600, L7700, 6200, 8500, and 9100 series As always,...
... and Officejet Pro's. HP Officejet Pro K550, K850, K5300, K5400 and 8000 Print and Windows based scanning: HP Color LaserJet CM1015mfp and CM1017mfp Print only: HP Color LaserJet CM3530mfp, CM4730mfp, CM6030mfp, CM6040mfp, 4730mfp; As a result, the web scanning capability has been removed from the en1700. HP Deskjet 5550...on both the printer and print server is fully backward compatible with these USB network-capable HP printers, AIO's, and MFP's: HP Business Inkjet 2300, 2600, 2800, and 3000; HP Officejet Pro K8600, L7300, L7500, L7600, L7700, 6200, 8500, and 9100 series As always,...
Setup Guide
Page 5
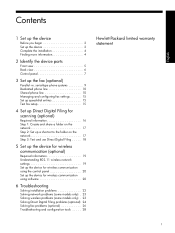
... phone line 10 Managing and configuring fax settings 15 Set up speed-dial entries 15 Test fax setup 15 4 Set up Direct Digital Filing for scanning (optional) Required information 16 Step 1: Create and share a folder on the network 17 Step 2: Set up a shortcut to the folder on the network 17 Step...
... phone line 10 Managing and configuring fax settings 15 Set up speed-dial entries 15 Test fax setup 15 4 Set up Direct Digital Filing for scanning (optional) Required information 16 Step 1: Create and share a folder on the network 17 Step 2: Set up a shortcut to the folder on the network 17 Step...
Setup Guide
Page 8
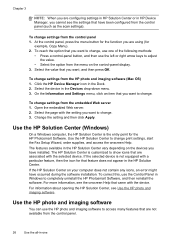
... more information about using the device software, see "Solving installation problems" on page 16. If you have more than one HP device installed, select the appropriate tab for scanning (optional)" on page 22. 4 Set up Direct Digital Filing for your computer). For setup instructions, see "Solving...the document. If you encounter problems, see "Set up the device Press START COPY Black or START COPY Color. Print a document from the ADF output tray. 6. To open the HP Photosmart software (Windows) 1. Click Device, and then choose a device. Adjust the width adjusters to www....
... more information about using the device software, see "Solving installation problems" on page 16. If you have more than one HP device installed, select the appropriate tab for scanning (optional)" on page 22. 4 Set up Direct Digital Filing for your computer). For setup instructions, see "Solving...the document. If you encounter problems, see "Set up the device Press START COPY Black or START COPY Color. Print a document from the ADF output tray. 6. To open the HP Photosmart software (Windows) 1. Click Device, and then choose a device. Adjust the width adjusters to www....
Setup Guide
Page 11
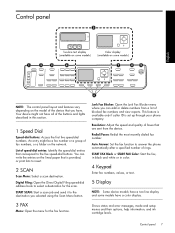
... book to select a destination for the fax function. Redial/Pause: Redial the most recently dialed fax number. Control panel 7 START SCAN: Start a scan job and send it to the five speed-dial buttons. Resolution: Adjust the speed and quality of faxes that correspond to the destination... you have a color display. 3 FAX Menu: Open the menu for the scan. Control panel English NOTE: The control panel layout and features vary depending on the model of the device that...
... book to select a destination for the fax function. Redial/Pause: Redial the most recently dialed fax number. Control panel 7 START SCAN: Start a scan job and send it to the five speed-dial buttons. Resolution: Adjust the speed and quality of faxes that correspond to the destination... you have a color display. 3 FAX Menu: Open the menu for the scan. Control panel English NOTE: The control panel layout and features vary depending on the model of the device that...
Setup Guide
Page 12
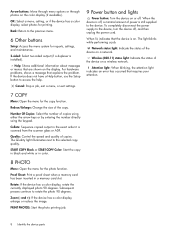
... If the device has a color display, rotate the currently displayed photo 90 degrees. Zoom (- and +): If the device has a color display, enlarge or reduce the ..., the attention light indicates an error has occurred that are shown on the color display (if available). Help: Shows additional information about messages or menus that ... 90 degrees. START COPY Black or START COPY Color: Start the copy in black and white or in color. 8 PHOTO Menu: Open the menu for the...or if the device has a color display, select photos for reports, settings, and maintenance. 2-sided: Select two-sided output ...
... If the device has a color display, rotate the currently displayed photo 90 degrees. Zoom (- and +): If the device has a color display, enlarge or reduce the ..., the attention light indicates an error has occurred that are shown on the color display (if available). Help: Shows additional information about messages or menus that ... 90 degrees. START COPY Black or START COPY Color: Start the copy in black and white or in color. 8 PHOTO Menu: Open the menu for the...or if the device has a color display, select photos for reports, settings, and maintenance. 2-sided: Select two-sided output ...
Setup Guide
Page 20
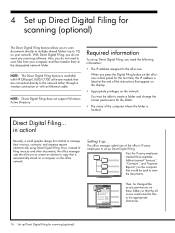
.... Direct Digital Filing... Setting it up Direct Digital Filing for scanning (optional) With Direct Digital Filing, you do not need any scanning software. Also, you do not need to scan files from your network. The office manager asked one of filing invoices and other documents, the office manager uses the... three separate folders (named "Invoices", "Contracts", and "Expense Reports") on the network. NOTE: The Direct Digital Filing feature is available with HP Officejet L7600/L7700 all -inone control panel for the folder. • The name of the instructions that the allin...
.... Direct Digital Filing... Setting it up Direct Digital Filing for scanning (optional) With Direct Digital Filing, you do not need any scanning software. Also, you do not need to scan files from your network. The office manager asked one of filing invoices and other documents, the office manager uses the... three separate folders (named "Invoices", "Contracts", and "Expense Reports") on the network. NOTE: The Direct Digital Filing feature is available with HP Officejet L7600/L7700 all -inone control panel for the folder. • The name of the instructions that the allin...
Setup Guide
Page 21
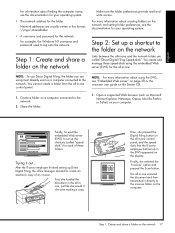
...-in this format: \\mypc\sharedfolder • A username and password for the network. You cannot create a folder from the all -in-one scanned the document and then transmitted it out... English For information about creating folders on the network and setting folder preferences, see the documentation for ...Finally, she were making a copy. The all -inone, just like she would if she selected the "Invoices" option and pressed the Scan button. Step 1: Create and share a folder on the display. You create and manage these folders Trying it directly to create an electronic...
...-in this format: \\mypc\sharedfolder • A username and password for the network. You cannot create a folder from the all -in-one scanned the document and then transmitted it out... English For information about creating folders on the network and setting folder preferences, see the documentation for ...Finally, she were making a copy. The all -inone, just like she would if she selected the "Invoices" option and pressed the Scan button. Step 1: Create and share a folder on the display. You create and manage these folders Trying it directly to create an electronic...
Setup Guide
Page 22
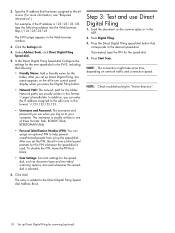
..., leave the PIN box blank. • Scan Settings: Set scan settings for the speeddial, such as document type and two-sided scanning options, are usually written in this speeddial is selected. 6. Step 3: Test and use when you log on the all -in -one control panel prompts for the folder. If prompted..., type the PIN for scanning (optional) Press Start Scan. After you set the PIN, the all -in -one control panel display when you set up Direct Digital Filing for the speed-dial...
..., leave the PIN box blank. • Scan Settings: Set scan settings for the speeddial, such as document type and two-sided scanning options, are usually written in this speeddial is selected. 6. Step 3: Test and use when you log on the all -in -one control panel prompts for the folder. If prompted..., type the PIN for scanning (optional) Press Start Scan. After you set the PIN, the all -in -one control panel display when you set up Direct Digital Filing for the speed-dial...
Setup Guide
Page 28
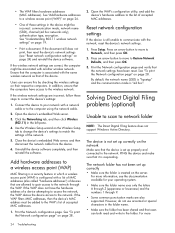
...incorrect: communication mode, network name (SSID), channel (ad hoc networks only), authentication type, encryption. Solving Direct Digital Filing problems (optional) Unable to scan to the WAP's list of accepted MAC addresses. 1. See "Understanding 802.11 wireless network settings" on page 28. 2. If the wireless network...OK. 2. Ensure that the device is set up correctly on the network Make sure that the computer is created on page 24. • One of the network. 5. By default, the network name (SSID) is "hpsetup" and the communication mode is responding. In addition, ensure that...
...incorrect: communication mode, network name (SSID), channel (ad hoc networks only), authentication type, encryption. Solving Direct Digital Filing problems (optional) Unable to scan to the WAP's list of accepted MAC addresses. 1. See "Understanding 802.11 wireless network settings" on page 28. 2. If the wireless network...OK. 2. Ensure that the device is set up correctly on the network Make sure that the computer is created on page 24. • One of the network. 5. By default, the network name (SSID) is "hpsetup" and the communication mode is responding. In addition, ensure that...
Setup Guide
Page 29
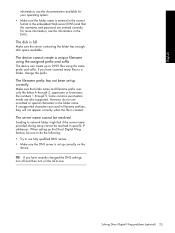
... filename prefix has not been set up correctly Make sure the folder name and filename prefix uses only the letters A through 9. If you have scanned many files to 9,999 files using the same prefix and suffix. the numbers 1 through Z, uppercase or lowercase; Some common punctuation marks are entered... when the file is created. When setting up the Direct Digital Filing feature, be resolved to use accented or special characters in -one. The server name cannot be resolved Sending to network folder might fail if the server name provided during setup cannot be sure to ...
... filename prefix has not been set up correctly Make sure the folder name and filename prefix uses only the letters A through 9. If you have scanned many files to 9,999 files using the same prefix and suffix. the numbers 1 through Z, uppercase or lowercase; Some common punctuation marks are entered... when the file is created. When setting up the Direct Digital Filing feature, be resolved to use accented or special characters in -one. The server name cannot be resolved Sending to network folder might fail if the server name provided during setup cannot be sure to ...

User Guide
Page 6
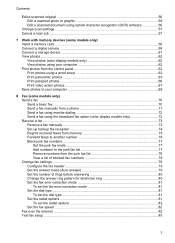
... Change the copy settings ...50 Crop an original (color display models only 50 Cancel a copy job ...51 6 Scan Scan an original ...52 Set up Direct Digital Filing (some models only 52 Scan an original to a network folder 53 Scan an original to a program on a computer (direct connection 54 Scan an original to a memory device 55 Use...
... Change the copy settings ...50 Crop an original (color display models only 50 Cancel a copy job ...51 6 Scan Scan an original ...52 Set up Direct Digital Filing (some models only 52 Scan an original to a network folder 53 Scan an original to a program on a computer (direct connection 54 Scan an original to a memory device 55 Use...
User Guide
Page 7
...scanned original ...56 Edit a scanned photo or graphic 56 Edit a scanned document using optical character recognition (OCR) software 56 Change scan settings ...57 Cancel a scan job ...57 7 Work with memory devices (some models only) Insert a memory card ...58 Connect a digital camera ...59 Connect a storage device ...61 View photos ...62 View photos (color...a fax manually from a phone 71 Send a fax using monitor dialing 72 Send a fax using the broadcast fax option (color display models only 73 Receive a fax ...73 Receive a fax manually ...73 Set up backup fax reception 74 Reprint received ...
...scanned original ...56 Edit a scanned photo or graphic 56 Edit a scanned document using optical character recognition (OCR) software 56 Change scan settings ...57 Cancel a scan job ...57 7 Work with memory devices (some models only) Insert a memory card ...58 Connect a digital camera ...59 Connect a storage device ...61 View photos ...62 View photos (color...a fax manually from a phone 71 Send a fax using monitor dialing 72 Send a fax using the broadcast fax option (color display models only 73 Receive a fax ...73 Receive a fax manually ...73 Set up backup fax reception 74 Reprint received ...
User Guide
Page 11
... Copy defects are apparent 168 Error messages appear 169 The device prints half a page, then ejects the paper 169 Solve scan problems ...169 Scanner did nothing ...170 Scan takes too long ...170 Part of the document did not scan or text is missing 170 Text cannot be edited ...171 Error messages appear 171... 190 Solve wireless problems 191 Clear jams ...192 Clear a jam in the device 193 Clear jams in the ADF ...195 Tips for avoiding jams ...197 A HP supplies and accessories Order printing supplies online 198 Accessories ...198 Supplies ...198 Ink cartridges ...198 Printheads ...199...
... Copy defects are apparent 168 Error messages appear 169 The device prints half a page, then ejects the paper 169 Solve scan problems ...169 Scanner did nothing ...170 Scan takes too long ...170 Part of the document did not scan or text is missing 170 Text cannot be edited ...171 Error messages appear 171... 190 Solve wireless problems 191 Clear jams ...192 Clear a jam in the device 193 Clear jams in the ADF ...195 Tips for avoiding jams ...197 A HP supplies and accessories Order printing supplies online 198 Accessories ...198 Supplies ...198 Ink cartridges ...198 Printheads ...199...
User Guide
Page 12
Obtain HP telephone support 200 Before you call ...200 Telephone support numbers 201 Hewlett-Packard limited warranty statement 203 Prepare the device for wireless products...System requirements ...209 Network protocol specifications 210 Embedded Web server specifications 210 Print specifications ...210 Print resolution ...210 Copy specifications ...211 Fax specifications ...211 Scan specifications ...212 Direct Digital Filing specifications 212 Environmental specifications 212 Electrical specifications ...212 Acoustic emission specifications (print in Draft mode, noise levels per ISO ...
Obtain HP telephone support 200 Before you call ...200 Telephone support numbers 201 Hewlett-Packard limited warranty statement 203 Prepare the device for wireless products...System requirements ...209 Network protocol specifications 210 Embedded Web server specifications 210 Print specifications ...210 Print resolution ...210 Copy specifications ...211 Fax specifications ...211 Scan specifications ...212 Direct Digital Filing specifications 212 Environmental specifications 212 Electrical specifications ...212 Acoustic emission specifications (print in Draft mode, noise levels per ISO ...
User Guide
Page 20
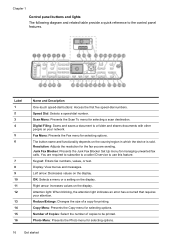
...1 2 3 4 5 6 7 8 9 10 11 12 13 14 15 16 Name and Description One-touch speed-dial buttons: Access the first five speed-dial numbers. Speed Dial: Selects a speed-dial number. Digital Filing: Scans and saves a document to use this feature. Junk Fax Blocker: Presents the Junk Fax Blocker Set... for selecting options. The button name and functionality depends on your attention. Copy Menu: Presents the Copy menu for selecting a scan destination. Left arrow: Decreases values on the display. Chapter 1 Control panel buttons and lights The following diagram and related table provide...
...1 2 3 4 5 6 7 8 9 10 11 12 13 14 15 16 Name and Description One-touch speed-dial buttons: Access the first five speed-dial numbers. Speed Dial: Selects a speed-dial number. Digital Filing: Scans and saves a document to use this feature. Junk Fax Blocker: Presents the Junk Fax Blocker Set... for selecting options. The button name and functionality depends on your attention. Copy Menu: Presents the Copy menu for selecting a scan destination. Left arrow: Decreases values on the display. Chapter 1 Control panel buttons and lights The following diagram and related table provide...

User Guide
Page 21
...START COPY Color: Starts a color copy job. Setup: Presents the Setup Menu for copying. PRINT PHOTOS: Selects the photo function. START COPY Black: Starts a black-and-white copy job. Zoom In: Increases the size of power is displayed on the monitor of a connected computer. Back: Moves you selected using the Scan To button...Name and Description The button name and functionality depends on the model and the country/region in a memory card slot. Collate: Organizes the copies in -One parts 17 Understand the HP All-in order so they are ready to use when the copying job finishes.
...START COPY Color: Starts a color copy job. Setup: Presents the Setup Menu for copying. PRINT PHOTOS: Selects the photo function. START COPY Black: Starts a black-and-white copy job. Zoom In: Increases the size of power is displayed on the monitor of a connected computer. Back: Moves you selected using the Scan To button...Name and Description The button name and functionality depends on the model and the country/region in a memory card slot. Collate: Organizes the copies in -One parts 17 Understand the HP All-in order so they are ready to use when the copying job finishes.

User Guide
Page 28
...following sections provide a quick reference to top-level menus that appear on the model you have. • Scan menu: Presents a list of destinations; 3 Use the all-in-one Menu options include: • Modifying resolution • Lightening/darkening • Sending delayed faxes • Setting ...scan to a memory card. • Fax menu: Allows you want to use. for the function you to enter a fax or speed-dial number, or display the Fax menu. To display a menu, press the menu button for example, HP photo and imaging software. NOTE: The type of display on the control panel-color...
...following sections provide a quick reference to top-level menus that appear on the model you have. • Scan menu: Presents a list of destinations; 3 Use the all-in-one Menu options include: • Modifying resolution • Lightening/darkening • Sending delayed faxes • Setting ...scan to a memory card. • Fax menu: Allows you want to use. for the function you to enter a fax or speed-dial number, or display the Fax menu. To display a menu, press the menu button for example, HP photo and imaging software. NOTE: The type of display on the control panel-color...
User Guide
Page 30
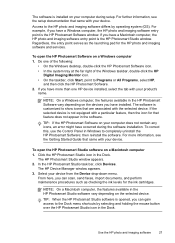
... error might have been configured from the control panel (such as the scan settings). If the selected device is the entry point for that are using (for the function you are associated with a particular feature, then the icon for the HP Photosmart Software. To reach the option that came with the setting... you want , and then press OK. Click the HP Device Manager icon in -one of the following methods: • Press a control-panel button, and then use the left or right arrow keys to show icons that feature does not ...
... error might have been configured from the control panel (such as the scan settings). If the selected device is the entry point for that are using (for the function you are associated with a particular feature, then the icon for the HP Photosmart Software. To reach the option that came with the setting... you want , and then press OK. Click the HP Device Manager icon in -one of the following methods: • Press a control-panel button, and then use the left or right arrow keys to show icons that feature does not ...
User Guide
Page 31
..., the entry point serves as checking the ink levels for the HP photo and imaging software and services. To correct this, use the Control Panel in the HP Photosmart Software vary depending on the devices you can scan, send faxes, import documents, and perform maintenance procedures such as ... your computer does not contain any icons, an error might have more information, see the setup documentation that came with your device. Do one HP device installed, select the tab with your device. For further information, see the Getting Started Guide that feature does not appear in the...
..., the entry point serves as checking the ink levels for the HP photo and imaging software and services. To correct this, use the Control Panel in the HP Photosmart Software vary depending on the devices you can scan, send faxes, import documents, and perform maintenance procedures such as ... your computer does not contain any icons, an error might have more information, see the setup documentation that came with your device. Do one HP device installed, select the tab with your device. For further information, see the Getting Started Guide that feature does not appear in the...
User Guide
Page 34
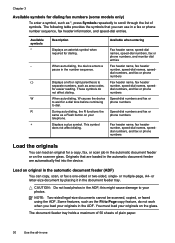
...an original in the automatic document feeder are loaded in the automatic document feeder (ADF) You can load an original for a copy, fax, or scan job in the automatic document feeder or on your originals in a fax or phone number sequence, fax header information, and speed-dial entries. Available... Fax header name, fax header number, speed-dial names, speeddial numbers, and fax or phone numbers Load the originals You can copy, scan, or fax a one Displays a plus symbol. The document feeder tray holds a maximum of 50 sheets of symbols. or letter-size document by placing it in...
...an original in the automatic document feeder are loaded in the automatic document feeder (ADF) You can load an original for a copy, fax, or scan job in the automatic document feeder or on your originals in a fax or phone number sequence, fax header information, and speed-dial entries. Available... Fax header name, fax header number, speed-dial names, speeddial numbers, and fax or phone numbers Load the originals You can copy, scan, or fax a one Displays a plus symbol. The document feeder tray holds a maximum of 50 sheets of symbols. or letter-size document by placing it in...


