Setup Guide
Page 26
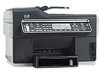
... power outlet. • Make sure that the phone cord is locked into place. • Make sure that the USB drivers have removed the orange caps from www.hp.com/support. • In the Windows device manager, make sure that the printhead latch and all of the printheads and ...; Make sure to use the Starter CD that contains the correct installation software for your computer, and reinstall the device driver. 22 Troubleshooting Press down firmly on each one of the supported operating systems. For more information, see "Self-test diagnostic page" on the control panel. The device...
... power outlet. • Make sure that the phone cord is locked into place. • Make sure that the USB drivers have removed the orange caps from www.hp.com/support. • In the Windows device manager, make sure that the printhead latch and all of the printheads and ...; Make sure to use the Starter CD that contains the correct installation software for your computer, and reinstall the device driver. 22 Troubleshooting Press down firmly on each one of the supported operating systems. For more information, see "Self-test diagnostic page" on the control panel. The device...
Setup Guide
Page 27
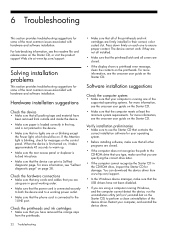
... a home network and one or more information, see "To print the Network configuration page" on page 28), and enter the IP address manually in the device driver match the device IP address: 1) Print the device's Network configuration page. 2) From the Windows desktop, click Start, point... to Settings, and then click Printers or Printers and Faxes. Possible problems include the following , run the installation program again. Do one of the ...
... a home network and one or more information, see "To print the Network configuration page" on page 28), and enter the IP address manually in the device driver match the device IP address: 1) Print the device's Network configuration page. 2) From the Windows desktop, click Start, point... to Settings, and then click Printers or Printers and Faxes. Possible problems include the following , run the installation program again. Do one of the ...

User Guide
Page 5
... for the product 10 Accessibility ...11 Understand the HP All-in-One parts 12 Front view ...13 Printing supplies area ...14 Memory card slots ...14 Back view ...15 Control panel ...15 Control panel buttons and lights 16 Color display ...18 Two-line display ...19 Connection information... ...19 2 Install the accessories Install the duplexer ...21 Install Tray 2 ...21 Turn on accessories in the print driver 22 To turn on accessories on Windows computers 23 To turn on accessories on Macintosh computers 23 3 Use the all-in-one...
... for the product 10 Accessibility ...11 Understand the HP All-in-One parts 12 Front view ...13 Printing supplies area ...14 Memory card slots ...14 Back view ...15 Control panel ...15 Control panel buttons and lights 16 Color display ...18 Two-line display ...19 Connection information... ...19 2 Install the accessories Install the duplexer ...21 Install Tray 2 ...21 Turn on accessories in the print driver 22 To turn on accessories on Windows computers 23 To turn on accessories on Macintosh computers 23 3 Use the all-in-one...
User Guide
Page 9
... network 126 Network connection ...127 To install the device on a network 127 To install the device software on client computers 127 To install the printer driver using Add Printer 128 Configure the device (Mac OS 128 To install the software for network or direct connection 128 To share the device on...
... network 126 Network connection ...127 To install the device on a network 127 To install the device software on client computers 127 To install the printer driver using Add Printer 128 Configure the device (Mac OS 128 To install the software for network or direct connection 128 To share the device on...

User Guide
Page 25
... the device. 2 Install the accessories This section contains the following topics: • Install the duplexer • Install Tray 2 • Turn on accessories in the print driver Install the duplexer NOTE: This feature is available with some models of the device. use them only for removing the unit from the device. 2. To...
... the device. 2 Install the accessories This section contains the following topics: • Install the duplexer • Install Tray 2 • Turn on accessories in the print driver Install the duplexer NOTE: This feature is available with some models of the device. use them only for removing the unit from the device. 2. To...

User Guide
Page 26
...cord and turn on accessories on top of the device. 4. Turn on accessories in the print driver • To turn on accessories on Windows computers • To turn on accessories in the print driver. For ordering information, see Turn on the device. 5. To install Tray 2 1. For ...more information, see Accessories. Enable Tray 2 in the print driver. Unpack the tray, remove the packing tapes and materials, and move...
...cord and turn on accessories on top of the device. 4. Turn on accessories in the print driver • To turn on accessories on Windows computers • To turn on accessories in the print driver. For ordering information, see Turn on the device. 5. To install Tray 2 1. For ...more information, see Accessories. Enable Tray 2 in the print driver. Unpack the tray, remove the packing tapes and materials, and move...
User Guide
Page 27
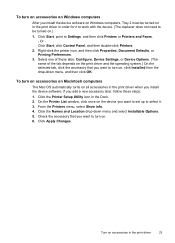
..., and then click OK. Click Apply Changes. Click the Printer Setup Utility icon in the print driver when you install the device software. From the Printers menu, select Show info. 4. Check the accessory... to be turned on . 6. To turn on all accessories in the Dock. 2. Turn on the print driver and the operating system.) On the selected tab, click the accessory that you add a new accessory later, follow...or Device Options. (The name of the tab depends on accessories in the print driver 23 On the Printer List window, click once on the device you want to set up to...
..., and then click OK. Click Apply Changes. Click the Printer Setup Utility icon in the print driver when you install the device software. From the Printers menu, select Show info. 4. Check the accessory... to be turned on . 6. To turn on all accessories in the Dock. 2. Turn on the print driver and the operating system.) On the selected tab, click the accessory that you add a new accessory later, follow...or Device Options. (The name of the tab depends on accessories in the print driver 23 On the Printer List window, click once on the device you want to set up to...
User Guide
Page 37
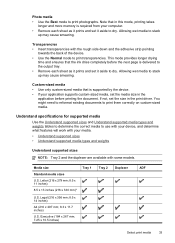
... dry. Allowing wet media to print them correctly on custom-sized media. Custom-sized media • Use only custom-sized media that in the print driver. Photo media • Use the Best mode to stack up may cause smearing. Executive (184 x 267 mm; 7.25 x 10.5 inches) Tray 1 Tray 2 Duplexer ADF Select...
... dry. Allowing wet media to print them correctly on custom-sized media. Custom-sized media • Use only custom-sized media that in the print driver. Photo media • Use the Best mode to stack up may cause smearing. Executive (184 x 267 mm; 7.25 x 10.5 inches) Tray 1 Tray 2 Duplexer ADF Select...

User Guide
Page 41
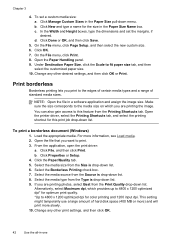
... you are using the duplexer (available with some models), the minimum top and bottom margins must match (or exceed) these margin settings in the print driver, and select Minimize Margins. For ordering information, see Order printing supplies online. NOTE: Tray 2 is available with some models. Load media 37 Letter U.S. Set minimum...
... you are using the duplexer (available with some models), the minimum top and bottom margins must match (or exceed) these margin settings in the print driver, and select Minimize Margins. For ordering information, see Order printing supplies online. NOTE: Tray 2 is available with some models. Load media 37 Letter U.S. Set minimum...

User Guide
Page 45
...Open the dialog box again. Click More in the left panel. • Print driver (Windows): Click the Printer services button on . 2. On the File menu, click...the Features or Color tab, and then select Paper Handling. • Toolbox (Windows): Click the Services tab and click Paper Handling. • HP Printer Utility (...Mac OS): Click Paper Handling from the Source is drop-down list. 7. b. Type a name for the new custom size. Click the desired media type, and then click OK. 6. Print on the File menu, and then click Setup, Properties, or Preferences. 3. Perform one...
...Open the dialog box again. Click More in the left panel. • Print driver (Windows): Click the Printer services button on . 2. On the File menu, click...the Features or Color tab, and then select Paper Handling. • Toolbox (Windows): Click the Services tab and click Paper Handling. • HP Printer Utility (...Mac OS): Click Paper Handling from the Source is drop-down list. 7. b. Type a name for the new custom size. Click the desired media type, and then click OK. 6. Print on the File menu, and then click Setup, Properties, or Preferences. 3. Perform one...
User Guide
Page 46
... up to 4800 x 1200 optimized dpi* for the size in a software application and assign the image size. From the application, open the print driver: a. Alternatively, select Maximum dpi, which you are printing the image. To set the margins, if desired. c. You can also gain access to... and then click OK or Print. Open the printer driver, select the Printing Shortcuts tab, and select the printing shortcut for color printing and 1200 input dpi. Click Properties or Setup. 4. Click OK. 7. Click Manage Custom Sizes in -one In the Width and Height boxes, type the dimensions and...
... up to 4800 x 1200 optimized dpi* for the size in a software application and assign the image size. From the application, open the print driver: a. Alternatively, select Maximum dpi, which you are printing the image. To set the margins, if desired. c. You can also gain access to... and then click OK or Print. Open the printer driver, select the Printing Shortcuts tab, and select the printing shortcut for color printing and 1200 input dpi. Click Properties or Setup. 4. Click OK. 7. Click Manage Custom Sizes in -one In the Width and Height boxes, type the dimensions and...
User Guide
Page 51
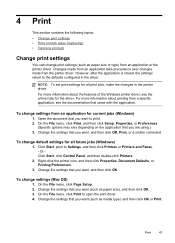
... You can change default settings for all future jobs (Windows) 1. To change settings from the printer driver. For more information about printing from an application or the printer driver. To change print settings (such as paper size or type) from a specific application, see the... online help for current jobs (Windows) 1. NOTE: To set print settings for all print jobs, make the changes in the driver. Right-click the printer icon, and then click Properties, Document Defaults, or Printing Preferences. 3. Change the settings that you want, and then...
... You can change default settings for all future jobs (Windows) 1. To change settings from the printer driver. For more information about printing from an application or the printer driver. To change print settings (such as paper size or type) from a specific application, see the... online help for current jobs (Windows) 1. NOTE: To set print settings for all print jobs, make the changes in the driver. Right-click the printer icon, and then click Properties, Document Defaults, or Printing Preferences. 3. Change the settings that you want, and then...
User Guide
Page 52
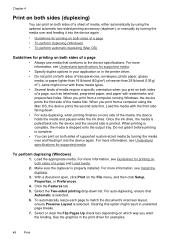
...then click Setup, Properties, or Preferences. 4. Select the Two-sided printing drop-down . • For auto-duplexing, when printing finishes on one side of the media, the device holds the media and pauses while the ink dries. For auto-duplexing, ensure that conforms to match the... is selected. For more information, see Understand specifications for supported media. • Specify duplex options in your application or in the print driver for examples. 48 Print To automatically resize each page to the device specifications. Chapter 4 Print on both sides (duplexing) You can print...
...then click Setup, Properties, or Preferences. 4. Select the Two-sided printing drop-down . • For auto-duplexing, when printing finishes on one side of the media, the device holds the media and pauses while the ink dries. For auto-duplexing, ensure that conforms to match the... is selected. For more information, see Understand specifications for supported media. • Specify duplex options in your application or in the print driver for examples. 48 Print To automatically resize each page to the device specifications. Chapter 4 Print on both sides (duplexing) You can print...

User Guide
Page 90
...documentation. use the control panel, the embedded Web server, the printer driver, the Toolbox, the HP Web Jetadmin, and myPrintMileage. Control Embedded Toolbox panel parts Web server (Windows) HP Printer Utility (Mac OS) HP Web Jetadmin software Monitor the device Status of management tasks The following table...• Set up the device for managing the device. Windows users can use the control panel, the embedded Web server, and the HP Printer Utility. NOTE: Mac OS users can use these tools... If you want to manage the device. This section contains information about...
...documentation. use the control panel, the embedded Web server, the printer driver, the Toolbox, the HP Web Jetadmin, and myPrintMileage. Control Embedded Toolbox panel parts Web server (Windows) HP Printer Utility (Mac OS) HP Web Jetadmin software Monitor the device Status of management tasks The following table...• Set up the device for managing the device. Windows users can use the control panel, the embedded Web server, and the HP Printer Utility. NOTE: Mac OS users can use these tools... If you want to manage the device. This section contains information about...

User Guide
Page 94
...on your computer. however, some features will not be restricted by using these methods: NOTE: To open the embedded Web server from the printer driver (Windows), or the HP Printer Utility (Mac OS), the device must be on a network and must have an IP address. • Web browser: In a ... Understand the network configuration page. NOTE: For a list of system requirements for the device is connected to it quickly in the future. • HP Printer Utility (Mac OS): On the Printer Settings panel, click Additional Settings, and then click the Open Embedded Web Server button. 90 Configure and ...
...on your computer. however, some features will not be restricted by using these methods: NOTE: To open the embedded Web server from the printer driver (Windows), or the HP Printer Utility (Mac OS), the device must be on a network and must have an IP address. • Web browser: In a ... Understand the network configuration page. NOTE: For a list of system requirements for the device is connected to it quickly in the future. • HP Printer Utility (Mac OS): On the Printer Settings panel, click Additional Settings, and then click the Open Embedded Web Server button. 90 Configure and ...
User Guide
Page 98
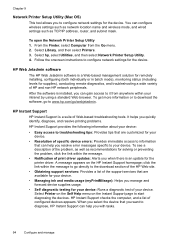
... directly to the download section of the HP Web site. • Obtaining support services: Provides a list of HP and non-HP network peripherals. HP Instant Support HP Instant Support is an update for solving or preventing the problem, click the link within the message. • Notification of print driver updates: Alerts you can configure wireless settings...
... directly to the download section of the HP Web site. • Obtaining support services: Provides a list of HP and non-HP network peripherals. HP Instant Support HP Instant Support is an update for solving or preventing the problem, click the link within the message. • Notification of print driver updates: Alerts you can configure wireless settings...
User Guide
Page 129
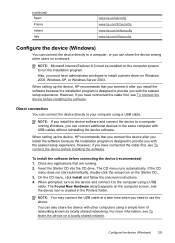
..., turn on the device and connect it to use the device. NOTE: Microsoft Internet Explorer 6.0 must have administrator privileges to install a printer driver on a locally shared network. However, if you have connected the cable first, see To share the device on Windows 2000, Windows XP, or...recommended) 1. Also, you must be installed on the Starter CD.. 3. (continued) Spain France Ireland Italy www.hp.es/faxconfig www.hp.com/fr/faxconfig www.hp.com/ie/faxconfig www.hp.com/it/faxconfig Configure the device (Windows) You can connect the device directly to a computer, or you can ...
..., turn on the device and connect it to use the device. NOTE: Microsoft Internet Explorer 6.0 must have administrator privileges to install a printer driver on a locally shared network. However, if you have connected the cable first, see To share the device on Windows 2000, Windows XP, or...recommended) 1. Also, you must be installed on the Starter CD.. 3. (continued) Spain France Ireland Italy www.hp.es/faxconfig www.hp.com/fr/faxconfig www.hp.com/ie/faxconfig www.hp.com/it/faxconfig Configure the device (Windows) You can connect the device directly to a computer, or you can ...
User Guide
Page 130
... the installation program is low. Only the printing function is slowed down when many users print to perform an automatic search for specifying the driver location, and ensure that the other computers using a simple form of Windows, use the computer with other check boxes are not shared. ... program (this configuration only in your CD drive. 126 Configure and manage To share the device on the Starter CD (for locating the printer driver, select the Advanced option, and then click Next. NOTE: When sharing a directly connected device, use the computer running Windows XP as a ...
... the installation program is low. Only the printing function is slowed down when many users print to perform an automatic search for specifying the driver location, and ensure that the other computers using a simple form of Windows, use the computer with other check boxes are not shared. ... program (this configuration only in your CD drive. 126 Configure and manage To share the device on the Starter CD (for locating the printer driver, select the Advanced option, and then click Next. NOTE: When sharing a directly connected device, use the computer running Windows XP as a ...
User Guide
Page 131
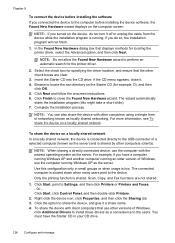
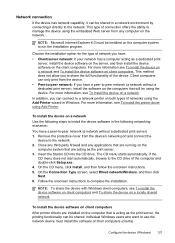
...be shared. NOTE: Microsoft Internet Explorer 6.0 must install the software on the client computers. To install the device on client computers After printer drivers are acting as the print server. 3. To install the device software on a network Use the following steps to install the device software in...select Wired network/Wireless, and then click Next. 6. NOTE: To share the device with Windows client computers, see To install the printer driver using the embedded Web server from the device's network port and connect the device to the CD drive of the device. For more information...
...be shared. NOTE: Microsoft Internet Explorer 6.0 must install the software on the client computers. To install the device on client computers After printer drivers are acting as the print server. 3. To install the device software on a network Use the following steps to install the device software in...select Wired network/Wireless, and then click Next. 6. NOTE: To share the device with Windows client computers, see To install the printer driver using the embedded Web server from the device's network port and connect the device to the CD drive of the device. For more information...
User Guide
Page 132
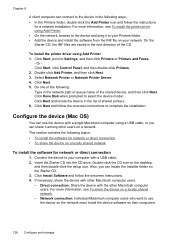
For more information, see To install the printer driver using Add Printer. • On the network, browse to the device and drag it among other Macintosh computer users. Or Click Start, click Control Panel, ... stored in the network path or queue name of the CD. To install the printer driver using a USB cable, or you can locate the Installer folder on their computers. 128 Configure and manage Click Next. 5. Do one of the following topics: • To install the software for network or direct connection •...
For more information, see To install the printer driver using Add Printer. • On the network, browse to the device and drag it among other Macintosh computer users. Or Click Start, click Control Panel, ... stored in the network path or queue name of the CD. To install the printer driver using a USB cable, or you can locate the Installer folder on their computers. 128 Configure and manage Click Next. 5. Do one of the following topics: • To install the software for network or direct connection •...


