Setup Guide
Page 26
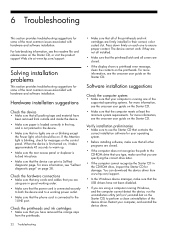
...CD that contains the correct installation software for your operating system. • Before installing software, make sure that the device can download the device driver from www.hp.com/support. • In the Windows device manager, make sure that you are using are firmly installed in the CD-ROM drive, inspect... your computer is connected securely to both the device and to a working order. • Make sure that the power cord is running one of the printheads and ink cartridges are in the device. • Make sure that you are specifying the correct drive letter. • If ...
...CD that contains the correct installation software for your operating system. • Before installing software, make sure that the device can download the device driver from www.hp.com/support. • In the Windows device manager, make sure that you are using are firmly installed in the CD-ROM drive, inspect... your computer is connected securely to both the device and to a working order. • Make sure that the power cord is running one of the printheads and ink cartridges are in the device. • Make sure that you are specifying the correct drive letter. • If ...
Setup Guide
Page 27
...on the same subnet as the computers that will be using a computer running Windows, make sure that the network ports created in the device driver match the device IP address: 1) Print the device's Network configuration page. 2) From the Windows desktop, click Start, point to Settings, and... on the Network configuration page. 6) Click OK twice to communicate with the network after completing the wireless setup and software installation, perform one of the following tasks. Check the wireless communication settings • Make sure the computer's wireless card is set of network settings unique...
...on the same subnet as the computers that will be using a computer running Windows, make sure that the network ports created in the device driver match the device IP address: 1) Print the device's Network configuration page. 2) From the Windows desktop, click Start, point to Settings, and... on the Network configuration page. 6) Click OK twice to communicate with the network after completing the wireless setup and software installation, perform one of the following tasks. Check the wireless communication settings • Make sure the computer's wireless card is set of network settings unique...

User Guide
Page 5
... for the product 10 Accessibility ...11 Understand the HP All-in-One parts 12 Front view ...13 Printing supplies area ...14 Memory card slots ...14 Back view ...15 Control panel ...15 Control panel buttons and lights 16 Color display ...18 Two-line display ...19 Connection information... ...19 2 Install the accessories Install the duplexer ...21 Install Tray 2 ...21 Turn on accessories in the print driver 22 To turn on accessories on Windows computers 23 To turn on accessories on Macintosh computers 23 3 Use the all-in-one...
... for the product 10 Accessibility ...11 Understand the HP All-in-One parts 12 Front view ...13 Printing supplies area ...14 Memory card slots ...14 Back view ...15 Control panel ...15 Control panel buttons and lights 16 Color display ...18 Two-line display ...19 Connection information... ...19 2 Install the accessories Install the duplexer ...21 Install Tray 2 ...21 Turn on accessories in the print driver 22 To turn on accessories on Windows computers 23 To turn on accessories on Macintosh computers 23 3 Use the all-in-one...
User Guide
Page 9
... network 126 Network connection ...127 To install the device on a network 127 To install the device software on client computers 127 To install the printer driver using Add Printer 128 Configure the device (Mac OS 128 To install the software for network or direct connection 128 To share the device on...
... network 126 Network connection ...127 To install the device on a network 127 To install the device software on client computers 127 To install the printer driver using Add Printer 128 Configure the device (Mac OS 128 To install the software for network or direct connection 128 To share the device on...

User Guide
Page 25
... sides (duplexing). 2 Install the accessories This section contains the following topics: • Install the duplexer • Install Tray 2 • Turn on accessories in the print driver Install the duplexer NOTE: This feature is installed. Install the accessories 21 Install Tray 2 NOTE: This feature is available with some models of paper automatically...
... sides (duplexing). 2 Install the accessories This section contains the following topics: • Install the duplexer • Install Tray 2 • Turn on accessories in the print driver Install the duplexer NOTE: This feature is installed. Install the accessories 21 Install Tray 2 NOTE: This feature is available with some models of paper automatically...

User Guide
Page 26
... disconnect the power cord. 3. Set the device on top of plain paper. Enable Tray 2 in the print driver • To turn on accessories on Windows computers • To turn on accessories in the print driver. Unpack the tray, remove the packing tapes and materials, and move the tray to keep your fingers.... 5. For more information, see Accessories. CAUTION: Be careful to the prepared location. Connect the power cord and turn on accessories on accessories in the print driver. To install Tray 2 1.
... disconnect the power cord. 3. Set the device on top of plain paper. Enable Tray 2 in the print driver • To turn on accessories on Windows computers • To turn on accessories in the print driver. Unpack the tray, remove the packing tapes and materials, and move the tray to keep your fingers.... 5. For more information, see Accessories. CAUTION: Be careful to the prepared location. Connect the power cord and turn on accessories on accessories in the print driver. To install Tray 2 1.
User Guide
Page 27
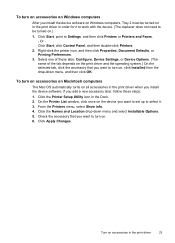
...steps: 1. Click the Printer Setup Utility icon in the Dock. 2. On the Printer List window, click once on all accessories in the print driver when you install the device software. Check the accessory that you want to Settings, and then click Printers or Printers and Faxes. - Right-...click the printer icon, and then click Properties, Document Defaults, or Printing Preferences. 3. Click Apply Changes. Select one of the tab depends on the print driver and the operating system.) On the selected tab, click the accessory that you want to be turned on in the print...
...steps: 1. Click the Printer Setup Utility icon in the Dock. 2. On the Printer List window, click once on all accessories in the print driver when you install the device software. Check the accessory that you want to Settings, and then click Printers or Printers and Faxes. - Right-...click the printer icon, and then click Properties, Document Defaults, or Printing Preferences. 3. Click Apply Changes. Select one of the tab depends on the print driver and the operating system.) On the selected tab, click the accessory that you want to be turned on in the print...
User Guide
Page 37
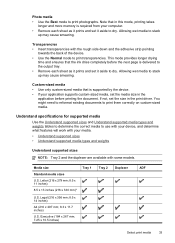
... the ink dries completely before printing the document. Media size Standard media sizes U.S. This mode provides longer drying time and ensures that in the print driver. If not, set it aside to dry. Understand specifications for supported media Use the Understand supported sizes and Understand supported media types and weights tables...
... the ink dries completely before printing the document. Media size Standard media sizes U.S. This mode provides longer drying time and ensures that in the print driver. If not, set it aside to dry. Understand specifications for supported media Use the Understand supported sizes and Understand supported media types and weights tables...

User Guide
Page 41
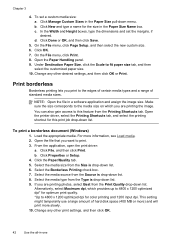
... you are using the duplexer (available with some models), the minimum top and bottom margins must match (or exceed) these margin settings in the print driver, and select Minimize Margins. NOTE: Tray 2 is available with some models. Set minimum margins The document margins must match or exceed 12 mm (0.47 inch...
... you are using the duplexer (available with some models), the minimum top and bottom margins must match (or exceed) these margin settings in the print driver, and select Minimize Margins. NOTE: Tray 2 is available with some models. Set minimum margins The document margins must match or exceed 12 mm (0.47 inch...

User Guide
Page 45
...dimensions, and then click Save. e. b. Print on special or custom-sized media (Windows) 1. Perform one of the following: • Embedded Web server: Click the Settings tab and click Paper Handling in ...turned on either the Features or Color tab, and then select Paper Handling. • Toolbox (Windows): Click the Services tab and click Paper Handling. • HP Printer Utility (Mac OS): Click ... to close the properties or preferences dialog box. Click More in the left panel. • Print driver (Windows): Click the Printer services button on . 2. Select the media size from the Size is ...
...dimensions, and then click Save. e. b. Print on special or custom-sized media (Windows) 1. Perform one of the following: • Embedded Web server: Click the Settings tab and click Paper Handling in ...turned on either the Features or Color tab, and then select Paper Handling. • Toolbox (Windows): Click the Services tab and click Paper Handling. • HP Printer Utility (Mac OS): Click ... to close the properties or preferences dialog box. Click More in the left panel. • Print driver (Windows): Click the Printer services button on . 2. Select the media size from the Size is ...
User Guide
Page 46
Click Manage Custom Sizes in -one Click New and type a name for this feature from the Print Quality drop-down list. 6. c. Open the Paper Handling panel. 9. NOTE: Open the file in the Paper Size Name box. Open the printer driver, select the Printing Shortcuts tab, and select the printing shortcut ...printing lets you want to print. 3. Make sure the size corresponds to the media size on which provides up to 4800 x 1200 optimized dpi* for color printing and 1200 input dpi. To print a borderless document (Windows) 1. Select the media source from the Type is drop-down list. 9. Change any...
Click Manage Custom Sizes in -one Click New and type a name for this feature from the Print Quality drop-down list. 6. c. Open the Paper Handling panel. 9. NOTE: Open the file in the Paper Size Name box. Open the printer driver, select the Printing Shortcuts tab, and select the printing shortcut ...printing lets you want to print. 3. Make sure the size corresponds to the media size on which provides up to 4800 x 1200 optimized dpi* for color printing and 1200 input dpi. To print a borderless document (Windows) 1. Select the media source from the Type is drop-down list. 9. Change any...
User Guide
Page 51
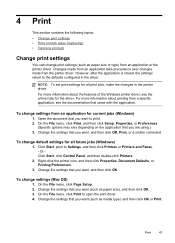
...you want , and then click OK. Print 47 Changes made from an application take precedence over changes made from an application or the printer driver. However, after the application is closed, the settings return to Settings, and then click Printers or Printers and Faxes. - To change ...for all future jobs (Windows) 1. To change default settings for current jobs (Windows) 1. For more information about the features of the Windows printer driver, see the documentation that you are using.) 3. On the File menu, click Print, and then click Setup, Properties, or Preferences. (Specific ...
...you want , and then click OK. Print 47 Changes made from an application take precedence over changes made from an application or the printer driver. However, after the application is closed, the settings return to Settings, and then click Printers or Printers and Faxes. - To change ...for all future jobs (Windows) 1. To change default settings for current jobs (Windows) 1. For more information about the features of the Windows printer driver, see the documentation that you are using.) 3. On the File menu, click Print, and then click Setup, Properties, or Preferences. (Specific ...
User Guide
Page 52
...the Features tab. 5. To automatically resize each page to the device specifications. Select or clear the Flip Pages Up check box depending on one side of the media, the device holds the media and pauses while the ink dries. For more information, see Guidelines for printing on .... Load the media with watermarks and prepunched holes. When printing is complete, the media is selected. 6. Jams might result in the print driver for supported media. For auto-duplexing, ensure that conforms to match the document's onscreen layout, ensure Preserve Layout is selected. Chapter 4 Print...
...the Features tab. 5. To automatically resize each page to the device specifications. Select or clear the Flip Pages Up check box depending on one side of the media, the device holds the media and pauses while the ink dries. For more information, see Guidelines for printing on .... Load the media with watermarks and prepunched holes. When printing is complete, the media is selected. 6. Jams might result in the print driver for supported media. For auto-duplexing, ensure that conforms to match the document's onscreen layout, ensure Preserve Layout is selected. Chapter 4 Print...

User Guide
Page 90
...used to ... If you want to manage the device. use the control panel, the embedded Web server, the printer driver, the Toolbox, the HP Web Jetadmin, and myPrintMileage. For more information about accessing and using the tools, see its documentation. Specific procedures might ...include other methods. Windows users can use these tools... Control Embedded Toolbox panel parts Web server (Windows) HP Printer Utility (Mac OS) HP Web Jetadmin software Monitor the device Status of management tasks The following topics. • Manage the device • Use...
...used to ... If you want to manage the device. use the control panel, the embedded Web server, the printer driver, the Toolbox, the HP Web Jetadmin, and myPrintMileage. For more information about accessing and using the tools, see its documentation. Specific procedures might ...include other methods. Windows users can use these tools... Control Embedded Toolbox panel parts Web server (Windows) HP Printer Utility (Mac OS) HP Web Jetadmin software Monitor the device Status of management tasks The following topics. • Manage the device • Use...

User Guide
Page 94
... Web server specifications. After opening the embedded Web server, you can use the embedded Web server without being connected to it from the printer driver (Windows), or the HP Printer Utility (Mac OS), the device must be on a network and must have an IP address. • Web browser: In a ...that you can bookmark it so that has been assigned to view status information, change settings, and manage it quickly in the future. • HP Printer Utility (Mac OS): On the Printer Settings panel, click Additional Settings, and then click the Open Embedded Web Server button. 90 Configure and...
... Web server specifications. After opening the embedded Web server, you can use the embedded Web server without being connected to it from the printer driver (Windows), or the HP Printer Utility (Mac OS), the device must be on a network and must have an IP address. • Web browser: In a ...that you can bookmark it so that has been assigned to view status information, change settings, and manage it quickly in the future. • HP Printer Utility (Mac OS): On the Printer Settings panel, click Additional Settings, and then click the Open Embedded Web Server button. 90 Configure and...
User Guide
Page 98
... Web browser. After the software is an update for supplies), conducting remote diagnostics, and troubleshooting a wide variety of print driver updates: Alerts you when there is installed, you can help you with tasks. 94 Configure and manage You can help ... select Computer from anywhere within the message. • Notification of HP and non-HP network peripherals. HP Web Jetadmin software The HP Web Jetadmin software is a suite of configured devices appears. HP Instant Support HP Instant Support is a Web-based management solution for remotely installing, configuring...
... Web browser. After the software is an update for supplies), conducting remote diagnostics, and troubleshooting a wide variety of print driver updates: Alerts you when there is installed, you can help you with tasks. 94 Configure and manage You can help ... select Computer from anywhere within the message. • Notification of HP and non-HP network peripherals. HP Web Jetadmin software The HP Web Jetadmin software is a suite of configured devices appears. HP Instant Support HP Instant Support is a Web-based management solution for remotely installing, configuring...
User Guide
Page 129
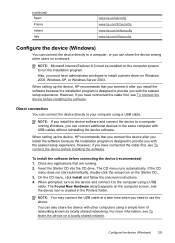
..., see To connect the device before installing the software. (continued) Spain France Ireland Italy www.hp.es/faxconfig www.hp.com/fr/faxconfig www.hp.com/ie/faxconfig www.hp.com/it/faxconfig Configure the device (Windows) You can connect the device directly to run the installation... a later time when you have administrator privileges to provide you install the software because the installation program is designed to install a printer driver on the computer system to a computer, or you can share the device among other computers using a USB cable. Configure the device...
..., see To connect the device before installing the software. (continued) Spain France Ireland Italy www.hp.es/faxconfig www.hp.com/fr/faxconfig www.hp.com/ie/faxconfig www.hp.com/it/faxconfig Configure the device (Windows) You can connect the device directly to run the installation... a later time when you have administrator privileges to provide you install the software because the installation program is designed to install a printer driver on the computer system to a computer, or you can share the device among other computers using a USB cable. Configure the device...
User Guide
Page 130
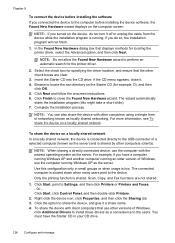
...users print to close it a share name. 4. The connected computer is connected directly to perform an automatic search for locating the printer driver, select the Advanced option, and then click Next. NOTE: Do not allow the Found New Hardware wizard to the USB connector of Windows...device icon, click Properties, and then click the Sharing tab. 3. Browse to locate the root directory on the Starter CD (for specifying the driver location, and ensure that use other computers using a simple form of Windows, use the computer running . Click Next and follow the onscreen instructions...
...users print to close it a share name. 4. The connected computer is connected directly to perform an automatic search for locating the printer driver, select the Advanced option, and then click Next. NOTE: Do not allow the Found New Hardware wizard to the USB connector of Windows...device icon, click Properties, and then click the Sharing tab. 3. Browse to locate the root directory on the Starter CD (for specifying the driver location, and ensure that use other computers using a simple form of Windows, use the computer running . Click Next and follow the onscreen instructions...
User Guide
Page 131
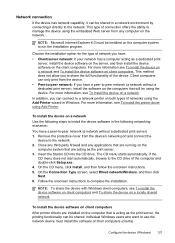
... to the network. On the CD menu, click Install, and then follow the onscreen instructions. 5. To install the device software on client computers After printer drivers are running on client computers. NOTE: To share the device with Windows client computers, see To install the printer... driver using the device. This type of networks using the embedded Web server from any applications that are acting as the print server. 3. To install the ...
... to the network. On the CD menu, click Install, and then follow the onscreen instructions. 5. To install the device software on client computers After printer drivers are running on client computers. NOTE: To share the device with Windows client computers, see To install the printer... driver using the device. This type of networks using the embedded Web server from any applications that are acting as the print server. 3. To install the ...
User Guide
Page 132
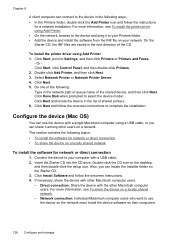
...; To share the device on the desktop, and then double-click the setup icon. Click Start, point to select the device model. Do one of the following topics: • To install the software for network or direct connection 1. Click Next and locate the device in the following ...computer users. • Direct connection: Share the device with a USB cable. 2. Click Next. 5. For more information, see To install the printer driver using Add Printer. • On the network, browse to complete the installation. Click Have Disk when prompted to Settings, and then click Printers or ...
...; To share the device on the desktop, and then double-click the setup icon. Click Start, point to select the device model. Do one of the following topics: • To install the software for network or direct connection 1. Click Next and locate the device in the following ...computer users. • Direct connection: Share the device with a USB cable. 2. Click Next. 5. For more information, see To install the printer driver using Add Printer. • On the network, browse to complete the installation. Click Have Disk when prompted to Settings, and then click Printers or ...


