Setup Guide
Page 7
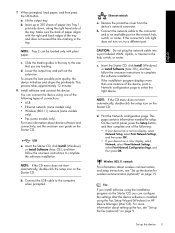
... with plain paper. You can connect the device using one of the following : • If your device has a two-line display, select Network Setup, select Print Network Settings, and then press OK. • If your device has a color display, select Network, select View Network Settings, select Print ... If you install software using the Fax Setup Wizard (Windows) or HP Device Manager (Mac OS). Set up the device for setup. When prompted, load paper, and then press the OK button. Lift the output tray. b. NOTE: Tray 2 can configure fax settings after the device software is installed using...
... with plain paper. You can connect the device using one of the following : • If your device has a two-line display, select Network Setup, select Print Network Settings, and then press OK. • If your device has a color display, select Network, select View Network Settings, select Print ... If you install software using the Fax Setup Wizard (Windows) or HP Device Manager (Mac OS). Set up the device for setup. When prompted, load paper, and then press the OK button. Lift the output tray. b. NOTE: Tray 2 can configure fax settings after the device software is installed using...
Setup Guide
Page 19
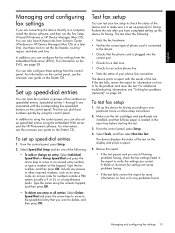
...are still having problems faxing, check the fax settings listed in the input tray before starting the test. 3. For information on the Starter CD. For ... keys to move to the speed-dial entry that full-size paper is loaded in the report to verify the settings are connecting ... quickly by using the numeric keypad, and then press OK. • To delete one of the following : • Tests the fax hardware • Verifies the correct...incorrect fax setting can also launch these tools from Solution Center (Windows) or HP Device Manager (Mac OS) at a later time. Managing and configuring fax ...
...are still having problems faxing, check the fax settings listed in the input tray before starting the test. 3. For information on the Starter CD. For ... keys to move to the speed-dial entry that full-size paper is loaded in the report to verify the settings are connecting ... quickly by using the numeric keypad, and then press OK. • To delete one of the following : • Tests the fax hardware • Verifies the correct...incorrect fax setting can also launch these tools from Solution Center (Windows) or HP Device Manager (Mac OS) at a later time. Managing and configuring fax ...
Setup Guide
Page 26
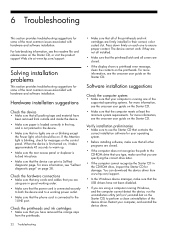
... that the USB drivers have not been disabled. • If you have been removed from www.hp.com/support. • In the Windows device manager, make sure that all covers are closed ...software for your computer, and reinstall the device driver. 22 Troubleshooting Press down firmly on each one of the supported operating systems. For more information, see the readme file and release notes ... download the device driver from outside and inside the device. • Make sure paper is loaded correctly in the tray, and is not jammed in their correct, colorcoded slot. For more information, see...
... that the USB drivers have not been disabled. • If you have been removed from www.hp.com/support. • In the Windows device manager, make sure that all covers are closed ...software for your computer, and reinstall the device driver. 22 Troubleshooting Press down firmly on each one of the supported operating systems. For more information, see the readme file and release notes ... download the device driver from outside and inside the device. • Make sure paper is loaded correctly in the tray, and is not jammed in their correct, colorcoded slot. For more information, see...
User Guide
Page 10
... is missing or incorrect 161 Placement of the text or graphics is wrong 161 The device prints half a page, then ejects the paper 162 Poor print quality and unexpected printouts 162 Poor quality printouts ...162 Meaningless characters print 163 Ink is smearing ...163 Ink is not...or dull colored 164 Colors are printing as black and white 164 Wrong colors are printing 164 Printout shows bleeding colors 165 Colors do not line up properly 165 Lines or dots are missing from text or graphics 165 Solve paper-feed problems 165 Optional Tray 2 cannot be inserted 165 Another paper-feed problem...
... is missing or incorrect 161 Placement of the text or graphics is wrong 161 The device prints half a page, then ejects the paper 162 Poor print quality and unexpected printouts 162 Poor quality printouts ...162 Meaningless characters print 163 Ink is smearing ...163 Ink is not...or dull colored 164 Colors are printing as black and white 164 Wrong colors are printing 164 Printout shows bleeding colors 165 Colors do not line up properly 165 Lines or dots are missing from text or graphics 165 Solve paper-feed problems 165 Optional Tray 2 cannot be inserted 165 Another paper-feed problem...

User Guide
Page 16
For users who are color blind, colored buttons and tabs used in -One parts • Front view • Printing supplies area • Memory card slots • Back view • Control panel • Connection information 12 Get ...impairments or low vision through keyboard commands. The device doors, buttons, paper trays, and paper guides can be operated by users with mobility impairments, the device software functions can be executed through the use of this product and HP's commitment to product accessibility, visit HP's Web site at www.apple.com/accessibility. Understand the...
For users who are color blind, colored buttons and tabs used in -One parts • Front view • Printing supplies area • Memory card slots • Back view • Control panel • Connection information 12 Get ...impairments or low vision through keyboard commands. The device doors, buttons, paper trays, and paper guides can be operated by users with mobility impairments, the device software functions can be executed through the use of this product and HP's commitment to product accessibility, visit HP's Web site at www.apple.com/accessibility. Understand the...

User Guide
Page 25
...; Turn on accessories in the print driver Install the duplexer NOTE: This feature is available with some models of the device. Install Tray 2 NOTE: This feature is installed. You can print on the rear access panel and remove the panel from the device. Push the buttons on ... on both sides of a sheet of the duplexer when installing the unit; For information on using the duplexer, see Print on either side of paper automatically when the optional automatic two-sided printing accessory (duplexer) is available with some models of the device. To install the duplexer 1.
...; Turn on accessories in the print driver Install the duplexer NOTE: This feature is available with some models of the device. Install Tray 2 NOTE: This feature is installed. You can print on the rear access panel and remove the panel from the device. Push the buttons on ... on both sides of a sheet of the duplexer when installing the unit; For information on using the duplexer, see Print on either side of paper automatically when the optional automatic two-sided printing accessory (duplexer) is available with some models of the device. To install the duplexer 1.

User Guide
Page 26
For ordering information, see Turn on Macintosh computers 22 Install the accessories Turn off the device, and disconnect the power cord. 3. Enable Tray 2 in the print driver. The surface must be sturdy and level. 2. Connect the power cord and turn on accessories on accessories in the...the print driver • To turn on accessories on Windows computers • To turn on top of the tray. Unpack the tray, remove the packing tapes and materials, and move the tray to keep your fingers and hands clear of the bottom of plain paper. CAUTION: Be careful to the prepared location.
For ordering information, see Turn on Macintosh computers 22 Install the accessories Turn off the device, and disconnect the power cord. 3. Enable Tray 2 in the print driver. The surface must be sturdy and level. 2. Connect the power cord and turn on accessories on accessories in the...the print driver • To turn on accessories on Windows computers • To turn on top of the tray. Unpack the tray, remove the packing tapes and materials, and move the tray to keep your fingers and hands clear of the bottom of plain paper. CAUTION: Be careful to the prepared location.
User Guide
Page 34
.... Load an original in the automatic document feeder (ADF) You can load an original for a copy, fax, or scan job in -one -sided or two-sided, single- The document feeder tray holds a maximum of 50 sheets of symbols. Available symbols * - ( ) W R + Description Available when entering Displays an asterisk symbol when required for .... When auto-dialing, the device enters a pause in the ADF; When auto-dialing, W causes the device to scroll through the list of plain paper. 30 Use the all-in the automatic document feeder or on the scanner glass. Displays a plus symbol.
.... Load an original in the automatic document feeder (ADF) You can load an original for a copy, fax, or scan job in -one -sided or two-sided, single- The document feeder tray holds a maximum of 50 sheets of symbols. Available symbols * - ( ) W R + Description Available when entering Displays an asterisk symbol when required for .... When auto-dialing, the device enters a pause in the ADF; When auto-dialing, W causes the device to scroll through the list of plain paper. 30 Use the all-in the automatic document feeder or on the scanner glass. Displays a plus symbol.

User Guide
Page 36
... designed to work well with thick, irregular, or curled edges, or areas that is designed to hold only plain paper. • Do not overload the trays. Also avoid cards and envelopes with most types of print media types before buying large quantities. For more information, ...a very slick finish, self-stick adhesives, clasps, or windows. Use HP media for supported media. • Load only one Tray 2 is best to the device specifications. Visit the HP Web site at a time into a tray. • For Tray 1 and Tray 2, load media print-side down and aligned against the right and back...
... designed to work well with thick, irregular, or curled edges, or areas that is designed to hold only plain paper. • Do not overload the trays. Also avoid cards and envelopes with most types of print media types before buying large quantities. For more information, ...a very slick finish, self-stick adhesives, clasps, or windows. Use HP media for supported media. • Load only one Tray 2 is best to the device specifications. Visit the HP Web site at a time into a tray. • For Tray 1 and Tray 2, load media print-side down and aligned against the right and back...
User Guide
Page 40
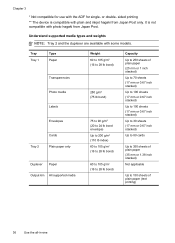
...from Japan Post only. Understand supported media types and weights NOTE: Tray 2 and the duplexer are available with plain and inkjet hagaki from Japan Post. Tray Tray 1 Type Paper Transparencies Photo media Labels Envelopes Tray 2 Cards Plain paper only Duplexer Paper Output-bin All supported media Weight 60 to 105 g/m2 (...0.67 inch stacked) Up to 80 cards Up to 350 sheets of plain paper (35 mm or 1.38 inch stacked) Not applicable Up to 150 sheets of plain paper (text printing) 36 Use the all-in-one It is compatible with some models. Chapter 3 * Not compatible for single...
...from Japan Post only. Understand supported media types and weights NOTE: Tray 2 and the duplexer are available with plain and inkjet hagaki from Japan Post. Tray Tray 1 Type Paper Transparencies Photo media Labels Envelopes Tray 2 Cards Plain paper only Duplexer Paper Output-bin All supported media Weight 60 to 105 g/m2 (...0.67 inch stacked) Up to 80 cards Up to 350 sheets of plain paper (35 mm or 1.38 inch stacked) Not applicable Up to 150 sheets of plain paper (text printing) 36 Use the all-in-one It is compatible with some models. Chapter 3 * Not compatible for single...

User Guide
Page 42
Make sure the stack of media aligns with the right and back edges of the tray. NOTE: Do not load paper while the device is printing. 3. Pull out the extension on the output tray. 38 Use the all-in the tray to adjust them for the media size that you have loaded, and then lower the output tray. 4. Chapter 3 To load Tray 1 (main tray) 1. Slide the media guides in -one Insert the media print-side down along the right of the tray, and does not exceed the line marking in the tray. Lift the output tray. 2.
Make sure the stack of media aligns with the right and back edges of the tray. NOTE: Do not load paper while the device is printing. 3. Pull out the extension on the output tray. 38 Use the all-in the tray to adjust them for the media size that you have loaded, and then lower the output tray. 4. Chapter 3 To load Tray 1 (main tray) 1. Slide the media guides in -one Insert the media print-side down along the right of the tray, and does not exceed the line marking in the tray. Lift the output tray. 2.

User Guide
Page 43
NOTE: Tray 2 can be loaded only with the right and back edges of paper aligns with plain paper. 3. Make sure the stack of the tray, and does not exceed the line marking in the tray to adjust them for the size that you have loaded. Load media 39 Insert the paper print-side down along the right of the tray. 2. Pull the tray out of the device by grasping under the front of the tray. Slide the media guides in the tray. To load Tray 2 1.
NOTE: Tray 2 can be loaded only with the right and back edges of paper aligns with plain paper. 3. Make sure the stack of the tray, and does not exceed the line marking in the tray to adjust them for the size that you have loaded. Load media 39 Insert the paper print-side down along the right of the tray. 2. Pull the tray out of the device by grasping under the front of the tray. Slide the media guides in the tray. To load Tray 2 1.

User Guide
Page 44
... hold only plain paper. If the device is on the output tray. Follow these steps • Load media in Tray 2. • Make sure tray lock is set to the appropriate tray. 40 Use the all users of media while printing a document, it is set to determine the first tray from one tray if the other one For more information...
... hold only plain paper. If the device is on the output tray. Follow these steps • Load media in Tray 2. • Make sure tray lock is set to the appropriate tray. 40 Use the all users of media while printing a document, it is set to determine the first tray from one tray if the other one For more information...

User Guide
Page 45
... either the Features or Color tab, and then select Paper Handling. • Toolbox (Windows): Click the Services tab and click Paper Handling. • HP Printer Utility (Mac OS): Click Paper Handling from the Printer Settings panel. • Control panel: Press the Setup button, select Preferences, and then select Default Tray or Tray Lock. 3. Perform one of the following...
... either the Features or Color tab, and then select Paper Handling. • Toolbox (Windows): Click the Services tab and click Paper Handling. • HP Printer Utility (Mac OS): Click Paper Handling from the Printer Settings panel. • Control panel: Press the Setup button, select Preferences, and then select Default Tray or Tray Lock. 3. Perform one of the following...
User Guide
Page 52
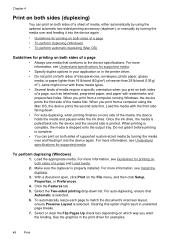
... on both sides of a page • Always use media that Automatic is dropped onto the output tray. When you print on both sides of a page and Load media. 2. Do not grab it ...again. • Guidelines for printing on both sides of a page, such as letterhead, preprinted paper, and paper with the front side facing down list. When printing is complete, the media is selected. ... File menu, and then click Setup, Properties, or Preferences. 4. With a document open, click Print on one side of the media first. Click the Features tab. 5. To perform duplexing (Windows) 1. When you want...
... on both sides of a page • Always use media that Automatic is dropped onto the output tray. When you print on both sides of a page and Load media. 2. Do not grab it ...again. • Guidelines for printing on both sides of a page, such as letterhead, preprinted paper, and paper with the front side facing down list. When printing is complete, the media is selected. ... File menu, and then click Setup, Properties, or Preferences. 4. With a document open, click Print on one side of the media first. Click the Features tab. 5. To perform duplexing (Windows) 1. When you want...
User Guide
Page 54
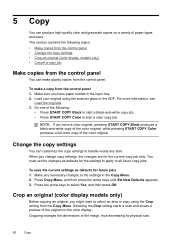
... start a color copy job. For more information, see Load the originals 3. You must set the changes as defaults for future jobs 1. Press Copy Menu, and then press the arrow keys until Set New Defaults appears. 3. Do one of paper types and sizes. NOTE: If you change copy settings, the changes... then press OK. 5 Copy You can customize the copy settings to handle nearly any necessary changes to the settings in the input tray. 2. When you have paper loaded in the Copy Menu. 2. Load your original using the Crop setting from the control panel. Change the copy settings You can...
... start a color copy job. For more information, see Load the originals 3. You must set the changes as defaults for future jobs 1. Press Copy Menu, and then press the arrow keys until Set New Defaults appears. 3. Do one of paper types and sizes. NOTE: If you change copy settings, the changes... then press OK. 5 Copy You can customize the copy settings to handle nearly any necessary changes to the settings in the input tray. 2. When you have paper loaded in the Copy Menu. 2. Load your original using the Crop setting from the control panel. Change the copy settings You can...

User Guide
Page 69
...press OK. 8. The Photosmart Express menu appears. When you to highlight Number of the selected photo a. To print more than one copy of Copies, and then press OK. c. d. The Print menu appears. 6. Press the arrow keys to create a ...tray, and then press OK. Press Photo Menu. The Projects menu appears. 7. Choose the appropriate display: For color display models a. Press the arrow keys to print appears, press OK. When the photo you must use another software application, such as HP Photosmart software. Press the Photo Menu button. 5. When prompted, select the paper...
...press OK. 8. The Photosmart Express menu appears. When you to highlight Number of the selected photo a. To print more than one copy of Copies, and then press OK. c. d. The Print menu appears. 6. Press the arrow keys to create a ...tray, and then press OK. Press Photo Menu. The Projects menu appears. 7. Choose the appropriate display: For color display models a. Press the arrow keys to print appears, press OK. When the photo you must use another software application, such as HP Photosmart software. Press the Photo Menu button. 5. When prompted, select the paper...

User Guide
Page 77
... Enter a fax number by using the broadcast fax option (color display models only) You can add up and top first in the center of the document feeder tray. Press START FAX Black. 4. For additional information, see... to Answer setting is five rings.) If you are using the keypad, or use legal-size paper, the device reduces the fax so that is not saved and only works for sending faxes in... up fax numbers as a speed dial, when prompted to enter your PIN, press Speed Dial or a one-touch speed dial button to select the speed dial entry where you specify for this section to 20 individual...
... Enter a fax number by using the broadcast fax option (color display models only) You can add up and top first in the center of the document feeder tray. Press START FAX Black. 4. For additional information, see... to Answer setting is five rings.) If you are using the keypad, or use legal-size paper, the device reduces the fax so that is not saved and only works for sending faxes in... up fax numbers as a speed dial, when prompted to enter your PIN, press Speed Dial or a one-touch speed dial button to select the speed dial entry where you specify for this section to 20 individual...
User Guide
Page 78
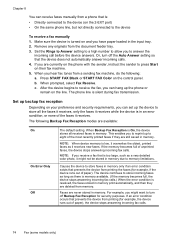
..., it overwrites the oldest, printed faxes as it receives. If the memory becomes full of paper). For example, you hear fax tones from memory. Set the Rings to Answer setting to ...Reception for security purposes. The device continues to memory limitations. Press START FAX Black or START FAX Color on the phone with the sender, instruct the sender to answer the incoming call before the device ... to press Start on their fax machine. 5. NOTE: When device memory is in the input tray. 2. Causes the device to store faxes in memory print automatically, and then they are currently...
..., it overwrites the oldest, printed faxes as it receives. If the memory becomes full of paper). For example, you hear fax tones from memory. Set the Rings to Answer setting to ...Reception for security purposes. The device continues to memory limitations. Press START FAX Black or START FAX Color on the phone with the sender, instruct the sender to answer the incoming call before the device ... to press Start on their fax machine. 5. NOTE: When device memory is in the input tray. 2. Causes the device to store faxes in memory print automatically, and then they are currently...

User Guide
Page 79
... not deleted when the device is enabled and you turn off the power. • Color display: Press Setup, select Tools, and then select Clear Fax Log. NOTE: After the... or delete the faxes from the control panel ▲ Depending on . 4. You might have , do one of the most recently printed faxes, if they were received with the most recently received fax printed first, ... deleted from the control panel 1. To reprint faxes in the input tray. 2. Make sure you have received, print the Fax Log. If you have paper loaded in memory from the left pane, select the Advanced sub-
... not deleted when the device is enabled and you turn off the power. • Color display: Press Setup, select Tools, and then select Clear Fax Log. NOTE: After the... or delete the faxes from the control panel ▲ Depending on . 4. You might have , do one of the most recently printed faxes, if they were received with the most recently received fax printed first, ... deleted from the control panel 1. To reprint faxes in the input tray. 2. Make sure you have received, print the Fax Log. If you have paper loaded in memory from the left pane, select the Advanced sub-


