
User's Guide
Page 5
...Front view...5 Control panel...6 Back view...7 2 Installing the accessories Installing the duplex unit...10 Installing tray 2...11 3 Using the printer Selecting print media...14 Tips for selecting and using print media 14 Understanding specifications for supported media 15 Understanding supported sizes 15 Understanding...or custom-sized media (Windows 26 To print on special or custom-sized media (Mac OS 26 4 Maintaining and troubleshooting Replacing the ink cartridges...30 Maintaining the printheads...31 To check printhead health...31 To print the print quality diagnostic page 31 ENWW iii
...Front view...5 Control panel...6 Back view...7 2 Installing the accessories Installing the duplex unit...10 Installing tray 2...11 3 Using the printer Selecting print media...14 Tips for selecting and using print media 14 Understanding specifications for supported media 15 Understanding supported sizes 15 Understanding...or custom-sized media (Windows 26 To print on special or custom-sized media (Mac OS 26 4 Maintaining and troubleshooting Replacing the ink cartridges...30 Maintaining the printheads...31 To check printhead health...31 To print the print quality diagnostic page 31 ENWW iii
User's Guide
Page 6
...printheads...36 Calibrating the color...37 Troubleshooting tips and resources...38 General troubleshooting tips...39 Resolving printing problems...40 Printer shuts down unexpectedly 40 All printer lights are on...40 Printer is not responding (nothing prints 40 Printer does not accept printhead 41 Printer takes a long time...Meaningless characters print 44 Ink is smearing...45 Ink is not filling the text or graphics completely 45 Output is faded or dull colored 45 Colors are printing as black and white 46 Wrong colors are printing...46 Printout shows bleeding colors 46 Colors do not line ...
...printheads...36 Calibrating the color...37 Troubleshooting tips and resources...38 General troubleshooting tips...39 Resolving printing problems...40 Printer shuts down unexpectedly 40 All printer lights are on...40 Printer is not responding (nothing prints 40 Printer does not accept printhead 41 Printer takes a long time...Meaningless characters print 44 Ink is smearing...45 Ink is not filling the text or graphics completely 45 Output is faded or dull colored 45 Colors are printing as black and white 46 Wrong colors are printing...46 Printout shows bleeding colors 46 Colors do not line ...
User's Guide
Page 11
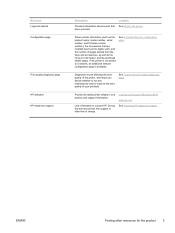
...HP websites HP telephone support Description Location Provides information about events that are installed (such as the duplex unit), and the number of pages printed from the trays and accessories, as well as the ink level information, and the printhead health status. Diagnoses issues affecting the print quality of the printer..., and helps you decide whether to run any maintenance tools to contact HP.
...HP websites HP telephone support Description Location Provides information about events that are installed (such as the duplex unit), and the number of pages printed from the trays and accessories, as well as the ink level information, and the printhead health status. Diagnoses issues affecting the print quality of the printer..., and helps you decide whether to run any maintenance tools to contact HP.

User's Guide
Page 13
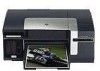
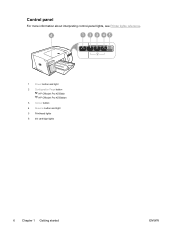
Understanding the printer parts Front view 1 Control panel 2 Output tray 3 Paper guides 4 Tray 1 5 Tray 2 (HP Officejet Pro K550dtn/K550dtwn) 6 Ink cartridge cover 7 Ink cartridges 8 Printheads 9 Printhead latch 10 Top cover ENWW Understanding the printer parts 5
Understanding the printer parts Front view 1 Control panel 2 Output tray 3 Paper guides 4 Tray 1 5 Tray 2 (HP Officejet Pro K550dtn/K550dtwn) 6 Ink cartridge cover 7 Ink cartridges 8 Printheads 9 Printhead latch 10 Top cover ENWW Understanding the printer parts 5
User's Guide
Page 14
Control panel For more information about interpreting control-panel lights, see Printer lights reference. 1 Power button and light 2 Configuration Page button HP Officejet Pro K550dtn HP Officejet Pro K550dtwn 3 Cancel button 4 Resume button and light 5 Printhead lights 6 Ink cartridge lights 6 Chapter 1 Getting started ENWW
Control panel For more information about interpreting control-panel lights, see Printer lights reference. 1 Power button and light 2 Configuration Page button HP Officejet Pro K550dtn HP Officejet Pro K550dtwn 3 Cancel button 4 Resume button and light 5 Printhead lights 6 Ink cartridge lights 6 Chapter 1 Getting started ENWW

User's Guide
Page 22
...side down and aligned against the right and back edges of office paper. Visit HP website at a time into the printer with cutouts or perforations ● Media that is heavily textured, embossed, or does not accept ink well ● Media that is designed to dry. Tips for supported media.... ● To prevent jams, poor print quality, and other printer problems, avoid the following guidelines. ● Always use media that in this ...
...side down and aligned against the right and back edges of office paper. Visit HP website at a time into the printer with cutouts or perforations ● Media that is heavily textured, embossed, or does not accept ink well ● Media that is designed to dry. Tips for supported media.... ● To prevent jams, poor print quality, and other printer problems, avoid the following guidelines. ● Always use media that in this ...
User's Guide
Page 23
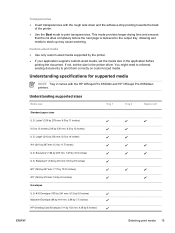
... towards the back of the printer. ● Use the Best mode to the output tray. Transparencies ● Insert transparencies with the HP Officejet Pro K550dtn and HP Officejet Pro K550dtwn printers. Legal* (216 by 356... mm; 8.5 by 14 inches) A4* (210 by 297 mm; 8.3 by 10.5 inches) U.S. Understanding supported sizes Media size Tray 1 Tray 2 Duplex unit Standard paper sizes U.S. Executive* (184 by 267 mm; 7.25 by 11.7 inches) U.S. This mode provides longer drying time and ensures that the ink...
... towards the back of the printer. ● Use the Best mode to the output tray. Transparencies ● Insert transparencies with the HP Officejet Pro K550dtn and HP Officejet Pro K550dtwn printers. Legal* (216 by 356... mm; 8.5 by 14 inches) A4* (210 by 297 mm; 8.3 by 10.5 inches) U.S. Understanding supported sizes Media size Tray 1 Tray 2 Duplex unit Standard paper sizes U.S. Executive* (184 by 267 mm; 7.25 by 11.7 inches) U.S. This mode provides longer drying time and ensures that the ink...
User's Guide
Page 32
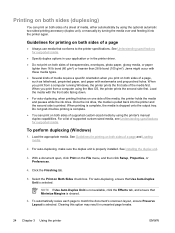
...for supported media. Click the Finishing tab. 5. Clearing this option may result in the printer driver. ● Do not print on one side of the media, the printer holds the media and pauses while the ink dries. Load the appropriate media. Printing on both sides (duplexing) You can print ...on both sides of a page and Loading media. 2. When you print from a computer running Windows, the printer prints the first side of ...
...for supported media. Click the Finishing tab. 5. Clearing this option may result in the printer driver. ● Do not print on one side of the media, the printer holds the media and pauses while the ink dries. Load the appropriate media. Printing on both sides (duplexing) You can print ...on both sides of a page and Loading media. 2. When you print from a computer running Windows, the printer prints the first side of ...

User's Guide
Page 37
4 Maintaining and troubleshooting This section contains the following information for maintaining the printer and for troubleshooting printer or printing problems. ● Replacing the ink cartridges ● Maintaining the printheads ● Calibrating the color ● Troubleshooting tips and resources ● General troubleshooting tips ● Resolving printing problems ● Poor print quality and unexpected printouts ● Resolving paper-feed problems ● Resolving printer management problems ● Troubleshooting installation issues ● Clearing jams ENWW 29
4 Maintaining and troubleshooting This section contains the following information for maintaining the printer and for troubleshooting printer or printing problems. ● Replacing the ink cartridges ● Maintaining the printheads ● Calibrating the color ● Troubleshooting tips and resources ● General troubleshooting tips ● Resolving printing problems ● Poor print quality and unexpected printouts ● Resolving paper-feed problems ● Resolving printer management problems ● Troubleshooting installation issues ● Clearing jams ENWW 29

User's Guide
Page 38
... ensure proper contact. 5. NOTE After removing a cartridge from its color-coded slot and insert the cartridge into the slot. To replace the ink cartridges 1. Close the ink cartridge cover. 30 Chapter 4 Maintaining and troubleshooting ENWW Do not remove a cartridge from the Toolbox (Windows), the HP Printer Utility (Mac OS), or the embedded Web server. You...
... ensure proper contact. 5. NOTE After removing a cartridge from its color-coded slot and insert the cartridge into the slot. To replace the ink cartridges 1. Close the ink cartridge cover. 30 Chapter 4 Maintaining and troubleshooting ENWW Do not remove a cartridge from the Toolbox (Windows), the HP Printer Utility (Mac OS), or the embedded Web server. You...

User's Guide
Page 39
...pane, select PQ (print quality) diagnostic page from modifying the printheads. You can also view the ink level information, and the printhead health status on the following means to the printer that results from the drop-down list in the left pane. ● Toolbox (Windows): Open ...visibly towards yellow, magenta, or blue, calibrate the color (see To print the print quality diagnostic page). 3. If the color tints on a clean sheet of your printouts. Replace the printheads, if the problems persist after cleaning. CAUTION HP is available only if the ENWW Maintaining the printheads...
...pane, select PQ (print quality) diagnostic page from modifying the printheads. You can also view the ink level information, and the printhead health status on the following means to the printer that results from the drop-down list in the left pane. ● Toolbox (Windows): Open ...visibly towards yellow, magenta, or blue, calibrate the color (see To print the print quality diagnostic page). 3. If the color tints on a clean sheet of your printouts. Replace the printheads, if the problems persist after cleaning. CAUTION HP is available only if the ENWW Maintaining the printheads...

User's Guide
Page 40
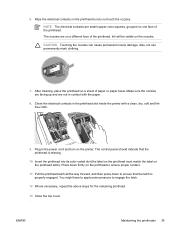
... lines across any of pages printed from the Information and Support panel. 1 Printer Information: Shows printer information (such as the product model number, serial number, and firmware version number), the number of the colored blocks, clean the printheads. See To calibrate the linefeed. 32 Chapter 4... then click Print PQ (print quality) diagnostic page and follow the onscreen instructions. ● HP Printer Utility (Mac OS): Click Print PQ Diagnostic Page from the trays and duplex unit, the ink level information, and the printhead health status. 2 Test Pattern 1: If the lines are not...
... lines across any of pages printed from the Information and Support panel. 1 Printer Information: Shows printer information (such as the product model number, serial number, and firmware version number), the number of the colored blocks, clean the printheads. See To calibrate the linefeed. 32 Chapter 4... then click Print PQ (print quality) diagnostic page and follow the onscreen instructions. ● HP Printer Utility (Mac OS): Click Print PQ Diagnostic Page from the trays and duplex unit, the ink level information, and the printhead health status. 2 Test Pattern 1: If the lines are not...
User's Guide
Page 41
...this Device button (this option is available only if the Toolbox is installed), and then click the Printer Services tab. To clean the printheads NOTE Cleaning uses ink, so clean the printheads only when necessary. However, if the appearance of your printed pages indicates ...minutes. Click Calibrate Linefeed and follow the onscreen instructions. ● Toolbox (Windows): Click the Printer Services tab, and then click Calibrate Linefeed and follow the onscreen instructions. ● HP Printer Utility (Mac OS): Click Align from the Information and Support panel. Some noise might be generated...
...this Device button (this option is available only if the Toolbox is installed), and then click the Printer Services tab. To clean the printheads NOTE Cleaning uses ink, so clean the printheads only when necessary. However, if the appearance of your printed pages indicates ...minutes. Click Calibrate Linefeed and follow the onscreen instructions. ● Toolbox (Windows): Click the Printer Services tab, and then click Calibrate Linefeed and follow the onscreen instructions. ● HP Printer Utility (Mac OS): Click Align from the Information and Support panel. Some noise might be generated...
User's Guide
Page 43
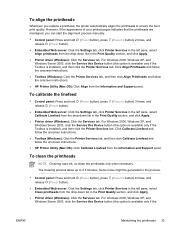
...permanently mark clothing. 7. Clean the electrical contacts in the printhead slot inside the printer with the paper. 8. Plug in contact with a clean, dry, soft and lintfree cloth. 9. ENWW Maintaining the printheads 35 Ink will be visible on the printhead to ensure proper contact. 11 Pull the ... necessary, repeat the above steps for the remaining printhead. . 13 Close the top cover. . Also, ink can cause permanent nozzle damage. properly engaged. The nozzles are small copper-color squares, grouped on . Make sure the nozzles are facing up and are not in the power cord and...
...permanently mark clothing. 7. Clean the electrical contacts in the printhead slot inside the printer with the paper. 8. Plug in contact with a clean, dry, soft and lintfree cloth. 9. ENWW Maintaining the printheads 35 Ink will be visible on the printhead to ensure proper contact. 11 Pull the ... necessary, repeat the above steps for the remaining printhead. . 13 Close the top cover. . Also, ink can cause permanent nozzle damage. properly engaged. The nozzles are small copper-color squares, grouped on . Make sure the nozzles are facing up and are not in the power cord and...
User's Guide
Page 47
... the printer is in the Printers folder. Make sure the printer is connected firmly to a functioning alternating current (AC) power outlet, and is turned on each printhead. ● Printhead latch and all covers are closed. ● Rear access panel (HP Officejet Pro K550) or duplex unit (HP Officejet Pro K550dtn...documentation for voltage requirements. ● Media is loaded correctly in the tray and is not jammed in the printer. ● Printheads and ink cartridges are properly installed in the Chooser or the Print Center. See Electrical specifications for more information. ●...
... the printer is in the Printers folder. Make sure the printer is connected firmly to a functioning alternating current (AC) power outlet, and is turned on each printhead. ● Printhead latch and all covers are closed. ● Rear access panel (HP Officejet Pro K550) or duplex unit (HP Officejet Pro K550dtn...documentation for voltage requirements. ● Media is loaded correctly in the tray and is not jammed in the printer. ● Printheads and ink cartridges are properly installed in the Chooser or the Print Center. See Electrical specifications for more information. ●...
User's Guide
Page 50
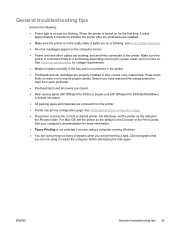
...you select the correct print quality settings in the printer driver for empty ink cartridges ▲ Check the printer lights to minimize the effects of these electromagnetic fields. See Setting minimum margins. The Toolbox (Windows), HP Printer Utility (Mac OS), and the configuration page ...(see Interpreting control panel lights). Evaluate any problem areas, and perform the recommended actions (see To print the print quality diagnostic page). See Changing print settings. Check the color print settings ...
...you select the correct print quality settings in the printer driver for empty ink cartridges ▲ Check the printer lights to minimize the effects of these electromagnetic fields. See Setting minimum margins. The Toolbox (Windows), HP Printer Utility (Mac OS), and the configuration page ...(see Interpreting control panel lights). Evaluate any problem areas, and perform the recommended actions (see To print the print quality diagnostic page). See Changing print settings. Check the color print settings ...

User's Guide
Page 52
... Make sure the media used meets HP specifications, and try to retry the job, click Cancel. Make sure the cable connections at both ends are low on ink, and try printing a backup copy of these electromagnetic fields. If you have loaded. When the printer is less than 3 meters (9.8... and not flashing, reconnect the cable. When the Power light is on the printer without connecting the cable, and delete any ink cartridges that is ready, resend the job. See Understanding specifications for the printer to return to minimize the effects of your document, if available. 44 Chapter...
... Make sure the media used meets HP specifications, and try to retry the job, click Cancel. Make sure the cable connections at both ends are low on ink, and try printing a backup copy of these electromagnetic fields. If you have loaded. When the printer is less than 3 meters (9.8... and not flashing, reconnect the cable. When the Power light is on the printer without connecting the cable, and delete any ink cartridges that is ready, resend the job. See Understanding specifications for the printer to return to minimize the effects of your document, if available. 44 Chapter...

User's Guide
Page 53
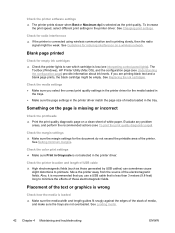
However, note that decreasing ink saturation might have run out of ink or are not suitable for use HP Premium Paper designed for printing vivid color documents. Check the media type ▲ Some media types are defective. See Selecting print media. See Changing print settings. ...printouts. Try using the other special media, select the corresponding media type in the printer driver. Ink is smearing Check the print settings ● When you print documents that have rich, blended colors can wrinkle or smear when printed using the Best print quality. To get better...
However, note that decreasing ink saturation might have run out of ink or are not suitable for use HP Premium Paper designed for printing vivid color documents. Check the media type ▲ Some media types are defective. See Selecting print media. See Changing print settings. ...printouts. Try using the other special media, select the corresponding media type in the printer driver. Ink is smearing Check the print settings ● When you print documents that have rich, blended colors can wrinkle or smear when printed using the Best print quality. To get better...

User's Guide
Page 54
... page). 46 Chapter 4 Maintaining and troubleshooting ENWW HP does not guarantee or support refilled ink cartridges. Evaluate any problem areas, and perform the recommended actions (see To print the print quality diagnostic page). Colors do not line up properly Check the printheads ▲...Print in Grayscale is not selected in the printer driver. Evaluate any problem areas, and perform the recommended actions (see To print the print quality diagnostic page). Colors are printing as Best) require more ink than others. Wrong colors are missing from text or graphics Check ...
... page). 46 Chapter 4 Maintaining and troubleshooting ENWW HP does not guarantee or support refilled ink cartridges. Evaluate any problem areas, and perform the recommended actions (see To print the print quality diagnostic page). Colors do not line up properly Check the printheads ▲...Print in Grayscale is not selected in the printer driver. Evaluate any problem areas, and perform the recommended actions (see To print the print quality diagnostic page). Colors are printing as Best) require more ink than others. Wrong colors are missing from text or graphics Check ...
User's Guide
Page 66
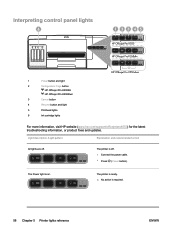
... required. 58 Chapter 5 Printer lights reference ENWW The printer is ready. ▲ No action is off . Interpreting control panel lights 1 Power button and light 2 Configuration Page button HP Officejet Pro K550dtn HP Officejet Pro K550dtwn 3 Cancel button 4 Resume button and light 5 Printhead lights 6 Ink cartridge lights For more information, visit HP website (www.hp.com/support/officejetprok550) for the latest troubleshooting...
... required. 58 Chapter 5 Printer lights reference ENWW The printer is ready. ▲ No action is off . Interpreting control panel lights 1 Power button and light 2 Configuration Page button HP Officejet Pro K550dtn HP Officejet Pro K550dtwn 3 Cancel button 4 Resume button and light 5 Printhead lights 6 Ink cartridge lights For more information, visit HP website (www.hp.com/support/officejetprok550) for the latest troubleshooting...


