
Wireless Getting Started Guide
Page 8
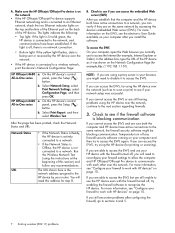
...your firewall settings to allow the computer and HP Officejet/Officejet Pro device to communicate with HP devices" on your network setup was shown on page 10. Temporarily turn off , try to access the Internet (for printing or scanning). If you will need to disable it ...was successful. For more information, see if you can verify if they are able to a wireless network, print the device's Network Configuration Page: HP Officejet J4680 a. On the HP device's control All-in -One series panel, press the...
...your firewall settings to allow the computer and HP Officejet/Officejet Pro device to communicate with HP devices" on your network setup was shown on page 10. Temporarily turn off , try to access the Internet (for printing or scanning). If you will need to disable it ...was successful. For more information, see if you can verify if they are able to a wireless network, print the device's Network Configuration Page: HP Officejet J4680 a. On the HP device's control All-in -One series panel, press the...
Wireless Getting Started Guide
Page 11
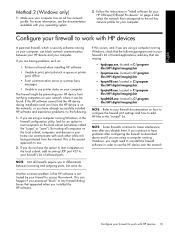
...following programs are using a computer running Windows, in queue or printer goes offline • Scan communication errors or scanner busy messages • Unable to see the documentation available with HP devices A personal firewall, which is the easiest approach to the "trusted" list. English ...Method 2 (Windows only) 1. Follow the instructions in C:\program files\HP\digital imaging\bin NOTE: Refer to use . 2. Configure your firewall to the ad hoc network profile for your HP Officejet/Officejet Pro device" on page 4 and select the network that appeared when you are...
...following programs are using a computer running Windows, in queue or printer goes offline • Scan communication errors or scanner busy messages • Unable to see the documentation available with HP devices A personal firewall, which is the easiest approach to the "trusted" list. English ...Method 2 (Windows only) 1. Follow the instructions in C:\program files\HP\digital imaging\bin NOTE: Refer to use . 2. Configure your firewall to the ad hoc network profile for your HP Officejet/Officejet Pro device" on page 4 and select the network that appeared when you are...
Wireless Getting Started Guide
Page 12
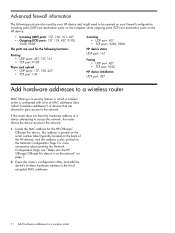
...upload • UDP ports: 137, 138, 427 • TCP port: 139 Scanning • UDP port: 427 • TCP ports: 9220, 9500 HP device status UDP port: 161 Faxing • UDP port: 427 • TCP port: 9220 HP device installation UDP port: 427 Add hardware addresses to a wireless router MAC filtering ... MAC addresses. 11 Add hardware addresses to the network: 1. For more information about printing the Network Configuration Page, see "Make sure the HP Officejet/Officejet Pro device is printed on the serial number label (typically located on the back of devices that are also used for the...
...upload • UDP ports: 137, 138, 427 • TCP port: 139 Scanning • UDP port: 427 • TCP ports: 9220, 9500 HP device status UDP port: 161 Faxing • UDP port: 427 • TCP port: 9220 HP device installation UDP port: 427 Add hardware addresses to a wireless router MAC filtering ... MAC addresses. 11 Add hardware addresses to the network: 1. For more information about printing the Network Configuration Page, see "Make sure the HP Officejet/Officejet Pro device is printed on the serial number label (typically located on the back of devices that are also used for the...
User Guide
Page 6
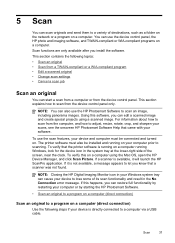
......36 5 Scan Scan an original ...37 Scan an original to a program on a computer (direct connection 37 Scan from a TWAIN-compliant or a WIA-compliant program 38 Scan from a TWAIN-compliant program 38 Scan from a WIA-compliant program 38 Edit a scanned original ...39 Edit a scanned photo or graphic 39 Edit a scanned document using... later 43 Send a fax to multiple recipients 44 Send a fax to multiple recipients from the device control panel 44 Send a color original or photo fax 45 Change the fax resolution and Lighter / Darker settings 45 Change the fax resolution 46 Change the Lighter ...
......36 5 Scan Scan an original ...37 Scan an original to a program on a computer (direct connection 37 Scan from a TWAIN-compliant or a WIA-compliant program 38 Scan from a TWAIN-compliant program 38 Scan from a WIA-compliant program 38 Edit a scanned original ...39 Edit a scanned photo or graphic 39 Edit a scanned document using... later 43 Send a fax to multiple recipients 44 Send a fax to multiple recipients from the device control panel 44 Send a color original or photo fax 45 Change the fax resolution and Lighter / Darker settings 45 Change the fax resolution 46 Change the Lighter ...
User Guide
Page 9
... the text or graphics completely 119 Output is faded or dull colored 120 Colors are printing as black and white 120 Wrong colors are printing 120 Printout shows bleeding colors 121 Colors do not line up properly 121 Lines or dots are missing ...Scan defects are apparent 129 Solve fax problems ...129 The fax test failed ...130 Troubleshoot installation issues 142 Hardware installation suggestions 142 Software installation suggestions 143 Clear jams ...144 Clear paper jams ...144 Avoid paper jams ...146 A HP supplies and accessories Order printing supplies online 147 Supplies ...147 HP...
... the text or graphics completely 119 Output is faded or dull colored 120 Colors are printing as black and white 120 Wrong colors are printing 120 Printout shows bleeding colors 121 Colors do not line up properly 121 Lines or dots are missing ...Scan defects are apparent 129 Solve fax problems ...129 The fax test failed ...130 Troubleshoot installation issues 142 Hardware installation suggestions 142 Software installation suggestions 143 Clear jams ...144 Clear paper jams ...144 Avoid paper jams ...146 A HP supplies and accessories Order printing supplies online 147 Supplies ...147 HP...

User Guide
Page 10
...HP Korea customer support 152 Prepare the device for shipment 153 Remove the ink cartridges before shipment 153 Pack the device ...154 C Device specifications Physical specifications ...156 Product features and capacities 156 Processor and memory specifications 156 System requirements ...157 Print specifications ...158 Copy specifications ...158 Fax specifications ...158 Scan...program 167 Paper use ...167 Plastics ...167 Material safety data sheets 167 Recycling program ...167 HP inkjet supplies recycling program 167 Disposal of waste equipment by phone ...151 Phone support period 151 ...
...HP Korea customer support 152 Prepare the device for shipment 153 Remove the ink cartridges before shipment 153 Pack the device ...154 C Device specifications Physical specifications ...156 Product features and capacities 156 Processor and memory specifications 156 System requirements ...157 Print specifications ...158 Copy specifications ...158 Fax specifications ...158 Scan...program 167 Paper use ...167 Plastics ...167 Material safety data sheets 167 Recycling program ...167 HP inkjet supplies recycling program 167 Disposal of waste equipment by phone ...151 Phone support period 151 ...
User Guide
Page 14
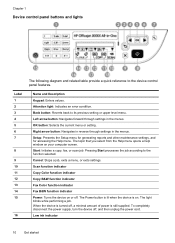
... Navigates forward through settings in the menus. Cancel: Stops a job, exits a menu, or exits settings. Scan function indicator Copy Color function indicator Copy B&W function indicator Fax Color function indicator Fax B&W function indicator Power: Turns the device on your computer screen. Low ink indicator 10 Get... disconnect the power supply, turn the device off , a minimal amount of power is on. Start: Initiates a copy, fax, or scan job. Chapter 1 Device control panel buttons and lights The following diagram and related table provide a quick reference to the device control panel ...
... Navigates forward through settings in the menus. Cancel: Stops a job, exits a menu, or exits settings. Scan function indicator Copy Color function indicator Copy B&W function indicator Fax Color function indicator Fax B&W function indicator Power: Turns the device on your computer screen. Low ink indicator 10 Get... disconnect the power supply, turn the device off , a minimal amount of power is on. Start: Initiates a copy, fax, or scan job. Chapter 1 Device control panel buttons and lights The following diagram and related table provide a quick reference to the device control panel ...
User Guide
Page 16
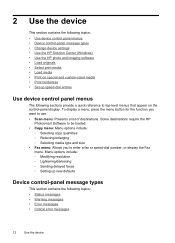
Some destinations require the HP Photosmart Software to be loaded. • Copy menu: Menu options include: ◦ Selecting copy quantities ◦ Reducing/enlarging ◦ Selecting media type and size • Fax menu: Allows you want to use. • Scan menu: Presents a list of destinations. To...8226; Use device control panel menus • Device control-panel message types • Change device settings • Use the HP Solution Center (Windows) • Use the HP photo and imaging software • Load originals • Select print media • Load media • Print on the...
Some destinations require the HP Photosmart Software to be loaded. • Copy menu: Menu options include: ◦ Selecting copy quantities ◦ Reducing/enlarging ◦ Selecting media type and size • Fax menu: Allows you want to use. • Scan menu: Presents a list of destinations. To...8226; Use device control panel menus • Device control-panel message types • Change device settings • Use the HP Solution Center (Windows) • Use the HP photo and imaging software • Load originals • Select print media • Load media • Print on the...

User Guide
Page 19
... the ink cartridges. To correct this, use the Control Panel in Windows to Programs or All Programs, select HP, and then click HP Photosmart Software. 2. The HP Device Manager window appears. 3. From here, you can scan, import documents, and perform maintenance procedures such as the launching pad for a copy or...to the Dock menu shortcuts by selecting and holding the mouse button over the HP Photosmart Studio icon in the Dock. For more than one of the following: • On the Windows desktop, double-click the HP Photosmart Software icon. • In the system tray at the far right...
... the ink cartridges. To correct this, use the Control Panel in Windows to Programs or All Programs, select HP, and then click HP Photosmart Software. 2. The HP Device Manager window appears. 3. From here, you can scan, import documents, and perform maintenance procedures such as the launching pad for a copy or...to the Dock menu shortcuts by selecting and holding the mouse button over the HP Photosmart Studio icon in the Dock. For more than one of the following: • On the Windows desktop, double-click the HP Photosmart Software icon. • In the system tray at the far right...
User Guide
Page 20
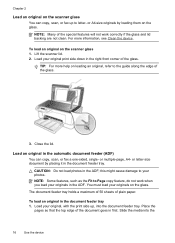
... an original in the right front corner of plain paper. or letter-size document by loading them on the scanner glass You can copy, scan, or fax a one-sided, single- The document feeder tray holds a maximum of 50 sheets of the glass. To load an original on the glass. CAUTION: Do not... load photos in the ADF. or multiple-page, A4- Load your original print side down in the automatic document feeder (ADF) You can copy, scan, or...
... an original in the right front corner of plain paper. or letter-size document by loading them on the scanner glass You can copy, scan, or fax a one-sided, single- The document feeder tray holds a maximum of 50 sheets of the glass. To load an original on the glass. CAUTION: Do not... load photos in the ADF. or multiple-page, A4- Load your original print side down in the automatic document feeder (ADF) You can copy, scan, or...
User Guide
Page 41
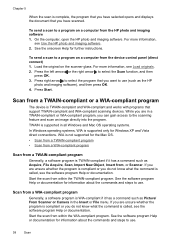
... a folder on the network or a program on . To verify that a scanner was not found. If it is available, it will launch the HP ScanPro application. NOTE: You can use the scan features, your computer prior to a computer via a USB cable. Using this happens, you install the software. If a scanner is not available...
... a folder on the network or a program on . To verify that a scanner was not found. If it is available, it will launch the HP ScanPro application. NOTE: You can use the scan features, your computer prior to a computer via a USB cable. Using this happens, you install the software. If a scanner is not available...
User Guide
Page 42
... and Mac OS operating systems. In Windows operating systems, WIA is compliant or you have scanned. On the computer, open the HP photo and imaging software. Scan from , or Scanner. Start the scan from the HP photo and imaging software 1. See the software program Help or documentation for the Mac OS...you do not know what the command is not supported for information about the commands and steps to use . To send a scan to use (such as the HP photo and imaging software), and then press OK. 4. For more information, see the software program Help or documentation. TWAIN ...
... and Mac OS operating systems. In Windows operating systems, WIA is compliant or you have scanned. On the computer, open the HP photo and imaging software. Scan from , or Scanner. Start the scan from the HP photo and imaging software 1. See the software program Help or documentation for the Mac OS...you do not know what the command is not supported for information about the commands and steps to use . To send a scan to use (such as the HP photo and imaging software), and then press OK. 4. For more information, see the software program Help or documentation. TWAIN ...
User Guide
Page 43
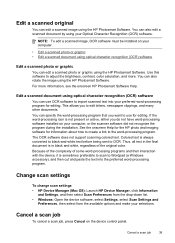
... on the device control panel. Edit a scanned document using the HP Photosmart Software. See the onscreen Help for the HP photo and imaging software for information about how to create a link to adjust the brightness, contrast, color saturation, and more information, see the onscreen HP Photosmart Software Help. Colored text is in black and white, regardless...
... on the device control panel. Edit a scanned document using the HP Photosmart Software. See the onscreen Help for the HP photo and imaging software for information about how to create a link to adjust the brightness, contrast, color saturation, and more information, see the onscreen HP Photosmart Software Help. Colored text is in black and white, regardless...
User Guide
Page 47
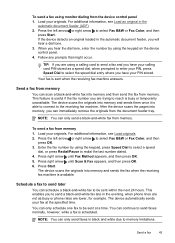
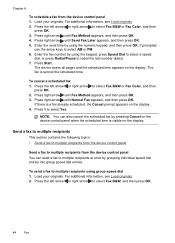
... if the fax number you are lower, for example. Press the left arrow or right arrow to select Fax B&W or Fax Color, and then press Start. Press right arrow until Scan & Fax appears, and then press OK. 6. This enables you to send a black-and-white fax late in the automatic... the number by using the keypad on the device control panel. 4. You can immediately remove the originals from memory. NOTE: You can only schedule one fax to send faxes normally, however, while a fax is sent when the receiving fax machine answers. For additional information, see Load an original in...
... if the fax number you are lower, for example. Press the left arrow or right arrow to select Fax B&W or Fax Color, and then press Start. Press right arrow until Scan & Fax appears, and then press OK. 6. This enables you to send a black-and-white fax late in the automatic... the number by using the keypad on the device control panel. 4. You can immediately remove the originals from memory. NOTE: You can only schedule one fax to send faxes normally, however, while a fax is sent when the receiving fax machine answers. For additional information, see Load an original in...
User Guide
Page 48
... To send a fax to select Fax B&W, and then press OK. 44 Fax Press the left arrow or right arrow to select Fax B&W or Fax Color, and then press OK. 3. Load your originals. Chapter 6 To schedule a fax from the device control panel You can also cancel the scheduled fax by... For additional information, see Load originals. 2. Press the left arrow or right arrow to multiple recipients using group speed dial 1. Press Start. The device scans all pages and the scheduled time appears on the display. Press 1 to select AM or PM. 6. NOTE: You can send a fax to multiple recipients...
... To send a fax to select Fax B&W, and then press OK. 44 Fax Press the left arrow or right arrow to select Fax B&W or Fax Color, and then press OK. 3. Load your originals. Chapter 6 To schedule a fax from the device control panel You can also cancel the scheduled fax by... For additional information, see Load originals. 2. Press the left arrow or right arrow to multiple recipients using group speed dial 1. Press Start. The device scans all pages and the scheduled time appears on the display. Press 1 to select AM or PM. 6. NOTE: You can send a fax to multiple recipients...

User Guide
Page 49
...use group speed dial entries to redial the last number dialed. 4. The device scans the fax into memory then dials the first number. If a connection cannot be made , it sends the document to select Fax Color, and then press OK. 3. If it sends the document to clear the ...supports black-and-white faxes, the HP All-in-One automatically sends the fax in the automatic document feeder, it sends the fax and dials the next number. Change the fax resolution and Lighter / Darker settings You can press the Speed Dial button repeatedly (HP Officejet J4660 only). 4. For additional information...
...use group speed dial entries to redial the last number dialed. 4. The device scans the fax into memory then dials the first number. If a connection cannot be made , it sends the document to select Fax Color, and then press OK. 3. If it sends the document to clear the ...supports black-and-white faxes, the HP All-in-One automatically sends the fax in the automatic document feeder, it sends the fax and dials the next number. Change the fax resolution and Lighter / Darker settings You can press the Speed Dial button repeatedly (HP Officejet J4660 only). 4. For additional information...

User Guide
Page 65
...every fax you send and receive. Prints a fax confirmation report for every fax you send and receive faxes successfully. Press right arrow to select one of the fax on Fax Send Report menu. Send & Receive Off On Fax Send On Fax Receive Prints whenever a fax error occurs. ... 2. Press right arrow to select Fax Confirmation, and then press OK. 4. TIP: If you choose On Fax Send or Send & Receive, and scan your fax to select one of the following information: • Transmission date and time • Type (whether received or sent) • Fax number • Duration •...
...every fax you send and receive. Prints a fax confirmation report for every fax you send and receive faxes successfully. Press right arrow to select one of the fax on Fax Send Report menu. Send & Receive Off On Fax Send On Fax Receive Prints whenever a fax error occurs. ... 2. Press right arrow to select Fax Confirmation, and then press OK. 4. TIP: If you choose On Fax Send or Send & Receive, and scan your fax to select one of the following information: • Transmission date and time • Type (whether received or sent) • Fax number • Duration •...
User Guide
Page 97
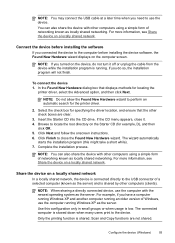
... Share the device on a locally shared network. Click Finish to locate the root directory on the device, do so, the installation program will not finish. Scan and Copy functions are clear. 3. NOTE: If you turned on the Starter CD (for locating the printer driver, select the Advanced option, and then click...
... Share the device on a locally shared network. Click Finish to locate the root directory on the device, do so, the installation program will not finish. Scan and Copy functions are clear. 3. NOTE: If you turned on the Starter CD (for locating the printer driver, select the Advanced option, and then click...
User Guide
Page 102
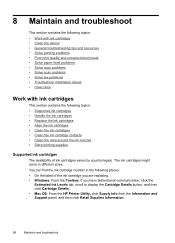
... Solve printing problems • Poor print quality and unexpected printouts • Solve paper-feed problems • Solve copy problems • Solve scan problems • Solve fax problems • Troubleshoot installation issues • Clear jams Work with ink cartridges This section contains the following places:...Ink Levels tab, scroll to display the Cartridge Details button, and then click Cartridge Details. • Mac OS: From the HP Printer Utility, click Supply Info from the Information and Support panel, and then click Retail Supplies Information. 98 Maintain and troubleshoot ...
... Solve printing problems • Poor print quality and unexpected printouts • Solve paper-feed problems • Solve copy problems • Solve scan problems • Solve fax problems • Troubleshoot installation issues • Clear jams Work with ink cartridges This section contains the following places:...Ink Levels tab, scroll to display the Cartridge Details button, and then click Cartridge Details. • Mac OS: From the HP Printer Utility, click Supply Info from the Information and Support panel, and then click Retail Supplies Information. 98 Maintain and troubleshoot ...
User Guide
Page 113
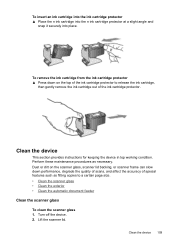
... keeping the device in top working condition. To remove the ink cartridge from the ink cartridge protector ▲ Press down performance, degrade the quality of scans, and affect the accuracy of the ink cartridge protector.
... keeping the device in top working condition. To remove the ink cartridge from the ink cartridge protector ▲ Press down performance, degrade the quality of scans, and affect the accuracy of the ink cartridge protector.


