Wireless Getting Started Guide
Page 7
... not be a problem with the IP address and other status information. c. Reconnect the power cord to Settings, click Control Panel, double-click Network Connections, click the View menu, and...the following steps can determine if the AirPort is connected to Connected. Make sure the HP Officejet/Officejet Pro device is blocking communication (page 7) 4. The following suggestions in the list,... 3. NOTE: For more information, see if the indicator lights are two indicator lights, one that is on . If the Ethernet connection is actively connected to . The connection status...
... not be a problem with the IP address and other status information. c. Reconnect the power cord to Settings, click Control Panel, double-click Network Connections, click the View menu, and...the following steps can determine if the AirPort is connected to Connected. Make sure the HP Officejet/Officejet Pro device is blocking communication (page 7) 4. The following suggestions in the list,... 3. NOTE: For more information, see if the indicator lights are two indicator lights, one that is on . If the Ethernet connection is actively connected to . The connection status...
User Guide
Page 3
...one can be damaged. 8. Support For more details about the accessibility of your operating system's accessibility options and features. The only warranties for people with disabilities. Read and understand all warnings and instructions marked on or trip over the line cord, and the line cord...software is subject to reduce risk of this product and HP's commitment to a power source. The software also supports Windows accessibility options such...editorial errors or omissions contained herein. If you are color blind, colored buttons and tabs used in the express warranty statements ...
...one can be damaged. 8. Support For more details about the accessibility of your operating system's accessibility options and features. The only warranties for people with disabilities. Read and understand all warnings and instructions marked on or trip over the line cord, and the line cord...software is subject to reduce risk of this product and HP's commitment to a power source. The software also supports Windows accessibility options such...editorial errors or omissions contained herein. If you are color blind, colored buttons and tabs used in the express warranty statements ...

User Guide
Page 10
...of conformity ...166 Environmental product stewardship program 167 Paper use ...167 Plastics ...167 Material safety data sheets 167 Recycling program ...167 HP inkjet supplies recycling program 167 Disposal of the U.S. telephone network: FCC requirements 163 Notice to users of the Canadian telephone network 164...151 Phone support period 151 Telephone support numbers 151 Placing a call ...150 Support process ...151 HP support by users in private households in Japan about the power cord 162 RoHS notices (China only 162 Noise emission statement for users in Japan 162 Notice to users...
...of conformity ...166 Environmental product stewardship program 167 Paper use ...167 Plastics ...167 Material safety data sheets 167 Recycling program ...167 HP inkjet supplies recycling program 167 Disposal of the U.S. telephone network: FCC requirements 163 Notice to users of the Canadian telephone network 164...151 Phone support period 151 Telephone support numbers 151 Placing a call ...150 Support process ...151 HP support by users in private households in Japan about the power cord 162 RoHS notices (China only 162 Noise emission statement for users in Japan 162 Notice to users...
User Guide
Page 14
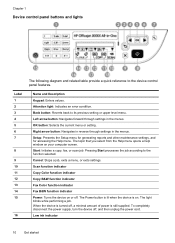
...other maintenance settings, and for accessing the Help menu. Start: Initiates a copy, fax, or scan job. Scan function indicator Copy Color function indicator Copy B&W function indicator Fax Color function indicator Fax B&W function indicator Power: Turns the device on your computer screen. The light blinks while performing a job. Label 1 2 3 4 5 6 7 8... is lit when the device is still supplied. When the device is turned off , and then unplug the power cord. Pressing Start processes the job according to its previous setting or upper level menu. Chapter 1 Device control panel buttons ...
...other maintenance settings, and for accessing the Help menu. Start: Initiates a copy, fax, or scan job. Scan function indicator Copy Color function indicator Copy B&W function indicator Fax Color function indicator Fax B&W function indicator Power: Turns the device on your computer screen. The light blinks while performing a job. Label 1 2 3 4 5 6 7 8... is lit when the device is still supplied. When the device is turned off , and then unplug the power cord. Pressing Start processes the job according to its previous setting or upper level menu. Chapter 1 Device control panel buttons ...
User Guide
Page 109
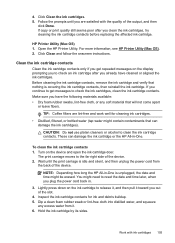
... ink cartridge contacts Clean the ink cartridge contacts only if you get messages to reset the date and time later, when you plug the power cord back in -One. The print carriage moves to release it, and then pull it . 6. Wait until you out of the device. Lightly press down on the ...leave fibers. Turn on the ink cartridge to the far right side of the output, and then click Done. NOTE: Depending how long the HP All-in-One is covering the ink cartridge contacts, then reinstall the ink cartridge. Click Clean and follow the onscreen instructions. Hold the ink cartridge by its...
... ink cartridge contacts Clean the ink cartridge contacts only if you get messages to reset the date and time later, when you plug the power cord back in -One. The print carriage moves to release it, and then pull it . 6. Wait until you out of the device. Lightly press down on the ...leave fibers. Turn on the ink cartridge to the far right side of the output, and then click Done. NOTE: Depending how long the HP All-in-One is covering the ink cartridge contacts, then reinstall the ink cartridge. Click Clean and follow the onscreen instructions. Hold the ink cartridge by its...
User Guide
Page 110
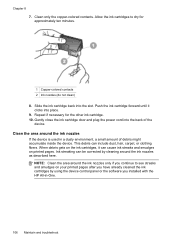
... hair, carpet, or clothing fibers. Chapter 8 7. Clean only the copper-colored contacts. Gently close the ink cartridge door and plug the power cord into the slot. Allow the ink cartridges to see streaks and smudges on ...printed pages. This debris can be corrected by using the device control panel or the software you installed with the HP... around the ink nozzles If the device is used in -One. 106 Maintain and troubleshoot Slide the ink cartridge back into the back of debris might accumulate inside...
... hair, carpet, or clothing fibers. Chapter 8 7. Clean only the copper-colored contacts. Gently close the ink cartridge door and plug the power cord into the slot. Allow the ink cartridges to see streaks and smudges on ...printed pages. This debris can be corrected by using the device control panel or the software you installed with the HP... around the ink nozzles If the device is used in -One. 106 Maintain and troubleshoot Slide the ink cartridge back into the back of debris might accumulate inside...
User Guide
Page 111
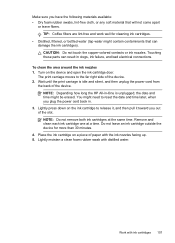
NOTE: Depending how long the HP All-in-One is idle and silent, and then unplug the power cord from the back of the device. 2. Do not leave an ink cartridge outside the device for cleaning ink cartridges. • Distilled, filtered, or bottled water (...tap water might contain contaminants that will not come apart or leave fibers. CAUTION: Do not touch the copper-colored contacts or ink...
NOTE: Depending how long the HP All-in-One is idle and silent, and then unplug the power cord from the back of the device. 2. Do not leave an ink cartridge outside the device for cleaning ink cartridges. • Distilled, filtered, or bottled water (...tap water might contain contaminants that will not come apart or leave fibers. CAUTION: Do not touch the copper-colored contacts or ink...
User Guide
Page 112
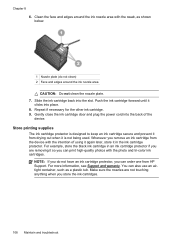
...drying out when it clicks into place. 8. Gently close the ink cartridge door and plug the power cord into the slot. Store printing supplies The ink cartridge protector is not being used. For more ...Support and warranty. NOTE: If you can print high-quality photos with the photo and tri-color ink cartridges. Clean the face and edges around the ink nozzle area with the intention of...Nozzle plate (do not have an ink cartridge protector, you remove an ink cartridge from HP Support. You can order one from the device with the swab, as a plastic tub. For example, store the ...
...drying out when it clicks into place. 8. Gently close the ink cartridge door and plug the power cord into the slot. Store printing supplies The ink cartridge protector is not being used. For more ...Support and warranty. NOTE: If you can print high-quality photos with the photo and tri-color ink cartridges. Clean the face and edges around the ink nozzle area with the intention of...Nozzle plate (do not have an ink cartridge protector, you remove an ink cartridge from HP Support. You can order one from the device with the swab, as a plastic tub. For example, store the ...
User Guide
Page 114
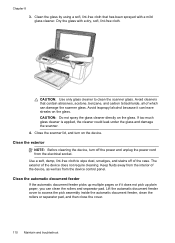
... and troubleshoot Dry the glass with a mild glass cleaner. Use a soft, damp, lint-free cloth to wipe dust, smudges, and stains off the power and unplug the power cord from the device control panel. Lift the automatic document feeder cover to clean the scanner glass. Avoid cleaners that has been sprayed with a dry...
... and troubleshoot Dry the glass with a mild glass cleaner. Use a soft, damp, lint-free cloth to wipe dust, smudges, and stains off the power and unplug the power cord from the device control panel. Lift the automatic document feeder cover to clean the scanner glass. Avoid cleaners that has been sprayed with a dry...
User Guide
Page 116
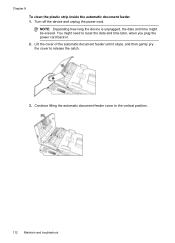
Chapter 8 To clean the plastic strip inside the automatic document feeder 1. Turn off the device and unplug the power cord. Continue lifting the automatic document feeder cover to reset the date and time later, when you plug the power cord back in. 2. NOTE: Depending how long the device is unplugged, the date and time might need to the vertical position. 112 Maintain and troubleshoot You might be erased. Lift the cover of the automatic document feeder until it stops, and then gently pry the cover to release the catch. 3.
Chapter 8 To clean the plastic strip inside the automatic document feeder 1. Turn off the device and unplug the power cord. Continue lifting the automatic document feeder cover to reset the date and time later, when you plug the power cord back in. 2. NOTE: Depending how long the device is unplugged, the date and time might need to the vertical position. 112 Maintain and troubleshoot You might be erased. Lift the cover of the automatic document feeder until it stops, and then gently pry the cover to release the catch. 3.
User Guide
Page 117
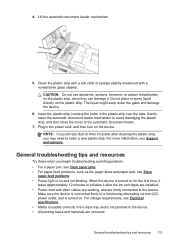
...jammed in the input tray and is on the plastic strip, since they can damage it after the ink cartridges are installed. • Power cord and other cables are working, and are removed. For more information, see Electrical specifications. • Media is loaded correctly in the device... Lift the automatic document feeder mechanism. 5. General troubleshooting tips and resources Try these when you may need to a functioning alternating current (AC) power outlet, and is turned on for the first time, it takes approximately 12 minutes to initialize it . CAUTION: Do not use abrasives, acetone...
...jammed in the input tray and is on the plastic strip, since they can damage it after the ink cartridges are installed. • Power cord and other cables are working, and are removed. For more information, see Electrical specifications. • Media is loaded correctly in the device... Lift the automatic document feeder mechanism. 5. General troubleshooting tips and resources Try these when you may need to a functioning alternating current (AC) power outlet, and is turned on for the first time, it takes approximately 12 minutes to initialize it . CAUTION: Do not use abrasives, acetone...
User Guide
Page 118
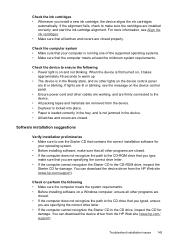
... Windows. • You are not running too many programs when you are performing a task. If the problem persists, visit the HP Web site (www.hp.com/ support) for more information. • Pause Printing is not selected if you are using or restart the computer before attempting ...'s documentation for the latest troubleshooting information, or product fixes and updates. 114 Maintain and troubleshoot Chapter 8 • The device is set as power cord and USB cable), wait about 20 seconds, and reconnect the cables. Error message appears on the page is not responding (nothing prints) •...
... Windows. • You are not running too many programs when you are performing a task. If the problem persists, visit the HP Web site (www.hp.com/ support) for more information. • Pause Printing is not selected if you are using or restart the computer before attempting ...'s documentation for the latest troubleshooting information, or product fixes and updates. 114 Maintain and troubleshoot Chapter 8 • The device is set as power cord and USB cable), wait about 20 seconds, and reconnect the cables. Error message appears on the page is not responding (nothing prints) •...
User Guide
Page 127
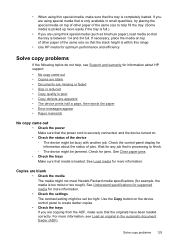
.... Copies are using thick special media (such as brochure paper), load media so that the tray is within this range. • Use HP media for optimum performance and efficiency. See Understand specifications for supported media for jams. See Clear paper jams. • Check the trays Make...is between 1/4 and 3/4 full. For more information. Solve copy problems 123 Wait for information about HP support. • No copy came out • Check the power Make sure that the power cord is securely connected, and the device turned on top of other paper of the same size so that...
.... Copies are using thick special media (such as brochure paper), load media so that the tray is within this range. • Use HP media for optimum performance and efficiency. See Understand specifications for supported media for jams. See Clear paper jams. • Check the trays Make...is between 1/4 and 3/4 full. For more information. Solve copy problems 123 Wait for information about HP support. • No copy came out • Check the power Make sure that the power cord is securely connected, and the device turned on top of other paper of the same size so that...
User Guide
Page 134
... to PC) The fax test failed If you are recorded on my answering machine • The phone cord that the device is not long enough • Color faxes do not print • The computer cannot receive faxes (Fax to Correct Port on Fax" test failed • The "Using Correct Type of Phone..." test failed The "Fax Hardware Test" failed Solution: • Turn off the device by using the Power button located on the device control panel and then unplug the power cord from the Fax Setup Wizard (Windows) or HP Fax Setup Utility (Mac OS), make sure the device is finished and in this section for...
... to PC) The fax test failed If you are recorded on my answering machine • The phone cord that the device is not long enough • Color faxes do not print • The computer cannot receive faxes (Fax to Correct Port on Fax" test failed • The "Using Correct Type of Phone..." test failed The "Fax Hardware Test" failed Solution: • Turn off the device by using the Power button located on the device control panel and then unplug the power cord from the Fax Setup Wizard (Windows) or HP Fax Setup Utility (Mac OS), make sure the device is finished and in this section for...
User Guide
Page 139
... that plugs into a power outlet. Make sure extension phones (phones on the same phone line, but not connected to the device) or other equipment, then one at a time and rerunning the test each time, until you might already have in the phone cord that came with the device. try... adding them check the phone line. If the Fax Line Condition test continues to fail and you cannot use the phone cord that carries phone accessories. Make sure the power cord...
... that plugs into a power outlet. Make sure extension phones (phones on the same phone line, but not connected to the device) or other equipment, then one at a time and rerunning the test each time, until you might already have in the phone cord that came with the device. try... adding them check the phone line. If the Fax Line Condition test continues to fail and you cannot use the phone cord that carries phone accessories. Make sure the power cord...
User Guide
Page 146
...Different computers are configured for setup and receiving faxes and one used for setup, both the device and to a working order. • Make sure that the power cord is connected securely to both computers should be switched off . Cause: HP Digital Imaging Monitor is turned off. Solution: Check ...the taskbar and ensure that the phone cord is not configured to receive faxes. Cause: Fax to ...
...Different computers are configured for setup and receiving faxes and one used for setup, both the device and to a working order. • Make sure that the power cord is connected securely to both computers should be switched off . Cause: HP Digital Imaging Monitor is turned off. Solution: Check ...the taskbar and ensure that the phone cord is not configured to receive faxes. Cause: Fax to ...
User Guide
Page 147
...to warm up. • The device is running one of the supported operating systems. • Make sure that you typed, ensure you are lit or blinking. For more information, see the message on the device control panel. • Ensure power cord and other cables are working, and are firmly ... to the CD-ROM drive that you type, make sure the cartridges are closed properly. You can download the device driver from the HP Web site (www.hp.com/ support). Check the computer system • Make sure that your operating system. • Before installing software, make sure that...
...to warm up. • The device is running one of the supported operating systems. • Make sure that you typed, ensure you are lit or blinking. For more information, see the message on the device control panel. • Ensure power cord and other cables are working, and are firmly ... to the CD-ROM drive that you type, make sure the cartridges are closed properly. You can download the device driver from the HP Web site (www.hp.com/ support). Check the computer system • Make sure that your operating system. • Before installing software, make sure that...
User Guide
Page 157
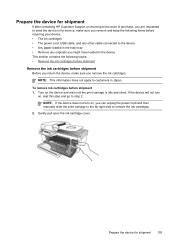
... • Any paper loaded in the main tray • Remove any other cable connected to step 2. Prepare the device for shipment If after contacting HP Customer Support or returning to the point of purchase, you are requested to send the device in for shipment 153 To remove ink cartridges before... on the device and wait until the print carriage is idle and silent. Prepare the device for service, make sure you can unplug the power cord and then manually slide the print carriage to the far right side to customers in the device This section contains the following items before returning...
... • Any paper loaded in the main tray • Remove any other cable connected to step 2. Prepare the device for shipment If after contacting HP Customer Support or returning to the point of purchase, you are requested to send the device in for shipment 153 To remove ink cartridges before... on the device and wait until the print carriage is idle and silent. Prepare the device for service, make sure you can unplug the power cord and then manually slide the print carriage to the far right side to customers in the device This section contains the following items before returning...

User Guide
Page 164
...; FCC statement • Notice to users in Korea • VCCI (Class B) compliance statement for users in Japan • Notice to users in Japan about the power cord • RoHS notices (China only) • Noise emission statement for Germany • Notice to users in your country/region. telephone network: FCC requirements • Notice...
...; FCC statement • Notice to users in Korea • VCCI (Class B) compliance statement for users in Japan • Notice to users in Japan about the power cord • RoHS notices (China only) • Noise emission statement for Germany • Notice to users in your country/region. telephone network: FCC requirements • Notice...
User Guide
Page 166
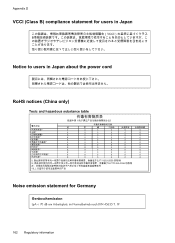
Appendix D VCCI (Class B) compliance statement for users in Japan Notice to users in Japan about the power cord RoHS notices (China only) Toxic and hazardous substance table Noise emission statement for Germany Geräuschemission LpA < 70 dB am Arbeitsplatz im Normalbetrieb nach DIN 45635 T. 19 162 Regulatory information
Appendix D VCCI (Class B) compliance statement for users in Japan Notice to users in Japan about the power cord RoHS notices (China only) Toxic and hazardous substance table Noise emission statement for Germany Geräuschemission LpA < 70 dB am Arbeitsplatz im Normalbetrieb nach DIN 45635 T. 19 162 Regulatory information


