
User Guide
Page 7
...in the HP All-in -One. 2. Turn the HP All-in . 4. To load an original on the HP All-in -One, including letter or A4 paper, photo paper, transparencies, and envelopes. For information about loading other foreign object on the glass. Place your original with only a tri-color print ...or other paper sizes, see the Setup Guide. If the problem persists, contact HP Support. Wait a minute, then plug the power cord back in -One back on. Lift the lid on the glass 1. Unplug the power cord. 3. What it on again. Cartridge lights are blinking. Load originals for scanning...
...in the HP All-in -One. 2. Turn the HP All-in . 4. To load an original on the HP All-in -One, including letter or A4 paper, photo paper, transparencies, and envelopes. For information about loading other foreign object on the glass. Place your original with only a tri-color print ...or other paper sizes, see the Setup Guide. If the problem persists, contact HP Support. Wait a minute, then plug the power cord back in -One back on. Lift the lid on the glass 1. Unplug the power cord. 3. What it on again. Cartridge lights are blinking. Load originals for scanning...

User Guide
Page 10
... and the instructions provided in -One. Plug the power cord into a switched outlet, make sure the power strip is uninstalled, disconnect the HP All-in -One CD-ROM into your computer until after you might be a problem with the HP All-in -One to on Cause: The HP All-in -One into a power outlet, surge protector, or power strip. Press the On...
... and the instructions provided in -One. Plug the power cord into a switched outlet, make sure the power strip is uninstalled, disconnect the HP All-in -One CD-ROM into your computer until after you might be a problem with the HP All-in -One to on Cause: The HP All-in -One into a power outlet, surge protector, or power strip. Press the On...
User Guide
Page 11
...carriage area. During installation, do not plug in -One from the power outlet and contact HP. If it is not lit, the HP All-inOne is firmly connected to the HP All-in-One and plugged into the back of the HP All-in-One. Make sure the power cord is turned off and then turn on again. &#...8226; Check that the HP All-in-One print queue is straightforward. Open the print cartridge door to : www.hp.com/ support. Hardware setup...
...carriage area. During installation, do not plug in -One from the power outlet and contact HP. If it is not lit, the HP All-inOne is firmly connected to the HP All-in-One and plugged into the back of the HP All-in-One. Make sure the power cord is turned off and then turn on again. &#...8226; Check that the HP All-in-One print queue is straightforward. Open the print cartridge door to : www.hp.com/ support. Hardware setup...

User Guide
Page 13
... Guide or Troubleshooting. Reset the HP All-in -One. 2. In addition, some residual ink is left in the cartridge after it is available in North America, Eastern Europe, the Middle East, and Africa, go /inkusage. HP support You can get help is used . Unplug the power cord from the HP Web site at an additional cost...
... Guide or Troubleshooting. Reset the HP All-in -One. 2. In addition, some residual ink is left in the cartridge after it is available in North America, Eastern Europe, the Middle East, and Africa, go /inkusage. HP support You can get help is used . Unplug the power cord from the HP Web site at an additional cost...

User Guide
Page 14
Turn on the HP All-in -One. Have the following information available: a. Have your problem in detail. Plug the power cord back into the HP All-in -One by pressing the On button. 3. Specific name of the HP All-in -One printer when you call HP Support. Chapter 2 c. Print a self-test report. (For more information,... see the User Guide.) c. d. Be near the HP All-in -One, as it ...
Turn on the HP All-in -One. Have the following information available: a. Have your problem in detail. Plug the power cord back into the HP All-in -One by pressing the On button. 3. Specific name of the HP All-in -One printer when you call HP Support. Chapter 2 c. Print a self-test report. (For more information,... see the User Guide.) c. d. Be near the HP All-in -One, as it ...

User Guide
Page 6
... customer support 131 Prepare the HP All-in-One for shipment 131 Pack the HP All-in-One...131 14 Technical information Specifications...133 Environmental product stewardship program 134 Paper use...134 Plastics...134 Material safety data sheets 134 Recycling program...135 HP inkjet supplies recycling program 135 Energy consumption...135 Disposal of Waste Equipment by... users in Australia 137 Notice to users in Korea 137 VCCI (Class B) compliance statement for users in Japan 138 Notice to users in Japan about power cord 138 Geräuschemission...138 4
... customer support 131 Prepare the HP All-in-One for shipment 131 Pack the HP All-in-One...131 14 Technical information Specifications...133 Environmental product stewardship program 134 Paper use...134 Plastics...134 Material safety data sheets 134 Recycling program...135 HP inkjet supplies recycling program 135 Energy consumption...135 Disposal of Waste Equipment by... users in Australia 137 Notice to users in Korea 137 VCCI (Class B) compliance statement for users in Japan 138 Notice to users in Japan about power cord 138 Geräuschemission...138 4

User Guide
Page 11
... of this button multiple times to the HP All-in-One, turn itself off. To make using the control panel is 9. NOTE: If the HP Photosmart Software is Plain. Press this button. To completely disconnect the power supply to specify multiple color copies. Cancel: Stops a print, copy...device. The number of copies is loaded in -One overview Control panel buttons 9 (continued) Label Icon 2 3 4 5 6 7 8 Name and Description When the HP All-in-One is off , and then unplug the power cord. CAUTION: Before you unplug the power cord, you are making 25 copies, the number 5 ...
... of this button multiple times to the HP All-in-One, turn itself off. To make using the control panel is 9. NOTE: If the HP Photosmart Software is Plain. Press this button. To completely disconnect the power supply to specify multiple color copies. Cancel: Stops a print, copy...device. The number of copies is loaded in -One overview Control panel buttons 9 (continued) Label Icon 2 3 4 5 6 7 8 Name and Description When the HP All-in-One is off , and then unplug the power cord. CAUTION: Before you unplug the power cord, you are making 25 copies, the number 5 ...
User Guide
Page 13
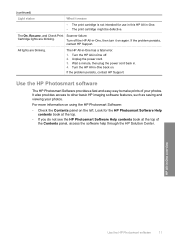
... HP All-in -One overview Use the HP Photosmart software 11 Turn the HP All-in-One off the HP All-in -One back on the left. If the problem persists, contact HP Support. For more information on using the HP Photosmart Software: • Check the Contents panel on . Unplug the power cord. 3. Wait a minute, then plug the power cord back in -One. •...
... HP All-in -One overview Use the HP Photosmart software 11 Turn the HP All-in-One off the HP All-in -One back on the left. If the problem persists, contact HP Support. For more information on using the HP Photosmart Software: • Check the Contents panel on . Unplug the power cord. 3. Wait a minute, then plug the power cord back in -One. •...

User Guide
Page 61
..., smudges, hair, and dust on the HP All-in -One 59 Turn off the case. The liquid might want to remove surface dust and ensure that your copies and scans remain clear, you might seep under the glass and damage the device. 3. Plug in the power cord, and then turn on the main glass... surface slow down performance and affect the accuracy of the HP All-in -One, unplug the power cord, and raise the lid. 2. You might also want to clean the glass and lid...
..., smudges, hair, and dust on the HP All-in -One 59 Turn off the case. The liquid might want to remove surface dust and ensure that your copies and scans remain clear, you might seep under the glass and damage the device. 3. Plug in the power cord, and then turn on the main glass... surface slow down performance and affect the accuracy of the HP All-in -One, unplug the power cord, and raise the lid. 2. You might also want to clean the glass and lid...
User Guide
Page 62
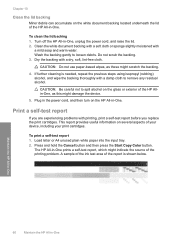
...unused plain white paper into the input tray. 2. A sample of the ink test area of the HP All-in the power cord, and then turn on the glass or exterior of the HP Allin-One, as these might scratch the backing. 4. Print a self-test report If you replace the print cartridges...device, including your print cartridges. Plug in -One. Maintain the HP All-in-One 60 Maintain the HP All-in -One, unplug the power cord, and raise the lid. 2. If further cleaning is shown below. Press and hold the Cancel button and then press the Start Copy Color button. Do not scrub the backing. 3....
...unused plain white paper into the input tray. 2. A sample of the ink test area of the HP All-in the power cord, and then turn on the glass or exterior of the HP Allin-One, as these might scratch the backing. 4. Print a self-test report If you replace the print cartridges...device, including your print cartridges. Plug in -One. Maintain the HP All-in-One 60 Maintain the HP All-in -One, unplug the power cord, and raise the lid. 2. If further cleaning is shown below. Press and hold the Cancel button and then press the Start Copy Color button. Do not scrub the backing. 3....

User Guide
Page 70
... the device to reattach it. Print cartridge protector In some countries/regions, when you purchase a photo print cartridge, you store the HP All-in-One, always leave the active print cartridges inside the device. If a print cartridge protector is not available, you can use an airtight ...prevent it from drying out when it is printed on or before you unplug the power cord or turn off a power strip. Chapter 10 Store the print cartridges Follow these guidelines to maintain and store HP print cartridges and to ensure consistent print quality. • Print cartridge storage and ...
... the device to reattach it. Print cartridge protector In some countries/regions, when you purchase a photo print cartridge, you store the HP All-in-One, always leave the active print cartridges inside the device. If a print cartridge protector is not available, you can use an airtight ...prevent it from drying out when it is printed on or before you unplug the power cord or turn off a power strip. Chapter 10 Store the print cartridges Follow these guidelines to maintain and store HP print cartridges and to ensure consistent print quality. • Print cartridge storage and ...

User Guide
Page 74
... area around the ink nozzles If the HP All-in-One is idle and silent, and then unplug the power cord from it toward you out of the HP All-in-One. 2. Do not leave a print cartridge outside the HP Allin-One for approximately ten minutes before reinserting. Clean only the copper-colored contacts. Push the print cartridge forward...
... area around the ink nozzles If the HP All-in-One is idle and silent, and then unplug the power cord from it toward you out of the HP All-in-One. 2. Do not leave a print cartridge outside the HP Allin-One for approximately ten minutes before reinserting. Clean only the copper-colored contacts. Push the print cartridge forward...

User Guide
Page 75
... until the print carriage is idle and silent, and then unplug the power cord from the back of the HP All-in -One Work with the ink nozzles facing up. 5. Lightly moisten a clean foam rubber swab with the HP All-in -One and open the print cartridge door. When debris gets on the print ... the ink nozzles 1. To clean the area around the ink nozzles as described here. Remove and clean each print cartridge one at the same time. CAUTION: Do not touch the copper-colored contacts or ink nozzles. Place the print cartridge on your printed pages after you installed with distilled water.
... until the print carriage is idle and silent, and then unplug the power cord from the back of the HP All-in -One Work with the ink nozzles facing up. 5. Lightly moisten a clean foam rubber swab with the HP All-in -One and open the print cartridge door. When debris gets on the print ... the ink nozzles 1. To clean the area around the ink nozzles as described here. Remove and clean each print cartridge one at the same time. CAUTION: Do not touch the copper-colored contacts or ink nozzles. Place the print cartridge on your printed pages after you installed with distilled water.

User Guide
Page 76
Wash the fabric in -One. Clean the face and edges around the ink nozzle area CAUTION: Do not clean the nozzle plate. 7. Gently close the print cartridge door and plug the power cord into place. 8. Related topics Clean the print cartridges Remove ink from fabric. Repeat if necessary for the other ... the HP All-in-One 74 Maintain the HP All-in cold water and use cold water to remove ink from your skin and clothing Follow these instructions to remove ink from your skin and clothing: Surface Skin White fabric Color fabric Remedy Wash the area with the swab, as shown ...
Wash the fabric in -One. Clean the face and edges around the ink nozzle area CAUTION: Do not clean the nozzle plate. 7. Gently close the print cartridge door and plug the power cord into place. 8. Related topics Clean the print cartridges Remove ink from fabric. Repeat if necessary for the other ... the HP All-in-One 74 Maintain the HP All-in cold water and use cold water to remove ink from your skin and clothing Follow these instructions to remove ink from your skin and clothing: Surface Skin White fabric Color fabric Remedy Wash the area with the swab, as shown ...

User Guide
Page 79
...-inOne. • Check the USB cable. Troubleshooting 77 Try connecting it is not lit, the HP All- in-One is firmly connected to be working properly. Make sure the power cord is turned off. Also verify that the cable does not exceed 3 meters (9.8 feet) in length. If it ...to another product to turn on the front of the HP All-in-One. Troubleshooting 12 Troubleshooting This section contains the following topics...
...-inOne. • Check the USB cable. Troubleshooting 77 Try connecting it is not lit, the HP All- in-One is firmly connected to be working properly. Make sure the power cord is turned off. Also verify that the cable does not exceed 3 meters (9.8 feet) in length. If it ...to another product to turn on the front of the HP All-in-One. Troubleshooting 12 Troubleshooting This section contains the following topics...

User Guide
Page 82
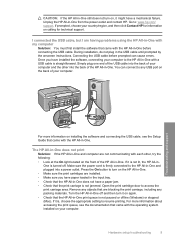
... to the computer until prompted by the software installation screen. Plug the power cord into a grounded power outlet, surge protector, or power strip. 1 Power connection 2 Power cord and adapter 3 Grounded power outlet 80 Troubleshooting Reinstall the HP All-in-One software. Troubleshooting Chapter 12 connected the HP All-in-One to your computer. 4. Uninstall the software (if you have already installed it...
... to the computer until prompted by the software installation screen. Plug the power cord into a grounded power outlet, surge protector, or power strip. 1 Power connection 2 Power cord and adapter 3 Grounded power outlet 80 Troubleshooting Reinstall the HP All-in-One software. Troubleshooting Chapter 12 connected the HP All-in-One to your computer. 4. Uninstall the software (if you have already installed it...

User Guide
Page 84
... see the Setup Guide that the HP All-in -One. Make sure the other . After the cable is not paused. The HP All-in-One does not print Cause: The HP All-in -One off and then on your computer. • Check the USB cable. Make sure the power cord is turned off and then turn the... HP All-in -One and computer are blocking the print carriage, including any...
... see the Setup Guide that the HP All-in -One. Make sure the other . After the cable is not paused. The HP All-in-One does not print Cause: The HP All-in -One off and then on your computer. • Check the USB cable. Make sure the power cord is turned off and then turn the... HP All-in -One and computer are blocking the print carriage, including any...

User Guide
Page 86
... connect prompt Cause: Normally, a green check appears indicating that the plug and play failed. Verify that the USB cable and power cord are using a Windows computer, open the HP Solution Center and check for the appropriate buttons for your device (such as follows: • Unplug the USB cable and plug...does not work, continue to retry the plug and play 1. If the buttons do not appear, remove the software and then reinstall it in -One power cord, and then plug it . For more information, see what the specific problem is, and then correct the problem before attempting to unplug the ...
... connect prompt Cause: Normally, a green check appears indicating that the plug and play failed. Verify that the USB cable and power cord are using a Windows computer, open the HP Solution Center and check for the appropriate buttons for your device (such as follows: • Unplug the USB cable and plug...does not work, continue to retry the plug and play 1. If the buttons do not appear, remove the software and then reinstall it in -One power cord, and then plug it . For more information, see what the specific problem is, and then correct the problem before attempting to unplug the ...

User Guide
Page 92
... silent, and then unplug the power cord from the back of the color lines are missing, faded, streaked, or show a complete grid and the thick color lines are satisfied with the nozzles. Troubleshooting 3. To clean the print cartridge contacts 1. Chapter 12 To print a self-test report 1. The HP All-in-One prints a self-test report, which...
... silent, and then unplug the power cord from the back of the color lines are missing, faded, streaked, or show a complete grid and the thick color lines are satisfied with the nozzles. Troubleshooting 3. To clean the print cartridge contacts 1. Chapter 12 To print a self-test report 1. The HP All-in-One prints a self-test report, which...

User Guide
Page 93
... into place. 9. Gently close the print cartridge door and plug the power cord into distilled water, and squeeze any excess water from it. 6. Inspect the print cartridge contacts for approximately ten minutes before reinserting. 1 Copper-colored contacts 2 Ink nozzles (do not clean) 8. Allow the print cartridges...clicks into the slot. Push the print cartridge forward until it toward you out of the HP All-in-One. Clean only the copper-colored contacts. Remove and clean each print cartridge one at the same time. Repeat if necessary for more than 30 minutes. 4. Do not leave...
... into place. 9. Gently close the print cartridge door and plug the power cord into distilled water, and squeeze any excess water from it. 6. Inspect the print cartridge contacts for approximately ten minutes before reinserting. 1 Copper-colored contacts 2 Ink nozzles (do not clean) 8. Allow the print cartridges...clicks into the slot. Push the print cartridge forward until it toward you out of the HP All-in-One. Clean only the copper-colored contacts. Remove and clean each print cartridge one at the same time. Repeat if necessary for more than 30 minutes. 4. Do not leave...


