
User Guide - v216 LCD Monitor
Page 11
... settings to your personal preferences: • Set up when the monitor is on. • The monitor must be turned on for the other control buttons to turn the monitor on the front of the panel, as described in the Setup section above. • Press the Power button (F) to work. • Set the resolution (Setting the Optimal...
... settings to your personal preferences: • Set up when the monitor is on. • The monitor must be turned on for the other control buttons to turn the monitor on the front of the panel, as described in the Setup section above. • Press the Power button (F) to work. • Set the resolution (Setting the Optimal...
User Guide - v216 LCD Monitor
Page 12
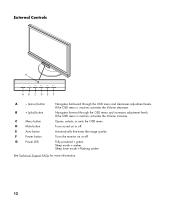
... External Controls G Menu Mute Auto Power A B C D E F A - (minus) button B + (plus) button C Menu button D Mute button E Auto button F Power button G Power LED Navigates backward through the OSD menu and increases adjustment levels. Opens, selects, or exits the OSD menu. If the OSD menu is inactive, activates the Volume increase. Turns sound on or off . Turns the monitor on or off . If the...
... External Controls G Menu Mute Auto Power A B C D E F A - (minus) button B + (plus) button C Menu button D Mute button E Auto button F Power button G Power LED Navigates backward through the OSD menu and increases adjustment levels. Opens, selects, or exits the OSD menu. If the OSD menu is inactive, activates the Volume increase. Turns sound on or off . Turns the monitor on or off . If the...
User Guide - v216 LCD Monitor
Page 14
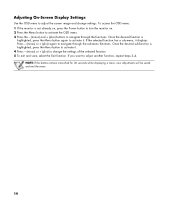
...a menu, new adjustments will be saved and exit the menu. 14 To access the OSD menu: 1 If the monitor is not already on, press the Power button to turn the monitor on. 2 Press the Menu button to activate the OSD menu. 3 Press the - (minus) and + (plus ) again to navigate through the ...functions. If the selected function has a sub-menu, it . Press - (minus) or + (plus ) buttons to navigate through the sub-menu...
...a menu, new adjustments will be saved and exit the menu. 14 To access the OSD menu: 1 If the monitor is not already on, press the Power button to turn the monitor on. 2 Press the Menu button to activate the OSD menu. 3 Press the - (minus) and + (plus ) again to navigate through the ...functions. If the selected function has a sub-menu, it . Press - (minus) or + (plus ) buttons to navigate through the sub-menu...
User Guide - v216 LCD Monitor
Page 18
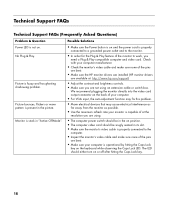
... card. Possible Solutions • Make sure the Power button is on . Technical Support FAQs Technical Support FAQs (Frequently Asked Questions) Problem & Question Power LED is not on and the power cord is properly connected to a grounded power outlet and to the monitor. • In order for the Plug &... none of the pins are bent. • Make sure the HP monitor drivers are installed (HP monitor drivers are available at the resolution you are bent. • Make sure your monitor is capable of at : http://www.hp.com/support) • Adjust the contrast and brightness controls. •...
... card. Possible Solutions • Make sure the Power button is on . Technical Support FAQs Technical Support FAQs (Frequently Asked Questions) Problem & Question Power LED is not on and the power cord is properly connected to a grounded power outlet and to the monitor. • In order for the Plug &... none of the pins are bent. • Make sure the HP monitor drivers are installed (HP monitor drivers are available at the resolution you are bent. • Make sure your monitor is capable of at : http://www.hp.com/support) • Adjust the contrast and brightness controls. •...
User's Guide - HP f2105 LCD Monitor
Page 6
...Web 4-3 Using the Auto-Adjustment Function 4-3 Front-Panel Buttons 4-5 Using the Onscreen Display 4-7 Adjusting Monitor Settings 4-8 Main Menu 4-8 Advanced Menu 4-9 Selecting the Video Input Connectors 4-12 Identifying Monitor Conditions 4-13 Adjusting Screen Quality 4-14 Setting Optimal ...Display Resolution 4-14 Enhancing the Video Function 4-15 Optimizing Analog Video 4-17 Entering User Modes 4-18 Power-Saver Feature 4-19 A Troubleshooting Solving ...
...Web 4-3 Using the Auto-Adjustment Function 4-3 Front-Panel Buttons 4-5 Using the Onscreen Display 4-7 Adjusting Monitor Settings 4-8 Main Menu 4-8 Advanced Menu 4-9 Selecting the Video Input Connectors 4-12 Identifying Monitor Conditions 4-13 Adjusting Screen Quality 4-14 Setting Optimal ...Display Resolution 4-14 Enhancing the Video Function 4-15 Optimizing Analog Video 4-17 Entering User Modes 4-18 Power-Saver Feature 4-19 A Troubleshooting Solving ...
User's Guide - HP f2105 LCD Monitor
Page 43
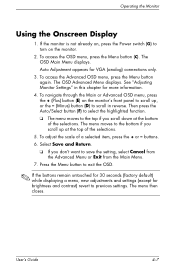
...See "Adjusting Monitor Settings" in reverse. The menu moves to the bottom if you don't want to previous settings. Press the Menu button to scroll up at the bottom of the selections. 5. If the monitor is not already on, press the Power switch (G) to turn on the monitor's front panel ...to exit the OSD. ✎ If the buttons remain untouched for 30 seconds (factory default...
...See "Adjusting Monitor Settings" in reverse. The menu moves to the bottom if you don't want to previous settings. Press the Menu button to scroll up at the bottom of the selections. 5. If the monitor is not already on, press the Power switch (G) to turn on the monitor's front panel ...to exit the OSD. ✎ If the buttons remain untouched for 30 seconds (factory default...

User's Guide - HP f2105 LCD Monitor
Page 45
...Position Adjustment Scale Custom Scaling Fill to Screen Fill to Aspect Ratio One to three levels and can be viewed in one of the monitor until the Main Menu is selected or factory reset is applied. The following table describes Advanced Menu selections, levels, and factory presets.... The Advanced Menu level 1 displays. ✎ After selecting the Advanced Menu from the Main Menu. Operating the Monitor Advanced Menu To access the Advanced Menu, press the Menu button again (twice), or select Advanced Menu from the Main Menu, the Advanced Menu remains the default OSD on subsequent...
...Position Adjustment Scale Custom Scaling Fill to Screen Fill to Aspect Ratio One to three levels and can be viewed in one of the monitor until the Main Menu is selected or factory reset is applied. The following table describes Advanced Menu selections, levels, and factory presets.... The Advanced Menu level 1 displays. ✎ After selecting the Advanced Menu from the Main Menu. Operating the Monitor Advanced Menu To access the Advanced Menu, press the Menu button again (twice), or select Advanced Menu from the Main Menu, the Advanced Menu remains the default OSD on subsequent...
User's Guide - HP f2105 LCD Monitor
Page 49
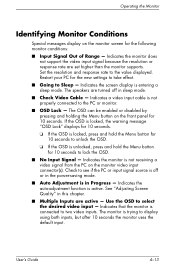
...signal because the resolution or response rate are turned off or in the power-saving mode. ■ Auto Adjustment is trying to two video inputs. The speakers are set higher than the monitor supports. The monitor is in this chapter. ■ Multiple Inputs are active - Indicates ...the auto-adjustment function is entering a sleep mode. The OSD can be enabled or disabled by pressing and holding the Menu button on the monitor video input connector(s). Set the resolution and response rate to Sleep - Restart your PC for 10 seconds. See "Adjusting Screen Quality" ...
...signal because the resolution or response rate are turned off or in the power-saving mode. ■ Auto Adjustment is trying to two video inputs. The speakers are set higher than the monitor supports. The monitor is in this chapter. ■ Multiple Inputs are active - Indicates ...the auto-adjustment function is entering a sleep mode. The OSD can be enabled or disabled by pressing and holding the Menu button on the monitor video input connector(s). Set the resolution and response rate to Sleep - Restart your PC for 10 seconds. See "Adjusting Screen Quality" ...
User's Guide - HP f2105 LCD Monitor
Page 57
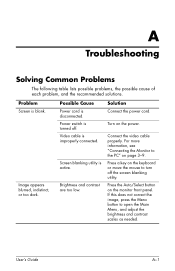
... is blank. Connect the video cable properly. Press a key on the power. Solution Connect the power cord. For more information, see "Connecting the Monitor to the PC" on the monitor front panel. Press the Auto/Select button on page 3-9. Turn on the keyboard or move the mouse to open the Main Menu, and adjust the...
... is blank. Connect the video cable properly. Press a key on the power. Solution Connect the power cord. For more information, see "Connecting the Monitor to the PC" on the monitor front panel. Press the Auto/Select button on page 3-9. Turn on the keyboard or move the mouse to open the Main Menu, and adjust the...

User's Guide - HP f2105 LCD Monitor
Page 58
...Press the Menu button to a supported setting. Select Image Control/ Horizontal Position or Vertical Position to adjust the horizontal or vertical position of Range" displays on the PC, or connect the DVI-D signal cable to the monitor and the PC. Change your PC so that the PC power is securely connected... to the DVI connector on screen. Be sure that the new settings take effect. DVI-D signal cable and DVI-D connector are not working. Connect the monitor video cable to the VGA connector on screen. Restart ...
...Press the Menu button to a supported setting. Select Image Control/ Horizontal Position or Vertical Position to adjust the horizontal or vertical position of Range" displays on the PC, or connect the DVI-D signal cable to the monitor and the PC. Change your PC so that the PC power is securely connected... to the DVI connector on screen. Be sure that the new settings take effect. DVI-D signal cable and DVI-D connector are not working. Connect the monitor video cable to the VGA connector on screen. Restart ...


