Quick Start Guide
Page 5
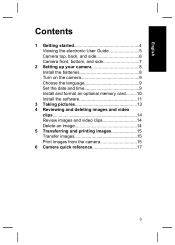
English Contents 1 Getting started 4 Viewing the electronic User Guide 5 Camera top, back, and side 6 Camera front, bottom, and side 7 2 Setting up your camera 8 Install the batteries 8 Turn on the camera 9 Choose the language 9 Set the date and time 9 Install and format an optional memory card.........10 Install the software 11 3 Taking pictures 13 4 Reviewing and deleting images and video clips 14 Review images and video clips 14 Delete an image 14 5 Transferring and printing images 15 Transfer images 15 Print images from the camera 15 6 Camera quick reference 17 3
English Contents 1 Getting started 4 Viewing the electronic User Guide 5 Camera top, back, and side 6 Camera front, bottom, and side 7 2 Setting up your camera 8 Install the batteries 8 Turn on the camera 9 Choose the language 9 Set the date and time 9 Install and format an optional memory card.........10 Install the software 11 3 Taking pictures 13 4 Reviewing and deleting images and video clips 14 Review images and video clips 14 Delete an image 14 5 Transferring and printing images 15 Transfer images 15 Print images from the camera 15 6 Camera quick reference 17 3

Quick Start Guide
Page 9
English Camera front, bottom, and side 12 3 7 4 6 5 1 Self-Timer/Video light. 2 Flash. 3 Microphone. 4 Focus switch-Switches between Normal focus. Macro and 5 Tripod mount. 6 Battery/Memory card door. 7 Lens cover/Power switch-Turns the camera on and off and protects the lens while the camera is off. Getting started 7
English Camera front, bottom, and side 12 3 7 4 6 5 1 Self-Timer/Video light. 2 Flash. 3 Microphone. 4 Focus switch-Switches between Normal focus. Macro and 5 Tripod mount. 6 Battery/Memory card door. 7 Lens cover/Power switch-Turns the camera on and off and protects the lens while the camera is off. Getting started 7
Quick Start Guide
Page 10
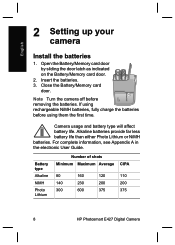
... by sliding the door latch as indicated on the Battery/Memory card door. 2. English 2 Setting up your camera Install the batteries 1. Note Turn the camera off before using them the first time. If using rechargeable NiMH batteries, fully charge the batteries ...see Appendix A in the electronic User Guide. Camera usage and battery type will affect battery life. Close the Battery/Memory card door. Battery type Alkaline NiMH Photo Lithium Number of shots Minimum Maximum Average CIPA 80 160 120 110 140 230 200 200 300 600 375 375 8 HP Photosmart E427 Digital Camera
... by sliding the door latch as indicated on the Battery/Memory card door. 2. English 2 Setting up your camera Install the batteries 1. Note Turn the camera off before using them the first time. If using rechargeable NiMH batteries, fully charge the batteries ...see Appendix A in the electronic User Guide. Camera usage and battery type will affect battery life. Close the Battery/Memory card door. Battery type Alkaline NiMH Photo Lithium Number of shots Minimum Maximum Average CIPA 80 160 120 110 140 230 200 200 300 600 375 375 8 HP Photosmart E427 Digital Camera
Quick Start Guide
Page 12
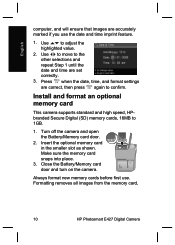
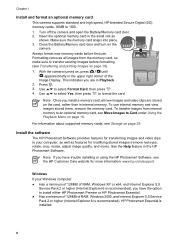
... the camera. Turn off the camera and open the Battery/Memory card door. 2. Install and format an optional memory card This camera supports standard and high speed, HPbranded Secure Digital (SD) memory cards, 16MB to the other selections and repeat Step 1 until the date and time are accurately marked if you use . Formatting removes all images from the memory card, 10 HP Photosmart E427 Digital Camera Use...
... the camera. Turn off the camera and open the Battery/Memory card door. 2. Install and format an optional memory card This camera supports standard and high speed, HPbranded Secure Digital (SD) memory cards, 16MB to the other selections and repeat Step 1 until the date and time are accurately marked if you use . Formatting removes all images from the memory card, 10 HP Photosmart E427 Digital Camera Use...
Quick Start Guide
Page 13
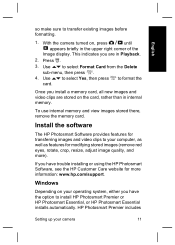
... images and video clips are in internal memory. To use internal memory and view images stored there, remove the memory card. Windows Depending on , press until appears briefly in the upper right corner of the Image display. English so make sure to your camera 11 Install the software The HP Photosmart Software provides features for transferring images...
... images and video clips are in internal memory. To use internal memory and view images stored there, remove the memory card. Windows Depending on , press until appears briefly in the upper right corner of the Image display. English so make sure to your camera 11 Install the software The HP Photosmart Software provides features for transferring images...
User Guide
Page 3
... and printing images 18 Transferring images with HP Photosmart Software 18 Transferring images without HP Photosmart Software 18 Connecting to the computer 18 Using a memory card reader 19 Printing images from the camera 19 5 Using the Setup Menu 20 6 Troubleshooting 21 Resetting the camera 21 Problems and solutions 21 7 Product support 25 Helpful websites...25 Getting assistance 25 HP Photosmart E427 Digital Camera 3
... and printing images 18 Transferring images with HP Photosmart Software 18 Transferring images without HP Photosmart Software 18 Connecting to the computer 18 Using a memory card reader 19 Printing images from the camera 19 5 Using the Setup Menu 20 6 Troubleshooting 21 Resetting the camera 21 Problems and solutions 21 7 Product support 25 Helpful websites...25 Getting assistance 25 HP Photosmart E427 Digital Camera 3

User Guide
Page 6
.... 3. Note Turn off . If using them the first time (see Using 5 Tripod mount. 6 Battery/Memory card door. 7 Lens cover/Power switch-Turns the camera on page 11). Normal focus (see Recharging NiMH batteries on page 28). 6 Before taking pictures Complete the ...following procedures before taking pictures or recording video clips. Install the batteries 1. Open the Battery/Memory card door by sliding the Battery/Memory card door toward the bottom of the camera. 2. Chapter 1 Camera front, bottom, and side 12 3 7 6 4 5 1 Self-Timer/Video light-See Using the...
.... 3. Note Turn off . If using them the first time (see Using 5 Tripod mount. 6 Battery/Memory card door. 7 Lens cover/Power switch-Turns the camera on page 11). Normal focus (see Recharging NiMH batteries on page 28). 6 Before taking pictures Complete the ...following procedures before taking pictures or recording video clips. Install the batteries 1. Open the Battery/Memory card door by sliding the Battery/Memory card door toward the bottom of the camera. 2. Chapter 1 Camera front, bottom, and side 12 3 7 6 4 5 1 Self-Timer/Video light-See Using the...
User Guide
Page 8
.... Formatting removes all new images and video clips are in internal memory. With the camera turned on page 16. To transfer images from the memory card, so make sure to 1GB. 1. Note If you install a memory card, all images from internal memory to install either HP Photosmart Premier or HP Photosmart Essential. ● Has a minimum of 128MB of RAM, Windows XP...
.... Formatting removes all new images and video clips are in internal memory. With the camera turned on page 16. To transfer images from the memory card, so make sure to 1GB. 1. Note If you install a memory card, all images from internal memory to install either HP Photosmart Premier or HP Photosmart Essential. ● Has a minimum of 128MB of RAM, Windows XP...

User Guide
Page 10
...corner of the Image Display. Press until appears briefly in the upper left corner of the Image Display, switch to any time the camera is on page 12. 3. To activate Live View, press until appears briefly in the Image Display. Taking still pictures You can... 1. For more information 10 Frame the subject for your picture. 4. For information about changing shooting modes, see Power indicators on page 27). 2 Memory card indicator. 3 12 Pictures remaining count. Press the Shutter button all the way down to take a picture almost any other shooting mode. Press , ...
...corner of the Image Display. Press until appears briefly in the upper left corner of the Image Display, switch to any time the camera is on page 12. 3. To activate Live View, press until appears briefly in the Image Display. Taking still pictures You can... 1. For more information 10 Frame the subject for your picture. 4. For information about changing shooting modes, see Power indicators on page 27). 2 Memory card indicator. 3 12 Pictures remaining count. Press the Shutter button all the way down to take a picture almost any other shooting mode. Press , ...
User Guide
Page 15
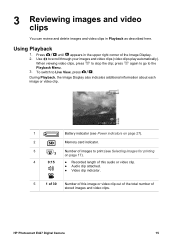
... Display also indicates additional information about each image or video clip. 1 Battery indicator (see Selecting images for printing 3 on page 27). 2 Memory card indicator. 3 Number of images to stop the clip; HP Photosmart E427 Digital Camera 15 3 Reviewing images and video clips You can review and delete images and video clips in the upper right corner of...
... Display also indicates additional information about each image or video clip. 1 Battery indicator (see Selecting images for printing 3 on page 27). 2 Memory card indicator. 3 Number of images to stop the clip; HP Photosmart E427 Digital Camera 15 3 Reviewing images and video clips You can review and delete images and video clips in the upper right corner of...
User Guide
Page 16
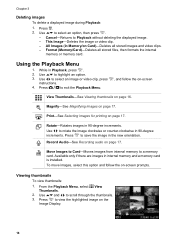
..., press instructions. 4. Use to highlight an option. 3. Press to rotate the image clockwise or counter-clockwise in internal memory and a memory card is installed. Print-See Selecting images for printing on page 17. Use to save the image in Playback, press ....if there are images in 90-degree increments. Using the Playback Menu 1. Move Images to Card-Moves images from internal memory to scroll through the thumbnails. 3. Use and to a memory card. Format (Memory/Card)-Deletes all stored images and video clips. - Press to select an option, then press ...
..., press instructions. 4. Use to highlight an option. 3. Press to rotate the image clockwise or counter-clockwise in internal memory and a memory card is installed. Print-See Selecting images for printing on page 17. Use to save the image in Playback, press ....if there are images in 90-degree increments. Using the Playback Menu 1. Move Images to Card-Moves images from internal memory to scroll through the thumbnails. 3. Use and to a memory card. Format (Memory/Card)-Deletes all stored images and video clips. - Press to select an option, then press ...
User Guide
Page 18
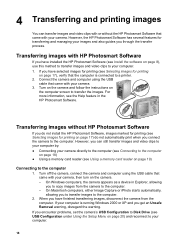
... computer using the USB cable that came with HP Photosmart Software If you through the transfer process. Transferring images without the HP Photosmart Software that came with your camera. 3. If your computer is connected to your computer. 1. If you have selected images for printing (see Using a memory card reader on page 19) Connecting to the computer. For...
... computer using the USB cable that came with HP Photosmart Software If you through the transfer process. Transferring images without the HP Photosmart Software that came with your camera. 3. If your computer is connected to your computer. 1. If you have selected images for printing (see Using a memory card reader on page 19) Connecting to the computer. For...
User Guide
Page 19
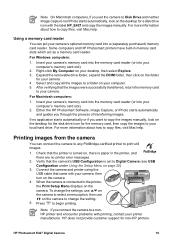
..., Image Capture, or iPhoto starts automatically and guides you connect the camera to a folder on the desktop for non-HP printers. To change the setting. 5. Insert your camera's memory card into the memory card reader (or into your computer's memory card slot). 2. HP Photosmart E427 Digital Camera 19 Some computers and HP Photosmart printers have built-in the printer, and there are no application starts automatically...
..., Image Capture, or iPhoto starts automatically and guides you connect the camera to a folder on the desktop for non-HP printers. To change the setting. 5. Insert your camera's memory card into the memory card reader (or into your computer's memory card slot). 2. HP Photosmart E427 Digital Camera 19 Some computers and HP Photosmart printers have built-in the printer, and there are no application starts automatically...

User Guide
Page 21
...; Having a large number of files (over 300) stored on page 6). If so, remove the memory card and turn on . If the camera still does not turn on page 8). HP Photosmart E427 Digital Camera 21 Turn off the camera. 2. Remove the memory card and batteries for the camera to reach full capacity. ● If you were using one). If you press buttons, reset...
...; Having a large number of files (over 300) stored on page 6). If so, remove the memory card and turn on . If the camera still does not turn on page 8). HP Photosmart E427 Digital Camera 21 Turn off the camera. 2. Remove the memory card and batteries for the camera to reach full capacity. ● If you were using one). If you press buttons, reset...
User Guide
Page 22
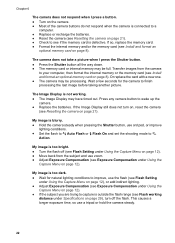
...taking another picture. My image is too dark. ● Wait for the camera to wake up the camera. ● Replace the batteries. If so, replace the memory card. ● Format the internal memory and/or the memory card (see Exposure Compensation under Specifications on page 12). My image is not ...Capture Menu on page 12). ● Move back from the camera to your computer, then format the internal memory or the memory card (see Install and format an optional memory card on page 21). ● Check to see Resetting the camera on page 8). If the Image Display still does not turn ...
...taking another picture. My image is too dark. ● Wait for the camera to wake up the camera. ● Replace the batteries. If so, replace the memory card. ● Format the internal memory and/or the memory card (see Exposure Compensation under Specifications on page 12). My image is not ...Capture Menu on page 12). ● Move back from the camera to your computer, then format the internal memory or the memory card (see Install and format an optional memory card on page 21). ● Check to see Resetting the camera on page 8). If the Image Display still does not turn ...
User Guide
Page 23
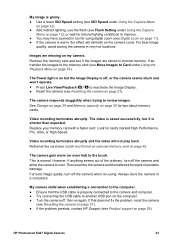
... memory cards. My image is grainy. ● Use a lower ISO Speed setting (see ISO Speed under Using the Capture Menu on page 12). ● Add indirect lighting, use the flash (see Flash Setting under Using the Playback Menu on page 16). The video is saved successfully, but the Image Display is normal. HP Photosmart E427 Digital Camera...
... memory cards. My image is grainy. ● Use a lower ISO Speed setting (see ISO Speed under Using the Capture Menu on page 12). ● Add indirect lighting, use the flash (see Flash Setting under Using the Playback Menu on page 16). The video is saved successfully, but the Image Display is normal. HP Photosmart E427 Digital Camera...
User Guide
Page 24
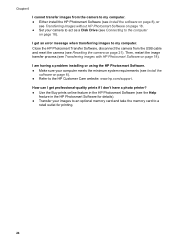
...; Use the Buy prints online feature in the HP Photosmart Software for details). ● Transfer your images to an optional memory card and take the memory card to the computer on page 18). Close the HP Photosmart Transfer Software, disconnect the camera from the camera to my computer. ● Either install the HP Photosmart Software (see Install the software on page 8), or...
...; Use the Buy prints online feature in the HP Photosmart Software for details). ● Transfer your images to an optional memory card and take the memory card to the computer on page 18). Close the HP Photosmart Transfer Software, disconnect the camera from the camera to my computer. ● Either install the HP Photosmart Software (see Install the software on page 8), or...
User Guide
Page 29
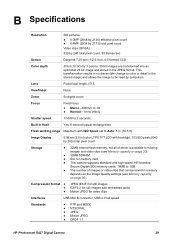
...● JPEG (EXIF) for still images EXIF2.2 for still images with embedded audio Motion JPEG for memory card. ● This camera supports standard and high speed, HP-branded Secure Digital (SD) memory cards, 16MB to 1GB. ● The number of images or video clips that can be read by ... clips (see Memory capacity on page 30). ● 32MB SDRAM ● Slot for video clips Interfaces USB Mini B connector, USB 2.0 full speed Standards ● PTP and MSDC ● NTSC/PAL ● JPEG ● Motion JPEG ● DPOF 1.1 HP Photosmart E427 Digital Camera 29 This transformation...
...● JPEG (EXIF) for still images EXIF2.2 for still images with embedded audio Motion JPEG for memory card. ● This camera supports standard and high speed, HP-branded Secure Digital (SD) memory cards, 16MB to 1GB. ● The number of images or video clips that can be read by ... clips (see Memory capacity on page 30). ● 32MB SDRAM ● Slot for video clips Interfaces USB Mini B connector, USB 2.0 full speed Standards ● PTP and MSDC ● NTSC/PAL ● JPEG ● Motion JPEG ● DPOF 1.1 HP Photosmart E427 Digital Camera 29 This transformation...

User Guide
Page 30
... on a memory card will vary depending on ). 5 Watts peak power usage. Thirty seconds of audio adds 470KB to different Image Quality settings (see Image Quality under Using the Capture Menu on page 12). 6MP Best Normal (6MP) 4MP 2MP VGA 8 images (1.2MB each) 10 images (1.0MB each) 18 images...height): ● 95.6 mm (W) by 24.2 mm (D) by 55.2 mm (H) ● 3.76 in (W) by .95 in (D) by 2.17 in internal memory when the camera is set to the file size. 30 Appendix B (continued) External body dimensions Weight Power Temperature range ● EXIF 2.2 ● DCF 1.0 ● DPS Measurements ...
... on a memory card will vary depending on ). 5 Watts peak power usage. Thirty seconds of audio adds 470KB to different Image Quality settings (see Image Quality under Using the Capture Menu on page 12). 6MP Best Normal (6MP) 4MP 2MP VGA 8 images (1.2MB each) 10 images (1.0MB each) 18 images...height): ● 95.6 mm (W) by 24.2 mm (D) by 55.2 mm (H) ● 3.76 in (W) by .95 in (D) by 2.17 in internal memory when the camera is set to the file size. 30 Appendix B (continued) External body dimensions Weight Power Temperature range ● EXIF 2.2 ● DCF 1.0 ● DPS Measurements ...

User Guide
Page 31
... 13 Delete button 5 deleting images 16 digital zoom 11 dimensions 30 direct print 19 Display Brightness 20 E Exposure Compensation 13, 14 F F-number 29 flash red-eye reduction 12, 14 working range 29 focal length 29 focus range settings Macro 11 Normal 11 format memory card 8 G getting assistance 25 H HP Photosmart Software 8, 9 I Image Display 5 Image Quality... reviewing images 15 S safety precautions for batteries 26 selecting images for printing 17 Self-Timer light 6 Self-Timer mode 12, 13 set date and time 7 HP Photosmart E427 Digital Camera 31
... 13 Delete button 5 deleting images 16 digital zoom 11 dimensions 30 direct print 19 Display Brightness 20 E Exposure Compensation 13, 14 F F-number 29 flash red-eye reduction 12, 14 working range 29 focal length 29 focus range settings Macro 11 Normal 11 format memory card 8 G getting assistance 25 H HP Photosmart Software 8, 9 I Image Display 5 Image Quality... reviewing images 15 S safety precautions for batteries 26 selecting images for printing 17 Self-Timer light 6 Self-Timer mode 12, 13 set date and time 7 HP Photosmart E427 Digital Camera 31


