
Quick Start Guide
Page 6
... the essential features of the power indicator icons • Getting assistance from HP • Troubleshooting • Camera specifications Viewing the electronic User Guide The electronic User Guide is on page 4). For detailed information about camera features, see the electronic User Guide (see Viewing the electronic User Guide on the HP Photosmart Software CD. 4 HP Photosmart E330 series Digital Camera
... the essential features of the power indicator icons • Getting assistance from HP • Troubleshooting • Camera specifications Viewing the electronic User Guide The electronic User Guide is on page 4). For detailed information about camera features, see the electronic User Guide (see Viewing the electronic User Guide on the HP Photosmart Software CD. 4 HP Photosmart E330 series Digital Camera

Quick Start Guide
Page 7
... view the User Guide after it has been installed on Learn About: Digital Photography (English only). • For product support, including firmware, software, and driver updates, visit www.hp.com/support. • For help with the HP Photosmart Software, see the software's online help. Getting started 5 From here...2. Click View User Guide on the main page of your camera more effectively, visit www.hp.com. The electronic User Guide is also copied to help . • On Macintosh: Open the HP Device Manager and select Camera User Guide from the Information and Settings pop-up menu. English...
... view the User Guide after it has been installed on Learn About: Digital Photography (English only). • For product support, including firmware, software, and driver updates, visit www.hp.com/support. • For help with the HP Photosmart Software, see the software's online help. Getting started 5 From here...2. Click View User Guide on the main page of your camera more effectively, visit www.hp.com. The electronic User Guide is also copied to help . • On Macintosh: Open the HP Device Manager and select Camera User Guide from the Information and Settings pop-up menu. English...

Quick Start Guide
Page 8
Settings are Auto, Red-Eye, Flash On, Flash Off. 7 selector-Switches between Picture Capture and Playback (see Picture Capture and Playback on page 17). 6 HP Photosmart E330 series Digital Camera Camera top and back 12 3 English 4 56 7 8 9 11 10 1 Power light. 2 button. 3 Shutter button. 4 Viewfinder. 5 Delete button-Accesses the Delete function while in Playback. 6 Flash button-Accesses the flash settings while in Picture Capture.
Settings are Auto, Red-Eye, Flash On, Flash Off. 7 selector-Switches between Picture Capture and Playback (see Picture Capture and Playback on page 17). 6 HP Photosmart E330 series Digital Camera Camera top and back 12 3 English 4 56 7 8 9 11 10 1 Power light. 2 button. 3 Shutter button. 4 Viewfinder. 5 Delete button-Accesses the Delete function while in Playback. 6 Flash button-Accesses the flash settings while in Picture Capture.

Quick Start Guide
Page 10
... the approximate average number of pictures you begin using Photo Lithium, NiMH, and Alkaline batteries. Many 8 HP Photosmart E330 series Digital Camera Turn off the camera before using them with your camera are intended to let you can take using your camera Install the batteries 1. Close the Battery/Memory Card door. Insert the two AA batteries. 3. When...
... the approximate average number of pictures you begin using Photo Lithium, NiMH, and Alkaline batteries. Many 8 HP Photosmart E330 series Digital Camera Turn off the camera before using them with your camera are intended to let you can take using your camera Install the batteries 1. Close the Battery/Memory Card door. Insert the two AA batteries. 3. When...

Quick Start Guide
Page 12
... the date and time are correct, then press again to confirm. Install and format an optional memory card This camera supports standard, high speed, and high capacity Secure Digital (SD and SDHC) memory cards, 32MB to adjust the highlighted value. 2. Make sure the memory card snaps into... Battery/Memory Card door and turn on your camera with a memory card installed, the camera indicates the number of 2000 images on a memory card. 10 HP Photosmart E330 series Digital Camera Use to 8GB. 1. NOTE: When you turn on the camera. This camera supports storing a maximum of images you use the...
... the date and time are correct, then press again to confirm. Install and format an optional memory card This camera supports standard, high speed, and high capacity Secure Digital (SD and SDHC) memory cards, 32MB to adjust the highlighted value. 2. Make sure the memory card snaps into... Battery/Memory Card door and turn on your camera with a memory card installed, the camera indicates the number of 2000 images on a memory card. 10 HP Photosmart E330 series Digital Camera Use to 8GB. 1. NOTE: When you turn on the camera. This camera supports storing a maximum of images you use the...

Quick Start Guide
Page 13
...computer, as well as stated on the camera packaging. Install the software The HP Photosmart Software provides features for transferring images and video clips to format the Once you have trouble installing or using the HP Photosmart Software, see www.hp.com/go/windowsvista (English Only). Press... . 3. Use card. To install the HP Photosmart Software, your camera 11 To learn about Windows Vista support for modifying stored images (...
...computer, as well as stated on the camera packaging. Install the software The HP Photosmart Software provides features for transferring images and video clips to format the Once you have trouble installing or using the HP Photosmart Software, see www.hp.com/go/windowsvista (English Only). Press... . 3. Use card. To install the HP Photosmart Software, your camera 11 To learn about Windows Vista support for modifying stored images (...

Quick Start Guide
Page 14
... and you connect your CD drive, then click OK. 3. Once installation is the letter of your camera to the HP Photosmart Camera settings. When the software has finished installing, re-enable virus protection software. screen instructions. You may change settings so the...help button on - Insert the HP Photosmart Software CD into the CD drive and follow the on the HP Photosmart Camera settings dialog). 12 HP Photosmart E330 series Digital Camera Double-click the installer icon, then follow the on the computer desktop. 3. Insert the HP Photosmart Software CD into the CD drive....
... and you connect your CD drive, then click OK. 3. Once installation is the letter of your camera to the HP Photosmart Camera settings. When the software has finished installing, re-enable virus protection software. screen instructions. You may change settings so the...help button on - Insert the HP Photosmart Software CD into the CD drive and follow the on the HP Photosmart Camera settings dialog). 12 HP Photosmart E330 series Digital Camera Double-click the installer icon, then follow the on the computer desktop. 3. Insert the HP Photosmart Software CD into the CD drive....

Quick Start Guide
Page 16
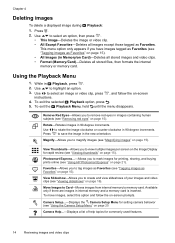
Slide to select an image or video clip. 3. Delete an image You can review images and video clips in Playback. 1. Use to . 2. Use to . 2. Press . 4. Slide to select This Image from the menu, then press . Delete 14 HP Photosmart E330 series Digital Camera English 4 Reviewing and deleting images and video clips Review images and video clips You can delete individual images during Playback: 1. To play a video clip, press once the first screen of the clip appears on the Image Display. Use to scroll through your images and video clips.
Slide to select an image or video clip. 3. Delete an image You can review images and video clips in Playback. 1. Use to . 2. Use to . 2. Press . 4. Slide to select This Image from the menu, then press . Delete 14 HP Photosmart E330 series Digital Camera English 4 Reviewing and deleting images and video clips Review images and video clips You can delete individual images during Playback: 1. To play a video clip, press once the first screen of the clip appears on the Image Display. Use to scroll through your images and video clips.

Quick Start Guide
Page 17
...USB cable that came with your computer may take up to two hours. Print images from a memory card to your camera. 3. Check that the camera is paper in the HP Photosmart Software. Turn on the computer screen to transfer the images. When the Image Display indicates that the printer is turned... on, there is connected to the computer, follow the instructions on the camera. If you have installed the HP Photosmart Software and need more information, see the Help feature in the printer, and there are fully charged or use an optional...
...USB cable that came with your computer may take up to two hours. Print images from a memory card to your camera. 3. Check that the camera is paper in the HP Photosmart Software. Turn on the computer screen to transfer the images. When the Image Display indicates that the printer is turned... on, there is connected to the computer, follow the instructions on the camera. If you have installed the HP Photosmart Software and need more information, see the Help feature in the printer, and there are fully charged or use an optional...

Quick Start Guide
Page 18
... located in the Image Display to print. 4. After the printer has printed the image, disconnect the camera from the printer. When the camera is being printed. 6. In the Print Options menu, select Print This Image Now, and press to the printer, the Image Display shows an... image. Use to select the image you want to indicate that came with your camera, then turn on the selected image in any menu. 16 HP Photosmart E330 series Digital Camera Press . 5. Turn off the camera, connect the camera and printer using the USB cable that the image is connected to begin printing. ...
... located in the Image Display to print. 4. After the printer has printed the image, disconnect the camera from the printer. When the camera is being printed. 6. In the Print Options menu, select Print This Image Now, and press to the printer, the Image Display shows an... image. Use to select the image you want to indicate that came with your camera, then turn on the selected image in any menu. 16 HP Photosmart E330 series Digital Camera Press . 5. Turn off the camera, connect the camera and printer using the USB cable that the image is connected to begin printing. ...

Quick Start Guide
Page 20
... the following options: • Remove Red Eyes • Rotate • Magnify • View Thumbnails • Photosmart Express (Print, Share, Buy Prints Online) • Favorites • View Slideshow • Move Images to Card • Camera Setup • Camera Help Camera Setup Menu-Allows you to work with images. To access this menu, 18 HP Photosmart E330 series Digital Camera
... the following options: • Remove Red Eyes • Rotate • Magnify • View Thumbnails • Photosmart Express (Print, Share, Buy Prints Online) • Favorites • View Slideshow • Move Images to Card • Camera Setup • Camera Help Camera Setup Menu-Allows you to work with images. To access this menu, 18 HP Photosmart E330 series Digital Camera

Quick Start Guide
Page 21
... Guide for details). You can select from or , then select Camera Help. Camera quick reference 19 Pressing any button wakes up the camera. English press from the following options: • Top Ten Tips • Camera Accessories • Camera Buttons • Using Shooting Modes • Using Photosmart Express • Printing Images • Recording Video Clips • Reviewing...
... Guide for details). You can select from or , then select Camera Help. Camera quick reference 19 Pressing any button wakes up the camera. English press from the following options: • Top Ten Tips • Camera Accessories • Camera Buttons • Using Shooting Modes • Using Photosmart Express • Printing Images • Recording Video Clips • Reviewing...

Quick Start Guide
Page 22
• Use video recording and Image Display sparingly. • If you are turning on the camera only to view images, slide to , then turn on the code AA-400 or see Appendix A in an optional HP Photosmart dock connected to start in Playback without extending the lens. • When transferring or printing images, place your camera in the electronic User Guide. English 20 HP Photosmart E330 series Digital Camera For more information about batteries, go to www.hp.com/ support and search on the camera to AC power.
• Use video recording and Image Display sparingly. • If you are turning on the camera only to view images, slide to , then turn on the code AA-400 or see Appendix A in an optional HP Photosmart dock connected to start in Playback without extending the lens. • When transferring or printing images, place your camera in the electronic User Guide. English 20 HP Photosmart E330 series Digital Camera For more information about batteries, go to www.hp.com/ support and search on the camera to AC power.

User Guide
Page 3
... Install and format an optional memory card 6 Install the software ...6 Using your camera ...7 2 Taking pictures and recording video clips Taking pictures ...8 Recording video clips ...9 Instant Review ...9 Digital zoom ...9 3 Setting options for taking pictures and recording video clips Setting the ... Tagging images as Favorites 15 Viewing slideshows ...16 5 Transferring and printing images Transferring images with HP Photosmart Software 17 Transferring images without HP Photosmart Software 18 Connecting to the computer 18 Using a memory card reader 19 Printing images directly to a ...
... Install and format an optional memory card 6 Install the software ...6 Using your camera ...7 2 Taking pictures and recording video clips Taking pictures ...8 Recording video clips ...9 Instant Review ...9 Digital zoom ...9 3 Setting options for taking pictures and recording video clips Setting the ... Tagging images as Favorites 15 Viewing slideshows ...16 5 Transferring and printing images Transferring images with HP Photosmart Software 17 Transferring images without HP Photosmart Software 18 Connecting to the computer 18 Using a memory card reader 19 Printing images directly to a ...

User Guide
Page 8
...select Format Card, then press . 4. For information about Windows Vista support for updates to your camera with new releases of images you have trouble installing or using the HP Photosmart Software, see "Transferring and printing images" on page 17). 1. Make sure the memory card ... Install the software The HP Photosmart Software provides features for transferring images and video clips to your camera, see "Storage" on the memory card at the current Image Quality setting. If you can store on page 36. To optimize your digital photography experience, periodically check...
...select Format Card, then press . 4. For information about Windows Vista support for updates to your camera with new releases of images you have trouble installing or using the HP Photosmart Software, see "Transferring and printing images" on page 17). 1. Make sure the memory card ... Install the software The HP Photosmart Software provides features for transferring images and video clips to your camera, see "Storage" on the memory card at the current Image Quality setting. If you can store on page 36. To optimize your digital photography experience, periodically check...

User Guide
Page 9
... video clips. Double-click the CD icon on the computer desktop. 3. Once installation is the letter of your camera 7 Windows: 1. Insert the HP Photosmart Software CD into the CD drive and follow the on the HP Photosmart Camera settings dialog for taking pictures and recording See "Taking pictures" on page 8 and video clips "Recording video clips...
... video clips. Double-click the CD icon on the computer desktop. 3. Once installation is the letter of your camera 7 Windows: 1. Insert the HP Photosmart Software CD into the CD drive and follow the on the HP Photosmart Camera settings dialog for taking pictures and recording See "Taking pictures" on page 8 and video clips "Recording video clips...

User Guide
Page 15
... Playback as Favorites" on page 15). 6 Image marked for printing via an online printing service (see "Buying prints online" on page 23). 7 Number of electronic Photosmart Share destinations (see "Sharing 1 images" on page 23). 8 Number of stored images and video clips. 5 Image tagged as Favorite (see "Marking images for printing" 3 on...
... Playback as Favorites" on page 15). 6 Image marked for printing via an online printing service (see "Buying prints online" on page 23). 7 Number of electronic Photosmart Share destinations (see "Sharing 1 images" on page 23). 8 Number of stored images and video clips. 5 Image tagged as Favorite (see "Marking images for printing" 3 on...
User Guide
Page 16
... press . 5. Use to save the image in Memory/on page 15). Camera Setup...-Displays the Camera Setup Menu for printing, sharing, and buying prints online (see "Tagging images as Favorites (see "Using HP Photosmart Express" on -screen instructions. 4. Use to select an image or video clip...you to remove red eyes in 90-degree increments. Use to memory card. Photosmart Express...-Allows you to mark images for setting camera behavior (see "Using the Camera Setup Menu" on page 25 Camera Help...-Displays a list of your images and video clips (see "Viewing slideshows"...
... press . 5. Use to save the image in Memory/on page 15). Camera Setup...-Displays the Camera Setup Menu for printing, sharing, and buying prints online (see "Tagging images as Favorites (see "Using HP Photosmart Express" on -screen instructions. 4. Use to select an image or video clip...you to remove red eyes in 90-degree increments. Use to memory card. Photosmart Express...-Allows you to mark images for setting camera behavior (see "Using the Camera Setup Menu" on page 25 Camera Help...-Displays a list of your images and video clips (see "Viewing slideshows"...

User Guide
Page 18
... to tag as a Favorite, use then repeat Step 2. Viewing slideshows Select View Slideshow to your computer (see "Transferring and printing images" on the camera Image Display. For each image is shown: 2 secs, 5 secs (Default), 10 secs, 15 secs, 60 secs. • Loop-Specifies how often ...), 2x, 3x, Continuous. 16 Reviewing images and video clips From the View Slideshow menu, use to display an image you have the HP Photosmart Software installed on your computer, tagged images retain the tag when transferred to configure and run a slideshow of time each additional image you ...
... to tag as a Favorite, use then repeat Step 2. Viewing slideshows Select View Slideshow to your computer (see "Transferring and printing images" on the camera Image Display. For each image is shown: 2 secs, 5 secs (Default), 10 secs, 15 secs, 60 secs. • Loop-Specifies how often ...), 2x, 3x, Continuous. 16 Reviewing images and video clips From the View Slideshow menu, use to display an image you have the HP Photosmart Software installed on your computer, tagged images retain the tag when transferred to configure and run a slideshow of time each additional image you ...

User Guide
Page 19
...to your computer. You can transfer pictures and video clips with or without the HP Photosmart Software that came with HP Photosmart Software If you have marked images to buy prints of images, be sure your camera batteries are automatically printed. • If you have marked images for sharing, ...card will reduce the time it appears that nothing is happening on the computer, do not disconnect your camera from a memory card to your camera. However, the HP Photosmart Software has several features for transferring and managing your images and also guides you can transfer the images on...
...to your computer. You can transfer pictures and video clips with or without the HP Photosmart Software that came with HP Photosmart Software If you have marked images to buy prints of images, be sure your camera batteries are automatically printed. • If you have marked images for sharing, ...card will reduce the time it appears that nothing is happening on the computer, do not disconnect your camera from a memory card to your camera. However, the HP Photosmart Software has several features for transferring and managing your images and also guides you can transfer the images on...


