Quick Setup and Getting Started Guide
Page 9
... with Windows Vista loaded, you turn on the screen. 2. Click view available updates and make sure all critical updates are selected. You will be prompted to the computer until the operating system is available in online help after you install the operating system. Additional information is successfully installed. Once an Internet connection has been established, click the Start button. 3. CAUTION: Do not add optional hardware or third-party devices...
... with Windows Vista loaded, you turn on the screen. 2. Click view available updates and make sure all critical updates are selected. You will be prompted to the computer until the operating system is available in online help after you install the operating system. Additional information is successfully installed. Once an Internet connection has been established, click the Start button. 3. CAUTION: Do not add optional hardware or third-party devices...
Quick Setup and Getting Started Guide
Page 10
... the software from http://www.hp.com/support. Follow the instructions on the hard drive. Installing or Upgrading Device Drivers When installing optional hardware devices after the operating system installation is an easy-to-use the Browse button in Windows XP to change the monitor model, refresh rates, screen resolution, color settings, font sizes, and power management settings. Be sure to save any files or documents that ask you to install a program from regular backups. 2 Quick Setup & Getting Started ENWW...
... the software from http://www.hp.com/support. Follow the instructions on the hard drive. Installing or Upgrading Device Drivers When installing optional hardware devices after the operating system installation is an easy-to-use the Browse button in Windows XP to change the monitor model, refresh rates, screen resolution, color settings, font sizes, and power management settings. Be sure to save any files or documents that ask you to install a program from regular backups. 2 Quick Setup & Getting Started ENWW...
Quick Setup and Getting Started Guide
Page 17
..., there is set up process. Basic Troubleshooting This section concentrates on the hard drive and under the reference library at http://www.hp.com/support. For example, if you are disabled and if the monitor is available on problems that all bootable media (diskette, CD, or USB device) from the power source before turning it in Computer Setup. the power button again to prevent system board or component...
..., there is set up process. Basic Troubleshooting This section concentrates on the hard drive and under the reference library at http://www.hp.com/support. For example, if you are disabled and if the monitor is available on problems that all bootable media (diskette, CD, or USB device) from the power source before turning it in Computer Setup. the power button again to prevent system board or component...
Hardware Reference Guide - dx7500 Microtower Model
Page 22
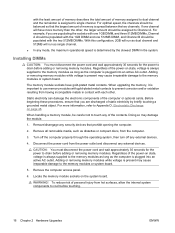
... and wait approximately 30 seconds for the power to cool before adding or removing memory modules. Locate the memory module sockets on page 48. Installing DIMMs CAUTION: You must disconnect the power cord and wait approximately 30 seconds for the power to Channel A. Remove all removable media, such as single channel. ● In any mode, the maximum operational speed is determined by briefly touching a grounded...
... and wait approximately 30 seconds for the power to cool before adding or removing memory modules. Locate the memory module sockets on page 48. Installing DIMMs CAUTION: You must disconnect the power cord and wait approximately 30 seconds for the power to Channel A. Remove all removable media, such as single channel. ● In any mode, the maximum operational speed is determined by briefly touching a grounded...

Hardware Reference Guide - dx7500 Microtower Model
Page 38
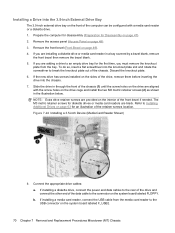
... through the operating system, then turn on the system board as long as diskettes or compact discs, from the power outlet and disconnect any external devices. b. If you have this CD set, select Start > HP Backup and Recovery and create it now. 1. Disconnect the power cord from the computer. 3. Remove the computer access panel. 32 Chapter 2 Hardware Upgrades ENWW Remove/disengage any external devices. 4. Connect the appropriate drive cables: a. Removing an Internal 3.5-inch Hard Drive NOTE: Before...
... through the operating system, then turn on the system board as long as diskettes or compact discs, from the power outlet and disconnect any external devices. b. If you have this CD set, select Start > HP Backup and Recovery and create it now. 1. Disconnect the power cord from the computer. 3. Remove the computer access panel. 32 Chapter 2 Hardware Upgrades ENWW Remove/disengage any external devices. 4. Connect the appropriate drive cables: a. Removing an Internal 3.5-inch Hard Drive NOTE: Before...

Hardware Reference Guide - dx7500 Microtower Model
Page 57
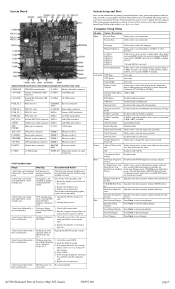
... 18 removing 18 slot locations 18 expansion card sockets 18 K keyboard components 5 connector 4 L line-in connector 4 line-out connector 4 ENWW locks cable lock 44 HP Business PC Security Lock 45 padlock 45 M media card reader features 3 installing 31 removing 29 memory installing 14 populating sockets 15 specifications 14 microphone connector 2, 4 monitor connector DVI 4 VGA 4 mouse connector 4 N network connector 4 O optical drive cleaning 50 installing 27 precautions 50 removing 26 P PCI Express card 18, 21 power supply 39 product ID location 7 R rear panel components 4 removing battery...
... 18 removing 18 slot locations 18 expansion card sockets 18 K keyboard components 5 connector 4 L line-in connector 4 line-out connector 4 ENWW locks cable lock 44 HP Business PC Security Lock 45 padlock 45 M media card reader features 3 installing 31 removing 29 memory installing 14 populating sockets 15 specifications 14 microphone connector 2, 4 monitor connector DVI 4 VGA 4 mouse connector 4 N network connector 4 O optical drive cleaning 50 installing 27 precautions 50 removing 26 P PCI Express card 18, 21 power supply 39 product ID location 7 R rear panel components 4 removing battery...
Illustrated Parts & Service Map: HP Compaq dx7500 Business PC Microtower Chassis
Page 3
... within removable devices. The Setup Utility is enabled. 2 short beeps followed by a three second pause No graphics card installed or graphics card initialization failed. Supervisor Password Allows you to specify which device groups will be a problem with the expansion card. 6. Priority CD-ROM Boot Prior- ity Hard Drive Boot Pri- Clear CMOS. 5. Onboard LAN Boot Disable/enable the boot ROM of the four: Floppy group, CD-ROM group, Hard drive group, Network boot group. ory Size PS/2 Mouse Disable/enable/auto detect USB Ports Disable/enable all 1394 ports. Change...
... within removable devices. The Setup Utility is enabled. 2 short beeps followed by a three second pause No graphics card installed or graphics card initialization failed. Supervisor Password Allows you to specify which device groups will be a problem with the expansion card. 6. Priority CD-ROM Boot Prior- ity Hard Drive Boot Pri- Clear CMOS. 5. Onboard LAN Boot Disable/enable the boot ROM of the four: Floppy group, CD-ROM group, Hard drive group, Network boot group. ory Size PS/2 Mouse Disable/enable/auto detect USB Ports Disable/enable all 1394 ports. Change...
Service Reference Guide: HP Compaq dx7500 Business PC
Page 20
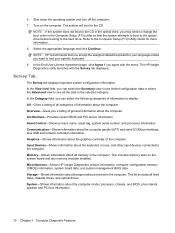
... (LPT) and serial (COM) port settings, plus internal speaker and PCI bus information. 10 Chapter 3 Computer Diagnostic Features Turn on the system board and any memory modules installed. NOTE: HP recommends that the system attempts to boot to the optical drive before booting to the Computer Setup (F10) Utility Guide for your specific keyboard. 9. This list includes all categories of all fixed disks, diskette drives, and optical drives. Shut down the operating system and turn off the computer...
... (LPT) and serial (COM) port settings, plus internal speaker and PCI bus information. 10 Chapter 3 Computer Diagnostic Features Turn on the system board and any memory modules installed. NOTE: HP recommends that the system attempts to boot to the optical drive before booting to the Computer Setup (F10) Utility Guide for your specific keyboard. 9. This list includes all categories of all fixed disks, diskette drives, and optical drives. Shut down the operating system and turn off the computer...
Service Reference Guide: HP Compaq dx7500 Business PC
Page 39
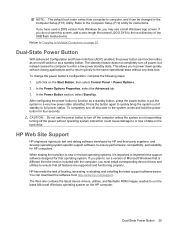
... HP computer. CAUTION: Do not use the power button to turn off all features are supported and functioning properly. If you plan to run the latest Microsoft Windows operating system on the hard drive. If you have used a DOS version from the version included with the computer, you must install corresponding device drivers and utilities to ensure that operating system. Dual-State Power Button With Advanced Configuration and Power Interface (ACPI) enabled, the power button...
... HP computer. CAUTION: Do not use the power button to turn off all features are supported and functioning properly. If you plan to run the latest Microsoft Windows operating system on the hard drive. If you have used a DOS version from the version included with the computer, you must install corresponding device drivers and utilities to ensure that operating system. Dual-State Power Button With Advanced Configuration and Power Interface (ACPI) enabled, the power button...
Service Reference Guide: HP Compaq dx7500 Business PC
Page 80
... appropriate drive cables: a. If installing a diskette drive, connect the power and data cables to the rear of the drive and connect the other end of the computer can be configured with the screw holes on the drive cage and install the two M3 metric retainer screws (2) as shown in the illustration below. If you are aligned with a media card reader or a diskette drive. 1. Remove the access panel (Access Panel on page 49). 4. Installing a Drive...
... appropriate drive cables: a. If installing a diskette drive, connect the power and data cables to the rear of the drive and connect the other end of the computer can be configured with the screw holes on the drive cage and install the two M3 metric retainer screws (2) as shown in the illustration below. If you are aligned with a media card reader or a diskette drive. 1. Remove the access panel (Access Panel on page 49). 4. Installing a Drive...
Service Reference Guide: HP Compaq dx7500 Business PC
Page 178
... resource conflict. Use Windows Device Manager to integrate the device with a mouse cleaning kit available from the bottom of new external device is not recognized as an additional drive or expansion card. Enter Computer Setup (F10) and enable the 1394 ports in Computer Setup. Solving Hardware Installation Problems You may not automatically configure when added if the default configuration conflicts with the ball are disabled in Computer Setup. Power switch of the mouse and clean the internal components with...
... resource conflict. Use Windows Device Manager to integrate the device with a mouse cleaning kit available from the bottom of new external device is not recognized as an additional drive or expansion card. Enter Computer Setup (F10) and enable the 1394 ports in Computer Setup. Solving Hardware Installation Problems You may not automatically configure when added if the default configuration conflicts with the ball are disabled in Computer Setup. Power switch of the mouse and clean the internal components with...
Service Reference Guide: HP Compaq dx7500 Business PC
Page 180
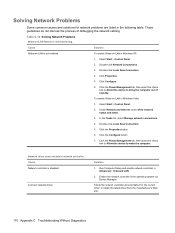
...12 Solving Network Problems Wake-on -LAN in Windows Vista: 1. Click Configure. 6. In the Tasks list, select Manage network connections. 4. Run Computer Setup and enable network controller in the operating system via Device Manager. Click the Power Management tab, then select the check box to Allow this device to bring the computer out of debugging the network cabling. Click the Properties button. 6. Select Start > Control Panel. 2. Solution 1. Enable the network controller in Advanced > Onboard LAN. 2. Incorrect network driver. To enable Wake-on -LAN feature...
...12 Solving Network Problems Wake-on -LAN in Windows Vista: 1. Click Configure. 6. In the Tasks list, select Manage network connections. 4. Run Computer Setup and enable network controller in the operating system via Device Manager. Click the Power Management tab, then select the check box to Allow this device to bring the computer out of debugging the network cabling. Click the Properties button. 6. Select Start > Control Panel. 2. Solution 1. Enable the network controller in Advanced > Onboard LAN. 2. Incorrect network driver. To enable Wake-on -LAN feature...
Service Reference Guide: HP Compaq dx7500 Business PC
Page 181
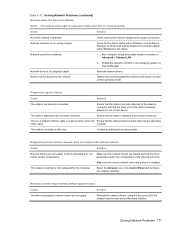
... securely connected. There is a problem with the network. Contact an authorized service provider. Diagnostics passes, but the computer does not communicate with the cable or a device at the other end of the cable. Cause Solution Network drivers are not loaded, or driver parameters do not Make sure the network drivers are corrupted. parameters match the configuration of the network controller. Reinstall the network drivers, using the Recovery Disc Set created from the hard drive's Recovery Partition. Solving Network Problems...
... securely connected. There is a problem with the network. Contact an authorized service provider. Diagnostics passes, but the computer does not communicate with the cable or a device at the other end of the cable. Cause Solution Network drivers are not loaded, or driver parameters do not Make sure the network drivers are corrupted. parameters match the configuration of the network controller. Reinstall the network drivers, using the Recovery Disc Set created from the hard drive's Recovery Partition. Solving Network Problems...

Service Reference Guide: HP Compaq dx7500 Business PC
Page 186
... panel, refer to a USB port that has been disabled Run the Computer Setup utility and ensure USB Ports are in Boot > Boot Device Priority > Floppy Group Boot Priority. 2. Turn off the computer. 2. Run the Computer Setup utility and change the removable media boot priority in Computer Setup. Install the flash drive only after making a bootable flash drive. Enabled in Boot > Boot Device Priority. If possible, replace the cable. 2. The device was not properly seated before applying power to the front of the Service Reference Guide. The image on the device...
... panel, refer to a USB port that has been disabled Run the Computer Setup utility and ensure USB Ports are in Boot > Boot Device Priority > Floppy Group Boot Priority. 2. Turn off the computer. 2. Run the Computer Setup utility and change the removable media boot priority in Computer Setup. Install the flash drive only after making a bootable flash drive. Enabled in Boot > Boot Device Priority. If possible, replace the cable. 2. The device was not properly seated before applying power to the front of the Service Reference Guide. The image on the device...
Service Reference Guide: HP Compaq dx7500 Business PC
Page 187
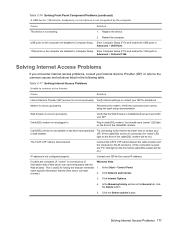
... ports in cable/DSL modem. Cookies are disabled in Advanced > USB Ports. 1394 ports on the computer are correct using the quick setup documentation. Select Start > Control Panel. 2. Enter Computer Setup (F10) and enable the USB ports in Computer Setup. Solving Internet Access Problems If you encounter Internet access problems, consult your Internet Service Provider (ISP) or refer to the Internet. Cause Solution Internet Service Provider (ISP) account is a small piece of information that a Web server can later retrieve.) Windows Vista...
... ports in cable/DSL modem. Cookies are disabled in Advanced > USB Ports. 1394 ports on the computer are correct using the quick setup documentation. Select Start > Control Panel. 2. Enter Computer Setup (F10) and enable the USB ports in Computer Setup. Solving Internet Access Problems If you encounter Internet access problems, consult your Internet Service Provider (ISP) or refer to the Internet. Cause Solution Internet Service Provider (ISP) account is a small piece of information that a Web server can later retrieve.) Windows Vista...
Service Reference Guide: HP Compaq dx7500 Business PC
Page 196
... keyboard cleaning 42 keyboard keys 43 CD-ROM or DVD problems 173 change notification 22 changing operating systems, support 29 changing password 32 chassis MT illustrated 37 cleaning computer 42 mouse 43 safety precautions 42 clearing password 33 Client Management Interface 17 Client Manager from Symantec 20 cloning tools, software 15 CMOS resetting jumper 182 computer cleaning 42 configuring power button 29 connecting MT drive cables 63 connecting SFF drive cables 98 connections MT system board 61 SFF system board 96 connector pin assignments 140 controlling access...
... keyboard cleaning 42 keyboard keys 43 CD-ROM or DVD problems 173 change notification 22 changing operating systems, support 29 changing password 32 chassis MT illustrated 37 cleaning computer 42 mouse 43 safety precautions 42 clearing password 33 Client Management Interface 17 Client Manager from Symantec 20 cloning tools, software 15 CMOS resetting jumper 182 computer cleaning 42 configuring power button 29 connecting MT drive cables 63 connecting SFF drive cables 98 connections MT system board 61 SFF system board 96 connector pin assignments 140 controlling access...
Service Reference Guide: HP Compaq dx7500 Business PC
Page 197
... Insight Diagnostics 9 installing expansion card 120 MT diskette drive 70 MT drive cables 63 MT hard drive 74 MT media card reader 70 optical drive 66 optical drive, SFF 103 SFF diskette drive 108 SFF drive cables 98 SFF hard drive 113 SFF media card reader 108 internal temperature of computer 34 Internet access problems 177 Internet addresses. See Web sites J jumper CMOS 182 password 181 K keyboard cleaning 42 pin assignments 140 keyboard delimiter characters, national 33 keyboard problems 166 L line-in audio pin assignments 141 line-out audio pin...
... Insight Diagnostics 9 installing expansion card 120 MT diskette drive 70 MT drive cables 63 MT hard drive 74 MT media card reader 70 optical drive 66 optical drive, SFF 103 SFF diskette drive 108 SFF drive cables 98 SFF hard drive 113 SFF media card reader 108 internal temperature of computer 34 Internet access problems 177 Internet addresses. See Web sites J jumper CMOS 182 password 181 K keyboard cleaning 42 pin assignments 140 keyboard delimiter characters, national 33 keyboard problems 166 L line-in audio pin assignments 141 line-out audio pin...
Service Reference Guide: HP Compaq dx7500 Business PC
Page 198
... installing 103 optical drive problems 173 overheating, prevention 41 P password changing 32 clearing 33 deleting 33 resetting jumper 181 security 31 setup 31 supervisor 32 PCI Express card 55, 57, 120, 122 PCI Express pin assignments 143 plastic wire fastener SFF removal and replacement 125 POST error codes 180 power button configuration 29 power cord set requirements country specific 147 power problems 154 power supply fan 43 MT removal and replacement 83 SFF removal and replacement 131 power supply, surge-tolerant 34 power switch assembly SFF removal and replacement 127 power switch/LED...
... installing 103 optical drive problems 173 overheating, prevention 41 P password changing 32 clearing 33 deleting 33 resetting jumper 181 security 31 setup 31 supervisor 32 PCI Express card 55, 57, 120, 122 PCI Express pin assignments 143 plastic wire fastener SFF removal and replacement 125 POST error codes 180 power button configuration 29 power cord set requirements country specific 147 power problems 154 power supply fan 43 MT removal and replacement 83 SFF removal and replacement 131 power supply, surge-tolerant 34 power switch assembly SFF removal and replacement 127 power switch/LED...
Troubleshooting Guide
Page 35
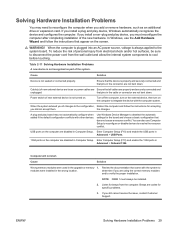
... securely connected and unplugged. Power switch of the system. Computer will not start. Solving Hardware Installation Problems You may not automatically configure when added if the default configuration conflicts with the computer system. Use Windows Device Manager to deselect the automatic settings for beeps from the wall outlet and allow the internal system components to reconfigure the computer when you did not accept them. Enter Computer Setup (F10) and enable the USB ports...
... securely connected and unplugged. Power switch of the system. Computer will not start. Solving Hardware Installation Problems You may not automatically configure when added if the default configuration conflicts with the computer system. Use Windows Device Manager to deselect the automatic settings for beeps from the wall outlet and allow the internal system components to reconfigure the computer when you did not accept them. Enter Computer Setup (F10) and enable the USB ports...
Troubleshooting Guide
Page 38
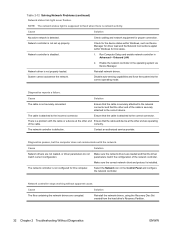
... Computer Setup and enable network controller in the Control Panel and configure the network controller. Network driver is not securely connected. Cause Solution The cable is not properly loaded. There is securely attached to the correct device. parameters match the configuration of the cable. Reinstall the network drivers, using the Recovery Disc Set created from the hard drive's Recovery Partition. 32 Chapter 2 Troubleshooting Without Diagnostics ENWW Reinstall network drivers. Disable auto-sensing capabilities and force the system into the correct operating mode...
... Computer Setup and enable network controller in the Control Panel and configure the network controller. Network driver is not securely connected. Cause Solution The cable is not properly loaded. There is securely attached to the correct device. parameters match the configuration of the cable. Reinstall the network drivers, using the Recovery Disc Set created from the hard drive's Recovery Partition. 32 Chapter 2 Troubleshooting Without Diagnostics ENWW Reinstall network drivers. Disable auto-sensing capabilities and force the system into the correct operating mode...


