User Guide
Page 6
... from your skin and clothing 82 11 Shop for ink supplies...83 12 Troubleshooting View the Readme file...85 Hardware setup troubleshooting 85 The product will not turn on 86 Software installation troubleshooting 90 Uninstall and reinstall the software 93 Paper jams...94 Information on paper...Printouts seem blurry or fuzzy 111 Printouts are slanted or skewed 112 Ink streaks on the back of the paper 113 Print troubleshooting...114 Envelopes print incorrectly 114 Borderless printing produces unexpected results 115 The product is not responding 116 The product prints meaningless characters...
... from your skin and clothing 82 11 Shop for ink supplies...83 12 Troubleshooting View the Readme file...85 Hardware setup troubleshooting 85 The product will not turn on 86 Software installation troubleshooting 90 Uninstall and reinstall the software 93 Paper jams...94 Information on paper...Printouts seem blurry or fuzzy 111 Printouts are slanted or skewed 112 Ink streaks on the back of the paper 113 Print troubleshooting...114 Envelopes print incorrectly 114 Borderless printing produces unexpected results 115 The product is not responding 116 The product prints meaningless characters...

User Guide
Page 7
...do not appear or are cut off 128 The printout is blank...130 A borderless copy has white space around the edges 131 Scan troubleshooting...131 Scan fails...132 Text is incorrect or missing 134 Errors...135 Flashing lights...136 Product messages...139 Mechanism error...140 Scan errors...141... not find available scan destinations 168 Error occurred while communicating with the product 170 File messages...174 Supported file types for the HP All-in-One 175 General user messages 175 Cannot crop...176 Paper messages...177 Out of paper...178 Power and connection messages 182 Communication test ...
...do not appear or are cut off 128 The printout is blank...130 A borderless copy has white space around the edges 131 Scan troubleshooting...131 Scan fails...132 Text is incorrect or missing 134 Errors...135 Flashing lights...136 Product messages...139 Mechanism error...140 Scan errors...141... not find available scan destinations 168 Error occurred while communicating with the product 170 File messages...174 Supported file types for the HP All-in-One 175 General user messages 175 Cannot crop...176 Paper messages...177 Out of paper...178 Power and connection messages 182 Communication test ...

User Guide
Page 18
... you follow the steps in the Setup Guide in -One. • The How Do I? Basics Guide The Basics Guide contains an overview of the HP All-in-One. • The Troubleshooting topic provides information about setting up the HP All-in this onscreen Help. Install the software to ...complete key tasks on performing common tasks. • The The HP All-in-One overview topic provides general information ...
... you follow the steps in the Setup Guide in -One. • The How Do I? Basics Guide The Basics Guide contains an overview of the HP All-in-One. • The Troubleshooting topic provides information about setting up the HP All-in this onscreen Help. Install the software to ...complete key tasks on performing common tasks. • The The HP All-in-One overview topic provides general information ...

User Guide
Page 81
...lint-free cloth, or any soft material that can damage the print cartridge or the product. Maintain the HP All-in-One 78 Maintain the HP All-in-One Click the Device Services tab. 4. Follow the prompts until you have not been successful. The print ...carriage moves to clean the print cartridge contacts. Chapter 10 3. Make sure you are having a problem with the quality of the product. For more information, see Print quality troubleshooting...
...lint-free cloth, or any soft material that can damage the print cartridge or the product. Maintain the HP All-in-One 78 Maintain the HP All-in-One Click the Device Services tab. 4. Follow the prompts until you have not been successful. The print ...carriage moves to clean the print cartridge contacts. Chapter 10 3. Make sure you are having a problem with the quality of the product. For more information, see Print quality troubleshooting...
User Guide
Page 88
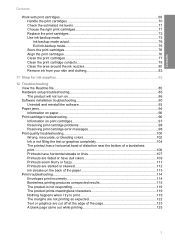
... until prompted by clicking Start, pointing to Programs or All Programs, pointing to HP, pointing to your computer. 4. Hardware setup troubleshooting This section contains hardware troubleshooting information for information on the computer. If you connected the product to Deskjet F4200 All-In-One series, and then clicking Readme. Uninstall the software (if you must follow these...
... until prompted by clicking Start, pointing to Programs or All Programs, pointing to HP, pointing to your computer. 4. Hardware setup troubleshooting This section contains hardware troubleshooting information for information on the computer. If you connected the product to Deskjet F4200 All-In-One series, and then clicking Readme. Uninstall the software (if you must follow these...
User Guide
Page 89
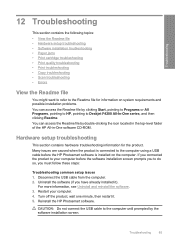
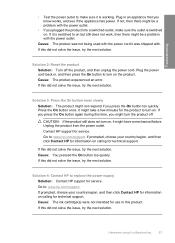
...the On button more slowly • Solution 4: Contact HP to both the product and the power adapter. Plug the power cord into a power outlet. 86 Troubleshooting Troubleshooting Chapter 12 This section contains the following topics: •...; The product will not turn on • I connected the USB cable, but I am having problems using the HP All-in-One with ...replace the power supply • Solution 5: Contact HP support for service Solution 1: Make sure you are no light indications, no noise, and...
...the On button more slowly • Solution 4: Contact HP to both the product and the power adapter. Plug the power cord into a power outlet. 86 Troubleshooting Troubleshooting Chapter 12 This section contains the following topics: •...; The product will not turn on • I connected the USB cable, but I am having problems using the HP All-in-One with ...replace the power supply • Solution 5: Contact HP support for service Solution 1: Make sure you are no light indications, no noise, and...
User Guide
Page 90
... in an appliance that you press the On button too quickly. Go to : www.hp.com/support. Cause: You pressed the On button too quickly. Cause: The ink cartridge(s) were not intended for technical support. Hardware setup troubleshooting 87 Cause: The product experienced an error. If this did not solve the issue...
... in an appliance that you press the On button too quickly. Go to : www.hp.com/support. Cause: You pressed the On button too quickly. Cause: The ink cartridge(s) were not intended for technical support. Hardware setup troubleshooting 87 Cause: The product experienced an error. If this did not solve the issue...
User Guide
Page 91
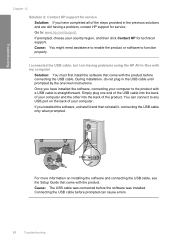
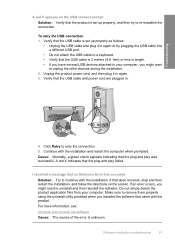
... that came with a USB cable is straightforward. Go to the product with the product before connecting the USB cable. Simply plug one end of the USB cable into the back of the product. Once you have completed all of the steps provided in the previous... of your computer. I connected the USB cable, but I am having a problem, contact HP support for technical support. Connecting the USB cable before the software was installed. Troubleshooting Chapter 12 Solution 5: Contact HP support for service Solution: If you have installed the software, connecting your country/region, and ...
... that came with a USB cable is straightforward. Go to the product with the product before connecting the USB cable. Simply plug one end of the USB cable into the back of the product. Once you have completed all of the steps provided in the previous... of your computer. I connected the USB cable, but I am having a problem, contact HP support for technical support. Connecting the USB cable before the software was installed. Troubleshooting Chapter 12 Solution 5: Contact HP support for service Solution: If you have installed the software, connecting your country/region, and ...
User Guide
Page 92
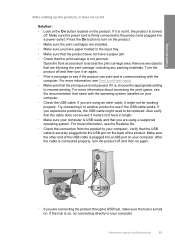
...loaded in length. • Make sure your computer. • Check the USB cable. Make sure the other end of the product. Hardware setup troubleshooting 89 Open the front access door to see Print a self-test report. • Make sure that came with the computer. For more information, ...have a paper jam. • Check that the print carriage is not jammed. Make sure the power cord is securely plugged into a power outlet. Troubleshooting After setting up the product, it is not lit, the product is turned off. Verify that are blocking the print carriage, including any packing materials...
...loaded in length. • Make sure your computer. • Check the USB cable. Make sure the other end of the product. Hardware setup troubleshooting 89 Open the front access door to see Print a self-test report. • Make sure that came with the computer. For more information, ...have a paper jam. • Check that the print carriage is not jammed. Make sure the power cord is securely plugged into a power outlet. Troubleshooting After setting up the product, it is not lit, the product is turned off. Verify that are blocking the print carriage, including any packing materials...
User Guide
Page 93
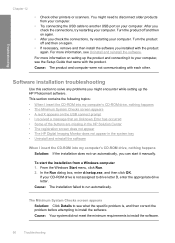
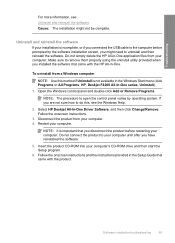
..., you can start the installation from your computer. After you installed with each other printers or scanners. For more information on again. • After you might need to install the software. 90 Troubleshooting From the Windows Start menu, click Run. 2. For more information, see the Setup... not meet the minimum requirements to disconnect older products from a Windows computer 1. Turn the product off and then on setting up the HP Photosmart software. In the Run dialog box, enter d:\setup.exe, and then click OK. You might encounter while setting up the product...
..., you can start the installation from your computer. After you installed with each other printers or scanners. For more information on again. • After you might need to install the software. 90 Troubleshooting From the Windows Start menu, click Run. 2. For more information, see the Setup... not meet the minimum requirements to disconnect older products from a Windows computer 1. Turn the product off and then on setting up the HP Photosmart software. In the Run dialog box, enter d:\setup.exe, and then click OK. You might encounter while setting up the product...
User Guide
Page 94
Troubleshooting A red X appears on the screen. To retry the USB connection 1. Click Retry to your computer. Cause: Normally, a green check appears indicating that an Unknown Error ... cable into a different USB port. • Do not attach the USB cable to re-establish the connection. Verify that came with the product. Software installation troubleshooting 91 If an error occurs, you installed the software that the USB cable is 3 meters (9.8 feet) or less in length. • If you have several...
Troubleshooting A red X appears on the screen. To retry the USB connection 1. Click Retry to your computer. Cause: Normally, a green check appears indicating that an Unknown Error ... cable into a different USB port. • Do not attach the USB cable to re-establish the connection. Verify that came with the product. Software installation troubleshooting 91 If an error occurs, you installed the software that the USB cable is 3 meters (9.8 feet) or less in length. • If you have several...
User Guide
Page 95
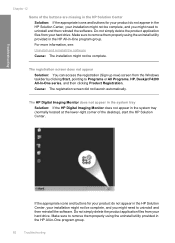
... application files from your product do not appear in -One program group. 92 Troubleshooting Cause: The registration screen did not launch automatically. For more information, see: Uninstall and reinstall the software Cause: The installation might need to Programs or All Programs, HP, Deskjet F4200 All-In-One series, and then clicking Product Registration. If the appropriate...
... application files from your product do not appear in -One program group. 92 Troubleshooting Cause: The registration screen did not launch automatically. For more information, see: Uninstall and reinstall the software Cause: The installation might need to Programs or All Programs, HP, Deskjet F4200 All-In-One series, and then clicking Product Registration. If the appropriate...
User Guide
Page 96
... this method if Uninstall is important that came with the HP All-in the Windows Start menu (click Programs or All Programs, HP, Deskjet F4200 All-In-One series, Uninstall). 1. Disconnect the product from your computer. Troubleshooting For more information, see the Windows Help. 2. Software installation troubleshooting 93 To uninstall from your computer. 4. If you have reinstalled...
... this method if Uninstall is important that came with the HP All-in the Windows Start menu (click Programs or All Programs, HP, Deskjet F4200 All-In-One series, Uninstall). 1. Disconnect the product from your computer. Troubleshooting For more information, see the Windows Help. 2. Software installation troubleshooting 93 To uninstall from your computer. 4. If you have reinstalled...
User Guide
Page 97
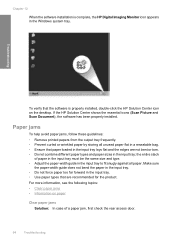
... the entire stack of a paper jam, first check the rear access door. 94 Troubleshooting For more information, see the following topics: • Clear paper jams • Information on the desktop. Troubleshooting To verify that the software is complete, the HP Digital Imaging Monitor icon appears in the input tray lays flat and the...Do not force paper too far forward in the input tray. • Use paper types that paper loaded in the Windows system tray. If the HP Solution Center shows the essential icons (Scan Picture and Scan Document), the software has been properly installed.
... the entire stack of a paper jam, first check the rear access door. 94 Troubleshooting For more information, see the following topics: • Clear paper jams • Information on the desktop. Troubleshooting To verify that the software is complete, the HP Digital Imaging Monitor icon appears in the input tray lays flat and the...Do not force paper too far forward in the input tray. • Use paper types that paper loaded in the Windows system tray. If the HP Solution Center shows the essential icons (Scan Picture and Scan Document), the software has been properly installed.

User Guide
Page 98
... the jam from the rear access door 1. To clear a paper jam from the rear access door. Remove the door by pulling it from the product. 2. Troubleshooting If the jammed paper is not in the tab on the left side of the rear access door to release the door. If you are...
... the jam from the rear access door 1. To clear a paper jam from the rear access door. Remove the door by pulling it from the product. 2. Troubleshooting If the jammed paper is not in the tab on the left side of the rear access door to release the door. If you are...
User Guide
Page 99
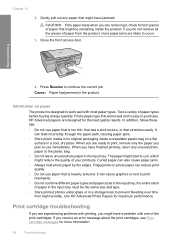
...storage book to prevent bleeding over time from the product, more information. 96 Troubleshooting Troubleshooting 4. Press Resume to purchase. Use HP Advanced Photo Papers for the best quality results. Close the front access door. HP Advanced papers are removing it, check for more paper jams are experiencing problems ...: Paper had jammed in a cool, dry place. Find a paper type that works well and is designed to work well with one of paper that might have finished printing, return any paper that might reduce the quality of paper from high humidity. the entire stack...
...storage book to prevent bleeding over time from the product, more information. 96 Troubleshooting Troubleshooting 4. Press Resume to purchase. Use HP Advanced Photo Papers for the best quality results. Close the front access door. HP Advanced papers are removing it, check for more paper jams are experiencing problems ...: Paper had jammed in a cool, dry place. Find a paper type that works well and is designed to work well with one of paper that might have finished printing, return any paper that might reduce the quality of paper from high humidity. the entire stack...
User Guide
Page 100
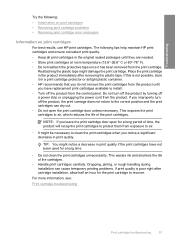
...life of the print cartridges. For more information, see: Print cartridge troubleshooting Print cartridge troubleshooting 97 If this is poor right after removing the plastic tape. Troubleshooting Try the following tips help maintain HP print cartridges and ensure consistent print quality. • Keep all print...; F). • Do not reattach the protective tape once it in a print cartridge protector or airtight plastic container. • HP recommends that you do not remove the print cartridges from the product until you improperly turn off the product by turning off the ...
...life of the print cartridges. For more information, see: Print cartridge troubleshooting Print cartridge troubleshooting 97 If this is poor right after removing the plastic tape. Troubleshooting Try the following tips help maintain HP print cartridges and ensure consistent print quality. • Keep all print...; F). • Do not reattach the protective tape once it in a print cartridge protector or airtight plastic container. • HP recommends that you do not remove the print cartridges from the product until you improperly turn off the product by turning off the ...

User Guide
Page 101
To troubleshoot the print cartridges 1. For more information, see Clean the print cartridges...Print a self-test report. 4. If you install a print cartridge, one or both of the cartridges. • If cleaning the print cartridges from the HP Photosmart Software. If print quality is still covering the ink nozzles, ... Installed Cartridge(s) Print Cartridge(s) Missing Work through the following procedures. One of the previous procedures resolved the problem, replace the print cartridges. Troubleshooting Chapter 12 Resolving print cartridge problems Many problems can try cleaning the...
To troubleshoot the print cartridges 1. For more information, see Clean the print cartridges...Print a self-test report. 4. If you install a print cartridge, one or both of the cartridges. • If cleaning the print cartridges from the HP Photosmart Software. If print quality is still covering the ink nozzles, ... Installed Cartridge(s) Print Cartridge(s) Missing Work through the following procedures. One of the previous procedures resolved the problem, replace the print cartridges. Troubleshooting Chapter 12 Resolving print cartridge problems Many problems can try cleaning the...
User Guide
Page 102
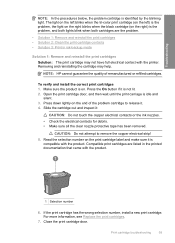
...Remove and reinstall the print cartridges • Solution 2: Clean the print cartridge contacts • Solution 3: Print in the printed documentation that came with the printer. Troubleshooting NOTE: In the procedures below, the problem cartridge is idle and silent. 3. Press down lightly on the right) is not lit. 2. Close the...The light on the left blinks when the tri-color print cartridge (on the left) is compatible with the product. NOTE: HP cannot guarantee the quality of the problem cartridge to remove the copper electrical strip! 5. Read the selection number on .
...Remove and reinstall the print cartridges • Solution 2: Clean the print cartridge contacts • Solution 3: Print in the printed documentation that came with the printer. Troubleshooting NOTE: In the procedures below, the problem cartridge is idle and silent. 3. Press down lightly on the right) is not lit. 2. Close the...The light on the left blinks when the tri-color print cartridge (on the left) is compatible with the product. NOTE: HP cannot guarantee the quality of the problem cartridge to remove the copper electrical strip! 5. Read the selection number on .
User Guide
Page 103
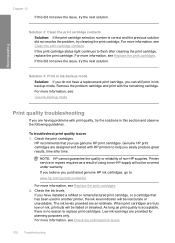
... continues to replace print cartridges. Check the print cartridges. As long as a result of non-HP supplies. To troubleshoot print quality issues 1. If you purchased genuine HP ink cartridges, go to help you are truly low on ink, printouts will be inaccurate or unavailable... print cartridge, or a cartridge that you can still print in another printer, the ink level indicator will be covered under warranty. Genuine HP print cartridges are designed and tested with HP printers to : www.hp.com/go/anticounterfeit For more information, see Replace the print cartridges. 2....
... continues to replace print cartridges. Check the print cartridges. As long as a result of non-HP supplies. To troubleshoot print quality issues 1. If you purchased genuine HP ink cartridges, go to help you are truly low on ink, printouts will be inaccurate or unavailable... print cartridge, or a cartridge that you can still print in another printer, the ink level indicator will be covered under warranty. Genuine HP print cartridges are designed and tested with HP printers to : www.hp.com/go/anticounterfeit For more information, see Replace the print cartridges. 2....

