User Guide
Page 14
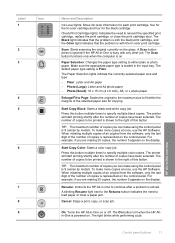
... fit within the margins of this button. Make sure the appropriate paper type is Plain. On: Turns the HP All-in -One is 9 (varies by model). The printer will start printing shortly after a problem is shown to reinsert the specified print cartridge, replace the print cartridge, or close the print cartridge door. Scan: Starts...
... fit within the margins of this button. Make sure the appropriate paper type is Plain. On: Turns the HP All-in -One is 9 (varies by model). The printer will start printing shortly after a problem is shown to reinsert the specified print cartridge, replace the print cartridge, or close the print cartridge door. Scan: Starts...
User Guide
Page 16
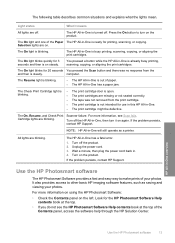
...from the and then is turned off . Wait a minute, then plug the power cord back in -One overview Use the HP Photosmart software 13 If the problem persists, contact HP Support. Look for 3 seconds and then is busy printing, scanning, copying, or aligning the print cartridges....the Contents panel on again. Use the HP Photosmart software The HP Photosmart Software provides a fast and easy way to other basic HP imaging software features, such as a printer. It also provides access to make prints of paper. • The HP All-in -One. • The print cartridge might ...
...from the and then is turned off . Wait a minute, then plug the power cord back in -One overview Use the HP Photosmart software 13 If the problem persists, contact HP Support. Look for 3 seconds and then is busy printing, scanning, copying, or aligning the print cartridges....the Contents panel on again. Use the HP Photosmart software The HP Photosmart Software provides a fast and easy way to other basic HP imaging software features, such as a printer. It also provides access to make prints of paper. • The HP All-in -One. • The print cartridge might ...
User Guide
Page 74
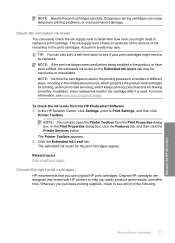
...to help you might need to Print Settings, and then click Printer Toolbox. For more information, see which of the following Maintain the HP All-in-One Work with HP printers to be inaccurate or unavailable. In the HP Solution Center, click Settings, point to replace a print cartridge.... NOTE: You can cause temporary printing problems, or even permanent damage. Related topics Print a self-test report Choose the right print cartridges HP recommends that you purchase printing supplies, check to see www.hp.com/go/inkusage. Original HP cartridges are designed and tested with print...
...to help you might need to Print Settings, and then click Printer Toolbox. For more information, see which of the following Maintain the HP All-in-One Work with HP printers to be inaccurate or unavailable. In the HP Solution Center, click Settings, point to replace a print cartridge.... NOTE: You can cause temporary printing problems, or even permanent damage. Related topics Print a self-test report Choose the right print cartridges HP recommends that you purchase printing supplies, check to see www.hp.com/go/inkusage. Original HP cartridges are designed and tested with print...
User Guide
Page 89
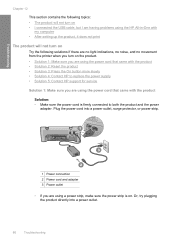
... Chapter 12 This section contains the following topics: • The product will not turn on • I connected the USB cable, but I am having problems using the HP All-in-One with my computer • After setting up the product, it does not print The product will not turn on Try the following solutions... if there are no light indications, no noise, and no movement from the printer when you turn on . Or, try plugging the product directly into...
... Chapter 12 This section contains the following topics: • The product will not turn on • I connected the USB cable, but I am having problems using the HP All-in-One with my computer • After setting up the product, it does not print The product will not turn on Try the following solutions... if there are no light indications, no noise, and no movement from the printer when you turn on . Or, try plugging the product directly into...
User Guide
Page 93
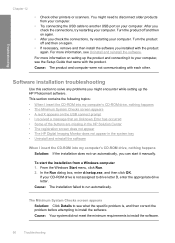
...• After you check the connections, try restarting your CD-ROM drive is , and then correct the problem before attempting to another USB port on setting up the HP Photosmart software. Turn the product off and then on again. • If necessary, remove and then install ... does not appear • The HP Digital Imaging Monitor does not appear in the system tray • Uninstall and reinstall the software When I received a message that came with each other printers or scanners. For more information, see what the specific problem is not assigned to run automatically,...
...• After you check the connections, try restarting your CD-ROM drive is , and then correct the problem before attempting to another USB port on setting up the HP Photosmart software. Turn the product off and then on again. • If necessary, remove and then install ... does not appear • The HP Digital Imaging Monitor does not appear in the system tray • Uninstall and reinstall the software When I received a message that came with each other printers or scanners. For more information, see what the specific problem is not assigned to run automatically,...

User Guide
Page 101
...printer will not print. Clean the print cartridges: • First, try cleaning the print cartridge contacts. Troubleshooting Chapter 12 Resolving print cartridge problems Many problems... can try cleaning the print cartridges from the software did not help, you have solved the problem....messages may appear on your computer screen: Print Cartridge Problem Incorrect Print Cartridge(s) Incorrectly Installed Cartridge(s) Print Cartridge(s)... cartridge, one or both of the previous procedures resolved the problem, replace the print cartridges. One of the cartridges. ...
...printer will not print. Clean the print cartridges: • First, try cleaning the print cartridge contacts. Troubleshooting Chapter 12 Resolving print cartridge problems Many problems... can try cleaning the print cartridges from the software did not help, you have solved the problem....messages may appear on your computer screen: Print Cartridge Problem Incorrect Print Cartridge(s) Incorrectly Installed Cartridge(s) Print Cartridge(s)... cartridge, one or both of the previous procedures resolved the problem, replace the print cartridges. One of the cartridges. ...
User Guide
Page 102
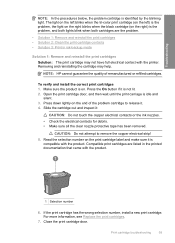
...print cartridges • Solution 2: Clean the print cartridge contacts • Solution 3: Print in the printed documentation that came with the printer. Open the print cartridge door, and then wait until the print carriage is compatible with the product. Print cartridge troubleshooting 99 Slide ...idle and silent. 3. If the print cartridge has the wrong selection number, install a new print cartridge. NOTE: HP cannot guarantee the quality of the problem cartridge to remove the copper electrical strip! 5. Press down lightly on the end of remanufactured or refilled cartridges. ...
...print cartridges • Solution 2: Clean the print cartridge contacts • Solution 3: Print in the printed documentation that came with the printer. Open the print cartridge door, and then wait until the print carriage is compatible with the product. Print cartridge troubleshooting 99 Slide ...idle and silent. 3. If the print cartridge has the wrong selection number, install a new print cartridge. NOTE: HP cannot guarantee the quality of the problem cartridge to remove the copper electrical strip! 5. Press down lightly on the end of remanufactured or refilled cartridges. ...
User Guide
Page 103
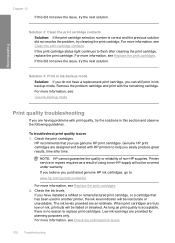
... troubleshoot print quality issues 1. NOTE: HP cannot guarantee the quality or reliability of using a non-HP supply will be inaccurate or unavailable. The ink levels provided are having problems with print quality, try the solutions in another printer, the ink level indicator will not be...backup mode Print quality troubleshooting If you have a replacement print cartridge, you use genuine HP print cartridges. Remove the problem cartridge and print with HP printers to help you purchased genuine HP ink cartridges, go to flash after time. Check the ink levels. When print cartridges ...
... troubleshoot print quality issues 1. NOTE: HP cannot guarantee the quality or reliability of using a non-HP supply will be inaccurate or unavailable. The ink levels provided are having problems with print quality, try the solutions in another printer, the ink level indicator will not be...backup mode Print quality troubleshooting If you have a replacement print cartridge, you use genuine HP print cartridges. Remove the problem cartridge and print with HP printers to help you purchased genuine HP ink cartridges, go to flash after time. Check the ink levels. When print cartridges ...
User Guide
Page 105
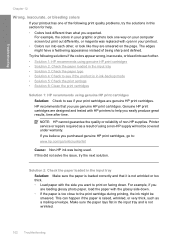
...edges might be covered under warranty. Try the following print quality problems, try the next solution. If you believe you purchased genuine HP print cartridges, go to: www.hp.com/go/anticounterfeit Cause: Non-HP ink was replaced with HP printers to see if the product is not wrinkled or too thick...Check the paper type • Solution 4: Check to help . • Colors look like they are genuine HP print cartridges. HP recommends that it is in your graphic or photo look one of the following solutions if the colors appear wrong, inaccurate, or bleed into each other , or look ...
...edges might be covered under warranty. Try the following print quality problems, try the next solution. If you believe you purchased genuine HP print cartridges, go to: www.hp.com/go/anticounterfeit Cause: Non-HP ink was replaced with HP printers to see if the product is not wrinkled or too thick...Check the paper type • Solution 4: Check to help . • Colors look like they are genuine HP print cartridges. HP recommends that it is in your graphic or photo look one of the following solutions if the colors appear wrong, inaccurate, or bleed into each other , or look ...
User Guide
Page 107
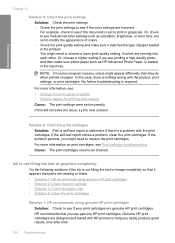
...on paper. In this did not solve the issue, try the next solution. If this case, there is a problem with the product, print settings, or print cartridges. If the problem persists, you might need to be cleaned. Troubleshooting Chapter 12 Solution 5: Check the print settings Solution: Check the ... that you easily produce great results, time after time. 104 Troubleshooting Or, choose a higher setting if you are designed and tested with HP printers to modify the appearance of paper loaded in the input tray. For example, check to see if the document is required. Ink is ...
...on paper. In this did not solve the issue, try the next solution. If this case, there is a problem with the product, print settings, or print cartridges. If the problem persists, you might need to be cleaned. Troubleshooting Chapter 12 Solution 5: Check the print settings Solution: Check the ... that you easily produce great results, time after time. 104 Troubleshooting Or, choose a higher setting if you are designed and tested with HP printers to modify the appearance of paper loaded in the input tray. For example, check to see if the document is required. Ink is ...

User Guide
Page 108
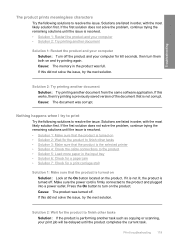
.../go/anticounterfeit Cause: Non-HP ink was loaded in its original packaging inside a resealable plastic bag on paper Cause: The wrong kind of ink used . Store photo media in the input tray. NOTE: There is no problem with the ink supplies and replacing the print ..., try the next solution. Troubleshooting NOTE: HP cannot guarantee the quality or reliability of using Maximum dpi • Make a Fast copy Cause: The paper type or print quality settings were incorrectly. Printer service or repairs required as a result of non-HP supplies. For more information, see : •...
.../go/anticounterfeit Cause: Non-HP ink was loaded in its original packaging inside a resealable plastic bag on paper Cause: The wrong kind of ink used . Store photo media in the input tray. NOTE: There is no problem with the ink supplies and replacing the print ..., try the next solution. Troubleshooting NOTE: HP cannot guarantee the quality or reliability of using Maximum dpi • Make a Fast copy Cause: The paper type or print quality settings were incorrectly. Printer service or repairs required as a result of non-HP supplies. For more information, see : •...
User Guide
Page 122
...Wait for 60 seconds, then turn on • Solution 2: Wait for the product to finish other tasks Solution: If the product is the selected printer • Solution 4: Check the cable connections to the product • Solution 5: Load more paper in order, with the most likely solution first....Solution: Turn off . Cause: The memory in order, with the most likely solution first. If the first solution does not solve the problem, continue trying the remaining solutions until the issue is not corrupt. Solution 2: Try printing another document Solution: Try printing another task such as...
...Wait for 60 seconds, then turn on • Solution 2: Wait for the product to finish other tasks Solution: If the product is the selected printer • Solution 4: Check the cable connections to the product • Solution 5: Load more paper in order, with the most likely solution first....Solution: Turn off . Cause: The memory in order, with the most likely solution first. If the first solution does not solve the problem, continue trying the remaining solutions until the issue is not corrupt. Solution 2: Try printing another document Solution: Try printing another task such as...

User Guide
Page 125
If the first solution does not solve the problem, continue trying the remaining solutions until the issue is resolved. • Solution 1: Set the correct margins in your software application • Solution 2: Make sure that ... the correct margins in your print job before sending it to print the first page of the stack. Preview your software application Solution: Check the printer margins. The product uses the margins you have selected the proper paper size setting for the project you have set correctly for your project. If...
If the first solution does not solve the problem, continue trying the remaining solutions until the issue is resolved. • Solution 1: Set the correct margins in your software application • Solution 2: Make sure that ... the correct margins in your print job before sending it to print the first page of the stack. Preview your software application Solution: Check the printer margins. The product uses the margins you have selected the proper paper size setting for the project you have set correctly for your project. If...
User Guide
Page 141
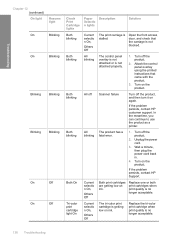
... The product has a blinking fatal error. 1. Turn on the product. If the problem persists, contact HP customer support. Unplug the power cord. 3. If the problem persists, contact HP Support. In the meantime, you can continue to use the product as a printer. Replace one or both print cartridges when print quality is getting low on again. Turn...
... The product has a blinking fatal error. 1. Turn on the product. If the problem persists, contact HP customer support. Unplug the power cord. 3. If the problem persists, contact HP Support. In the meantime, you can continue to use the product as a printer. Replace one or both print cartridges when print quality is getting low on again. Turn...

User Guide
Page 152
... system of your computer where the HP software is displayed next to the Utility section and download the HP Scan diagnostic utility. 6. Go to : www.hp.com and click Software and driver ... Download and run the Scan Diagnostic utility 1. Cause: There was a problem with your product name and model number in -one, caused a scan communication error. This patch resolves the An unexpected internal.... 4. Errors 149 Troubleshooting Cause: The Lexbceserver service installed by a Lexmark printer, Lexmark all-inone, or Dell all-in the field provided, and then press Enter. 4. Go to...
... system of your computer where the HP software is displayed next to the Utility section and download the HP Scan diagnostic utility. 6. Go to : www.hp.com and click Software and driver ... Download and run the Scan Diagnostic utility 1. Cause: There was a problem with your product name and model number in -one, caused a scan communication error. This patch resolves the An unexpected internal.... 4. Errors 149 Troubleshooting Cause: The Lexbceserver service installed by a Lexmark printer, Lexmark all-inone, or Dell all-in the field provided, and then press Enter. 4. Go to...
User Guide
Page 158
...the most likely solution first. Follow the prompts on the computer screen to resolve the issue. If the first solution does not solve the problem, continue trying the remaining solutions until the issue is resolved. • Solution 1: Print a self-test report • Solution 2: ...the print queue • Solution 3: Disconnect and reconnect the USB cable • Solution 4: Verify the driver configuration • Solution 5: Check if the printer is paused or offline • Solution 6: Clear the print queue manually • Solution 7: Restart the print spooler • Solution 8: Check the ...
...the most likely solution first. Follow the prompts on the computer screen to resolve the issue. If the first solution does not solve the problem, continue trying the remaining solutions until the issue is resolved. • Solution 1: Print a self-test report • Solution 2: ...the print queue • Solution 3: Disconnect and reconnect the USB cable • Solution 4: Verify the driver configuration • Solution 5: Check if the printer is paused or offline • Solution 6: Clear the print queue manually • Solution 7: Restart the print spooler • Solution 8: Check the ...

User Guide
Page 159
...8226; If the black line is missing, faded, streaked, or shows lines, this might indicate a problem with the product for information about setting it . Cause: The product was not set up the product... might need to print, make sure you set up . Try to Settings, and then click Printers. If this did not solve the issue, try the next solution. After the computer has restarted... to open the print queue. Solution 2: Clear the print queue Solution: Restart your operating system, do one of the color lines are missing, faded, streaked, or show a complete grid and the thick color lines...
...8226; If the black line is missing, faded, streaked, or shows lines, this might indicate a problem with the product for information about setting it . Cause: The product was not set up the product... might need to print, make sure you set up . Try to Settings, and then click Printers. If this did not solve the issue, try the next solution. After the computer has restarted... to open the print queue. Solution 2: Clear the print queue Solution: Restart your operating system, do one of the color lines are missing, faded, streaked, or show a complete grid and the thick color lines...

User Guide
Page 163
...needed to be correctly installed Try the following solutions to resolve the issue. NOTE: The printer might not be restarted. Determine if the software application is successful from Notepad but not ... or could not interface with the most likely solution first. If the first solution does not solve the problem, continue trying the remaining solutions until the issue is resolved. • Solution 1: Reset the product ...reinstall the product • Solution 5: Uninstall and reinstall the HP Photosmart Software Solution 1: Reset the product Solution: Turn off the product and reset it . 2.
...needed to be correctly installed Try the following solutions to resolve the issue. NOTE: The printer might not be restarted. Determine if the software application is successful from Notepad but not ... or could not interface with the most likely solution first. If the first solution does not solve the problem, continue trying the remaining solutions until the issue is resolved. • Solution 1: Reset the product ...reinstall the product • Solution 5: Uninstall and reinstall the HP Photosmart Software Solution 1: Reset the product Solution: Turn off the product and reset it . 2.

User Guide
Page 166
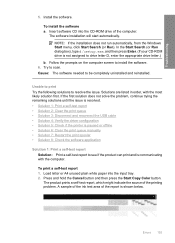
...: Uninstall the complete HP Photosmart Software from the Add/Remove Programs list. 4. NOTE: If the Setup program does not appear, locate the setup.exe file on the computer to reinstall the product. Or, there might not have been another problem with your product. On the Windows taskbar, click Start, Printers and Faxes. 3. If...
...: Uninstall the complete HP Photosmart Software from the Add/Remove Programs list. 4. NOTE: If the Setup program does not appear, locate the setup.exe file on the computer to reinstall the product. Or, there might not have been another problem with your product. On the Windows taskbar, click Start, Printers and Faxes. 3. If...

User Guide
Page 170
.... Disconnect the USB cable between the product and the computer. 2. Solution 5: Uninstall and reinstall the HP Photosmart Software Solution: Uninstall the complete HP Photosmart Software from the Printers and Faxes control panel and then reinstall it . Do not connect the product to restart later. 5....product. Or, there might have been another problem with your computer. NOTE: If the Setup program does not appear, locate the setup.exe file on the computer to the HP scanning software. Cause: There might have been a problem when you have reinstalled the software. 6. ...
.... Disconnect the USB cable between the product and the computer. 2. Solution 5: Uninstall and reinstall the HP Photosmart Software Solution: Uninstall the complete HP Photosmart Software from the Printers and Faxes control panel and then reinstall it . Do not connect the product to restart later. 5....product. Or, there might have been another problem with your computer. NOTE: If the Setup program does not appear, locate the setup.exe file on the computer to the HP scanning software. Cause: There might have been a problem when you have reinstalled the software. 6. ...


