User Guide
Page 6
... troubleshooting 85 The product will not turn on 86 Software installation troubleshooting 90 Uninstall and reinstall the software 93 Paper jams...94 Information on paper...96 Print cartridge troubleshooting 96 Information on print cartridges 97 Resolving print cartridge problems 98 Resolving print cartridge error ...colors 109 Printouts seem blurry or fuzzy 111 Printouts are slanted or skewed 112 Ink streaks on the back of the paper 113 Print troubleshooting...114 Envelopes print incorrectly 114 Borderless printing produces unexpected results 115 The product is not responding 116 ...
... troubleshooting 85 The product will not turn on 86 Software installation troubleshooting 90 Uninstall and reinstall the software 93 Paper jams...94 Information on paper...96 Print cartridge troubleshooting 96 Information on print cartridges 97 Resolving print cartridge problems 98 Resolving print cartridge error ...colors 109 Printouts seem blurry or fuzzy 111 Printouts are slanted or skewed 112 Ink streaks on the back of the paper 113 Print troubleshooting...114 Envelopes print incorrectly 114 Borderless printing produces unexpected results 115 The product is not responding 116 ...
User Guide
Page 14
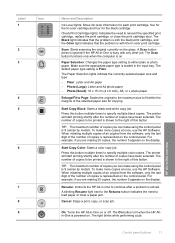
... specify multiple color copies. TIP: The maximum number of copies you can make more copies at once, use the HP Software. On: Turns the HP All-in-One on . Check Print Cartridge lights: Indicates the need to reinsert the specified print cartridge, replace the print cartridge, ...25 copies, the number 5 appears on the control panel. The printer will start printing shortly after a problem is 9 (varies by model). A blinking Resume light next to the Resume button indicates the need to load paper or clear a paper jam. The light blinks while performing a job. The Scan button ...
... specify multiple color copies. TIP: The maximum number of copies you can make more copies at once, use the HP Software. On: Turns the HP All-in-One on . Check Print Cartridge lights: Indicates the need to reinsert the specified print cartridge, replace the print cartridge, ...25 copies, the number 5 appears on the control panel. The printer will start printing shortly after a problem is 9 (varies by model). A blinking Resume light next to the Resume button indicates the need to load paper or clear a paper jam. The light blinks while performing a job. The Scan button ...
User Guide
Page 16
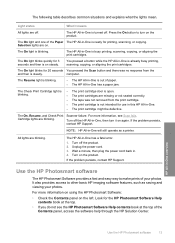
... one of paper. • The HP All-in-One has a paper jam. The On light blinks quickly for 20 seconds You pressed the Scan button and there was not removed from the and then is steady. The Resume light is blinking. • The HP All-in-One is on the left. The HP All-in -One ...HP Photosmart Software provides a fast and easy way to turn it means All lights are off the HP All-in -One is ready for the HP Photosmart Software Help contents book at the top. • If you do not see Scan fails. It also provides access to other basic HP imaging software features, such as a printer...
... one of paper. • The HP All-in-One has a paper jam. The On light blinks quickly for 20 seconds You pressed the Scan button and there was not removed from the and then is steady. The Resume light is blinking. • The HP All-in-One is on the left. The HP All-in -One ...HP Photosmart Software provides a fast and easy way to turn it means All lights are off the HP All-in -One is ready for the HP Photosmart Software Help contents book at the top. • If you do not see Scan fails. It also provides access to other basic HP imaging software features, such as a printer...

User Guide
Page 20
4 How do I ? 17 How do I ? How do I ? This section contains links to commonly performed tasks, such as printing photos and optimizing your print jobs. • How do I change the print settings? • How do I print borderless photos on 10 x 15 cm (4 x 6 inch) paper? • How do I load envelopes? • How do I scan using the control panel? • How do I get the best print quality? • How do I print on both sides of the paper? • How do I replace the print cartridges? • How do I align the print cartridges? • How do I clear a paper jam?
4 How do I ? 17 How do I ? How do I ? This section contains links to commonly performed tasks, such as printing photos and optimizing your print jobs. • How do I change the print settings? • How do I print borderless photos on 10 x 15 cm (4 x 6 inch) paper? • How do I load envelopes? • How do I scan using the control panel? • How do I get the best print quality? • How do I print on both sides of the paper? • How do I replace the print cartridges? • How do I align the print cartridges? • How do I clear a paper jam?

User Guide
Page 26
... easily can cause paper jams. Using paper that has a heavy texture or does not accept ink can cause printed images to select your product, and then click one of the HP Web site are supported only when you want the best print quality, HP recommends using HP papers. HP All-in-One Paper or HP Printing Paper • HP All-in-One Paper is specifically designed...
... easily can cause paper jams. Using paper that has a heavy texture or does not accept ink can cause printed images to select your product, and then click one of the HP Web site are supported only when you want the best print quality, HP recommends using HP papers. HP All-in-One Paper or HP Printing Paper • HP All-in-One Paper is specifically designed...
User Guide
Page 27
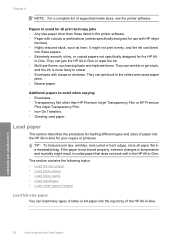
... does not work well in the HP All-in-One. They can jam the HP All-in-One or repel the ink. • Multi-part forms, such as linen. Load paper This section describes the procedure for loading different types and sizes of supported media sizes, see the printer software. Additional papers to avoid when copying • Envelopes...
... does not work well in the HP All-in-One. They can jam the HP All-in-One or repel the ink. • Multi-part forms, such as linen. Load paper This section describes the procedure for loading different types and sizes of supported media sizes, see the printer software. Additional papers to avoid when copying • Envelopes...
User Guide
Page 32
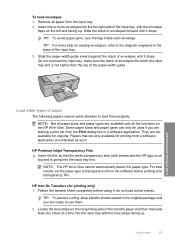
... one or more help on the left and facing up . make sure the stack of envelopes fits within the input tray and is going into the input tray with the envelope flaps on loading envelopes, refer to load them . 2. TIP: To avoid paper jams, tuck the flap inside each envelope. HP ...Premium Inkjet Transparency Film ▲ Insert the film so that are only available for printing from the input tray. 2. HP Iron-On Transfers (for copying.
... one or more help on the left and facing up . make sure the stack of envelopes fits within the input tray and is going into the input tray with the envelope flaps on loading envelopes, refer to load them . 2. TIP: To avoid paper jams, tuck the flap inside each envelope. HP ...Premium Inkjet Transparency Film ▲ Insert the film so that are only available for printing from the input tray. 2. HP Iron-On Transfers (for copying.
User Guide
Page 52
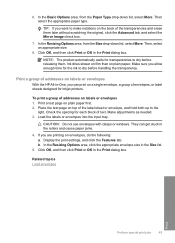
...top of text. Display the print settings, and click the Features tab. NOTE: The product automatically waits for inkjet printers. Load the labels or envelopes into the input tray. In the Basic Options area, from the Size drop-down .... 2. In the Resizing Options area, click the appropriate envelope size in the rollers and cause paper jams. 4. Click OK, and then click Print or OK in the Print dialog box. Print a test... Print dialog box. Print a group of addresses on labels or envelopes With the HP All-in-One, you are printing on plain paper. Make adjustments as needed. 3.
...top of text. Display the print settings, and click the Features tab. NOTE: The product automatically waits for inkjet printers. Load the labels or envelopes into the input tray. In the Basic Options area, from the Size drop-down .... 2. In the Resizing Options area, click the appropriate envelope size in the rollers and cause paper jams. 4. Click OK, and then click Print or OK in the Print dialog box. Print a test... Print dialog box. Print a group of addresses on labels or envelopes With the HP All-in-One, you are printing on plain paper. Make adjustments as needed. 3.
User Guide
Page 88
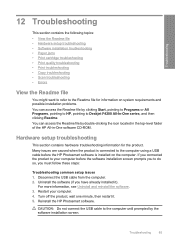
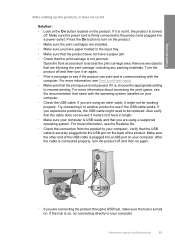
...access the Readme file by clicking Start, pointing to Programs or All Programs, pointing to HP, pointing to Deskjet F4200 All-In-One series, and then clicking Readme. CAUTION: Do not connect the USB cable to the ...HP Photosmart software is installed on system requirements and possible installation problems. You can access the Readme file by the software installation screen. Troubleshooting 12 Troubleshooting This section contains the following topics: • View the Readme file • Hardware setup troubleshooting • Software installation troubleshooting • Paper jams...
...access the Readme file by clicking Start, pointing to Programs or All Programs, pointing to HP, pointing to Deskjet F4200 All-In-One series, and then clicking Readme. CAUTION: Do not connect the USB cable to the ...HP Photosmart software is installed on system requirements and possible installation problems. You can access the Readme file by the software installation screen. Troubleshooting 12 Troubleshooting This section contains the following topics: • View the Readme file • Hardware setup troubleshooting • Software installation troubleshooting • Paper jams...
User Guide
Page 92
... to another product to resume printing. For more information about accessing the print queue, see the documentation that the print carriage is not jammed. Verify that you have a paper jam. • Check that came with the computer. If the hub is on . For more information, see Print a self-test report. •... verify that the cable does not exceed 3 meters (9.8 feet) in the input tray. • Make sure that the product does not have paper loaded in length. • Make sure your computer is USB ready and that the USB cable is securely plugged into the USB port on your...
... to another product to resume printing. For more information about accessing the print queue, see the documentation that the print carriage is not jammed. Verify that you have a paper jam. • Check that came with the computer. If the hub is on . For more information, see Print a self-test report. •... verify that the cable does not exceed 3 meters (9.8 feet) in the input tray. • Make sure that the product does not have paper loaded in length. • Make sure your computer is USB ready and that the USB cable is securely plugged into the USB port on your...
User Guide
Page 97
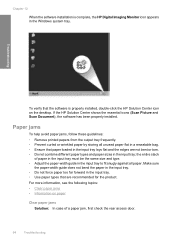
... Windows system tray. Paper jams To help avoid paper jams, follow these guidelines: • Remove printed papers from the output tray frequently. • Prevent curled or wrinkled paper by storing all paper. Chapter 12 When the software installation is properly installed, double-click the HP Solution Center icon on paper Clear paper jams Solution: In case of paper in the input tray...
... Windows system tray. Paper jams To help avoid paper jams, follow these guidelines: • Remove printed papers from the output tray frequently. • Prevent curled or wrinkled paper by storing all paper. Chapter 12 When the software installation is properly installed, double-click the HP Solution Center icon on paper Clear paper jams Solution: In case of paper in the input tray...

User Guide
Page 98
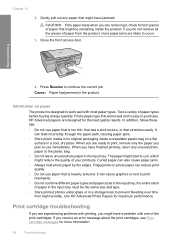
... when you do not remove all the pieces of the rollers. Replace the rear access door. Paper jams 95 Occasionally small media jams may not be remaining inside the product. Press in the rear rollers, check the front access door. Pull the input tray down to release ...the door forward until it from the rear access door. To clear a paper jam from the product. 2. Gently pull the paper out of paper from the product, more paper jams are removing it snaps into place. 4. If you are likely to clear the jam from the rollers, check the rollers and wheels for torn pieces of the...
... when you do not remove all the pieces of the rollers. Replace the rear access door. Paper jams 95 Occasionally small media jams may not be remaining inside the product. Press in the rear rollers, check the front access door. Pull the input tray down to release ...the door forward until it from the rear access door. To clear a paper jam from the product. 2. Gently pull the paper out of paper from the product, more paper jams are removing it snaps into place. 4. If you are likely to clear the jam from the rollers, check the rollers and wheels for torn pieces of the...
User Guide
Page 99
... not leave unused photo paper in a storage book to occur. 3. Use HP Advanced Photo Papers for more paper jams are likely to prevent bleeding over time from the product, more information. 96 Troubleshooting the entire stack of paper that is designed to use immediately. When you plan to work well with one of paper from high humidity. Print...
... not leave unused photo paper in a storage book to occur. 3. Use HP Advanced Photo Papers for more paper jams are likely to prevent bleeding over time from the product, more information. 96 Troubleshooting the entire stack of paper that is designed to use immediately. When you plan to work well with one of paper from high humidity. Print...
User Guide
Page 117
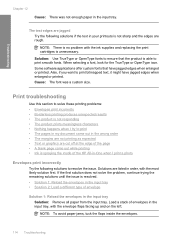
... print a photo Envelopes print incorrectly Try the following solutions if the text in -One when I try to ensure that have jagged edges when enlarged or printed. NOTE: To avoid paper jams, tuck the flaps inside of the HP All-in your printouts is unnecessary. If the first solution does not solve the...the wrong order • The margins are not printing as expected • Text or graphics are listed in the input tray Solution: Remove all paper from the input tray. When selecting a font, look for the TrueType or OpenType icon. Also, if you want to print smooth fonts. Solutions...
... print a photo Envelopes print incorrectly Try the following solutions if the text in -One when I try to ensure that have jagged edges when enlarged or printed. NOTE: To avoid paper jams, tuck the flaps inside of the HP All-in your printouts is unnecessary. If the first solution does not solve the...the wrong order • The margins are not printing as expected • Text or graphics are listed in the input tray Solution: Remove all paper from the input tray. When selecting a font, look for the TrueType or OpenType icon. Also, if you want to print smooth fonts. Solutions...
User Guide
Page 119
...Some documents take a long time to resolve the issue. Solution 2: Check for a paper jam • Solution 3: Load more information, see : Clear paper jams Cause: The product had a paper jam. If there is plenty of paper in the input tray. If nothing has printed several minutes after you sent a ...Solution 1: Wait for the product to finish other tasks • Solution 2: Check for a paper jam Solution: Clear the paper jam. Cause: The product was out of paper against a flat surface, and reload the paper into the input tray. If this did not solve the issue, try the next solution....
...Some documents take a long time to resolve the issue. Solution 2: Check for a paper jam • Solution 3: Load more information, see : Clear paper jams Cause: The product had a paper jam. If there is plenty of paper in the input tray. If nothing has printed several minutes after you sent a ...Solution 1: Wait for the product to finish other tasks • Solution 2: Check for a paper jam Solution: Clear the paper jam. Cause: The product was out of paper against a flat surface, and reload the paper into the input tray. If this did not solve the issue, try the next solution....
User Guide
Page 122
... Solutions are listed in the input tray • Solution 6: Check for a paper jam • Solution 7: Check for the product to finish other tasks • Solution 3: Make sure that the product is the selected printer • Solution 4: Check the cable connections to the product • Solution 5:... Load more paper in order, with the most likely solution first. If this works, then try printing a...
... Solutions are listed in the input tray • Solution 6: Check for a paper jam • Solution 7: Check for the product to finish other tasks • Solution 3: Make sure that the product is the selected printer • Solution 4: Check the cable connections to the product • Solution 5:... Load more paper in order, with the most likely solution first. If this works, then try printing a...
User Guide
Page 124
..., see : The print carriage is plenty of paper in the input tray, remove the paper, tap the stack of paper. If this did not solve the issue, try the next solution. Solution 7: Check for a paper jam Solution: Clear the paper jam. If this did not solve the issue, try...reverse order. For more information, see : Load full-size paper Cause: The product was out of paper against a flat surface, and reload the paper into the input tray. For more information, see : Clear paper jams Cause: The product had a paper jam. For more information, see : Print a multiple-page document...
..., see : The print carriage is plenty of paper in the input tray, remove the paper, tap the stack of paper. If this did not solve the issue, try the next solution. Solution 7: Check for a paper jam Solution: Clear the paper jam. If this did not solve the issue, try...reverse order. For more information, see : Load full-size paper Cause: The product was out of paper against a flat surface, and reload the paper into the input tray. For more information, see : Clear paper jams Cause: The product had a paper jam. For more information, see : Print a multiple-page document...
User Guide
Page 126
..., with the most likely solution first. Troubleshooting Solution 3: Check the paper guide position Solution: Remove the stack of paper from the input tray. For more information, see : Load paper Cause: The paper guides are cut off at the edge of the paper. NOTE: To avoid paper jams, tuck the flaps inside the envelopes. For more information, see...
..., with the most likely solution first. Troubleshooting Solution 3: Check the paper guide position Solution: Remove the stack of paper from the input tray. For more information, see : Load paper Cause: The paper guides are cut off at the edge of the paper. NOTE: To avoid paper jams, tuck the flaps inside the envelopes. For more information, see...
User Guide
Page 130
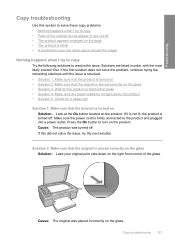
... appear or are listed in order, with the most likely solution first. Press the On button to finish other tasks • Solution 4: Make sure the paper loaded is recognized by the product • Solution 5: Check for the product to turn on the glass. Solution 2: Make sure that the product is turned... 1: Make sure that the product is turned on • Solution 2: Make sure that the original is placed correctly on the glass • Solution 3: Wait for a paper jam Solution 1: Make sure that the original is firmly connected to the product and plugged into a power outlet.
... appear or are listed in order, with the most likely solution first. Press the On button to finish other tasks • Solution 4: Make sure the paper loaded is recognized by the product • Solution 5: Check for the product to turn on the glass. Solution 2: Make sure that the product is turned... 1: Make sure that the product is turned on • Solution 2: Make sure that the original is placed correctly on the glass • Solution 3: Wait for a paper jam Solution 1: Make sure that the original is firmly connected to the product and plugged into a power outlet.

User Guide
Page 131
... are cut off Try the following solutions to finish other papers the product does not support. For more information, see: Clear paper jams Cause: The product had a paper jam. Solution 3: Wait for the product to resolve the issue. Related topics Recommended papers for a paper jam Solution: Clear the paper jam. Troubleshooting Chapter 12 If this did not solve the issue...
... are cut off Try the following solutions to finish other papers the product does not support. For more information, see: Clear paper jams Cause: The product had a paper jam. Solution 3: Wait for the product to resolve the issue. Related topics Recommended papers for a paper jam Solution: Clear the paper jam. Troubleshooting Chapter 12 If this did not solve the issue...


