
Service Reference Guide: HP Compaq dc7900 Business PC
Page 7
...Power Cable ...52 PATA Device Information ...53 ATA SMART Drives ...53 Hard Drive Capacities ...53 6 Identifying the Chassis, Routine Care, and Disassembly Preparation Chassis Designations ...54 Convertible Minitower (CMT 54 Small Form Factor (SFF 55 Ultra-Slim Desktop......59 Cleaning the Monitor ...60 Cleaning the Mouse ...60 Service Considerations ...60 Power Supply Fan ...60 Tools and Software Requirements 60 Screws ...61 Cables and Connectors ......a Security Lock 66 Cable Lock ...66 Padlock ...67 HP Business PC Security Lock 68 Computer Access Panel ...70 Front Bezel ...71 Bezel Blanks...
...Power Cable ...52 PATA Device Information ...53 ATA SMART Drives ...53 Hard Drive Capacities ...53 6 Identifying the Chassis, Routine Care, and Disassembly Preparation Chassis Designations ...54 Convertible Minitower (CMT 54 Small Form Factor (SFF 55 Ultra-Slim Desktop......59 Cleaning the Monitor ...60 Cleaning the Mouse ...60 Service Considerations ...60 Power Supply Fan ...60 Tools and Software Requirements 60 Screws ...61 Cables and Connectors ......a Security Lock 66 Cable Lock ...66 Padlock ...67 HP Business PC Security Lock 68 Computer Access Panel ...70 Front Bezel ...71 Bezel Blanks...
Service Reference Guide: HP Compaq dc7900 Business PC
Page 9
... ...168 Power Supply ...169 System Board ...171 Backwall ...172 Battery ...173 Type 1 Battery Holder ...174 Type 2 Battery Holder ...174 Type 3 Battery Holder ...175 Using the Small Form Factor Computer in a Tower Orientation 176 9 Removal and Replacement Procedures Ultra-Slim Desktop (USDT)... Chassis Preparation for Disassembly ...178 External Security Devices ...179 Installing a Security Lock 179 Cable Lock ...179 Padlock ...180 HP Business PC Security Lock 180 Computer Access Panel ...183 Front Bezel...
... ...168 Power Supply ...169 System Board ...171 Backwall ...172 Battery ...173 Type 1 Battery Holder ...174 Type 2 Battery Holder ...174 Type 3 Battery Holder ...175 Using the Small Form Factor Computer in a Tower Orientation 176 9 Removal and Replacement Procedures Ultra-Slim Desktop (USDT)... Chassis Preparation for Disassembly ...178 External Security Devices ...179 Installing a Security Lock 179 Cable Lock ...179 Padlock ...180 HP Business PC Security Lock 180 Computer Access Panel ...183 Front Bezel...
Service Reference Guide: HP Compaq dc7900 Business PC
Page 200
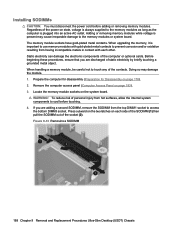
...183). 3. Locate the memory module sockets on each other. WARNING! Installing SODIMMs CAUTION: You must disconnect the power cord before touching. 4. When upgrading the memory, it is plugged into an active AC outlet. Doing so ...supplied to touch any of personal injury from hot surfaces, allow the internal system components to the memory modules or system board. Static electricity can damage the electronic components of static electricity by briefly touching a grounded metal object. Figure 9-13 Removing a SODIMM 188 Chapter 9 Removal and Replacement Procedures Ultra-Slim Desktop...
...183). 3. Locate the memory module sockets on each other. WARNING! Installing SODIMMs CAUTION: You must disconnect the power cord before touching. 4. When upgrading the memory, it is plugged into an active AC outlet. Doing so ...supplied to touch any of personal injury from hot surfaces, allow the internal system components to the memory modules or system board. Static electricity can damage the electronic components of static electricity by briefly touching a grounded metal object. Figure 9-13 Removing a SODIMM 188 Chapter 9 Removal and Replacement Procedures Ultra-Slim Desktop...
Service Reference Guide: HP Compaq dc7900 Business PC
Page 202
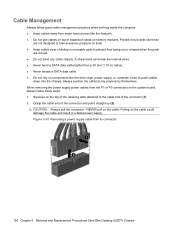
Grasp the cable end of the connector (1). 2. When removing the power supply power cables from major heat sources like the heatsink. ● Do not jam cables on top of sliding or moveable parts to prevent their being cut ... cover to lay properly by themselves. Always position the cables to push cables down into the chassis. Figure 9-15 Removing a power supply cable from its connector 190 Chapter 9 Removal and Replacement Procedures Ultra-Slim Desktop (USDT) Chassis A sharp bend can break the internal wires. ● Never bend a SATA data cable tighter than a 30 mm (1.18...
Grasp the cable end of the connector (1). 2. When removing the power supply power cables from major heat sources like the heatsink. ● Do not jam cables on top of sliding or moveable parts to prevent their being cut ... cover to lay properly by themselves. Always position the cables to push cables down into the chassis. Figure 9-15 Removing a power supply cable from its connector 190 Chapter 9 Removal and Replacement Procedures Ultra-Slim Desktop (USDT) Chassis A sharp bend can break the internal wires. ● Never bend a SATA data cable tighter than a 30 mm (1.18...


