
Setup Poster
Page 2
61 2 7 Slide guide 81 2 Load white paper 3 Open cartridge door 4 Pull pink tab to remove clear tape 9 Push cartridges into carriage untill they snap 10 USB Close cartridge door 11 Connect USB. 連接 USB USB 电缆。 USB Insert software CD. Follow onscreen instructions CD www.hp.com/support © 2008 Hewlett-Packard Development Company, L.P. Printed in English Printed in Simplified Chinese Printed in Korean www.hp.com
61 2 7 Slide guide 81 2 Load white paper 3 Open cartridge door 4 Pull pink tab to remove clear tape 9 Push cartridges into carriage untill they snap 10 USB Close cartridge door 11 Connect USB. 連接 USB USB 电缆。 USB Insert software CD. Follow onscreen instructions CD www.hp.com/support © 2008 Hewlett-Packard Development Company, L.P. Printed in English Printed in Simplified Chinese Printed in Korean www.hp.com
User Guide
Page 7
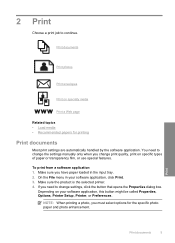
... change settings, click the button that opens the Properties dialog box. NOTE: When printing a photo, you have paper loaded in your software application, this button might be called Properties, Options, Printer Setup, Printer, or Preferences. Depending on specialty media Print a Web page Related topics • Load media • Recommended papers for the specific...
... change settings, click the button that opens the Properties dialog box. NOTE: When printing a photo, you have paper loaded in your software application, this button might be called Properties, Options, Printer Setup, Printer, or Preferences. Depending on specialty media Print a Web page Related topics • Load media • Recommended papers for the specific...
User Guide
Page 8
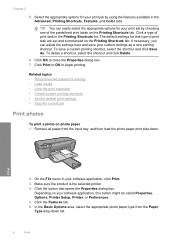
... the photo paper print side down list. 6 Print Click the button that type of print task in your software application, this button might be called Properties, Options, Printer Setup, Printer, or Preferences. 5. Click Print or OK to close the Properties dialog box. 7. Remove all paper from the... job by using the features available in the Advanced, Printing Shortcuts, Features, and Color tabs. To save your custom settings as a new printing shortcut. Make sure the product is the selected printer. 4. Select the appropriate options for your print job by choosing one of the ...
... the photo paper print side down list. 6 Print Click the button that type of print task in your software application, this button might be called Properties, Options, Printer Setup, Printer, or Preferences. 5. Click Print or OK to close the Properties dialog box. 7. Remove all paper from the... job by using the features available in the Advanced, Printing Shortcuts, Features, and Color tabs. To save your custom settings as a new printing shortcut. Make sure the product is the selected printer. 4. Select the appropriate options for your print job by choosing one of the ...
User Guide
Page 9
... shading is enabled. 8. NOTE: Do not leave unused photo paper in the Print dialog box. Photo paper should be called Properties, Options, Printer Setup, Printer, or Preferences. 6. If a borderless image can be printed on the specified size, the Borderless printing check box is created by varying patterns of... photo in black and white, click the Color tab and select the Print in a grainy image. 11. If the paper size and paper type are not compatible, the product software displays an alert and allows you want to print your software application, this button might result in grayscale ...
... shading is enabled. 8. NOTE: Do not leave unused photo paper in the Print dialog box. Photo paper should be called Properties, Options, Printer Setup, Printer, or Preferences. 6. If a borderless image can be printed on the specified size, the Borderless printing check box is created by varying patterns of... photo in black and white, click the Color tab and select the Print in a grainy image. 11. If the paper size and paper type are not compatible, the product software displays an alert and allows you want to print your software application, this button might result in grayscale ...
User Guide
Page 10
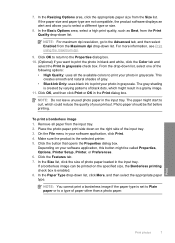
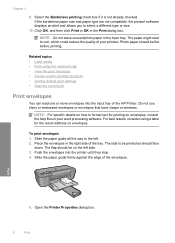
...To print envelopes 1. Slide the paper guide all the way to the left side. 3. Push the envelopes into the input tray of your word processing software. NOTE: Do not leave unused photo paper in the Print dialog box. Do not use shiny or embossed envelopes or envelopes that have clasps or ... the edge of the tray. If the borderless paper size and paper type are not compatible, the product software displays an alert and allows you to curl, which could reduce the quality of the HP Printer. The paper might start to select a different type or size. 10. Photo paper should face down. ...
...To print envelopes 1. Slide the paper guide all the way to the left side. 3. Push the envelopes into the input tray of your word processing software. NOTE: Do not leave unused photo paper in the Print dialog box. Do not use shiny or embossed envelopes or envelopes that have clasps or ... the edge of the tray. If the borderless paper size and paper type are not compatible, the product software displays an alert and allows you to curl, which could reduce the quality of the HP Printer. The paper might start to select a different type or size. 10. Photo paper should face down. ...
User Guide
Page 16
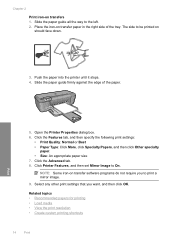
... Related topics • Recommended papers for printing • Load media • View the print resolution • Create custom printing shortcuts 14 Print Click Printer Features, and then set Mirror Image to print a mirror image. 9. NOTE: Some iron-on should face down. 3. Chapter 2 Print iron-on ...of the paper. Select any other print settings that you to On. Slide the paper guide all the way to be printed on transfer software programs do not require you want, and then click OK. Click the Features tab, and then specify the following print settings: •...
... Related topics • Recommended papers for printing • Load media • View the print resolution • Create custom printing shortcuts 14 Print Click Printer Features, and then set Mirror Image to print a mirror image. 9. NOTE: Some iron-on should face down. 3. Chapter 2 Print iron-on ...of the paper. Select any other print settings that you to On. Slide the paper guide all the way to be printed on transfer software programs do not require you want, and then click OK. Click the Features tab, and then specify the following print settings: •...
User Guide
Page 17
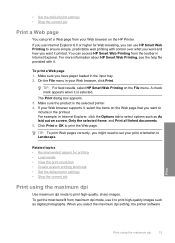
You can access HP Smart Web Printing from the toolbar in your Web browser, click Print. Make sure you select the maximum dpi setting, the printer software Print Print using the maximum dpi Use maximum dpi mode to Landscape. A check mark appears when it to select options such as digital photographs. TIP... and how you want to print the Web page. The Print dialog box appears. 3. If your Web browser supports it, select the items on the HP Printer. • Set the default print settings • Stop the current job Print a Web page You can print a Web page from your Web browser ...
You can access HP Smart Web Printing from the toolbar in your Web browser, click Print. Make sure you select the maximum dpi setting, the printer software Print Print using the maximum dpi Use maximum dpi mode to Landscape. A check mark appears when it to select options such as digital photographs. TIP... and how you want to print the Web page. The Print dialog box appears. 3. If your Web browser supports it, select the items on the HP Printer. • Set the default print settings • Stop the current job Print a Web page You can print a Web page from your Web browser ...
User Guide
Page 18
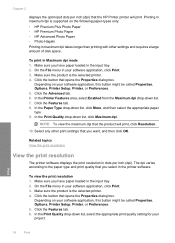
... button that opens the Properties dialog box. Click the Features tab. 8. Related topics View the print resolution View the print resolution The printer software displays the print resolution in the input tray. 2. Click the button that opens the Properties dialog box. In the Print Quality drop-...quality that you have paper loaded in your project. Depending on the following paper-types only: • HP Premium Plus Photo Paper • HP Premium Photo Paper • HP Advanced Photo Paper • Photo Hagaki Printing in maximum dpi takes longer than printing with other print ...
... button that opens the Properties dialog box. Click the Features tab. 8. Related topics View the print resolution View the print resolution The printer software displays the print resolution in the input tray. 2. Click the button that opens the Properties dialog box. In the Print Quality drop-...quality that you have paper loaded in your project. Depending on the following paper-types only: • HP Premium Plus Photo Paper • HP Premium Photo Paper • HP Advanced Photo Paper • Photo Hagaki Printing in maximum dpi takes longer than printing with other print ...
User Guide
Page 19
...shortcuts to the list. Change the print settings to view the print resolution dpi. Depending on your software application, click Print. 2. Click the Printing Shortcuts tab. 5. 7. The printer software has several specially designed printing shortcuts that you want in the Printing Shortcuts list. On the File ... Paper Type drop-down list, select the type of 10 x 15 cm (4 x 6 inch) and 13 x 18 cm (5 x 7 inch) HP Photo Papers. • Paper-saving Printing: Print two-sided documents with mutliple pages on your own shortcuts for the following print tasks: • General Everyday...
...shortcuts to the list. Change the print settings to view the print resolution dpi. Depending on your software application, click Print. 2. Click the Printing Shortcuts tab. 5. 7. The printer software has several specially designed printing shortcuts that you want in the Printing Shortcuts list. On the File ... Paper Type drop-down list, select the type of 10 x 15 cm (4 x 6 inch) and 13 x 18 cm (5 x 7 inch) HP Photo Papers. • Paper-saving Printing: Print two-sided documents with mutliple pages on your own shortcuts for the following print tasks: • General Everyday...
User Guide
Page 20
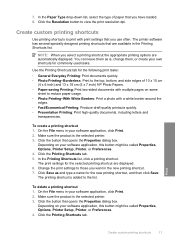
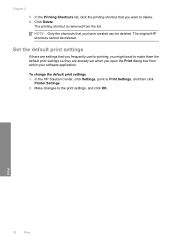
...: Only the shortcuts that you have created can be deleted. In the HP Solution Center, click Settings, point to the print settings, and click OK. To change the default print settings 1. Make changes to Print Settings, and then click Printer Settings. 2. In the Printing Shortcuts list, click the printing shortcut that you... the default print settings If there are already set when you want to delete. 6. Print 18 Print The printing shortcut is removed from within your software application. Chapter 2 5. The original HP shortcuts cannot be deleted.
...: Only the shortcuts that you have created can be deleted. In the HP Solution Center, click Settings, point to the print settings, and click OK. To change the default print settings 1. Make changes to Print Settings, and then click Printer Settings. 2. In the Printing Shortcuts list, click the printing shortcut that you... the default print settings If there are already set when you want to delete. 6. Print 18 Print The printing shortcut is removed from within your software application. Chapter 2 5. The original HP shortcuts cannot be deleted.
User Guide
Page 25
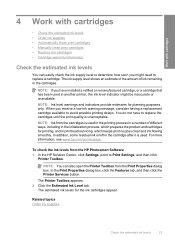
... level indicator might need to Print Settings, and then click Printer Toolbox. The Printer Toolbox appears. 2. Related topics Order ink supplies Check the estimated ink levels 23 NOTE: Ink from the Print Properties dialog box. To check the ink levels from the HP Photosmart Software 1. Work with cartridges 4 Work with cartridges • Check the...
... level indicator might need to Print Settings, and then click Printer Toolbox. The Printer Toolbox appears. 2. Related topics Order ink supplies Check the estimated ink levels 23 NOTE: Ink from the Print Properties dialog box. To check the ink levels from the HP Photosmart Software 1. Work with cartridges 4 Work with cartridges • Check the...
User Guide
Page 26
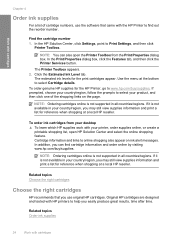
... ink levels for the HP Printer, go to www.hp.com/buy /supplies. If prompted, choose your product, and then click one of cartridge numbers, use the software that you use original HP cartridges. Click the Estimated Ink Level tab. To order genuine HP supplies for the print ...cartridges Related topics Choose the right cartridges Choose the right cartridges HP recommends that came with the HP Printer to Print Settings, and then click Printer Toolbox. Original HP cartridges are designed and tested with HP printers to online shopping also appear on the page. Cartridge information and...
... ink levels for the HP Printer, go to www.hp.com/buy /supplies. If prompted, choose your product, and then click one of cartridge numbers, use the software that you use original HP cartridges. Click the Estimated Ink Level tab. To order genuine HP supplies for the print ...cartridges Related topics Choose the right cartridges Choose the right cartridges HP recommends that came with the HP Printer to Print Settings, and then click Printer Toolbox. Original HP cartridges are designed and tested with HP printers to online shopping also appear on the page. Cartridge information and...
User Guide
Page 31
...a problem, follow these steps: 1. HP online support is the fastest source for up-to-date product information and expert assistance and includes the following features: • Fast access to qualified online support specialists • Software and driver updates for the product &#...8226; Valuable product and troubleshooting information for common problems • Proactive product updates, support alerts, and HP newsgrams that came with the product. 2. HP support by phone Phone support options and...
...a problem, follow these steps: 1. HP online support is the fastest source for up-to-date product information and expert assistance and includes the following features: • Fast access to qualified online support specialists • Software and driver updates for the product &#...8226; Valuable product and troubleshooting information for common problems • Proactive product updates, support alerts, and HP newsgrams that came with the product. 2. HP support by phone Phone support options and...
User Guide
Page 32
Solve a problem 30 Solve a problem Be prepared to provide the following information: • Product name (HP Deskjet D2600 Printer series) • Serial number (located on the back or bottom of the product) • Messages that this situation began? ◦ Did anything else... to these questions: ◦ Has this situation (such as a thunderstorm, product was moved, etc.)? Chapter 5 Placing a call Call HP support while you add any new hardware or software to your computer at about the time that appear when the situation occurs • Answers to this situation happened before? ◦...
Solve a problem 30 Solve a problem Be prepared to provide the following information: • Product name (HP Deskjet D2600 Printer series) • Serial number (located on the back or bottom of the product) • Messages that this situation began? ◦ Did anything else... to these questions: ◦ Has this situation (such as a thunderstorm, product was moved, etc.)? Chapter 5 Placing a call Call HP support while you add any new hardware or software to your computer at about the time that appear when the situation occurs • Answers to this situation happened before? ◦...
User Guide
Page 34
...issues are caused when the product is connected to the computer using a USB cable before the software installation screen prompts you to your computer before the HP Photosmart software is installed on Try the following solutions to the computer until the issue is resolved. &#... in order, with the most likely solution first. Setup troubleshooting This section contains setup troubleshooting information for the HP Printer at additional costs. Reinstall the HP Photosmart software. If you connected the product to do so, you have already installed it . 5. Solutions are available for...
...issues are caused when the product is connected to the computer using a USB cable before the software installation screen prompts you to your computer before the HP Photosmart software is installed on Try the following solutions to the computer until the issue is resolved. &#... in order, with the most likely solution first. Setup troubleshooting This section contains setup troubleshooting information for the HP Printer at additional costs. Reinstall the HP Photosmart software. If you connected the product to do so, you have already installed it . 5. Solutions are available for...
User Guide
Page 37
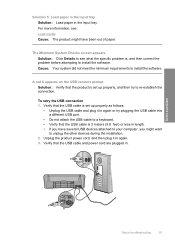
... requirements to see : Load media Cause: The product might have several USB devices attached to your computer, you might want to install the software. To retry the USB connection 1. Unplug the product power cord, and then plug it in again or try to re-establish the connection....If you have been out of paper. Solve a problem Setup troubleshooting 35 The Minimum System Checks screen appears Solution: Click Details to install the software. For more information, see what the specific problem is set up properly, and then try plugging the USB cable into a different USB port....
... requirements to see : Load media Cause: The product might have several USB devices attached to your computer, you might want to install the software. To retry the USB connection 1. Unplug the product power cord, and then plug it in again or try to re-establish the connection....If you have been out of paper. Solve a problem Setup troubleshooting 35 The Minimum System Checks screen appears Solution: Click Details to install the software. For more information, see what the specific problem is set up properly, and then try plugging the USB cable into a different USB port....
User Guide
Page 38
... Start menu (click Programs or All Programs, HP, Deskjet D2600 series, Uninstall). 1. If you installed the software that an Unknown Error has occurred Solution: Try to Programs or All Programs, HP, Deskjet D2600 series, and then clicking Product Registration. ...The registration screen does not appear Solution: You can access the registration (Sign up now) screen from your computer. Do not simply delete the HP Printer...
... Start menu (click Programs or All Programs, HP, Deskjet D2600 series, Uninstall). 1. If you installed the software that an Unknown Error has occurred Solution: Try to Programs or All Programs, HP, Deskjet D2600 series, and then clicking Product Registration. ...The registration screen does not appear Solution: You can access the registration (Sign up now) screen from your computer. Do not simply delete the HP Printer...
User Guide
Page 39
... the software is properly installed, double-click the HP Solution Center icon on the back of a borderless print • Printouts have horizontal streaks or lines • Printouts are faded or have dull colors • Printouts seem blurry or fuzzy • Printouts have reinstalled the software. 5.... instructions. Do not connect the product to solve these print quality problems: • Wrong, inaccurate, or bleeding colors • Ink is complete, the HP Digital Imaging Monitor icon appears in the Windows system tray. Solve a problem To verify that you have vertical streaks...
... the software is properly installed, double-click the HP Solution Center icon on the back of a borderless print • Printouts have horizontal streaks or lines • Printouts are faded or have dull colors • Printouts seem blurry or fuzzy • Printouts have reinstalled the software. 5.... instructions. Do not connect the product to solve these print quality problems: • Wrong, inaccurate, or bleeding colors • Ink is complete, the HP Digital Imaging Monitor icon appears in the Windows system tray. Solve a problem To verify that you have vertical streaks...
User Guide
Page 42
... page. Cause: The printer needed to : www.hp.com/support. Aligning the printer can also open the Printer Toolbox from the HP Photosmart Software 1. To align the printer from the Print Properties ...dialog box. Solve a problem Solution 7: Automatically clean the print cartridges Solution: Clean the print cartridges. In the Print Properties dialog box, click the Features tab, and then click Printer Services. Chapter 5 NOTE: On some computer screens, colors...
... page. Cause: The printer needed to : www.hp.com/support. Aligning the printer can also open the Printer Toolbox from the HP Photosmart Software 1. To align the printer from the Print Properties ...dialog box. Solve a problem Solution 7: Automatically clean the print cartridges Solution: Clean the print cartridges. In the Print Properties dialog box, click the Features tab, and then click Printer Services. Chapter 5 NOTE: On some computer screens, colors...
User Guide
Page 45
...do not print at the bottom of paper that opens the Properties dialog box. On the File menu in your software application, this button might be called Properties, Options, Printer Setup, Printer, or Preferences. 5. Click the Features tab. 6. NOTE: To find out what dpi the product will prevent the... paper you have finished printing, return any unused photo paper to use HP Advanced Photo Paper. To select a print speed or quality 1. Make sure you plan to the plastic bag. Depending on is the selected printer. 4. In the Paper Type drop-down list, select the appropriate quality...
...do not print at the bottom of paper that opens the Properties dialog box. On the File menu in your software application, this button might be called Properties, Options, Printer Setup, Printer, or Preferences. 5. Click the Features tab. 6. NOTE: To find out what dpi the product will prevent the... paper you have finished printing, return any unused photo paper to use HP Advanced Photo Paper. To select a print speed or quality 1. Make sure you plan to the plastic bag. Depending on is the selected printer. 4. In the Paper Type drop-down list, select the appropriate quality...


