Setup Poster
Page 1
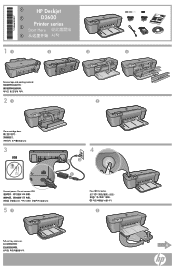
KO *CH366-90033* *CH366-90033* *CH366-90033* ZHCN HP Deskjet D2600 Printer series Start Here ZHTW EN 11 2 3 4 Remove tape and packing material 21 2 Close cartridge door 3 USB Connect power. Do not connect USB USB USB USB 51 4 2 3 1 Press On button 2 Pull out tray extension. 6
KO *CH366-90033* *CH366-90033* *CH366-90033* ZHCN HP Deskjet D2600 Printer series Start Here ZHTW EN 11 2 3 4 Remove tape and packing material 21 2 Close cartridge door 3 USB Connect power. Do not connect USB USB USB USB 51 4 2 3 1 Press On button 2 Pull out tray extension. 6
User Guide
Page 3
Contents Contents 1 Get to know the HP Printer Printer parts...3 Control panel features...4 2 Print Print documents...5 Print photos...6 Print envelopes...8 Print on specialty media...9 Print a Web page...15 4 Work with... supplies...24 Automatically clean print cartridges 25 Manually clean print cartridges 25 Replace the cartridges...26 Cartridge warranty information 28 5 Solve a problem HP support...29 Setup troubleshooting...32 Print quality troubleshooting...37 Print troubleshooting...53 Errors...58 7 Technical information Notice...77 Specifications...77 Environmental product stewardship ...
Contents Contents 1 Get to know the HP Printer Printer parts...3 Control panel features...4 2 Print Print documents...5 Print photos...6 Print envelopes...8 Print on specialty media...9 Print a Web page...15 4 Work with... supplies...24 Automatically clean print cartridges 25 Manually clean print cartridges 25 Replace the cartridges...26 Cartridge warranty information 28 5 Solve a problem HP support...29 Setup troubleshooting...32 Print quality troubleshooting...37 Print troubleshooting...53 Errors...58 7 Technical information Notice...77 Specifications...77 Environmental product stewardship ...
User Guide
Page 5
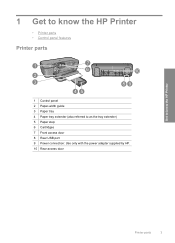
Get to know the HP Printer 1 Get to know the HP Printer • Printer parts • Control panel features Printer parts 1 Control panel 2 Paper-width guide 3 Paper tray 4 Paper tray extender (also referred to as the tray extender) 5 Paper stop 6 Cartridges 7 Front access door 8 Rear USB port 9 Power connection: Use only with the power adapter supplied by HP. 10 Rear access door Printer parts 3
Get to know the HP Printer 1 Get to know the HP Printer • Printer parts • Control panel features Printer parts 1 Control panel 2 Paper-width guide 3 Paper tray 4 Paper tray extender (also referred to as the tray extender) 5 Paper stop 6 Cartridges 7 Front access door 8 Rear USB port 9 Power connection: Use only with the power adapter supplied by HP. 10 Rear access door Printer parts 3
User Guide
Page 6
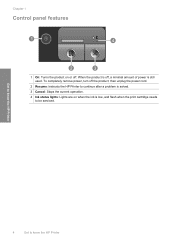
When the product is off, a minimal amount of power is low, and flash when the print cartridge needs to be serviced. Chapter 1 Control panel features 1 On: Turns the product on when the ink is still used. To completely remove power, turn off . Get to know the HP Printer 4 Get to continue after a problem is solved. 3 Cancel: Stops the current operation. 4 Ink status lights: Lights are on or off the product, then unplug the power cord. 2 Resume: Instructs the HP Printer to know the HP Printer
When the product is off, a minimal amount of power is low, and flash when the print cartridge needs to be serviced. Chapter 1 Control panel features 1 On: Turns the product on when the ink is still used. To completely remove power, turn off . Get to know the HP Printer 4 Get to continue after a problem is solved. 3 Cancel: Stops the current operation. 4 Ink status lights: Lights are on or off the product, then unplug the power cord. 2 Resume: Instructs the HP Printer to know the HP Printer
User Guide
Page 7
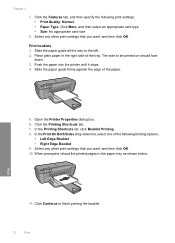
... Choose a print job to change the settings manually only when you have paper loaded in your software application, this button might be called Properties, Options, Printer Setup, Printer, or Preferences. You need to change print quality, print on specific types of paper or transparency film, or use special features. Make sure you...
... Choose a print job to change the settings manually only when you have paper loaded in your software application, this button might be called Properties, Options, Printer Setup, Printer, or Preferences. You need to change print quality, print on specific types of paper or transparency film, or use special features. Make sure you...
User Guide
Page 8
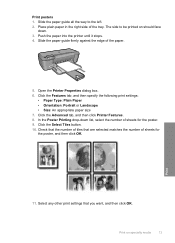
Select the appropriate options for your software application, this button might be called Properties, Options, Printer Setup, Printer, or Preferences. 5. Print 2. Make sure the product is the selected printer. 4. In the Basic Options area, select the appropriate photo paper type from the input ...tray, and then load the photo paper print side down list. 6 Print To save your software application, click Print. 3. On the File menu in the Advanced, Printing Shortcuts, Features, and Color...
Select the appropriate options for your software application, this button might be called Properties, Options, Printer Setup, Printer, or Preferences. 5. Print 2. Make sure the product is the selected printer. 4. In the Basic Options area, select the appropriate photo paper type from the input ...tray, and then load the photo paper print side down list. 6 Print To save your software application, click Print. 3. On the File menu in the Advanced, Printing Shortcuts, Features, and Color...
User Guide
Page 9
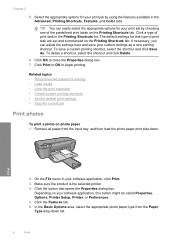
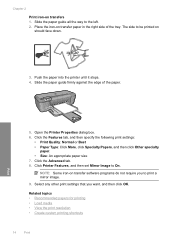
...drop-down list. Depending on your software application, this button might result in grayscale. If a borderless image can be called Properties, Options, Printer Setup, Printer, or Preferences. 6. In the Basic Options area, select a high print quality, such as Best, from the Maximum dpi drop-down list... Click OK to return to the Properties dialog box. 10. (Optional) If you to print the photo in black and white, click the Color tab and select the Print in grayscale. To print a borderless image 1. Make sure the product is enabled. 8. Click the Features tab. 7....
...drop-down list. Depending on your software application, this button might result in grayscale. If a borderless image can be called Properties, Options, Printer Setup, Printer, or Preferences. 6. In the Basic Options area, select a high print quality, such as Best, from the Maximum dpi drop-down list... Click OK to return to the Properties dialog box. 10. (Optional) If you to print the photo in black and white, click the Color tab and select the Print in grayscale. To print a borderless image 1. Make sure the product is enabled. 8. Click the Features tab. 7....
User Guide
Page 10
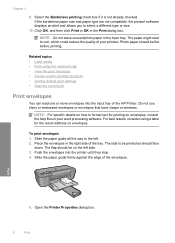
... • Set the default print settings • Stop the current job Print envelopes You can load one or more envelopes into the printer until they stop. 4. Open the Printer Properties dialog box. 8 Print Chapter 2 9. NOTE: Do not leave unused photo paper in the Print dialog box. Photo paper should... face down. The side to curl, which could reduce the quality of the HP Printer. Select the Borderless printing check box if it is not already checked. The paper might start to be printed on should be on envelopes....
... • Set the default print settings • Stop the current job Print envelopes You can load one or more envelopes into the printer until they stop. 4. Open the Printer Properties dialog box. 8 Print Chapter 2 9. NOTE: Do not leave unused photo paper in the Print dialog box. Photo paper should... face down. The side to curl, which could reduce the quality of the HP Printer. Select the Borderless printing check box if it is not already checked. The paper might start to be printed on should be on envelopes....
User Guide
Page 11
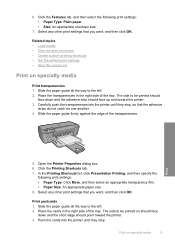
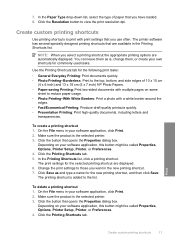
...the Printing Shortcuts tab. 7. Print on specialty media Print transparencies 1. Slide the paper guide firmly against the edge of the tray. Open the Printer Properties dialog box. 6. Print postcards 1. Click the Features tab, and then select the following print settings: • Paper Type: Click ...More, and then select an appropriate transparency film. • Paper Size: An appropriate paper size 8. Carefully push the transparencies into the printer until they stop , so that you want , and then click OK. Related topics • Load media • View the print resolution...
...the Printing Shortcuts tab. 7. Print on specialty media Print transparencies 1. Slide the paper guide firmly against the edge of the tray. Open the Printer Properties dialog box. 6. Print postcards 1. Click the Features tab, and then select the following print settings: • Paper Type: Click ...More, and then select an appropriate transparency film. • Paper Size: An appropriate paper size 8. Carefully push the transparencies into the printer until they stop , so that you want , and then click OK. Related topics • Load media • View the print resolution...
User Guide
Page 12
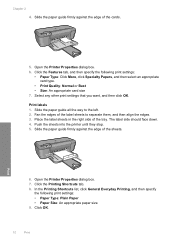
...Place the label sheets in the right side of the label sheets to the left. 2. Print 6. Open the Printer Properties dialog box. 7. Click the Printing Shortcuts tab. 8. Open the Printer Properties dialog box. 6. Slide the paper guide all the way to separate them, and then align the edges...or Best • Size: An appropriate card size 7. Chapter 2 4. Print labels 1. The label side should face down. 4. Push the sheets into the printer until they stop. 5. Click the Features tab, and then specify the following print settings: • Paper Type: Plain Paper • Paper Size: An...
...Place the label sheets in the right side of the label sheets to the left. 2. Print 6. Open the Printer Properties dialog box. 7. Click the Printing Shortcuts tab. 8. Open the Printer Properties dialog box. 6. Slide the paper guide all the way to separate them, and then align the edges...or Best • Size: An appropriate card size 7. Chapter 2 4. Print labels 1. The label side should face down. 4. Push the sheets into the printer until they stop. 5. Click the Features tab, and then specify the following print settings: • Paper Type: Plain Paper • Paper Size: An...
User Guide
Page 13
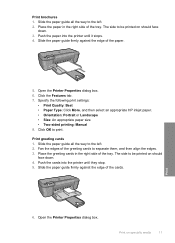
... then select an appropriate HP inkjet paper. • Orientation: Portrait or Landscape • Size: An appropriate paper size • Two-sided printing: Manual 8. Fan the edges of the tray. The side to be printed on specialty media 11 Print 6. Print on should face down . 4. Push the paper into the printer until it stops...
... then select an appropriate HP inkjet paper. • Orientation: Portrait or Landscape • Size: An appropriate paper size • Two-sided printing: Manual 8. Fan the edges of the tray. The side to be printed on specialty media 11 Print 6. Print on should face down . 4. Push the paper into the printer until it stops...
User Guide
Page 14
Chapter 2 7. Push the paper into the printer until it stops. 4. Slide the paper guide firmly against the edge of the following print settings: • Print Quality: Normal • Paper Type: Click More, .... Print 11. Click the Features tab, and then specify the following binding options: • Left Edge Booklet • Right Edge Booklet 9. Print booklets 1. Open the Printer Properties dialog box. 6. Slide the paper guide all the way to be printed on should face down list, select one of the paper. 5. Select any...
Chapter 2 7. Push the paper into the printer until it stops. 4. Slide the paper guide firmly against the edge of the following print settings: • Print Quality: Normal • Paper Type: Click More, .... Print 11. Click the Features tab, and then specify the following binding options: • Left Edge Booklet • Right Edge Booklet 9. Print booklets 1. Open the Printer Properties dialog box. 6. Slide the paper guide all the way to be printed on should face down list, select one of the paper. 5. Select any...
User Guide
Page 15
... side of sheets for the poster, and then click OK. Push the paper into the printer until it stops. 4. The side to the left. 2. Open the Printer Properties dialog box. 6. Click the Advanced tab, and then click Printer Features. 8. In the Poster Printing drop-down . 3. Print on should face down list, select the...
... side of sheets for the poster, and then click OK. Push the paper into the printer until it stops. 4. The side to the left. 2. Open the Printer Properties dialog box. 6. Click the Advanced tab, and then click Printer Features. 8. In the Poster Printing drop-down . 3. Print on should face down list, select the...
User Guide
Page 16
The side to print a mirror image. 9. Open the Printer Properties dialog box. 6. Push the paper into the printer until it stops. 4. Related topics • Recommended papers for printing • Load media • View the print resolution • Create custom printing shortcuts... iron-on transfer paper in the right side of the paper. Select any other print settings that you to be printed on transfers 1. Print 5. Click Printer Features, and then set Mirror Image to the left. 2. Click the Features tab, and then specify the following print settings: • Print Quality:...
The side to print a mirror image. 9. Open the Printer Properties dialog box. 6. Push the paper into the printer until it stops. 4. Related topics • Recommended papers for printing • Load media • View the print resolution • Create custom printing shortcuts... iron-on transfer paper in the right side of the paper. Select any other print settings that you to be printed on transfers 1. Print 5. Click Printer Features, and then set Mirror Image to the left. 2. Click the Features tab, and then specify the following print settings: • Print Quality:...
User Guide
Page 17
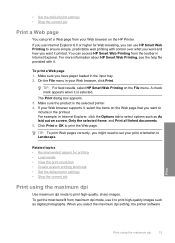
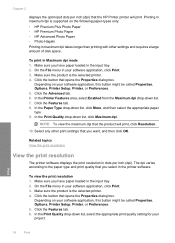
... dpi Use maximum dpi mode to ensure simple, predictable web printing with it , select the items on the HP Printer. Related topics • Recommended papers for Web browsing, you want it printed. You can access HP Smart Web Printing from the toolbar in the input tray. 2. Make sure you want and how you... or OK to Landscape. The Print dialog box appears. 3. If your print orientation to print the Web page. If you use it is the selected printer. 4. On the File menu in your Web browser on the Web page that you have paper loaded in Internet Explorer. To get the most benefit...
... dpi Use maximum dpi mode to ensure simple, predictable web printing with it , select the items on the HP Printer. Related topics • Recommended papers for Web browsing, you want it printed. You can access HP Smart Web Printing from the toolbar in the input tray. 2. Make sure you want and how you... or OK to Landscape. The Print dialog box appears. 3. If your print orientation to print the Web page. If you use it is the selected printer. 4. On the File menu in your Web browser on the Web page that you have paper loaded in Internet Explorer. To get the most benefit...
User Guide
Page 18
... Preferences. 5. In the Paper Type drop-down list. 7. The dpi varies according to the paper type and print quality that the HP Printer printer will print, click Resolution. 10. To view the print resolution 1. Print 16 Print Click the Features tab. 8. Make sure you select... dialog box. Depending on the following paper-types only: • HP Premium Plus Photo Paper • HP Premium Photo Paper • HP Advanced Photo Paper • Photo Hagaki Printing in Maximum dpi mode 1. In the Printer Features area, select Enabled from the Maximum dpi drop-down list, click...
... Preferences. 5. In the Paper Type drop-down list. 7. The dpi varies according to the paper type and print quality that the HP Printer printer will print, click Resolution. 10. To view the print resolution 1. Print 16 Print Click the Features tab. 8. Make sure you select... dialog box. Depending on the following paper-types only: • HP Premium Plus Photo Paper • HP Premium Photo Paper • HP Advanced Photo Paper • Photo Hagaki Printing in Maximum dpi mode 1. In the Printer Features area, select Enabled from the Maximum dpi drop-down list, click...
User Guide
Page 19
... , or create your software application, click Print. 2. Use the Printing Shortcuts tab for commonly used tasks. Make sure the product is the selected printer. 3. Click the button that you have loaded. 8. Click the Printing Shortcuts tab. 5. Change the print settings to print with a white border ... 7. In the Paper Type drop-down list, select the type of 10 x 15 cm (4 x 6 inch) and 13 x 18 cm (5 x 7 inch) HP Photo Papers. • Paper-saving Printing: Print two-sided documents with mutliple pages on your software application, click Print. 2. Click the Resolution button to the...
... , or create your software application, click Print. 2. Use the Printing Shortcuts tab for commonly used tasks. Make sure the product is the selected printer. 3. Click the button that you have loaded. 8. Click the Printing Shortcuts tab. 5. Change the print settings to print with a white border ... 7. In the Paper Type drop-down list, select the type of 10 x 15 cm (4 x 6 inch) and 13 x 18 cm (5 x 7 inch) HP Photo Papers. • Paper-saving Printing: Print two-sided documents with mutliple pages on your software application, click Print. 2. Click the Resolution button to the...
User Guide
Page 20
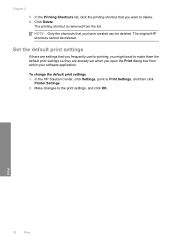
...within your software application. Set the default print settings If there are already set when you might want to Print Settings, and then click Printer Settings. 2. Print 18 Print NOTE: Only the shortcuts that you have created can be deleted. To change the default print settings 1. In the... HP Solution Center, click Settings, point to delete. 6. In the Printing Shortcuts list, click the printing shortcut that you want to the print settings, ...
...within your software application. Set the default print settings If there are already set when you might want to Print Settings, and then click Printer Settings. 2. Print 18 Print NOTE: Only the shortcuts that you have created can be deleted. To change the default print settings 1. In the... HP Solution Center, click Settings, point to delete. 6. In the Printing Shortcuts list, click the printing shortcut that you want to the print settings, ...
User Guide
Page 21
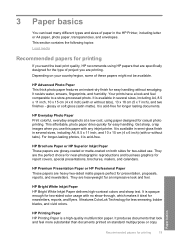
... newsletters. It features ColorLok Technology for easy handling. It is a high-quality multifunction paper. HP Bright White Inkjet Paper HP Bright White Inkjet Paper delivers high-contrast colors and sharp text. glossy or soft gloss (satin matte). They are heavy two-sided matte papers... several sizes, including A4, 8.5 x 11 inch, and 10 x 15 cm (4 x 6 inch) (with any inkjet printer. HP Premium Presentation Paper or HP Professional Paper These papers are the perfect choice for near-photographic reproductions and business graphics for longer lasting documents. Get sharp,...
... newsletters. It features ColorLok Technology for easy handling. It is a high-quality multifunction paper. HP Bright White Inkjet Paper HP Bright White Inkjet Paper delivers high-contrast colors and sharp text. glossy or soft gloss (satin matte). They are heavy two-sided matte papers... several sizes, including A4, 8.5 x 11 inch, and 10 x 15 cm (4 x 6 inch) (with any inkjet printer. HP Premium Presentation Paper or HP Professional Paper These papers are the perfect choice for near-photographic reproductions and business graphics for longer lasting documents. Get sharp,...

User Guide
Page 22
... quality, and produce documents with your color presentations vivid and even more impressive. It is acid-free for papers with the ColorLok logo for longer lasting documents. If prompted, choose your country/region, follow the prompts to share. HP Premium Inkjet Transparency Film HP Premium Inkjet Transparency Film make your HP Printer. This film is a high-quality...
... quality, and produce documents with your color presentations vivid and even more impressive. It is acid-free for papers with the ColorLok logo for longer lasting documents. If prompted, choose your country/region, follow the prompts to share. HP Premium Inkjet Transparency Film HP Premium Inkjet Transparency Film make your HP Printer. This film is a high-quality...


