Basic Guide
Page 27
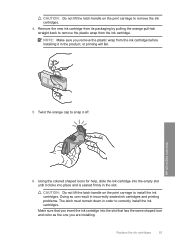
...sure you are installing. HP All-in the product, or printing will fail. 5. Twist the orange cap to remove the plastic wrap from the ink cartridge before installing it clicks into the slot that has the same shaped icon and color as the one you remove the plastic ...CAUTION: Do not lift the latch handle on the print carriage to install the ink cartridges. CAUTION: Do not lift the latch handle on the print carriage to correctly install the ink cartridges. Using the colored shaped icons for help, slide the ink cartridge into the empty slot until it in -One overview 6. Replace ...
...sure you are installing. HP All-in the product, or printing will fail. 5. Twist the orange cap to remove the plastic wrap from the ink cartridge before installing it clicks into the slot that has the same shaped icon and color as the one you remove the plastic ...CAUTION: Do not lift the latch handle on the print carriage to install the ink cartridges. CAUTION: Do not lift the latch handle on the print carriage to correctly install the ink cartridges. Using the colored shaped icons for help, slide the ink cartridge into the empty slot until it in -One overview 6. Replace ...
User Guide
Page 128
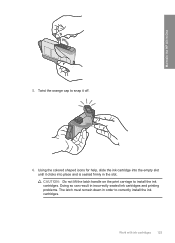
Twist the orange cap to install the ink cartridges. CAUTION: Do not lift the latch handle on the print carriage to snap it clicks into the empty slot until it off. 6. Work with ink cartridges 125 Using the colored shaped icons for help, slide the ink cartridge into place and is seated firmly in order to correctly install the ink cartridges. Doing so can result in incorrectly seated ink cartridges and printing problems. The latch must remain down in the slot. Maintain the HP All-in-One 5.
Twist the orange cap to install the ink cartridges. CAUTION: Do not lift the latch handle on the print carriage to snap it clicks into the empty slot until it off. 6. Work with ink cartridges 125 Using the colored shaped icons for help, slide the ink cartridge into place and is seated firmly in order to correctly install the ink cartridges. Doing so can result in incorrectly seated ink cartridges and printing problems. The latch must remain down in the slot. Maintain the HP All-in-One 5.
User Guide
Page 279
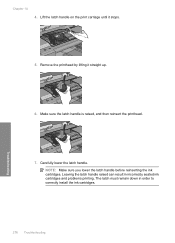
Leaving the latch handle raised can result in order to correctly install the ink cartridges. The latch must remain down in incorrectly seated ink cartridges and problems printing. NOTE: Make sure you lower the latch handle before reinserting the ink cartridges. Troubleshooting 276 Troubleshooting Lift the latch handle on the print carriage until it straight up. 6. Remove the printhead by lifting it stops. 5. Carefully lower the latch handle. Chapter 14 4. Make sure the latch handle is raised, and then reinsert the printhead. 7.
Leaving the latch handle raised can result in order to correctly install the ink cartridges. The latch must remain down in incorrectly seated ink cartridges and problems printing. NOTE: Make sure you lower the latch handle before reinserting the ink cartridges. Troubleshooting 276 Troubleshooting Lift the latch handle on the print carriage until it straight up. 6. Remove the printhead by lifting it stops. 5. Carefully lower the latch handle. Chapter 14 4. Make sure the latch handle is raised, and then reinsert the printhead. 7.
User Guide
Page 283
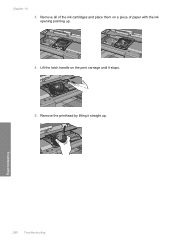
Remove all of the ink cartridges and place them on the print carriage until it straight up . 4. Chapter 14 3. Remove the printhead by lifting it stops. 5. Troubleshooting 280 Troubleshooting Lift the latch handle on a piece of paper with the ink opening pointing up .
Remove all of the ink cartridges and place them on the print carriage until it straight up . 4. Chapter 14 3. Remove the printhead by lifting it stops. 5. Troubleshooting 280 Troubleshooting Lift the latch handle on a piece of paper with the ink opening pointing up .
User Guide
Page 288
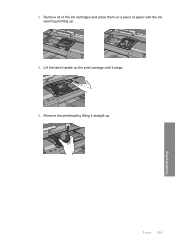
3. Remove all of the ink cartridges and place them on the print carriage until it straight up . 4. Lift the latch handle on a piece of paper with the ink opening pointing up . Errors 285 Troubleshooting Remove the printhead by lifting it stops. 5.
3. Remove all of the ink cartridges and place them on the print carriage until it straight up . 4. Lift the latch handle on a piece of paper with the ink opening pointing up . Errors 285 Troubleshooting Remove the printhead by lifting it stops. 5.


