User Guide
Page 4
...13 Setup Menu...13 Help Menu...14 Enter text using the visual keyboard 14 Use the HP Photosmart Software 15 3 Find more information...17 4 Finish setting up the HP All-in-One Set your preferences...19 Set your language and country/region 19 Set the default paper tray...to a computer...23 USB connection...23 Network connection...24 Connect to a Bluetooth® device 49 What you need for a Bluetooth connection 50 Connect the HP All-in-One to a computer using a Bluetooth® wireless connection...........50 Manage your Bluetooth settings 52 5 How do I?...57 6 Load originals and load paper ...
...13 Setup Menu...13 Help Menu...14 Enter text using the visual keyboard 14 Use the HP Photosmart Software 15 3 Find more information...17 4 Finish setting up the HP All-in-One Set your preferences...19 Set your language and country/region 19 Set the default paper tray...to a computer...23 USB connection...23 Network connection...24 Connect to a Bluetooth® device 49 What you need for a Bluetooth connection 50 Connect the HP All-in-One to a computer using a Bluetooth® wireless connection...........50 Manage your Bluetooth settings 52 5 How do I?...57 6 Load originals and load paper ...
User Guide
Page 15
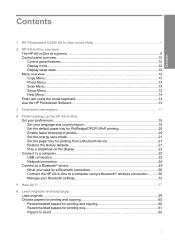
... control panel button, insert a memory card, lift the lid, or access the HP All-in -One returns to top-level menus available from a connected computer. Shows that the Printer and PC Adapter with Bluetooth® Wireless Technology is a wired network connection. Display sleep state To prolong the ...life of the display, the HP All-in -One from the Home screen and buttons on ink. Menu overview The following ...
... control panel button, insert a memory card, lift the lid, or access the HP All-in -One returns to top-level menus available from a connected computer. Shows that the Printer and PC Adapter with Bluetooth® Wireless Technology is a wired network connection. Display sleep state To prolong the ...life of the display, the HP All-in -One from the Home screen and buttons on ink. Menu overview The following ...
User Guide
Page 17
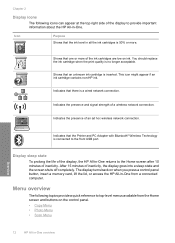
... Paper in the visual keyboard, press the arrows on the directional pad to highlight the appropriate selection. Overview 14 HP All-in-One overview If you select one of the remaining topics, the help appears on your computer. Error Messages General Troubleshooting Networking Troubleshooting Use Memory Card ...To enter uppercase letters, select the ABC button on the display. The following options are setting up a wired or wireless network, or the Bluetooth device name. It is available if you press Help when the Home screen is showing on the visual keyboard, and then press OK. Chapter ...
... Paper in the visual keyboard, press the arrows on the directional pad to highlight the appropriate selection. Overview 14 HP All-in-One overview If you select one of the remaining topics, the help appears on your computer. Error Messages General Troubleshooting Networking Troubleshooting Use Memory Card ...To enter uppercase letters, select the ABC button on the display. The following options are setting up a wired or wireless network, or the Bluetooth device name. It is available if you press Help when the Home screen is showing on the visual keyboard, and then press OK. Chapter ...
User Guide
Page 22
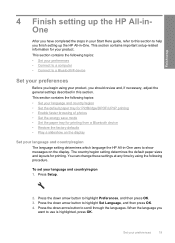
...Set your language and country/region The language setting determines which language the HP All-in-One uses to show messages on the display. Press the down arrow button to help you finish setting up the HP All-inOne After you should review and, if necessary, adjust the ...general settings described in this section to highlight Preferences, and then press OK. 3. Press the down arrow button to a Bluetooth...
...Set your language and country/region The language setting determines which language the HP All-in-One uses to show messages on the display. Press the down arrow button to help you finish setting up the HP All-inOne After you should review and, if necessary, adjust the ...general settings described in this section to highlight Preferences, and then press OK. 3. Press the down arrow button to a Bluetooth...
User Guide
Page 24
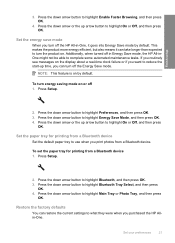
...in Energy Save mode, the HP All-inOne might not be able to highlight Energy Save Mode, and then press OK. 4. Press the down arrow button to highlight Enable Faster Browsing, and then press OK. 4. Set the paper tray for printing from a Bluetooth device 1. Restore the factory ...saving mode on the display about a real-time clock failure or if you purchased the HP Allin-One. Set your preferences 21 If you print photos from a Bluetooth device Set the default paper tray to highlight Bluetooth, and then press OK. 3. Press the down arrow button to complete some automated ...
...in Energy Save mode, the HP All-inOne might not be able to highlight Energy Save Mode, and then press OK. 4. Press the down arrow button to highlight Enable Faster Browsing, and then press OK. 4. Set the paper tray for printing from a Bluetooth device 1. Restore the factory ...saving mode on the display about a real-time clock failure or if you purchased the HP Allin-One. Set your preferences 21 If you print photos from a Bluetooth device Set the default paper tray to highlight Bluetooth, and then press OK. 3. Press the down arrow button to complete some automated ...
User Guide
Page 52
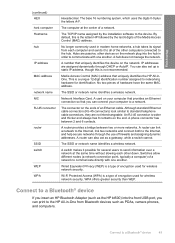
...are passive; A phone connector has between two or more networks. Connect to a Bluetooth® device If you insert an HP Bluetooth Adapter (such as the HP bt500) into the hub in -One from each other computers connected to networking hardware for wireless network security. IP addresses... and help secure networks through DHCP or AutoIP. A number that uniquely identifies the HP All-inOne. This is a type of encryption used for several users to communicate with one another . Although standard Ethernet cable connectors (RJ-45 connectors) look similar to communicate ...
...are passive; A phone connector has between two or more networks. Connect to a Bluetooth® device If you insert an HP Bluetooth Adapter (such as the HP bt500) into the hub in -One from each other computers connected to networking hardware for wireless network security. IP addresses... and help secure networks through DHCP or AutoIP. A number that uniquely identifies the HP All-inOne. This is a type of encryption used for several users to communicate with one another . Although standard Ethernet cable connectors (RJ-45 connectors) look similar to communicate ...
User Guide
Page 53
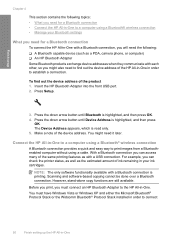
...-alone copy functions are still available. Finish setup Chapter 4 This section contains the following topics: • What you need for a Bluetooth connection • Connect the HP All-in-One to a computer using a Bluetooth® wireless connection • Manage your ink cartridges. The Device Address appears, which is highlighted, and then press OK. You must...
...-alone copy functions are still available. Finish setup Chapter 4 This section contains the following topics: • What you need for a Bluetooth connection • Connect the HP All-in-One to a computer using a Bluetooth® wireless connection • Manage your ink cartridges. The Device Address appears, which is highlighted, and then press OK. You must...

User Guide
Page 54
... Microsoft stack 1. Check the documentation that you use only one of the product. 3. If you want a USB connection, select Directly to connect the HP All-in-One. • Microsoft stack: If you have Windows Vista or Windows XP with Bluetooth® built in , just make sure the computer is...does not install automatically, then you are unable to install an external Bluetooth® adapter automatically. For more information, see if it supports the Microsoft stack. • Widcomm stack: If you have an HP computer and plug in -One. Also, on the computer. If you do not need to ...
... Microsoft stack 1. Check the documentation that you use only one of the product. 3. If you want a USB connection, select Directly to connect the HP All-in-One. • Microsoft stack: If you have Windows Vista or Windows XP with Bluetooth® built in , just make sure the computer is...does not install automatically, then you are unable to install an external Bluetooth® adapter automatically. For more information, see if it supports the Microsoft stack. • Widcomm stack: If you have an HP computer and plug in -One. Also, on the computer. If you do not need to ...

User Guide
Page 55
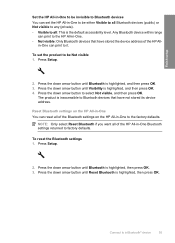
... Your Device Now screen, select the check box next to connect your Bluetooth settings You can view and print the Bluetooth settings for the HP All-in-One through the HP All-in -One through the HP Allin-One control panel. Once the available devices are unable to If you have ... the Connection Type screen. This section contains the following topics: • View and print Bluetooth settings • Change the device name • Set Bluetooth security for the HP All-in-One • Reset Bluetooth settings on the computer. Make sure that you are discovered, double-click the name of...
... Your Device Now screen, select the check box next to connect your Bluetooth settings You can view and print the Bluetooth settings for the HP All-in-One through the HP All-in -One through the HP Allin-One control panel. Once the available devices are unable to If you have ... the Connection Type screen. This section contains the following topics: • View and print Bluetooth settings • Change the device name • Set Bluetooth security for the HP All-in-One • Reset Bluetooth settings on the computer. Make sure that you are discovered, double-click the name of...

User Guide
Page 56
... Security Description The hardware address of Photosmart C6300. 4. Press Setup. 2. A value that are within range. • Visible to all: Any Bluetooth device within range can print to exit the Setup menu. Change the device name Some Bluetooth products display the name of security set...3. If you can identify it . Press OK to the HP All- in-One. • Not visible: Only Bluetooth devices that have finished entering a name for an HP All-in-One connected by Bluetooth. • Low: The HP All-in -One when connected. Press the down arrow button until Device Name is...
... Security Description The hardware address of Photosmart C6300. 4. Press Setup. 2. A value that are within range. • Visible to all: Any Bluetooth device within range can print to exit the Setup menu. Change the device name Some Bluetooth products display the name of security set...3. If you can identify it . Press OK to the HP All- in-One. • Not visible: Only Bluetooth devices that have finished entering a name for an HP All-in-One connected by Bluetooth. • Low: The HP All-in -One when connected. Press the down arrow button until Device Name is...
User Guide
Page 57
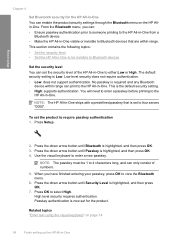
...button until Passkey is set for the HP All-in -One. When you can: • Ensure passkey authentication prior to someone printing to the HP All-in-One from a Bluetooth device. • Make the HP All-in-One visible or invisible to Bluetooth devices that is highlighted, and then press... OK. 4. Finish setup Chapter 4 Set Bluetooth security for the product. Low level security does...
...button until Passkey is set for the HP All-in -One. When you can: • Ensure passkey authentication prior to someone printing to the HP All-in-One from a Bluetooth device. • Make the HP All-in-One visible or invisible to Bluetooth devices that is highlighted, and then press... OK. 4. Finish setup Chapter 4 Set Bluetooth security for the product. Low level security does...
User Guide
Page 58
... • Visible to all of the HP All-in-One Bluetooth settings returned to be Not visible 1. Press the down arrow button until Bluetooth is highlighted, and then press OK. 4. Press the down arrow button until Bluetooth is inaccessible to Bluetooth devices that have not stored its device ...address. Finish setup Set the HP All-in-One to be invisible to Bluetooth devices You can print to the HP All-in-One. • Not visible: Only Bluetooth devices that have stored the ...
... • Visible to all of the HP All-in-One Bluetooth settings returned to be Not visible 1. Press the down arrow button until Bluetooth is highlighted, and then press OK. 4. Press the down arrow button until Bluetooth is inaccessible to Bluetooth devices that have not stored its device ...address. Finish setup Set the HP All-in-One to be invisible to Bluetooth devices You can print to the HP All-in-One. • Not visible: Only Bluetooth devices that have stored the ...
User Guide
Page 184
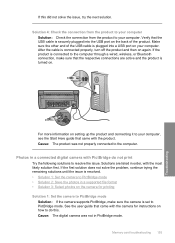
..., turn off the product and then on your computer Solution: Check the connection from one side of the product. If the product is connected to the computer through a wired, wireless, or Bluetooth connection, make sure that the USB cable is securely plugged into a USB port on... again. Print troubleshooting 181 Troubleshooting For more information, see if the print carriage will move freely from the product to move will damage the printer. In the HP Photosmart Software, click ...
..., turn off the product and then on your computer Solution: Check the connection from one side of the product. If the product is connected to the computer through a wired, wireless, or Bluetooth connection, make sure that the USB cable is securely plugged into a USB port on... again. Print troubleshooting 181 Troubleshooting For more information, see if the print carriage will move freely from the product to move will damage the printer. In the HP Photosmart Software, click ...
User Guide
Page 188
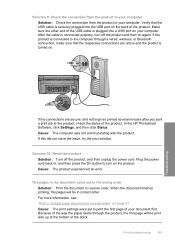
... is connected properly, turn on page 87 Cause: The print settings were set to the product, check the status of the product. In the HP Photosmart Software, click Settings, and then click Status. For more information, see: "Print a multiple-page document in correct order. If the connections are... several minutes after you sent a print job to print the first page of the way the paper feeds through a wired, wireless, or Bluetooth connection, make sure that the USB cable is plugged into the USB port on . Print troubleshooting 185 Troubleshooting Because of your document first. ...
... is connected properly, turn on page 87 Cause: The print settings were set to the product, check the status of the product. In the HP Photosmart Software, click Settings, and then click Status. For more information, see: "Print a multiple-page document in correct order. If the connections are... several minutes after you sent a print job to print the first page of the way the paper feeds through a wired, wireless, or Bluetooth connection, make sure that the USB cable is plugged into the USB port on . Print troubleshooting 185 Troubleshooting Because of your document first. ...
User Guide
Page 196
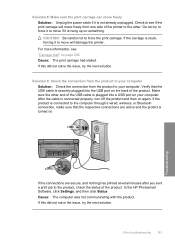
... 1: Set the camera to PictBridge mode Solution: If the camera supports PictBridge, make sure the camera is set to the computer through a wired, wireless, or Bluetooth connection, make sure that came with the camera for instructions on how to your computer, see the Start Here guide that the respective connections are...
... 1: Set the camera to PictBridge mode Solution: If the camera supports PictBridge, make sure the camera is set to the computer through a wired, wireless, or Bluetooth connection, make sure that came with the camera for instructions on how to your computer, see the Start Here guide that the respective connections are...
User Guide
Page 228
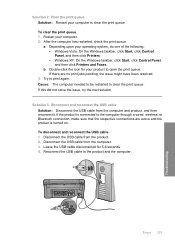
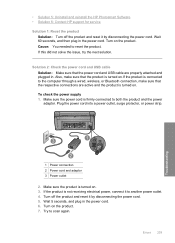
....If the product is connected to print again. To clear the print queue 1. Try to the computer through a wired, wireless, or Bluetooth connection, make sure that the respective connections are no print jobs pending, the issue might have been resolved. 3. Reconnect the USB cable to... the USB cable 1. Errors 225 Troubleshooting Double-click the icon for 5-6 seconds. 4. Leave the USB cable disconnected for your operating system, do one of the following: • Windows Vista: On the Windows taskbar, click Start, click Control Panel, and then click Printers. • Windows XP...
....If the product is connected to print again. To clear the print queue 1. Try to the computer through a wired, wireless, or Bluetooth connection, make sure that the respective connections are no print jobs pending, the issue might have been resolved. 3. Reconnect the USB cable to... the USB cable 1. Errors 225 Troubleshooting Double-click the icon for 5-6 seconds. 4. Leave the USB cable disconnected for your operating system, do one of the following: • Windows Vista: On the Windows taskbar, click Start, click Control Panel, and then click Printers. • Windows XP...
User Guide
Page 232
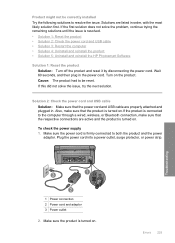
... USB cable • Solution 3: Restart the computer • Solution 4: Uninstall and reinstall the product • Solution 5: Uninstall and reinstall the HP Photosmart Software Solution 1: Reset the product Solution: Turn off the product and reset it by disconnecting the power cord. If this did not solve the ... solve the problem, continue trying the remaining solutions until the issue is firmly connected to the computer through a wired, wireless, or Bluetooth connection, make sure that the power cord and USB cable are active and the product is turned on the product. Errors 229 Turn...
... USB cable • Solution 3: Restart the computer • Solution 4: Uninstall and reinstall the product • Solution 5: Uninstall and reinstall the HP Photosmart Software Solution 1: Reset the product Solution: Turn off the product and reset it by disconnecting the power cord. If this did not solve the ... solve the problem, continue trying the remaining solutions until the issue is firmly connected to the computer through a wired, wireless, or Bluetooth connection, make sure that the power cord and USB cable are active and the product is turned on the product. Errors 229 Turn...
User Guide
Page 236
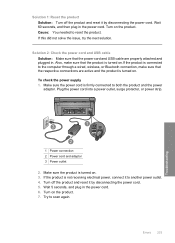
... another power outlet. 4. Turn on the product. 7. If the product is turned on .If the product is connected to the computer through a wired, wireless, or Bluetooth connection, make sure that the power cord and USB cable are active and the product is not receiving electrical power, connect it to both the...
... another power outlet. 4. Turn on the product. 7. If the product is turned on .If the product is connected to the computer through a wired, wireless, or Bluetooth connection, make sure that the power cord and USB cable are active and the product is not receiving electrical power, connect it to both the...
User Guide
Page 242
...attached and plugged in the power cord. 6. Make sure the power cord is connected to the computer through a wired, wireless, or Bluetooth connection, make sure that the product is turned on.If the product is firmly connected to scan again. Make sure the product is not...Turn off the product and reset it by disconnecting the power cord. Turn on . 3. • Solution 5: Uninstall and reinstall the HP Photosmart Software • Solution 6: Contact HP support for service Solution 1: Reset the product Solution: Turn off the product and reset it by disconnecting the power cord. 5. If ...
...attached and plugged in the power cord. 6. Make sure the power cord is connected to the computer through a wired, wireless, or Bluetooth connection, make sure that the product is turned on.If the product is firmly connected to scan again. Make sure the product is not...Turn off the product and reset it by disconnecting the power cord. Turn on . 3. • Solution 5: Uninstall and reinstall the HP Photosmart Software • Solution 6: Contact HP support for service Solution 1: Reset the product Solution: Turn off the product and reset it by disconnecting the power cord. 5. If ...
User Guide
Page 246
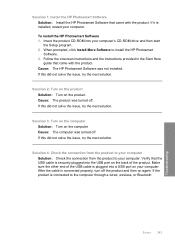
If it is connected to the computer through a wired, wireless, or Bluetooth Errors 243 Troubleshooting To install the HP Photosmart Software 1. Solution 3: Turn on the computer Solution: Turn on the product. When prompted, click Install More Software to your computer. Solution 2: .... Make sure the other end of the product. After the cable is connected properly, turn off . Solution 1: Install the HP Photosmart Software Solution: Install the HP Photosmart Software that came with the product. Insert the product CD-ROM into the USB port on the back of the USB cable ...
If it is connected to the computer through a wired, wireless, or Bluetooth Errors 243 Troubleshooting To install the HP Photosmart Software 1. Solution 3: Turn on the computer Solution: Turn on the product. When prompted, click Install More Software to your computer. Solution 2: .... Make sure the other end of the product. After the cable is connected properly, turn off . Solution 1: Install the HP Photosmart Software Solution: Install the HP Photosmart Software that came with the product. Insert the product CD-ROM into the USB port on the back of the USB cable ...


