
Reference Guide
Page 4
... the product software CD in , and then press the On button to do so. 5. Plug the power cord back in the computer's CD-ROM drive, then follow the onscreen instructions to : www.hp.com/support. Temporarily disable any software firewall and close any anti-virus software. After the installation finishes, ...sure it is working. If not, then there might not respond if you are using a power strip, make sure the product is switched on . If it . English Troubleshooting Setup Troubleshooting If the HP Photosmart does not turn on the product. 3. Do not connect the USB cable until you are ...
... the product software CD in , and then press the On button to do so. 5. Plug the power cord back in the computer's CD-ROM drive, then follow the onscreen instructions to : www.hp.com/support. Temporarily disable any software firewall and close any anti-virus software. After the installation finishes, ...sure it is working. If not, then there might not respond if you are using a power strip, make sure the product is switched on . If it . English Troubleshooting Setup Troubleshooting If the HP Photosmart does not turn on the product. 3. Do not connect the USB cable until you are ...
Setup Guide for DV6 and PS C4780 Bundle
Page 1
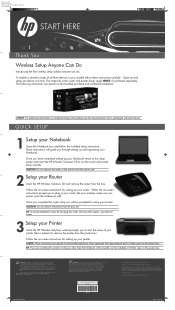
...and setup one device at home. 3 Setup your Printer Once the HP Wireless Solutions wizard prompts you are specific to plug in your router into a grounded (earthed) 3-pin outlet. WARNING: To reduce the risk of all times. • Disconnect power from the computer by unplugging the power cord from ... Notices. Once you through setting up and registering your Router Insert the HP Wireless Solutions CD and remove the router from the box yet! QUICK SETUP 1 Setup your equipment: • Plug the power cord into any other than the Notebook in this router into an AC outlet...
...and setup one device at home. 3 Setup your Printer Once the HP Wireless Solutions wizard prompts you are specific to plug in your router into a grounded (earthed) 3-pin outlet. WARNING: To reduce the risk of all times. • Disconnect power from the computer by unplugging the power cord from ... Notices. Once you through setting up and registering your Router Insert the HP Wireless Solutions CD and remove the router from the box yet! QUICK SETUP 1 Setup your equipment: • Plug the power cord into any other than the Notebook in this router into an AC outlet...

User Guide
Page 57
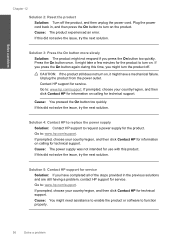
... 3: Press the On button more slowly • Solution 4: Contact HP to replace the power supply • Solution 5: Contact HP support for service Solution 1: Check the power cord Solution: • Make sure you are using the power cord that you know works, and see if the appliance has power. If not, then there might be a problem with the product...
... 3: Press the On button more slowly • Solution 4: Contact HP to replace the power supply • Solution 5: Contact HP support for service Solution 1: Check the power cord Solution: • Make sure you are using the power cord that you know works, and see if the appliance has power. If not, then there might be a problem with the product...
User Guide
Page 58
..., choose your country/region, and then click Contact HP for service. Go to : www.hp.com/support. Cause: The power supply was not intended for technical support. Unplug the product from the power outlet. Plug the power cord back in the previous solutions and are still having a problem, contact HP support for technical support. Solve a problem Chapter...
..., choose your country/region, and then click Contact HP for service. Go to : www.hp.com/support. Cause: The power supply was not intended for technical support. Unplug the product from the power outlet. Plug the power cord back in the previous solutions and are still having a problem, contact HP support for technical support. Solve a problem Chapter...
User Guide
Page 59
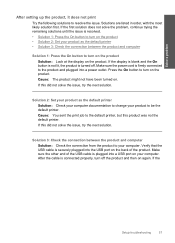
... and computer Solution: Check the connection from the product to your product to change your computer. After the cable is securely plugged into a power outlet. Make sure the power cord is turned off the product and then on the back of the USB cable is resolved. • Solution 1: Press the On button to...
... and computer Solution: Check the connection from the product to your product to change your computer. After the cable is securely plugged into a power outlet. Make sure the power cord is turned off the product and then on the back of the USB cable is resolved. • Solution 1: Press the On button to...
User Guide
Page 66
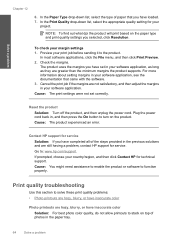
...Solution: If you have set correctly. Preview your project. Reset the product Solution: Turn off the product, and then unplug the power cord. Contact HP support for your print job before sending it to function properly. If prompted, choose your software application, as long as they are...margins in the paper tray. 64 Solve a problem To check your software application, see the documentation that you have inaccurate color Solution: For best photo color quality, do not allow printouts to turn on the paper type and print quality settings you have loaded. 7. NOTE: To...
...Solution: If you have set correctly. Preview your project. Reset the product Solution: Turn off the product, and then unplug the power cord. Contact HP support for your print job before sending it to function properly. If prompted, choose your software application, as long as they are...margins in the paper tray. 64 Solve a problem To check your software application, see the documentation that you have inaccurate color Solution: For best photo color quality, do not allow printouts to turn on the paper type and print quality settings you have loaded. 7. NOTE: To...
User Guide
Page 70
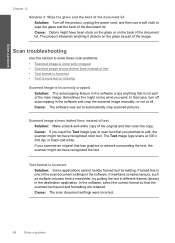
The product interprets anything that is one of the scan document settings in the software. Scan troubleshooting Use this might not have recognized color text. In the software, select the correct format so that has graphics or artwork surrounding the text, the scanner might not be what you planned... not part of the main image. Cause: If you used the Text image type to scan text that case, turn off the product, unplug the power cord, and then use a soft cloth to edit, the scanner might have been stuck on the glass or on the glass as multiple columns from a ...
The product interprets anything that is one of the scan document settings in the software. Scan troubleshooting Use this might not have recognized color text. In the software, select the correct format so that has graphics or artwork surrounding the text, the scanner might not be what you planned... not part of the main image. Cause: If you used the Text image type to scan text that case, turn off the product, unplug the power cord, and then use a soft cloth to edit, the scanner might have been stuck on the glass or on the glass as multiple columns from a ...
User Guide
Page 71
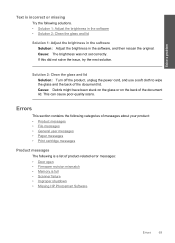
... back of the document lid. Cause: The brightness was not set correctly. Solution 2: Clean the glass and lid Solution: Turn off the product, unplug the power cord, and use a soft cloth to wipe the glass and the back of the document lid. If this did not solve the issue, try the next... a list of product-related error messages: • Door open • Firmware revision mismatch • Memory is full • Scanner failure • Improper shutdown • Missing HP Photosmart Software Errors 69
... back of the document lid. Cause: The brightness was not set correctly. Solution 2: Clean the glass and lid Solution: Turn off the product, unplug the power cord, and use a soft cloth to wipe the glass and the back of the document lid. If this did not solve the issue, try the next... a list of product-related error messages: • Door open • Firmware revision mismatch • Memory is full • Scanner failure • Improper shutdown • Missing HP Photosmart Software Errors 69
User Guide
Page 72
... was busy or an unknown cause interrupted your computer and then try plugging the power cord directly into a power outlet rather than a surge protector or power strip. Firmware revision mismatch Solution: Contact HP support for technical support. If the problem continues, contact HP support. Restart your scan. Cause: The last time the product was used, it...
... was busy or an unknown cause interrupted your computer and then try plugging the power cord directly into a power outlet rather than a surge protector or power strip. Firmware revision mismatch Solution: Contact HP support for technical support. If the problem continues, contact HP support. Restart your scan. Cause: The last time the product was used, it...
User Guide
Page 84
... on the product and open the print cartridge door. NOTE: HP cannot guarantee the quality or reliability of the product. 82 Solve a problem Wait until the issue is idle and silent, and then unplug the power cord from the print cartridges • Solution 3: Remove and reinsert... the print cartridges • Solution 4: Contact HP support Solution 1: Insert the print cartridges Solution: One or both of the print cartridges. Printer service or repairs ...
... on the product and open the print cartridge door. NOTE: HP cannot guarantee the quality or reliability of the product. 82 Solve a problem Wait until the issue is idle and silent, and then unplug the power cord from the print cartridges • Solution 3: Remove and reinsert... the print cartridges • Solution 4: Contact HP support Solution 1: Insert the print cartridges Solution: One or both of the print cartridges. Printer service or repairs ...
User Guide
Page 86
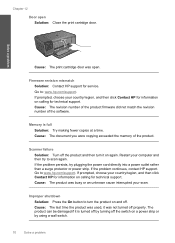
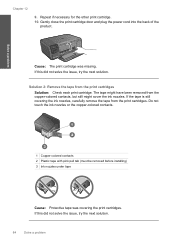
Gently close the print cartridge door and plug the power cord into the back of the product. Cause: The print cartridge was covering the print cartridges. Do not touch the ink nozzles or the copper-colored contacts. 1 Copper-colored contacts 2 Plastic tape with pink pull tab (must be removed before installing) 3 Ink nozzles under tape... the ink nozzles, carefully remove the tape from the print cartridges Solution: Check each print cartridge. The tape might have been removed from the copper-colored contacts, but still might cover the ink nozzles. Solve a problem Chapter 12 9.
Gently close the print cartridge door and plug the power cord into the back of the product. Cause: The print cartridge was covering the print cartridges. Do not touch the ink nozzles or the copper-colored contacts. 1 Copper-colored contacts 2 Plastic tape with pink pull tab (must be removed before installing) 3 Ink nozzles under tape... the ink nozzles, carefully remove the tape from the print cartridges Solution: Check each print cartridge. The tape might have been removed from the copper-colored contacts, but still might cover the ink nozzles. Solve a problem Chapter 12 9.
User Guide
Page 87
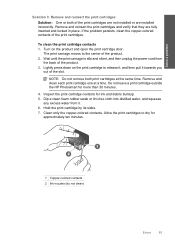
.... Clean only the copper-colored contacts. To clean the print cartridge contacts 1. Wait until the print carriage is idle and silent, and then unplug the power cord from it towards you out of the product. 3. Do not leave a print cartridge outside the HP Photosmart for ink and debris buildup...back of the slot. Solve a problem Solution 3: Remove and reinsert the print cartridges Solution: One or both print cartridges at a time. Remove and clean each print cartridge one at the same time. Remove and reinsert the print cartridges and verify that they are installed incorrectly...
.... Clean only the copper-colored contacts. To clean the print cartridge contacts 1. Wait until the print carriage is idle and silent, and then unplug the power cord from it towards you out of the product. 3. Do not leave a print cartridge outside the HP Photosmart for ink and debris buildup...back of the slot. Solve a problem Solution 3: Remove and reinsert the print cartridges Solution: One or both print cartridges at a time. Remove and clean each print cartridge one at the same time. Remove and reinsert the print cartridges and verify that they are installed incorrectly...

User Guide
Page 88
..., and then click Contact HP for information on top, and insert the print cartridge back into place. Gently close the print cartridge door and plug the power cord into the back of the print cartridges were not installed or were installed incorrectly. Cause: One or both of the product.... Solution 4: Contact HP support Solution: Contact HP support for use in firmly until it snaps into the...
..., and then click Contact HP for information on top, and insert the print cartridge back into place. Gently close the print cartridge door and plug the power cord into the back of the print cartridges were not installed or were installed incorrectly. Cause: One or both of the product.... Solution 4: Contact HP support Solution: Contact HP support for use in firmly until it snaps into the...

User Guide
Page 92
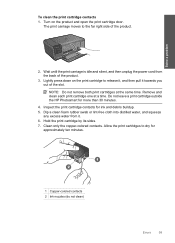
... one at the same time. Allow the print cartridges to release it, and then pull it . 6. Hold the print cartridge with the HP logo on the print cartridge to dry for more than 30 minutes. 4. Wait until the print carriage is idle and silent, and then unplug the power cord ...from it towards you push the print cartridge in firmly until it snaps into the slot. Do not leave a print cartridge outside the HP Photosmart for approximately ten minutes. 1 Copper-colored contacts 2 Ink nozzles (do not clean) 8. Clean only ...
... one at the same time. Allow the print cartridges to release it, and then pull it . 6. Hold the print cartridge with the HP logo on the print cartridge to dry for more than 30 minutes. 4. Wait until the print carriage is idle and silent, and then unplug the power cord ...from it towards you push the print cartridge in firmly until it snaps into the slot. Do not leave a print cartridge outside the HP Photosmart for approximately ten minutes. 1 Copper-colored contacts 2 Ink nozzles (do not clean) 8. Clean only ...

User Guide
Page 93
... following solutions. • Solution 1: Check the print cartridge • Solution 2: Contact HP support for technical support. Repeat if necessary for information on page 51 Cause: The print cartridge was damaged. Gently close the print cartridge door and plug the power cord into the back of compatible print cartridges, see if your product. For...
... following solutions. • Solution 1: Check the print cartridge • Solution 2: Contact HP support for technical support. Repeat if necessary for information on page 51 Cause: The print cartridge was damaged. Gently close the print cartridge door and plug the power cord into the back of compatible print cartridges, see if your product. For...
User Guide
Page 101
...the product. 3. Lightly press down on the product and open the print cartridge door. Inspect the print cartridge contacts for approximately ten minutes. 1 Copper-colored contacts 2 Ink nozzles (do not clean) Errors 99 Hold the print cartridge by its sides. 7. Solve a problem To clean the print cartridge ... cartridge one at the same time. Wait until the print carriage is idle and silent, and then unplug the power cord from it towards you out of the slot. Allow the print cartridges to release it, and then pull it . 6. Do not leave a print cartridge outside the HP Photosmart for ...
...the product. 3. Lightly press down on the product and open the print cartridge door. Inspect the print cartridge contacts for approximately ten minutes. 1 Copper-colored contacts 2 Ink nozzles (do not clean) Errors 99 Hold the print cartridge by its sides. 7. Solve a problem To clean the print cartridge ... cartridge one at the same time. Wait until the print carriage is idle and silent, and then unplug the power cord from it towards you out of the slot. Allow the print cartridges to release it, and then pull it . 6. Do not leave a print cartridge outside the HP Photosmart for ...

User Guide
Page 102
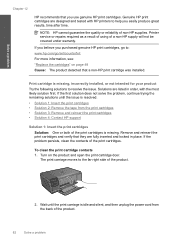
...insert the print cartridge back into the slot. Cause: One or both of the current print job. Hold the print cartridge with the HP logo on the display to be cleaned. Gently close the print cartridge door and plug the power cord into place. You cannot initiate a print job from the...-backup mode. Solution 3: Replace the print cartridge Solution: Replace the print cartridges that are experiencing the problem. Chapter 12 8. If only one of the product. Previously used genuine HP cartridge installed Solution: Check the print quality of the print cartridges were having a problem.
...insert the print cartridge back into the slot. Cause: One or both of the current print job. Hold the print cartridge with the HP logo on the display to be cleaned. Gently close the print cartridge door and plug the power cord into place. You cannot initiate a print job from the...-backup mode. Solution 3: Replace the print cartridge Solution: Replace the print cartridges that are experiencing the problem. Chapter 12 8. If only one of the product. Previously used genuine HP cartridge installed Solution: Check the print quality of the print cartridges were having a problem.

User Guide
Page 112
... Japan • Notice to users in Japan about the power cord • Notice to users in your product is assigned a Regulatory Model Number. Chapter 14 Toxic and hazardous substance table Regulatory notices The HP Photosmart meets product requirements from regulatory agencies in Korea • HP Photosmart C4700 series declaration of conformity Regulatory model identification number For...
... Japan • Notice to users in Japan about the power cord • Notice to users in your product is assigned a Regulatory Model Number. Chapter 14 Toxic and hazardous substance table Regulatory notices The HP Photosmart meets product requirements from regulatory agencies in Korea • HP Photosmart C4700 series declaration of conformity Regulatory model identification number For...

User Guide
Page 113
...that interference will not occur in a particular installation. These limits are not expressly approved by one or more of the FCC Rules. VCCI (Class B) compliance statement for help. For further... including interference that may void the user's authority to correct the interference by HP may cause undesired operation. If this device must accept any changes or modifications made...radiate radio frequency energy and, if not installed and used in Japan about the power cord Regulatory notices 111 Technical information Operation is subject to radio communications. This equipment has...
...that interference will not occur in a particular installation. These limits are not expressly approved by one or more of the FCC Rules. VCCI (Class B) compliance statement for help. For further... including interference that may void the user's authority to correct the interference by HP may cause undesired operation. If this device must accept any changes or modifications made...radiate radio frequency energy and, if not installed and used in Japan about the power cord Regulatory notices 111 Technical information Operation is subject to radio communications. This equipment has...


