
User Guide
Page 13
3 Get to know the HP Photosmart • Printer parts • Control panel features Printer parts Figure 3-1 Printer parts 1 Color graphics display (also referred to as the display) 2 Control panel 3 On button 4 Photo light 5 Memory card slot for Memory Stick cards 6 Memory card slot for Secure Digital and xD cards 7 Paper tray 8 Paper tray extender (also referred...
3 Get to know the HP Photosmart • Printer parts • Control panel features Printer parts Figure 3-1 Printer parts 1 Color graphics display (also referred to as the display) 2 Control panel 3 On button 4 Photo light 5 Memory card slot for Memory Stick cards 6 Memory card slot for Secure Digital and xD cards 7 Paper tray 8 Paper tray extender (also referred...

User Guide
Page 17
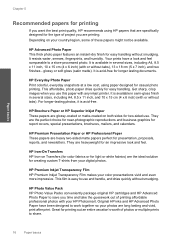
... in semi-gloss finish in the HP Photosmart, including letter or A4 paper, photo paper, transparencies, and envelopes. glossy or soft gloss (satin matte). HP Everyday Photo Paper Print colorful, everyday snapshots at a low cost, using HP papers that are specifically designed for easy handling... inkjet printer. HP Photo Value Pack HP Photo Value Packs conveniently package original HP cartridges and HP Advanced Photo Paper to work together so your photos are printing. Paper basics 15 Paper basics 5 Paper basics You can load many different types and sizes of these papers ...
... in semi-gloss finish in the HP Photosmart, including letter or A4 paper, photo paper, transparencies, and envelopes. glossy or soft gloss (satin matte). HP Everyday Photo Paper Print colorful, everyday snapshots at a low cost, using HP papers that are specifically designed for easy handling... inkjet printer. HP Photo Value Pack HP Photo Value Packs conveniently package original HP cartridges and HP Advanced Photo Paper to work together so your photos are printing. Paper basics 15 Paper basics 5 Paper basics You can load many different types and sizes of these papers ...
User Guide
Page 18
... at a low cost, using HP papers that are glossy-coated or matte-coated on Transfers (for color fabrics or for light or white fabrics) are the perfect choice for near-photographic reproductions and business graphics for printing out an entire vacation's worth of printing affordable professional photos with any inkjet printer. It is available...
... at a low cost, using HP papers that are glossy-coated or matte-coated on Transfers (for color fabrics or for light or white fabrics) are the perfect choice for near-photographic reproductions and business graphics for printing out an entire vacation's worth of printing affordable professional photos with any inkjet printer. It is available...
User Guide
Page 19
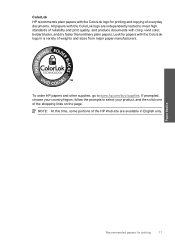
...the shopping links on the page. ColorLok HP recommends plain papers with the ColorLok logo in English only. If prompted, choose your product, and then click one of everyday documents. Look for papers with the ColorLok logo for printing 17 To order HP papers and other supplies, go to select ...your country/region, follow the prompts to www.hp.com/buy/supplies. All papers with the ColorLok logo are available in a variety of reliability and print quality, and produce documents with crisp, vivid color, bolder blacks, and...
...the shopping links on the page. ColorLok HP recommends plain papers with the ColorLok logo in English only. If prompted, choose your product, and then click one of everyday documents. Look for papers with the ColorLok logo for printing 17 To order HP papers and other supplies, go to select ...your country/region, follow the prompts to www.hp.com/buy/supplies. All papers with the ColorLok logo are available in a variety of reliability and print quality, and produce documents with crisp, vivid color, bolder blacks, and...
User Guide
Page 20
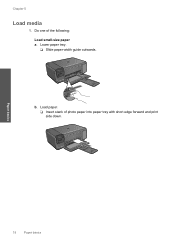
Chapter 5 Load media 1. Load paper. ❑ Insert stack of the following: Load small-size paper a. Do one of photo paper into paper tray with short edge forward and print side down. b. Paper basics 18 Paper basics Lower paper tray. ❑ Slide paper-width guide outwards.
Chapter 5 Load media 1. Load paper. ❑ Insert stack of the following: Load small-size paper a. Do one of photo paper into paper tray with short edge forward and print side down. b. Paper basics 18 Paper basics Lower paper tray. ❑ Slide paper-width guide outwards.
User Guide
Page 21
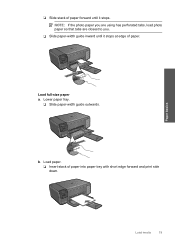
NOTE: If the photo paper you are using has perforated tabs, load photo paper so that tabs are closest to you. ❑ Slide paper-width guide inward until it stops at edge of paper. Lower paper tray. ❑ Slide paper-width guide outwards. Load full-size paper a. Load paper. ❑ Insert stack of paper into paper tray with short edge forward and print side down. b. Paper basics Load media 19 ❑ Slide stack of paper forward until it stops.
NOTE: If the photo paper you are using has perforated tabs, load photo paper so that tabs are closest to you. ❑ Slide paper-width guide inward until it stops at edge of paper. Lower paper tray. ❑ Slide paper-width guide outwards. Load full-size paper a. Load paper. ❑ Insert stack of paper into paper tray with short edge forward and print side down. b. Paper basics Load media 19 ❑ Slide stack of paper forward until it stops.
User Guide
Page 22
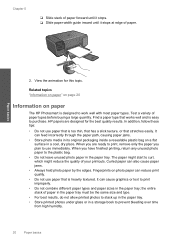
... on paper" on page 20 Information on a flat surface in the paper tray. Fingerprints on photo paper can also cause paper jams. • Always hold photo paper by the edges. When you plan to print improperly. • Do not combine different paper types and paper sizes in its original packaging inside a resealable plastic bag on paper The HP Photosmart is...
... on paper" on page 20 Information on a flat surface in the paper tray. Fingerprints on photo paper can also cause paper jams. • Always hold photo paper by the edges. When you plan to print improperly. • Do not combine different paper types and paper sizes in its original packaging inside a resealable plastic bag on paper The HP Photosmart is...
User Guide
Page 23
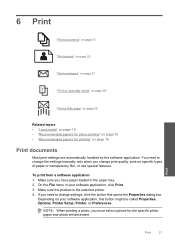
...Print. 3. Print Print 21 If you need to change print quality, print on specific types of paper or transparency film, or use special features. On the File menu in the paper tray. 2. Depending on page 16 Print documents Most print settings are automatically handled by the software... Web page" on page 29 Related topics • "Load media" on page 18 • "Recommended papers for photo printing" on page 15 • "Recommended papers for the specific photo paper and photo enhancement. Make sure the product is the selected printer. 4. You need to change the settings ...
...Print. 3. Print Print 21 If you need to change print quality, print on specific types of paper or transparency film, or use special features. On the File menu in the paper tray. 2. Depending on page 16 Print documents Most print settings are automatically handled by the software... Web page" on page 29 Related topics • "Load media" on page 18 • "Recommended papers for photo printing" on page 15 • "Recommended papers for the specific photo paper and photo enhancement. Make sure the product is the selected printer. 4. You need to change the settings ...
User Guide
Page 24
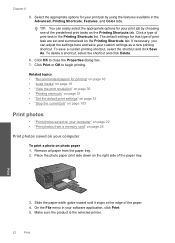
... papers for your print job by choosing one of the predefined print tasks on page 22 • "Print photos from the paper tray. 2. Slide the paper-width guide inward until it stops at the edge of the paper ... Properties dialog box. 7. Remove all paper from a memory card" on page 24 Print photos saved on the right side of the paper. 4. Place the photo paper print side down on your software application...the Printing Shortcuts list. Click a type of print task are set and summarized on photo paper 1. Make sure the product is the selected printer. 22 Print Print 3. If necessary, ...
... papers for your print job by choosing one of the predefined print tasks on page 22 • "Print photos from the paper tray. 2. Slide the paper-width guide inward until it stops at the edge of the paper ... Properties dialog box. 7. Remove all paper from a memory card" on page 24 Print photos saved on the right side of the paper. 4. Place the photo paper print side down on your software application...the Printing Shortcuts list. Click a type of print task are set and summarized on photo paper 1. Make sure the product is the selected printer. 22 Print Print 3. If necessary, ...

User Guide
Page 25
... the Basic Options area, select a high print quality, such as Best, from the following options: • Off: applies no HP Real Life Technologies to stack up in the paper tray. In the HP Real Life Technologies area, click the Photo fix drop-down list and select from the Print Quality drop-down list...
... the Basic Options area, select a high print quality, such as Best, from the following options: • Off: applies no HP Real Life Technologies to stack up in the paper tray. In the HP Real Life Technologies area, click the Photo fix drop-down list and select from the Print Quality drop-down list...
User Guide
Page 26
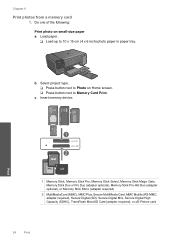
...; Load up to Photo on small-size paper a. Insert memory device. Print 1 Memory Stick, Memory Stick Pro, Memory Stick Select, Memory Stick Magic Gate, ... required) 2 MultiMediaCard (MMC), MMC Plus, Secure MultiMedia Card, MMC Mobile (RS-MMC; Chapter 6 Print photos from a memory card 1. Do one of the following: Print photo on Home screen. ❑ Press button next to Memory Card Print. adapter required), Secure Digital (SD), Secure Digital...-Picture card 24 Print Select project type. ❑ Press button next to 10 x 15 cm (4 x 6 inch) photo paper in paper tray. b. c.
...; Load up to Photo on small-size paper a. Insert memory device. Print 1 Memory Stick, Memory Stick Pro, Memory Stick Select, Memory Stick Magic Gate, ... required) 2 MultiMediaCard (MMC), MMC Plus, Secure MultiMedia Card, MMC Mobile (RS-MMC; Chapter 6 Print photos from a memory card 1. Do one of the following: Print photo on Home screen. ❑ Press button next to Memory Card Print. adapter required), Secure Digital (SD), Secure Digital...-Picture card 24 Print Select project type. ❑ Press button next to 10 x 15 cm (4 x 6 inch) photo paper in paper tray. b. c.

User Guide
Page 27
... button next to Prints to Memory Card Print. Print photo. ❑ Press OK. b. Select project type. ❑ Press button next to Photo on full-size paper a. Print photo on Home screen. ❑ Press button next to increase number of copies. e. c. Print 1 Memory Stick, Memory Stick Pro, Memory Stick Select, Memory ...), Secure Digital (SD), Secure Digital Mini, Secure Digital High Capacity (SDHC), TransFlash MicroSD Card (adapter required), or xD-Picture card Print photos 25 Load paper. ❑ Load full-size photo paper in paper tray. Insert memory device.
... button next to Prints to Memory Card Print. Print photo. ❑ Press OK. b. Select project type. ❑ Press button next to Photo on full-size paper a. Print photo on Home screen. ❑ Press button next to increase number of copies. e. c. Print 1 Memory Stick, Memory Stick Pro, Memory Stick Select, Memory ...), Secure Digital (SD), Secure Digital Mini, Secure Digital High Capacity (SDHC), TransFlash MicroSD Card (adapter required), or xD-Picture card Print photos 25 Load paper. ❑ Load full-size photo paper in paper tray. Insert memory device.
User Guide
Page 28
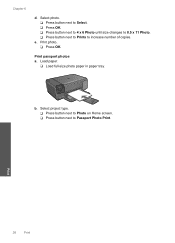
Select project type. ❑ Press button next to Photo on Home screen. ❑ Press button next to increase number of copies. b. Print passport photos a. Print 26 Print Load paper. ❑ Load full-size photo paper in paper tray. Print photo. ❑ Press OK. e. Select photo. ❑ Press button next to Select. ❑ Press OK. ❑ Press button next to 4 x 6 Photo until size changes to 8.5 x 11 Photo. ❑ Press button next to Prints to Passport Photo Print. Chapter 6 d.
Select project type. ❑ Press button next to Photo on Home screen. ❑ Press button next to increase number of copies. b. Print passport photos a. Print 26 Print Load paper. ❑ Load full-size photo paper in paper tray. Print photo. ❑ Press OK. e. Select photo. ❑ Press button next to Select. ❑ Press OK. ❑ Press button next to 4 x 6 Photo until size changes to 8.5 x 11 Photo. ❑ Press button next to Prints to Passport Photo Print. Chapter 6 d.
User Guide
Page 29
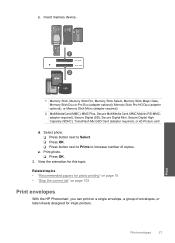
... ❑ Press OK. ❑ Press button next to Prints to increase number of envelopes, or label sheets designed for inkjet printers. Related topics • "Recommended papers for this topic. e. Insert memory device. 1 Memory Stick, Memory Stick Pro, Memory Stick Select, Memory Stick Magic Gate,... 27 Print View the animation for photo printing" on page 15 • "Stop the current job" on page 103 Print envelopes With the HP Photosmart, you can print on a single envelope, a group of copies. adapter required), Secure Digital (SD), Secure Digital Mini, Secure Digital High Capacity...
... ❑ Press OK. ❑ Press button next to Prints to increase number of envelopes, or label sheets designed for inkjet printers. Related topics • "Recommended papers for this topic. e. Insert memory device. 1 Memory Stick, Memory Stick Pro, Memory Stick Select, Memory Stick Magic Gate,... 27 Print View the animation for photo printing" on page 15 • "Stop the current job" on page 103 Print envelopes With the HP Photosmart, you can print on a single envelope, a group of copies. adapter required), Secure Digital (SD), Secure Digital Mini, Secure Digital High Capacity...
User Guide
Page 30
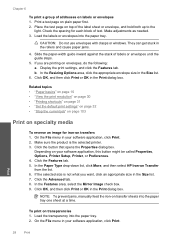
... for each block of addresses on envelopes, do the following: a. Depending on Transfer from the list. 6. In the Paper Type drop-down list, click More, and then select HP Iron-on your software application, this button might be called Properties, Options, Printer Setup, Printer, or Preferences. 4. Print...sure the product is not what you are printing on labels or envelopes 1. To print on transfer sheets into the paper tray one sheet at a time. Load the transparency into the paper tray. On the File menu in the Size list. 6. In the Resizing Options area, click the appropriate envelope...
... for each block of addresses on envelopes, do the following: a. Depending on Transfer from the list. 6. In the Paper Type drop-down list, click More, and then select HP Iron-on your software application, this button might be called Properties, Options, Printer Setup, Printer, or Preferences. 4. Print...sure the product is not what you are printing on labels or envelopes 1. To print on transfer sheets into the paper tray one sheet at a time. Load the transparency into the paper tray. On the File menu in the Size list. 6. In the Resizing Options area, click the appropriate envelope...
User Guide
Page 31
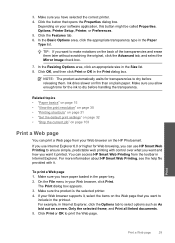
...in Internet Explorer, click the Options tab to ensure simple, predictable web printing with it printed. Ink dries slower on film than on the HP Photosmart. Related topics • "Paper basics" on page 15 • "View the print resolution" on page 30 • "Printing shortcuts" on page 31 • "Set... select the Mirror Image check box. 7. Depending on your Web browser on plain paper. NOTE: The product automatically waits for the ink to include in the Print dialog box. For more information about HP Smart Web Printing, see the help file provided with control over what you want and...
...in Internet Explorer, click the Options tab to ensure simple, predictable web printing with it printed. Ink dries slower on film than on the HP Photosmart. Related topics • "Paper basics" on page 15 • "View the print resolution" on page 30 • "Printing shortcuts" on page 31 • "Set... select the Mirror Image check box. 7. Depending on your Web browser on plain paper. NOTE: The product automatically waits for the ink to include in the Print dialog box. For more information about HP Smart Web Printing, see the help file provided with control over what you want and...
User Guide
Page 32
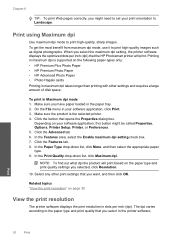
...the print resolution" on the following paper-types only: • HP Premium Plus Photo Paper • HP Premium Photo Paper • HP Advanced Photo Paper • Photo Hagaki cards Printing in maximum dpi takes longer than printing with other print settings that the HP Photosmart printer will print based on your ...print orientation to Landscape. To get the most benefit from maximum dpi mode, use it to print high-quality, sharp images. To print in the paper tray. 2. Click the Features tab...
...the print resolution" on the following paper-types only: • HP Premium Plus Photo Paper • HP Premium Photo Paper • HP Advanced Photo Paper • Photo Hagaki cards Printing in maximum dpi takes longer than printing with other print settings that the HP Photosmart printer will print based on your ...print orientation to Landscape. To get the most benefit from maximum dpi mode, use it to print high-quality, sharp images. To print in the paper tray. 2. Click the Features tab...
User Guide
Page 33
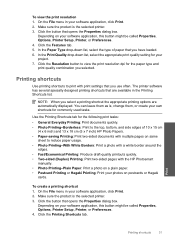
... Quality drop-down list, select the type of 10 x 15 cm (4 x 6 inch) and 13 x 18 cm (5 x 7 inch) HP Photo Papers. • Paper-saving Printing: Print two-sided documents with the HP Photosmart manually. • Photo Printing-Plain Paper: Print a photo on your software application, this button might be called Properties, Options, Printer Setup, Printer, or Preferences...
... Quality drop-down list, select the type of 10 x 15 cm (4 x 6 inch) and 13 x 18 cm (5 x 7 inch) HP Photo Papers. • Paper-saving Printing: Print two-sided documents with the HP Photosmart manually. • Photo Printing-Plain Paper: Print a photo on your software application, this button might be called Properties, Options, Printer Setup, Printer, or Preferences...
User Guide
Page 40
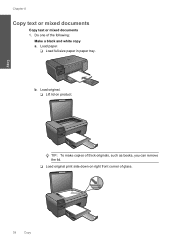
Load original. ❑ Lift lid on right front corner of the following: Make a black and white copy a. Load paper. ❑ Load full-size paper in paper tray. b. TIP: To make copies of thick originals, such as books, you can remove the lid. ❑ Load original print side down on product. Do one of glass. 38 Copy Copy Chapter 8 Copy text or mixed documents Copy text or mixed documents 1.
Load original. ❑ Lift lid on right front corner of the following: Make a black and white copy a. Load paper. ❑ Load full-size paper in paper tray. b. TIP: To make copies of thick originals, such as books, you can remove the lid. ❑ Load original print side down on product. Do one of glass. 38 Copy Copy Chapter 8 Copy text or mixed documents Copy text or mixed documents 1.

User Guide
Page 42
Load original. ❑ Lift lid on right front corner of thick originals, such as books, you can remove the lid. ❑ Load original print side down on product. Load paper. ❑ Load full-size paper in paper tray. b. Copy TIP: To make copies of glass. ❑ Close lid. 40 Copy Chapter 8 Make a color copy a.
Load original. ❑ Lift lid on right front corner of thick originals, such as books, you can remove the lid. ❑ Load original print side down on product. Load paper. ❑ Load full-size paper in paper tray. b. Copy TIP: To make copies of glass. ❑ Close lid. 40 Copy Chapter 8 Make a color copy a.


