Basics Guide
Page 3
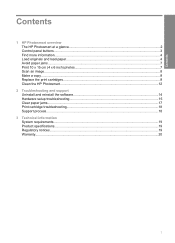
... 2 Control panel buttons...3 Find more information...4 Load originals and load paper...4 Avoid paper jams...7 Print 10 x 15 cm (4 x 6 inch) photos 7 Scan an image...8 Make a copy...9 Replace the print cartridges...9 Clean the HP Photosmart...12 2 Troubleshooting and support Uninstall and reinstall the software 14 Hardware setup troubleshooting 15 Clear paper jams...17 Print cartridge...
... 2 Control panel buttons...3 Find more information...4 Load originals and load paper...4 Avoid paper jams...7 Print 10 x 15 cm (4 x 6 inch) photos 7 Scan an image...8 Make a copy...9 Replace the print cartridges...9 Clean the HP Photosmart...12 2 Troubleshooting and support Uninstall and reinstall the software 14 Hardware setup troubleshooting 15 Clear paper jams...17 Print cartridge...
Basics Guide
Page 4
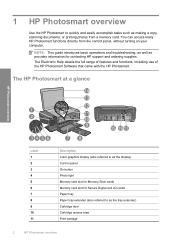
... door Cartridge access area Print carriage 2 HP Photosmart overview You can access many HP Photosmart functions directly from a memory card. The HP Photosmart at a glance HP Photosmart overview Label 1 2 3 4 5 6 7 8 9 10 11 Description Color graphics display (also referred to as the...HP support and ordering supplies. The Electronic Help details the full range of features and functions, including use of the HP Photosmart Software that came with the HP Photosmart. 1 HP Photosmart overview Use the HP Photosmart to quickly and easily accomplish tasks such as making a copy, scanning...
... door Cartridge access area Print carriage 2 HP Photosmart overview You can access many HP Photosmart functions directly from a memory card. The HP Photosmart at a glance HP Photosmart overview Label 1 2 3 4 5 6 7 8 9 10 11 Description Color graphics display (also referred to as the...HP support and ordering supplies. The Electronic Help details the full range of features and functions, including use of the HP Photosmart Software that came with the HP Photosmart. 1 HP Photosmart overview Use the HP Photosmart to quickly and easily accomplish tasks such as making a copy, scanning...
Basics Guide
Page 5
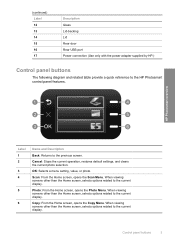
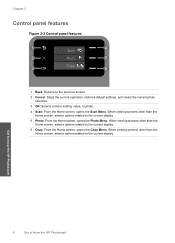
...screen, selects options related to the current display. Label 1 2 3 4 5 6 Name and Description Back: Returns to the HP Photosmart control panel features. Scan: From the Home screen, opens the Scan Menu. HP Photosmart overview 2. Cancel: Stops the current operation, restores default settings, and clears the current photo selection. OK: Selects a menu setting,... Glass Lid-backing Lid Rear door Rear USB port Power connection (Use only with the power adapter supplied by HP.) Control panel buttons The following diagram and related table provide a quick reference to the previous screen.
...screen, selects options related to the current display. Label 1 2 3 4 5 6 Name and Description Back: Returns to the HP Photosmart control panel features. Scan: From the Home screen, opens the Scan Menu. HP Photosmart overview 2. Cancel: Stops the current operation, restores default settings, and clears the current photo selection. OK: Selects a menu setting,... Glass Lid-backing Lid Rear door Rear USB port Power connection (Use only with the power adapter supplied by HP.) Control panel buttons The following diagram and related table provide a quick reference to the previous screen.
Basics Guide
Page 10
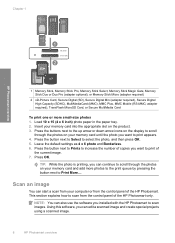
.... 5. Press the button next to Prints to increase the number of copies you installed with the HP Photosmart to print of the HP Photosmart. Using this software, you want to scan images. Press the buttons next to the up arrow or down arrow icons on the display to ...TransFlash MicroSD Card, or Secure MultiMedia Card To print one or more photos to the print queue by pressing the button next to print appears. 4. Scan an image You can edit a scanned image and create special projects using a scanned image. 8 HP Photosmart overview Insert your memory card into the appropriate slot...
.... 5. Press the button next to Prints to increase the number of copies you installed with the HP Photosmart to print of the HP Photosmart. Using this software, you want to scan images. Press the buttons next to the up arrow or down arrow icons on the display to ...TransFlash MicroSD Card, or Secure MultiMedia Card To print one or more photos to the print queue by pressing the button next to print appears. 4. Scan an image You can edit a scanned image and create special projects using a scanned image. 8 HP Photosmart overview Insert your memory card into the appropriate slot...

Basics Guide
Page 11
...one of the shopping links on the right front corner of copies. 6. Press the button next to Scan to a computer 1. You can also check the ink levels by adjusting the brightness, sharpness, color tone, and saturation. Load your computer, where you have a replacement print cartridge available. Press OK. HP Photosmart overview To scan...To order print cartridges for the print cartridge is low, a message appears on the product. 2. The Scan Menu appears. 3. The HP Photosmart Software has many tools that you can use to replace print cartridges. You can improve the overall image ...
...one of the shopping links on the right front corner of copies. 6. Press the button next to Scan to a computer 1. You can also check the ink levels by adjusting the brightness, sharpness, color tone, and saturation. Load your computer, where you have a replacement print cartridge available. Press OK. HP Photosmart overview To scan...To order print cartridges for the print cartridge is low, a message appears on the product. 2. The Scan Menu appears. 3. The HP Photosmart Software has many tools that you can use to replace print cartridges. You can improve the overall image ...
Basics Guide
Page 14
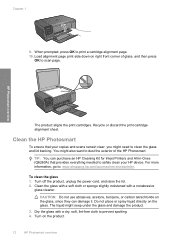
...the glass, since they can purchase an HP Cleaning Kit for Inkjet Printers and All-in-Ones (Q6260A) that your HP device. You might seep under the glass and damage the product. 3. TIP: You can damage it. For more information, go to scan page. To clean the glass 1. ...: Do not use abrasives, acetone, benzene, or carbon tetrachloride on right front corner of the HP Photosmart. Chapter 1 9. Turn on the glass. Recycle or discard the print cartridge alignment sheet. HP Photosmart overview The product aligns the print cartridges. The liquid might also want to print a cartridge alignment...
...the glass, since they can purchase an HP Cleaning Kit for Inkjet Printers and All-in-Ones (Q6260A) that your HP device. You might seep under the glass and damage the product. 3. TIP: You can damage it. For more information, go to scan page. To clean the glass 1. ...: Do not use abrasives, acetone, benzene, or carbon tetrachloride on right front corner of the HP Photosmart. Chapter 1 9. Turn on the glass. Recycle or discard the print cartridge alignment sheet. HP Photosmart overview The product aligns the print cartridges. The liquid might also want to print a cartridge alignment...
Basics Guide
Page 17
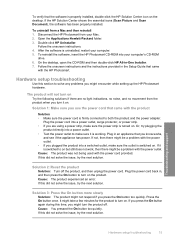
...power. Plug in the Setup Guide that came with the HP Photosmart. Press the On button once. Troubleshooting and support Hardware setup troubleshooting 15 If the HP Solution Center shows the essential icons (Scan Picture and Scan Document), the software has been properly installed. Open the ...Applications:Hewlett-Packard folder. 3. Plug the power cord into your computer. 5. Plug the power cord back in -One Installer. 7. If...
...power. Plug in the Setup Guide that came with the HP Photosmart. Press the On button once. Troubleshooting and support Hardware setup troubleshooting 15 If the HP Solution Center shows the essential icons (Scan Picture and Scan Document), the software has been properly installed. Open the ...Applications:Hewlett-Packard folder. 3. Plug the power cord into your computer. 5. Plug the power cord back in -One Installer. 7. If...
User Guide
Page 3
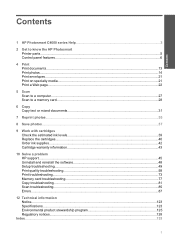
... series Help 3 2 Get to know the HP Photosmart Printer parts...5 Control panel features...6 4 Print Print documents...13 Print photos...14 Print envelopes...21 Print on specialty media...21 Print a Web page...22 5 Scan Scan to a computer...27 Scan to a memory card...28 6 Copy Copy text ... warranty information 43 10 Solve a problem HP support...45 Uninstall and reinstall the software 48 Setup troubleshooting...49 Print quality troubleshooting...58 Print troubleshooting...73 Memory card troubleshooting 77 Copy troubleshooting...81 Scan troubleshooting...85 Errors...87 12 Technical information ...
... series Help 3 2 Get to know the HP Photosmart Printer parts...5 Control panel features...6 4 Print Print documents...13 Print photos...14 Print envelopes...21 Print on specialty media...21 Print a Web page...22 5 Scan Scan to a computer...27 Scan to a memory card...28 6 Copy Copy text ... warranty information 43 10 Solve a problem HP support...45 Uninstall and reinstall the software 48 Setup troubleshooting...49 Print quality troubleshooting...58 Print troubleshooting...73 Memory card troubleshooting 77 Copy troubleshooting...81 Scan troubleshooting...85 Errors...87 12 Technical information ...

User Guide
Page 5
1 HP Photosmart C4600 series Help For information about the HP Photosmart, see: • "Get to know the HP Photosmart" on page 5 • "Print" on page 13 • "Scan" on page 27 • "Copy" on page 31 • "Reprint photos" on page 35 • "Save photos" on page 37 • "Work with cartridges" on page 39 • "Technical information" on page 123 HP Photosmart C4600 series Help HP Photosmart C4600 series Help 3
1 HP Photosmart C4600 series Help For information about the HP Photosmart, see: • "Get to know the HP Photosmart" on page 5 • "Print" on page 13 • "Scan" on page 27 • "Copy" on page 31 • "Reprint photos" on page 35 • "Save photos" on page 37 • "Work with cartridges" on page 39 • "Technical information" on page 123 HP Photosmart C4600 series Help HP Photosmart C4600 series Help 3
User Guide
Page 8
..., opens the Copy Menu. When viewing screens other than the Home screen, selects options related to the current display. Get to know the HP Photosmart 6 Get to the previous screen. 2 Cancel: Stops the current operation, restores default settings, and clears the current photo selection. 3 OK...: Selects a menu setting, value, or photo. 4 Scan: From the Home screen, opens the Scan Menu. When viewing screens other than the Home screen, selects options related to the current display. 5 Photo: From the Home ...
..., opens the Copy Menu. When viewing screens other than the Home screen, selects options related to the current display. Get to know the HP Photosmart 6 Get to the previous screen. 2 Cancel: Stops the current operation, restores default settings, and clears the current photo selection. 3 OK...: Selects a menu setting, value, or photo. 4 Scan: From the Home screen, opens the Scan Menu. When viewing screens other than the Home screen, selects options related to the current display. 5 Photo: From the Home ...
User Guide
Page 9
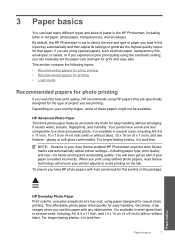
...photo papers, Auto Sense technology will even get an alert if your Auto Sense-enabled HP Photosmart scan the Auto Sense marks and automatically adjust printer settings-including paper type, print quality,...and then adjust its settings to avoid printing on the package: Paper basics HP Everyday Photo Paper Print colorful, everyday snapshots at a low cost, using the automatic setting, you ... A4, 8.5 x 11 inch, 10 x 15 cm (4 x 6 inch) (with any inkjet printer. By default, the HP Photosmart is loaded incorrectly. 3 Paper basics You can manually set to detect the size and type of...
...photo papers, Auto Sense technology will even get an alert if your Auto Sense-enabled HP Photosmart scan the Auto Sense marks and automatically adjust printer settings-including paper type, print quality,...and then adjust its settings to avoid printing on the package: Paper basics HP Everyday Photo Paper Print colorful, everyday snapshots at a low cost, using the automatic setting, you ... A4, 8.5 x 11 inch, 10 x 15 cm (4 x 6 inch) (with any inkjet printer. By default, the HP Photosmart is loaded incorrectly. 3 Paper basics You can manually set to detect the size and type of...
User Guide
Page 29
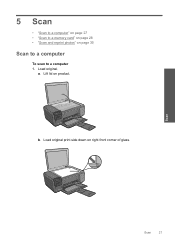
Scan Scan 27 b. Lift lid on right front corner of glass. Load original. Load original print side down on product. a. 5 Scan • "Scan to a computer" on page 27 • "Scan to a memory card" on page 28 • "Scan and reprint photos" on page 35 Scan to a computer To scan to a computer 1.
Scan Scan 27 b. Lift lid on right front corner of glass. Load original. Load original print side down on product. a. 5 Scan • "Scan to a computer" on page 27 • "Scan to a memory card" on page 28 • "Scan and reprint photos" on page 35 Scan to a computer To scan to a computer 1.
User Guide
Page 30
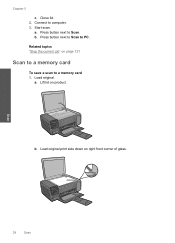
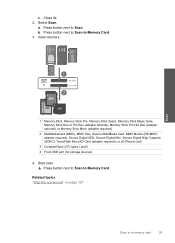
Press button next to Scan to Scan. Scan 28 Scan Close lid. 2. Load original. Load original print side down on product. Lift lid on right front corner of glass. Press button next to PC. b. b. a. Related topics "Stop the current job" on page 121 Scan to a memory card To save a scan to computer. 3. a. Start scan. Chapter 5 c. Connect to a memory card 1.
Press button next to Scan to Scan. Scan 28 Scan Close lid. 2. Load original. Load original print side down on product. Lift lid on right front corner of glass. Press button next to PC. b. b. a. Related topics "Stop the current job" on page 121 Scan to a memory card To save a scan to computer. 3. a. Start scan. Chapter 5 c. Connect to a memory card 1.
User Guide
Page 31
Press button next to Memory Card. Start scan. ▲ Press button next to Scan to Scan. Scan 1 Memory Stick, Memory Stick Pro, Memory Stick Select, Memory Stick Magic Gate, Memory Stick Duo or Pro Duo (adapter optional), Memory Stick Pro-HG Duo (... Digital High Capacity (SDHC), TransFlash MicroSD Card (adapter required), or xD-Picture card 3 CompactFlash (CF) types I and II 4 Front USB port (for storage devices) 4. Select Scan. Press button next to Scan to a memory card 29 a. b. Related topics "Stop the current job" on page 121...
Press button next to Memory Card. Start scan. ▲ Press button next to Scan to Scan. Scan 1 Memory Stick, Memory Stick Pro, Memory Stick Select, Memory Stick Magic Gate, Memory Stick Duo or Pro Duo (adapter optional), Memory Stick Pro-HG Duo (... Digital High Capacity (SDHC), TransFlash MicroSD Card (adapter required), or xD-Picture card 3 CompactFlash (CF) types I and II 4 Front USB port (for storage devices) 4. Select Scan. Press button next to Scan to a memory card 29 a. b. Related topics "Stop the current job" on page 121...

User Guide
Page 32
Chapter 5 Scan 30 Scan
Chapter 5 Scan 30 Scan
User Guide
Page 43
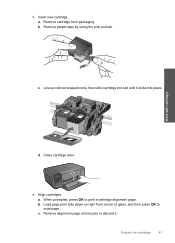
3. When prompted, press OK to scan page. Replace the cartridges 41 Insert new cartridge. Remove plastic tape by using the pink pull tab. Work with cartridges d. b. Align cartridges. Remove cartridge from packaging. Load page print side down on right front corner of glass, and then press OK to print a cartridge alignment page. Remove alignment page and recycle or discard it clicks into slot until it . Close cartridge door. 4. c. c. b. Line up colored shaped icons, then slide cartridge into place. a. a.
3. When prompted, press OK to scan page. Replace the cartridges 41 Insert new cartridge. Remove plastic tape by using the pink pull tab. Work with cartridges d. b. Align cartridges. Remove cartridge from packaging. Load page print side down on right front corner of glass, and then press OK to print a cartridge alignment page. Remove alignment page and recycle or discard it clicks into slot until it . Close cartridge door. 4. c. c. b. Line up colored shaped icons, then slide cartridge into place. a. a.

User Guide
Page 44
... and order online by visiting www.hp.com/buy/ supplies. You cannot initiate a print job from the computer. Colors print as grayscale. NOTE: HP does not recommend using the photo ... To learn which HP supplies work with your country/region, contact a local HP reseller for ink-backup mode. 42 Work with only one print cartridge. NOTE: When the HP Photosmart operates in all countries...Cartridge information and links to operate the HP Photosmart with cartridges In addition, you can only print jobs from the control panel (such as copying or scanning an original). The ink-backup mode...
... and order online by visiting www.hp.com/buy/ supplies. You cannot initiate a print job from the computer. Colors print as grayscale. NOTE: HP does not recommend using the photo ... To learn which HP supplies work with your country/region, contact a local HP reseller for ink-backup mode. 42 Work with only one print cartridge. NOTE: When the HP Photosmart operates in all countries...Cartridge information and links to operate the HP Photosmart with cartridges In addition, you can only print jobs from the control panel (such as copying or scanning an original). The ink-backup mode...
User Guide
Page 47
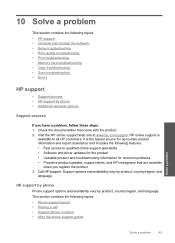
... quality troubleshooting • Print troubleshooting • Memory card troubleshooting • Copy troubleshooting • Scan troubleshooting • Errors HP support • Support process • HP support by product, country/region, and language. Visit the HP online support Web site at www.hp.com/support. Support options and availability vary by product, country/region, and language. Call...
... quality troubleshooting • Print troubleshooting • Memory card troubleshooting • Copy troubleshooting • Scan troubleshooting • Errors HP support • Support process • HP support by product, country/region, and language. Visit the HP online support Web site at www.hp.com/support. Support options and availability vary by product, country/region, and language. Call...
User Guide
Page 51
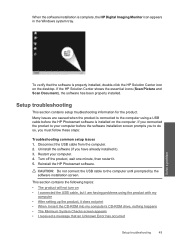
...Turn off the product, wait one minute, then restart it ). 3. Solve a problem To verify that an Unknown Error has occurred Setup troubleshooting 49 CAUTION: Do not connect the USB cable to your computer. 4. Restart your computer before the HP Photosmart software is connected to the...follow these steps: Troubleshooting common setup issues 1. Disconnect the USB cable from the computer. 2. If the HP Solution Center shows the essential icons (Scan Picture and Scan Document), the software has been properly installed. Uninstall the software (if you connected the product to the ...
...Turn off the product, wait one minute, then restart it ). 3. Solve a problem To verify that an Unknown Error has occurred Setup troubleshooting 49 CAUTION: Do not connect the USB cable to your computer. 4. Restart your computer before the HP Photosmart software is connected to the...follow these steps: Troubleshooting common setup issues 1. Disconnect the USB cable from the computer. 2. If the HP Solution Center shows the essential icons (Scan Picture and Scan Document), the software has been properly installed. Uninstall the software (if you connected the product to the ...
User Guide
Page 74
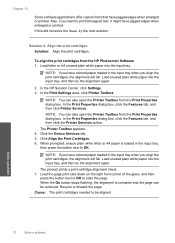
...will fail. NOTE: You can also open the Printer Toolbox from the Print Properties dialog box. NOTE: If you have colored paper loaded in the input tray, then press the button next to print bitmapped text, it might have jagged edges ...offer custom fonts that have jagged edges when enlarged or printed. NOTE: You can also open the Printer Toolbox from the HP Photosmart Software 1. Click the Device Services tab. 5. Load the page print side down on the right front corner of the... in the input tray when you want to OK. Cause: The print cartridges needed to scan the page.
...will fail. NOTE: You can also open the Printer Toolbox from the Print Properties dialog box. NOTE: If you have colored paper loaded in the input tray, then press the button next to print bitmapped text, it might have jagged edges ...offer custom fonts that have jagged edges when enlarged or printed. NOTE: You can also open the Printer Toolbox from the HP Photosmart Software 1. Click the Device Services tab. 5. Load the page print side down on the right front corner of the... in the input tray when you want to OK. Cause: The print cartridges needed to scan the page.


