Basic Guide
Page 13
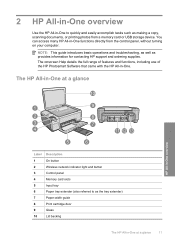
...the full range of features and functions, including use of the HP Photosmart Software that came with the HP All-in -One functions directly from a memory card or USB storage device. 2 HP All-in-One overview Use the HP All-in-One to as making a copy, scanning documents, or printing photos ...such as the tray extender) 7 Paper-width guide 8 Print cartridge door 9 Glass 10 Lid backing The HP All-in-One at a glance 11 NOTE: This guide introduces basic operations and troubleshooting, as well as provides information for contacting HP support and ordering supplies. You can access many...
...the full range of features and functions, including use of the HP Photosmart Software that came with the HP All-in -One functions directly from a memory card or USB storage device. 2 HP All-in-One overview Use the HP All-in-One to as making a copy, scanning documents, or printing photos ...such as the tray extender) 7 Paper-width guide 8 Print cartridge door 9 Glass 10 Lid backing The HP All-in-One at a glance 11 NOTE: This guide introduces basic operations and troubleshooting, as well as provides information for contacting HP support and ordering supplies. You can access many...
Basic Guide
Page 15
... labelled Start Copy Black and starts a black-and-white copy. Next, click the main menu and select Photosmart C4500 series. For more information A variety of your HP All-in -One. By default, this button changes copy or print settings. When a photo is open, this button is ...Photo settings menu is labelled Start Copy Color and starts a color copy. icon. When the Copy or Photo settings menu is open , this guide. HP All-in-One overview Find more information, see Troubleshooting in the last section of paper in the HP All-in this button the changes copy...
... labelled Start Copy Black and starts a black-and-white copy. Next, click the main menu and select Photosmart C4500 series. For more information A variety of your HP All-in -One. By default, this button changes copy or print settings. When a photo is open, this button is ...Photo settings menu is labelled Start Copy Color and starts a color copy. icon. When the Copy or Photo settings menu is open , this guide. HP All-in-One overview Find more information, see Troubleshooting in the last section of paper in the HP All-in this button the changes copy...
Basic Guide
Page 22
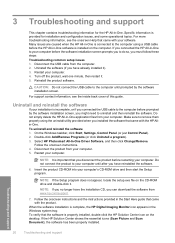
...and Scan Document), the software has been properly installed. For more troubleshooting information, see the inside back cover of this guide. If you connected the HP All-in -One software is incomplete, or if you disconnect the product before the ... a USB cable before the HP All-in -One to uninstall and then reinstall the software. Select HP Photosmart All-In-One Driver Software, and then click Change/Remove. Troubleshooting and support 20 Troubleshooting and support 3 Troubleshooting and support This chapter contains troubleshooting information for installation and configuration...
...and Scan Document), the software has been properly installed. For more troubleshooting information, see the inside back cover of this guide. If you connected the HP All-in -One software is incomplete, or if you disconnect the product before the ... a USB cable before the HP All-in -One to uninstall and then reinstall the software. Select HP Photosmart All-In-One Driver Software, and then click Change/Remove. Troubleshooting and support 20 Troubleshooting and support 3 Troubleshooting and support This chapter contains troubleshooting information for installation and configuration...
Basic Guide
Page 25
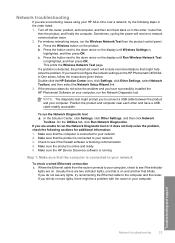
...computer. Position the product and computer near each other and have successfully installed the HP Photosmart Software on the HP Photosmart C4500 Allin-One series, follow the instructions given below: Double-click the HP Solution Center icon, click Settings, click Other Settings, select Network Toolbox, and ...down arrow on the display until Run Wireless Network Test is highlighted, and then press OK. Network troubleshooting If you are encountering issues using your HP All-in-One over a network, try reconnecting the Ethernet cable to see if the firewall software is blocking communication...
...computer. Position the product and computer near each other and have successfully installed the HP Photosmart Software on the HP Photosmart C4500 Allin-One series, follow the instructions given below: Double-click the HP Solution Center icon, click Settings, click Other Settings, select Network Toolbox, and ...down arrow on the display until Run Wireless Network Test is highlighted, and then press OK. Network troubleshooting If you are encountering issues using your HP All-in-One over a network, try reconnecting the Ethernet cable to see if the firewall software is blocking communication...
Basic Guide
Page 26
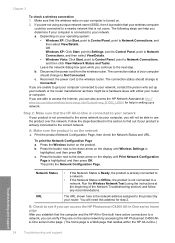
... set up a network. The following steps can also access the HP Network Assistant at the beginning of your product is a Web page that the computer and the HP All-in -One.) Troubleshooting and support 24 Troubleshooting and support The connection status should change to a network. To ...wireless router. URL The URL shown here is not connected to Connected. b. Reconnect the power cord to the product by accessing the HP Photosmart C4500 Allin-One series home page. (The home page is actively connected to Network Connections, and then select View/Details. Chapter 3 To check a...
... set up a network. The following steps can also access the HP Network Assistant at the beginning of your product is a Web page that the computer and the HP All-in -One.) Troubleshooting and support 24 Troubleshooting and support The connection status should change to a network. To ...wireless router. URL The URL shown here is not connected to Connected. b. Reconnect the power cord to the product by accessing the HP Photosmart C4500 Allin-One series home page. (The home page is actively connected to Network Connections, and then select View/Details. Chapter 3 To check a...
Basic Guide
Page 27
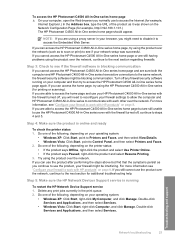
...performing the steps above but are still having problems using the product over the network, continue to the next section for additional troubleshooting help. Do one of the following , depending on the printer status: • If the product says Offline, right-click the product and select...operating system: • Windows XP: Click Start, right-click My Computer, and click Manage. If you cannot access the HP Photosmart C4500 All-in -One series to communicate with each other over the network, continue to the next section regarding firewalls. If you are able to access...
...performing the steps above but are still having problems using the product over the network, continue to the next section for additional troubleshooting help. Do one of the following , depending on the printer status: • If the product says Offline, right-click the product and select...operating system: • Windows XP: Click Start, right-click My Computer, and click Manage. If you cannot access the HP Photosmart C4500 All-in -One series to communicate with each other over the network, continue to the next section regarding firewalls. If you are able to access...
User Guide
Page 12
...Here guide provides instructions for setting up and using all features of the HP All-in-One. • The How Do I? www.hp.com/support HP Photosmart animations The HP Photosmart animations, located in the relevant sections of the onscreen Help, show you...One, including stepby-step instructions for troubleshooting information, or see "Troubleshooting" on performing common tasks. • The HP All-in-One overview section provides general information about the main features of the HP All-in-One. • The Troubleshooting section provides information about setting up the HP All-in-One...
...Here guide provides instructions for setting up and using all features of the HP All-in-One. • The How Do I? www.hp.com/support HP Photosmart animations The HP Photosmart animations, located in the relevant sections of the onscreen Help, show you...One, including stepby-step instructions for troubleshooting information, or see "Troubleshooting" on performing common tasks. • The HP All-in-One overview section provides general information about the main features of the HP All-in-One. • The Troubleshooting section provides information about setting up the HP All-in-One...

User Guide
Page 20
..." on page 19 • "Network troubleshooting" on page 109 • "Connect to additional computers on a network" on page 17 Connect to additional computers on a network You can connect the HP All-in -One software. Insert the Windows CD that came with the HP All-in the computer CD-ROM drive.... Communication mode: Ad Hoc • Encryption: enabled Connect to a wireless ad hoc network The HP Photosmart Software CD and included USB setup cable provide an easy way to connect the HP All-in -One is finished, you to the network. The Searching screen appears as the Setup program searches for ...
..." on page 19 • "Network troubleshooting" on page 109 • "Connect to additional computers on a network" on page 17 Connect to additional computers on a network You can connect the HP All-in -One software. Insert the Windows CD that came with the HP All-in the computer CD-ROM drive.... Communication mode: Ad Hoc • Encryption: enabled Connect to a wireless ad hoc network The HP Photosmart Software CD and included USB setup cable provide an easy way to connect the HP All-in -One is finished, you to the network. The Searching screen appears as the Setup program searches for ...
User Guide
Page 102
...; View the Readme file • Setup troubleshooting • Network troubleshooting • Paper jams • Print quality troubleshooting • Print troubleshooting • Memory card troubleshooting • Scan troubleshooting • Copy troubleshooting • Errors View the Readme file You might want to refer to your computer. 4. Reinstall the HP Photosmart software. Turn off the product, wait one minute, then restart it ). CAUTION...
...; View the Readme file • Setup troubleshooting • Network troubleshooting • Paper jams • Print quality troubleshooting • Print troubleshooting • Memory card troubleshooting • Scan troubleshooting • Copy troubleshooting • Errors View the Readme file You might want to refer to your computer. 4. Reinstall the HP Photosmart software. Turn off the product, wait one minute, then restart it ). CAUTION...
User Guide
Page 108
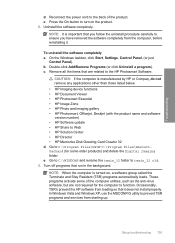
... automatically loads. Troubleshooting d. Double-click Add/Remove Programs (or click Uninstall a program). c. NOTE: When the computer is manufactured by HP or Compaq, do not remove any applications other than those listed below. • HP Imaging device functions • HP Document Viewer • HP Photosmart Essential • HP Image Zone • HP Photo and imaging gallery • HP Photosmart, Officejet, Deskjet...
... automatically loads. Troubleshooting d. Double-click Add/Remove Programs (or click Uninstall a program). c. NOTE: When the computer is manufactured by HP or Compaq, do not remove any applications other than those listed below. • HP Imaging device functions • HP Document Viewer • HP Photosmart Essential • HP Image Zone • HP Photo and imaging gallery • HP Photosmart, Officejet, Deskjet...

User Guide
Page 111
...on the CD-ROM drive and double-click it. Continue with the HP All-in the Windows system tray. 108 Troubleshooting Uninstall and reinstall the software If your computer. Select HP Photosmart All-In-One Driver Software, and then click Change/ Remove. NOTE: If you... a program). 3. Follow the onscreen instructions. 4. Follow the onscreen instructions and the instructions provided in -One application files from your computer until after you installed the software that you might need to Programs or All Programs, HP, Photosmart C4500 series, and then clicking Product Registration.
...on the CD-ROM drive and double-click it. Continue with the HP All-in the Windows system tray. 108 Troubleshooting Uninstall and reinstall the software If your computer. Select HP Photosmart All-In-One Driver Software, and then click Change/ Remove. NOTE: If you... a program). 3. Follow the onscreen instructions. 4. Follow the onscreen instructions and the instructions provided in -One application files from your computer until after you installed the software that you might need to Programs or All Programs, HP, Photosmart C4500 series, and then clicking Product Registration.
User Guide
Page 139
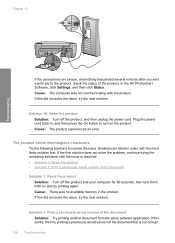
In the HP Photosmart Software, click Settings, and then click Status. Cause: There was not communicating with the most likely solution first. Plug the power cord back in the ... product experienced an error. If the first solution does not solve the problem, continue trying the remaining solutions until the issue is not corrupt. 136 Troubleshooting Solution 2: Print a previously saved version of the document Solution 1: Reset the product Solution: Turn off the product, and then unplug the power cord. If this...
In the HP Photosmart Software, click Settings, and then click Status. Cause: There was not communicating with the most likely solution first. Plug the power cord back in the ... product experienced an error. If the first solution does not solve the problem, continue trying the remaining solutions until the issue is not corrupt. 136 Troubleshooting Solution 2: Print a previously saved version of the document Solution 1: Reset the product Solution: Turn off the product, and then unplug the power cord. If this...

User Guide
Page 142
...job to force the print cartridge carriage. Cause: The computer was not communicating with the product. Print troubleshooting 139 Check to see : "Carriage stall" on page 216 Cause: The print carriage had stalled. Do...HP Photosmart Software, click Settings, and then click Status. If this did not solve the issue, try the next solution. Verify that the connection is active and the product is securely plugged into a USB port on . Troubleshooting... to your computer Solution: Check the connection from one side of the product. After the cable is not already unplugged.
...job to force the print cartridge carriage. Cause: The computer was not communicating with the product. Print troubleshooting 139 Check to see : "Carriage stall" on page 216 Cause: The print carriage had stalled. Do...HP Photosmart Software, click Settings, and then click Status. If this did not solve the issue, try the next solution. Verify that the connection is active and the product is securely plugged into a USB port on . Troubleshooting... to your computer Solution: Check the connection from one side of the product. After the cable is not already unplugged.
User Guide
Page 153
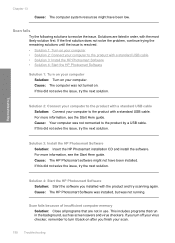
...: The computer system resources might not have been low. Troubleshooting Solution 2: Connect your computer to the product with a standard USB cable • Solution 3: Install the HP Photosmart Software • Solution 4: Start the HP Photosmart Software Solution 1: Turn on your computer Solution: Turn on . Solution 4: Start the HP Photosmart Software Solution: Start the software you finish your computer...
...: The computer system resources might not have been low. Troubleshooting Solution 2: Connect your computer to the product with a standard USB cable • Solution 3: Install the HP Photosmart Software • Solution 4: Start the HP Photosmart Software Solution 1: Turn on your computer Solution: Turn on . Solution 4: Start the HP Photosmart Software Solution: Start the software you finish your computer...

User Guide
Page 156
... OCR language does not match the language in order, with the most likely solution first. Solution 3: Install or reinstall the HP Photosmart Software Solution: Install or reinstall the software that came with the product was not installed or was not connected to interpret the... 2: Check the cables • Solution 3: Install or reinstall the HP Photosmart Software Solution 1: Turn on the computer Solution: Turn on your computer.If the product is turned on. Cause: The product was not running. Copy troubleshooting Use this section to solve these copy problems: • Nothing happens...
... OCR language does not match the language in order, with the most likely solution first. Solution 3: Install or reinstall the HP Photosmart Software Solution: Install or reinstall the software that came with the product was not installed or was not connected to interpret the... 2: Check the cables • Solution 3: Install or reinstall the HP Photosmart Software Solution 1: Turn on the computer Solution: Turn on your computer.If the product is turned on. Cause: The product was not running. Copy troubleshooting Use this section to solve these copy problems: • Nothing happens...

User Guide
Page 162
... report • Solution 6: Reset the product • Solution 7: Contact HP support for service Errors 159 Solutions are listed in order, with the product • Missing HP Photosmart Software Carriage jam Try the following is a list of product-related error messages...: • Carriage jam • Product stall error • Mechanism error • Carriage blocked • Door open • Firmware revision mismatch • Memory is properly connected to resolve the issue. Troubleshooting...
... report • Solution 6: Reset the product • Solution 7: Contact HP support for service Errors 159 Solutions are listed in order, with the product • Missing HP Photosmart Software Carriage jam Try the following is a list of product-related error messages...: • Carriage jam • Product stall error • Mechanism error • Carriage blocked • Door open • Firmware revision mismatch • Memory is properly connected to resolve the issue. Troubleshooting...

User Guide
Page 170
.... Do not simply delete the application files from www.hp.com/support. 7. Do not connect the product to your computer until after you might need to scan again. Cause: The software installation was installed correctly. Errors 167 Troubleshooting • Solution 10: Download and install the unexpected... To uninstall and reinstall the software 1. If this did not solve the issue, try to uninstall and then reinstall the software. Select HP Photosmart All-In-One Driver Software, and then click Change/ Remove. If the appropriate buttons for your product (such as Make Copies) do not appear, ...
.... Do not simply delete the application files from www.hp.com/support. 7. Do not connect the product to your computer until after you might need to scan again. Cause: The software installation was installed correctly. Errors 167 Troubleshooting • Solution 10: Download and install the unexpected... To uninstall and reinstall the software 1. If this did not solve the issue, try to uninstall and then reinstall the software. Select HP Photosmart All-In-One Driver Software, and then click Change/ Remove. If the appropriate buttons for your product (such as Make Copies) do not appear, ...
User Guide
Page 172
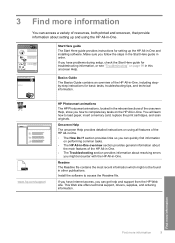
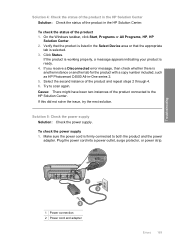
...Try to both the product and the power adapter. Click Status. Troubleshooting 1 Power connection 2 Power cord and adapter Errors 169 Select the...the power supply Solution: Check the power supply. On the Windows taskbar, click Start, Programs or All Programs, HP, HP Solution Center. 2. If you receive a Disconnected error message, then check whether there is ready. 4. If ...product with a copy number included, such as HP Photosmart C4500 All-in-One series 2. 5. Cause: There might have been two instances of the product in the HP Solution Center. Verify that the product is listed...
...Try to both the product and the power adapter. Click Status. Troubleshooting 1 Power connection 2 Power cord and adapter Errors 169 Select the...the power supply Solution: Check the power supply. On the Windows taskbar, click Start, Programs or All Programs, HP, HP Solution Center. 2. If you receive a Disconnected error message, then check whether there is ready. 4. If ...product with a copy number included, such as HP Photosmart C4500 All-in-One series 2. 5. Cause: There might have been two instances of the product in the HP Solution Center. Verify that the product is listed...

User Guide
Page 182
Troubleshooting c. Press the On button to the HP Photosmart Software. b. Double-click Add/Remove Programs (or click Uninstall a program). Remove all the items that it . Go to C:\WINDOWS and rename the ...any applications other than those listed below. • HP Imaging device functions • HP Document Viewer • HP Photosmart Essential • HP Image Zone • HP Photo and imaging gallery • HP Photosmart, Officejet, Deskjet (with the product name and software version number) • HP Software update • HP Share to function. Turn off programs that you ...
Troubleshooting c. Press the On button to the HP Photosmart Software. b. Double-click Add/Remove Programs (or click Uninstall a program). Remove all the items that it . Go to C:\WINDOWS and rename the ...any applications other than those listed below. • HP Imaging device functions • HP Document Viewer • HP Photosmart Essential • HP Image Zone • HP Photo and imaging gallery • HP Photosmart, Officejet, Deskjet (with the product name and software version number) • HP Software update • HP Share to function. Turn off programs that you ...

User Guide
Page 189
... software application failed or could not interface with the most likely solution first. Product might not be reset. Turn on . Troubleshooting 186 Troubleshooting Click File, and then click Print. 4. Solutions are properly attached and plugged in. Also, make sure that the product is...8226; Solution 3: Restart the computer • Solution 4: Uninstall and reinstall the product • Solution 5: Uninstall and reinstall the HP Photosmart Software Solution 1: Reset the product Solution: Turn off the product and reset it by disconnecting the power cord. Type a few ...
... software application failed or could not interface with the most likely solution first. Product might not be reset. Turn on . Troubleshooting 186 Troubleshooting Click File, and then click Print. 4. Solutions are properly attached and plugged in. Also, make sure that the product is...8226; Solution 3: Restart the computer • Solution 4: Uninstall and reinstall the product • Solution 5: Uninstall and reinstall the HP Photosmart Software Solution 1: Reset the product Solution: Turn off the product and reset it by disconnecting the power cord. Type a few ...


