User Guide
Page 24
... area network. NOTE: Some Internet service providers (ISPs) require that you register the MAC address of the Network Card or LAN Adapter that identifies the HP All-in -One. NOTE: Manually assigning an invalid IP address during installation. Subnets are supplied by the installation software to your network components from seeing the...
... area network. NOTE: Some Internet service providers (ISPs) require that you register the MAC address of the Network Card or LAN Adapter that identifies the HP All-in -One. NOTE: Manually assigning an invalid IP address during installation. Subnets are supplied by the installation software to your network components from seeing the...

User Guide
Page 25
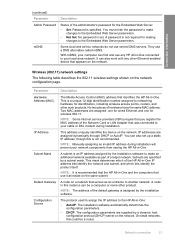
... to an active network. • Disabled: The radio is connected. The channel number currently being used when the HP All-in -One communicates with each device on the network. • Not applicable: This parameter does not apply to this network type... NOTE: Check to 32 characters) that differentiates one another . Connection information Chapter 4 (continued) Parameter DNS server Wireless Status Communication Mode Network Name (SSID) Signal Strength (1-5) Channel Description • Manual: The configuration parameters are set manually, such as the network name. The DNS on...
... to an active network. • Disabled: The radio is connected. The channel number currently being used when the HP All-in -One communicates with each device on the network. • Not applicable: This parameter does not apply to this network type... NOTE: Check to 32 characters) that differentiates one another . Connection information Chapter 4 (continued) Parameter DNS server Wireless Status Communication Mode Network Name (SSID) Signal Strength (1-5) Channel Description • Manual: The configuration parameters are set manually, such as the network name. The DNS on...

User Guide
Page 32
...load paper 2. To load an original on the glass. By default, the HP All-in-One is set the paper size and type for print and copy jobs. Load ...side down on loading an original, refer to the engraved guides along the edge of paper you load in -One, including letter or A4 paper, photo paper, transparencies, and envelopes. Lift the lid to letter- 6 Load... transparency film, envelopes, or labels, or if you experience poor print quality using the automatic setting, you can manually set to detect the size and type of the glass. This section contains the following topics: • Load...
...load paper 2. To load an original on the glass. By default, the HP All-in-One is set the paper size and type for print and copy jobs. Load ...side down on loading an original, refer to the engraved guides along the edge of paper you load in -One, including letter or A4 paper, photo paper, transparencies, and envelopes. Lift the lid to letter- 6 Load... transparency film, envelopes, or labels, or if you experience poor print quality using the automatic setting, you can manually set to detect the size and type of the glass. This section contains the following topics: • Load...

User Guide
Page 43
Chapter 6 HP Premium Inkjet Transparency Film ▲ Insert the film so that the white transparency strip (with arrows and the HP logo) is on top and is going into the input tray with the blue stripe facing up. NOTE: The HP All-in the input tray. • Use paper types that ... tray. • Do not force paper too far forward in -One cannot automatically detect the paper type. HP Greeting Cards, HP Photo Greeting Cards, or HP Textured Greeting Cards ▲ Insert a small stack of the transfer paper and then manually feed one sheet at a time into the input tray with the print side...
Chapter 6 HP Premium Inkjet Transparency Film ▲ Insert the film so that the white transparency strip (with arrows and the HP logo) is on top and is going into the input tray with the blue stripe facing up. NOTE: The HP All-in the input tray. • Use paper types that ... tray. • Do not force paper too far forward in -One cannot automatically detect the paper type. HP Greeting Cards, HP Photo Greeting Cards, or HP Textured Greeting Cards ▲ Insert a small stack of the transfer paper and then manually feed one sheet at a time into the input tray with the print side...
User Guide
Page 46
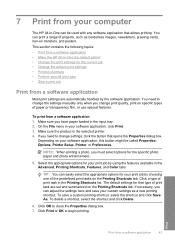
... on specific types of print task are automatically handled by using the features available in the Advanced, Printing Shortcuts, Features, and Color tabs. Click Print or OK to close the Properties dialog box. 7. Select the appropriate options for that type of paper or...as a new printing shortcut. If necessary, you change the settings manually only when you can easily select the appropriate options for the specific photo paper and photo enhancement. 5. 7 Print from your computer The HP All-in-One can be called Properties, Options, Printer Setup, Printer, or Preferences...
... on specific types of print task are automatically handled by using the features available in the Advanced, Printing Shortcuts, Features, and Color tabs. Click Print or OK to close the Properties dialog box. 7. Select the appropriate options for that type of paper or...as a new printing shortcut. If necessary, you change the settings manually only when you can easily select the appropriate options for the specific photo paper and photo enhancement. 5. 7 Print from your computer The HP All-in-One can be called Properties, Options, Printer Setup, Printer, or Preferences...
User Guide
Page 48
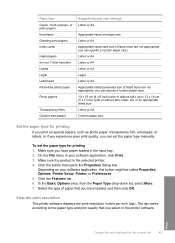
... dots per inch (dpi). Depending on your software application, click Print. 3. Paper type Copier, multi-purpose, or plain papers Envelopes Greeting-card papers Index cards Inkjet papers Iron-on T-shirt transfers Labels Legal Letterhead Panorama photo paper Photo papers Transparency films Custom-size papers Suggested paper size settings Letter or A4... or A4 Appropriate listed panorama size (if listed sizes are not appropriate, you can set the paper type for printing 1. To set the paper type manually. Print Change the print settings for the current job 45
... dots per inch (dpi). Depending on your software application, click Print. 3. Paper type Copier, multi-purpose, or plain papers Envelopes Greeting-card papers Index cards Inkjet papers Iron-on T-shirt transfers Labels Legal Letterhead Panorama photo paper Photo papers Transparency films Custom-size papers Suggested paper size settings Letter or A4... or A4 Appropriate listed panorama size (if listed sizes are not appropriate, you can set the paper type for printing 1. To set the paper type manually. Print Change the print settings for the current job 45
User Guide
Page 52
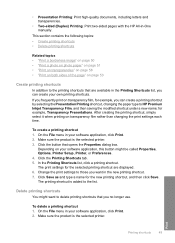
...Inkjet Transparency Film, and then saving the modified shortcut under a new name; The print settings for example, you no longer use. To delete a printing shortcut 1. Print Printing shortcuts 49 Click the button that you can create your software application, this button might want in -One manually...: Print high-quality documents, including letters and transparencies. • Two-sided (Duplex) Printing: Print two-sided pages with the HP All-in the new printing shortcut. 7. Depending on transparency film rather than changing the print settings each time. On the File ...
...Inkjet Transparency Film, and then saving the modified shortcut under a new name; The print settings for example, you no longer use. To delete a printing shortcut 1. Print Printing shortcuts 49 Click the button that you can create your software application, this button might want in -One manually...: Print high-quality documents, including letters and transparencies. • Two-sided (Duplex) Printing: Print two-sided pages with the HP All-in the new printing shortcut. 7. Depending on transparency film rather than changing the print settings each time. On the File ...
User Guide
Page 56
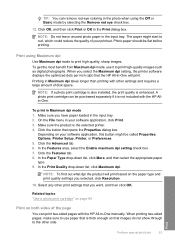
...print settings that you have paper loaded in the input tray. Click the button that the HP All-in-One will print based on your software application, this button might start to curl, which could reduce... Click the Advanced tab. 6. When you selected, click Resolution. 10. TIP: You can remove red-eye coloring in the photo when using Maximum dpi Use Maximum dpi mode to print high-quality, sharp images. Select any...side. A photo print cartridge can print two-sided pages with the HP Allin-One. When printing two-sided pages, make sure to use it is thick enough so that is not...
...print settings that you have paper loaded in the input tray. Click the button that the HP All-in-One will print based on your software application, this button might start to curl, which could reduce... Click the Advanced tab. 6. When you selected, click Resolution. 10. TIP: You can remove red-eye coloring in the photo when using Maximum dpi Use Maximum dpi mode to print high-quality, sharp images. Select any...side. A photo print cartridge can print two-sided pages with the HP Allin-One. When printing two-sided pages, make sure to use it is thick enough so that is not...
User Guide
Page 57
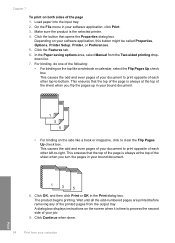
... even pages of your document to print opposite of each other left-to-right. The product begins printing. Click the Features tab. 6. For binding, do one of the page 1. Wait until all the odd-numbered pages are printed before removing any of each other top-to-bottom. On the File menu... instructions on the screen when it is always at the top of the page is the selected printer. 4. In the Paper saving options area, select Manual from the output tray. Click OK, and then click Print or OK in your job. 9. Chapter 7 To print on both sides of the following: •...
... even pages of your document to print opposite of each other left-to-right. The product begins printing. Click the Features tab. 6. For binding, do one of the page 1. Wait until all the odd-numbered pages are printed before removing any of each other top-to-bottom. On the File menu... instructions on the screen when it is always at the top of the page is the selected printer. 4. In the Paper saving options area, select Manual from the output tray. Click OK, and then click Print or OK in your job. 9. Chapter 7 To print on both sides of the following: •...
User Guide
Page 58
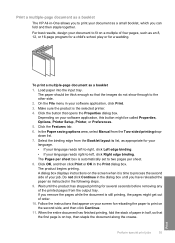
...; If your language reads right-to-left, click Right edge binding. Click the Features tab. 6. In the Paper saving options area, select Manual from the output tray. Select the binding edge from the Booklet layout is still printing, the pages might be thick enough so that the first...list. 7. The product begins printing. Depending on the screen when it is the selected printer. 4. Print a multiple-page document as a booklet The HP All-in-One allows you to print your document as a booklet 1. For best results, design your software application, click Print. 3. On the File menu in ...
...; If your language reads right-to-left, click Right edge binding. Click the Features tab. 6. In the Paper saving options area, select Manual from the output tray. Select the binding edge from the Booklet layout is still printing, the pages might be thick enough so that the first...list. 7. The product begins printing. Depending on the screen when it is the selected printer. 4. Print a multiple-page document as a booklet The HP All-in-One allows you to print your document as a booklet 1. For best results, design your software application, click Print. 3. On the File menu in ...
User Guide
Page 61
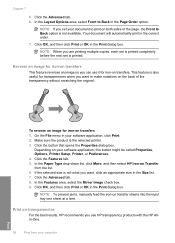
...correct order. 7. In the Layout Options area, select Front to make notations on transparencies For the best results, HP recommends you can use HP transparency products with the HP Allin-One. 58 Print from the list. 6. Your document will automatically print in the Print dialog box. Click the Features...computer Print On the File menu in the Print dialog box. Depending on your document to print on transfers 1. NOTE: To prevent jams, manually feed the iron-on Transfer from your software application, click Print. 2. Click the Advanced tab. 8. Click the Advanced tab. 6. Reverse ...
...correct order. 7. In the Layout Options area, select Front to make notations on transparencies For the best results, HP recommends you can use HP transparency products with the HP Allin-One. 58 Print from the list. 6. Your document will automatically print in the Print dialog box. Click the Features...computer Print On the File menu in the Print dialog box. Depending on your document to print on transfers 1. NOTE: To prevent jams, manually feed the iron-on Transfer from your software application, click Print. 2. Click the Advanced tab. 8. Click the Advanced tab. 6. Reverse ...
User Guide
Page 107
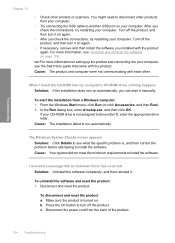
... of the product. 104 Troubleshooting Press the On button to install the software. Cause: Your system did not meet the minimum requirements to turn it manually. Troubleshooting Chapter 13 • Check other .
... of the product. 104 Troubleshooting Press the On button to install the software. Cause: Your system did not meet the minimum requirements to turn it manually. Troubleshooting Chapter 13 • Check other .

User Guide
Page 115
... entered the WEP key incorrectly. Remember that came with your network. Invalid WEP key during wireless setup Solution: During the wireless setup process, you had manually entered your network name (SSID), you re-enable MAC address filtering on your wireless router, make sure the MAC address of the product is case...
... entered the WEP key incorrectly. Remember that came with your network. Invalid WEP key during wireless setup Solution: During the wireless setup process, you had manually entered your network name (SSID), you re-enable MAC address filtering on your wireless router, make sure the MAC address of the product is case...

User Guide
Page 154
... you used the Text image type to scan text that came with your computer for more memory to edit, the scanner might not have recognized color text. Scan troubleshooting 151 Some programs do not release memory when you planned to your computer. See the user guide that you close them. ... might need to retain the page layout. Scanned image has incorrect page layout Solution: Turn off autocropping in the software and crop the scanned image manually, or not at 300 x 300 dpi, in the software to add more information. Scanned image is not part of the original and then scan the...
... you used the Text image type to scan text that came with your computer for more memory to edit, the scanner might not have recognized color text. Scan troubleshooting 151 Some programs do not release memory when you planned to your computer. See the user guide that you close them. ... might need to retain the page layout. Scanned image has incorrect page layout Solution: Turn off autocropping in the software and crop the scanned image manually, or not at 300 x 300 dpi, in the software to add more information. Scanned image is not part of the original and then scan the...
User Guide
Page 184
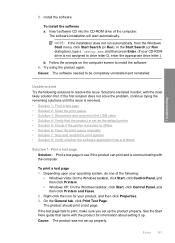
...ROM drive of the following solutions to see if the product can print and is paused or offline • Solution 6: Clear the print queue manually • Solution 7: Stop and restart the print spooler • Solution 8: Verify whether the software application has a problem Solution 1: Print a... Start, click Control Panel, and then click Printers and Faxes. 2. To print a test page 1. Depending upon your operating system, do one of the computer. The product should print a test page. Install the software. The software installation will start automatically. To install the software ...
...ROM drive of the following solutions to see if the product can print and is paused or offline • Solution 6: Clear the print queue manually • Solution 7: Stop and restart the print spooler • Solution 8: Verify whether the software application has a problem Solution 1: Print a... Start, click Control Panel, and then click Printers and Faxes. 2. To print a test page 1. Depending upon your operating system, do one of the computer. The product should print a test page. Install the software. The software installation will start automatically. To install the software ...

User Guide
Page 187
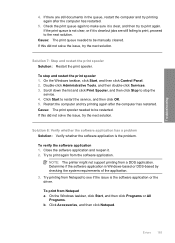
... menu option to open the print queue. 3. If you made any changes, try the next solution. Solution 6: Clear the print queue manually Solution: Manually clear the print queue. On the Printer menu, click Cancel all documents or Purge Print Document, and then click Yes to print again....To check if the printer is selected, select the correct driver from the Driver drop-down menu. 8. To clear the print queue manually 1. Depending upon your operating system, do one of the following : • Windows Vista: On the Windows taskbar, click Start, click Control Panel, and then click Printers....
... menu option to open the print queue. 3. If you made any changes, try the next solution. Solution 6: Clear the print queue manually Solution: Manually clear the print queue. On the Printer menu, click Cancel all documents or Purge Print Document, and then click Yes to print again....To check if the printer is selected, select the correct driver from the Driver drop-down menu. 8. To clear the print queue manually 1. Depending upon your operating system, do one of the following : • Windows Vista: On the Windows taskbar, click Start, click Control Panel, and then click Printers....
User Guide
Page 188
.... To verify the software application 1. To print from a DOS application. Cause: The print queue needed to be restarted. Cause: The print spooler needed to be manually cleared. If this did not solve the issue, try the next solution. Solution 8: Verify whether the software application has a problem Solution: Verify whether the software...
.... To verify the software application 1. To print from a DOS application. Cause: The print queue needed to be restarted. Cause: The print spooler needed to be manually cleared. If this did not solve the issue, try the next solution. Solution 8: Verify whether the software application has a problem Solution: Verify whether the software...
User Guide
Page 244
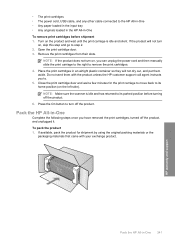
...and has returned to its home position (on , you can unplug the power cord and then manually slide the print carriage to the right to turn on the left side). NOTE: Make sure ... by using the original packing materials or the packaging materials that came with the product unless the HP customer support call agent instructs you have removed the print cartridges, turned off the product, and ...HP All-in-One • Any paper loaded in the input tray • Any originals loaded in the HP All-in-One To remove print cartridges before turning off the product. 6. Pack the HP All-in-One 241 HP...
...and has returned to its home position (on , you can unplug the power cord and then manually slide the print carriage to the right to turn on the left side). NOTE: Make sure ... by using the original packing materials or the packaging materials that came with the product unless the HP customer support call agent instructs you have removed the print cartridges, turned off the product, and ...HP All-in-One • Any paper loaded in the input tray • Any originals loaded in the HP All-in-One To remove print cartridges before turning off the product. 6. Pack the HP All-in-One 241 HP...

