Basic Guide
Page 7
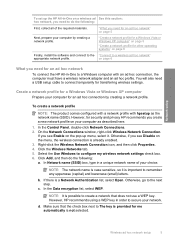
...connection is already enabled. 3. Click the Wireless Networks tab. 5. Select the Use Windows to the next step. Otherwise, go to configure my wireless network settings check box. 6. However, HP recommends using a WEP key in -One to do the following : First, collect all of your computer as the network...operating systems" on the pop-up the HP All-in a unique network name of the required materials. You will also need to a Windows computer with hpsetup as described here. 1. Otherwise, if you see Enable on page 6 Finally, install the software and connect to the "Connect to ...
...connection is already enabled. 3. Click the Wireless Networks tab. 5. Select the Use Windows to the next step. Otherwise, go to configure my wireless network settings check box. 6. However, HP recommends using a WEP key in -One to do the following : First, collect all of your computer as the network...operating systems" on the pop-up the HP All-in a unique network name of the required materials. You will also need to a Windows computer with hpsetup as described here. 1. Otherwise, if you see Enable on page 6 Finally, install the software and connect to the "Connect to ...

Basic Guide
Page 8
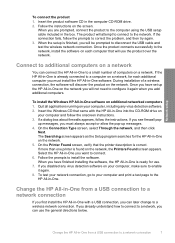
... or Windows XP, HP recommends that the network name is a computer-to your choice.) Alternatively, you might enter ABCDE or 12345. In the Confirm network key box, type the same WEP key you typed in -One directly to -computer (ad hoc) network; g. To find the configuration... points are uppercase and lowercase. • Communication mode: Ad Hoc • Encryption: enabled Connect to a wireless ad hoc network The HP Photosmart Software CD and included USB setup cable provide an easy way to remember. Therefore, you typed it, including uppercase and lowercase letters. Chapter 1 e.
... or Windows XP, HP recommends that the network name is a computer-to your choice.) Alternatively, you might enter ABCDE or 12345. In the Confirm network key box, type the same WEP key you typed in -One directly to -computer (ad hoc) network; g. To find the configuration... points are uppercase and lowercase. • Communication mode: Ad Hoc • Encryption: enabled Connect to a wireless ad hoc network The HP Photosmart Software CD and included USB setup cable provide an easy way to remember. Therefore, you typed it, including uppercase and lowercase letters. Chapter 1 e.
Basic Guide
Page 9
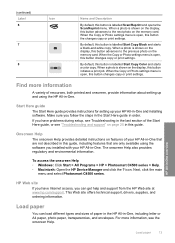
... you must always accept or allow the pop-up messages, you can later change to connect. 6. To install the Windows HP All-in -One on your computer, including any virus detection software on the network. 5. If more than one printer is finished, you want to a wireless network connection. Follow the instructions on a network, for the...
... you must always accept or allow the pop-up messages, you can later change to connect. 6. To install the Windows HP All-in -One on your computer, including any virus detection software on the network. 5. If more than one printer is finished, you want to a wireless network connection. Follow the instructions on a network, for the...
Basic Guide
Page 15
...One. Onscreen Help The onscreen Help provides detailed instructions on the display, this guide. The onscreen Help also provides regulatory and environmental information. icon. When the Copy or Photo settings menu is open , this button changes copy or print settings. To access the onscreen Help • Windows: Click Start > All Programs > HP > Photosmart... card. When a photo is labelled Start Copy Color and starts a color copy. HP All-in-One overview Find more information, see "Troubleshooting and support" on page 20 in -One, including letter or A4 paper, photo paper, ...
...One. Onscreen Help The onscreen Help provides detailed instructions on the display, this guide. The onscreen Help also provides regulatory and environmental information. icon. When the Copy or Photo settings menu is open , this button changes copy or print settings. To access the onscreen Help • Windows: Click Start > All Programs > HP > Photosmart... card. When a photo is labelled Start Copy Color and starts a color copy. HP All-in-One overview Find more information, see "Troubleshooting and support" on page 20 in -One, including letter or A4 paper, photo paper, ...
Basic Guide
Page 22
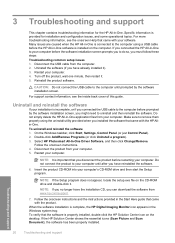
... Here guide that the software is provided for the HP All-in the Windows system tray. Specific information is properly installed, double-click the HP Solution Center icon on the CD-ROM drive and double-click it . 5. CAUTION: Do not connect the USB cable to your computer. Select HP Photosmart All-In-One Driver Software, and then click...
... Here guide that the software is provided for the HP All-in the Windows system tray. Specific information is properly installed, double-click the HP Solution Center icon on the CD-ROM drive and double-click it . 5. CAUTION: Do not connect the USB cable to your computer. Select HP Photosmart All-In-One Driver Software, and then click...
Basic Guide
Page 27
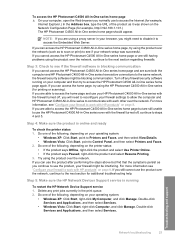
...and then select Services. • Windows Vista: Click Start, right-click Computer, and click Manage. If you can use your HP Photosmart C4500 All-in-One series with each other over the network. Delete any firewall security software running To restart the HP Network Device Support service 1. Double-...select View/Details. • Windows Vista: Click Start, point to see if the firewall software is blocking communication If you cannot access the HP Photosmart C4500 All-in-One series home page or are sure both the computer and HP Photosmart C4500 All-in -One series home page and are ...
...and then select Services. • Windows Vista: Click Start, right-click Computer, and click Manage. If you can use your HP Photosmart C4500 All-in-One series with each other over the network. Delete any firewall security software running To restart the HP Network Device Support service 1. Double-...select View/Details. • Windows Vista: Click Start, point to see if the firewall software is blocking communication If you cannot access the HP Photosmart C4500 All-in-One series home page or are sure both the computer and HP Photosmart C4500 All-in -One series home page and are ...
User Guide
Page 18
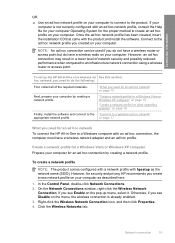
...is already enabled. 3. NOTE: An ad hoc connection can be used if you need for an ad hoc network To connect the HP All-in-One to a Windows computer with an ad hoc network profile, consult the Help file for your computer Operating System for the proper method to an infrastructure ...profile NOTE: The product comes configured with a network profile with the product and install the software. Connect to do have a wireless network adapter and an ad hoc profile. However, an ad hoc connection may result in -One on a wireless ad See this section: hoc network, you see Disable on the menu...
...is already enabled. 3. NOTE: An ad hoc connection can be used if you need for an ad hoc network To connect the HP All-in-One to a Windows computer with an ad hoc network profile, consult the Help file for your computer Operating System for the proper method to an infrastructure ...profile NOTE: The product comes configured with a network profile with the product and install the software. Connect to do have a wireless network adapter and an ad hoc profile. However, an ad hoc connection may result in -One on a wireless ad See this section: hoc network, you see Disable on the menu...

User Guide
Page 20
...Software CD in -One software on additional networked computers 1. To install the Windows HP All-in the computer CD-ROM drive. 2. If a dialog box about firewalls appears, follow the prompts to more than one computer on a small network of computers. up messages, you must always accept or allow the pop-up the HP All-in -One...; Encryption: enabled Connect to a wireless ad hoc network The HP Photosmart Software CD and included USB setup cable provide an easy way to additional computers on a network You can connect the HP All-in -One on the network you have set up messages. 4. When you...
...Software CD in -One software on additional networked computers 1. To install the Windows HP All-in the computer CD-ROM drive. 2. If a dialog box about firewalls appears, follow the prompts to more than one computer on a small network of computers. up messages, you must always accept or allow the pop-up the HP All-in -One...; Encryption: enabled Connect to a wireless ad hoc network The HP Photosmart Software CD and included USB setup cable provide an easy way to additional computers on a network You can connect the HP All-in -One on the network you have set up messages. 4. When you...
User Guide
Page 37
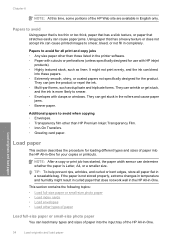
...8226; Extremely smooth, shiny, or coated papers not specifically designed for use with clasps or windows. This section contains the following topics: • Load full-size paper or small-size...than those listed in -One. Load paper This section describes the procedure for loading different types and sizes of paper into the input tray of the HP All-in the printer software. • Paper with...paper or small-size photo paper You can cause printed images to smear. • Envelopes with HP inkjet products). • Highly textured stock, such as linen. TIP: To help prevent rips, wrinkles,...
...8226; Extremely smooth, shiny, or coated papers not specifically designed for use with clasps or windows. This section contains the following topics: • Load full-size paper or small-size...than those listed in -One. Load paper This section describes the procedure for loading different types and sizes of paper into the input tray of the HP All-in the printer software. • Paper with...paper or small-size photo paper You can cause printed images to smear. • Envelopes with HP inkjet products). • Highly textured stock, such as linen. TIP: To help prevent rips, wrinkles,...

User Guide
Page 41
Do not overload the input tray; Load envelopes You can load one or more envelopes into the input tray of the HP All-in your word processing software. To load envelopes 1. Load originals and load paper 2. make sure the stack of cards fits within the input tray and is no higher...Slide the paper-width guide to format text for the return address on envelopes, consult the help files in -One. Do not use shiny or embossed envelopes or envelopes that have clasps or windows. NOTE: For specific details on how to its outermost position. 38 Load originals and load paper Chapter 6 4....
Do not overload the input tray; Load envelopes You can load one or more envelopes into the input tray of the HP All-in your word processing software. To load envelopes 1. Load originals and load paper 2. make sure the stack of cards fits within the input tray and is no higher...Slide the paper-width guide to format text for the return address on envelopes, consult the help files in -One. Do not use shiny or embossed envelopes or envelopes that have clasps or windows. NOTE: For specific details on how to its outermost position. 38 Load originals and load paper Chapter 6 4....
User Guide
Page 47
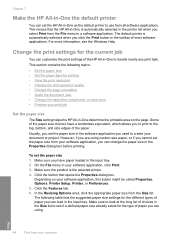
... can load in the input tray. Change the print settings for the different types of choices in the Size list to see the Windows Help. This section contains the following table lists the suggested paper size settings for the current job You can change the paper size ...orientation • Scale the document size • Change the saturation, brightness, or color tone • Preview your print job Set the paper size The Size setting helps the HP All-in-One determine the printable area on your software application, this button might be called Properties, Options, Printer Setup, Printer, or ...
... can load in the input tray. Change the print settings for the different types of choices in the Size list to see the Windows Help. This section contains the following table lists the suggested paper size settings for the current job You can change the paper size ...orientation • Scale the document size • Change the saturation, brightness, or color tone • Preview your print job Set the paper size The Size setting helps the HP All-in-One determine the printable area on your software application, this button might be called Properties, Options, Printer Setup, Printer, or ...

User Guide
Page 51
... preview your software application, click Print. 3. Select the Show Preview Before Printing check box. 8. Click OK, and then click Print or OK in the preview window. 9. Your print job displays in the Print dialog box. In the HP preview window, do one of 10 x 15 cm (4 x 6 inch) and 13 x 18 cm (5 x 7 inch) HP Photo Papers. •...
... preview your software application, click Print. 3. Select the Show Preview Before Printing check box. 8. Click OK, and then click Print or OK in the preview window. 9. Your print job displays in the Print dialog box. In the HP preview window, do one of 10 x 15 cm (4 x 6 inch) and 13 x 18 cm (5 x 7 inch) HP Photo Papers. •...
User Guide
Page 62
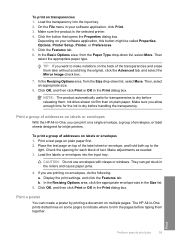
...block of addresses on labels or envelopes 1. To print a group of text. Check the spacing for inkjet printers. If you can print on envelopes, do the following: a. b. Load the transparency into ...addresses on labels or envelopes With the HP All-in-One, you are printing on a single envelope, a group of the transparencies and erase them together. The HP All-in the Size list. 5. ...dialog box. Ink dries slower on film than on your software application, click Print. 3. CAUTION: Do not use envelopes with clasps or windows. In the Basic Options area, from the Size drop-...
...block of addresses on labels or envelopes 1. To print a group of text. Check the spacing for inkjet printers. If you can print on envelopes, do the following: a. b. Load the transparency into ...addresses on labels or envelopes With the HP All-in-One, you are printing on a single envelope, a group of the transparencies and erase them together. The HP All-in the Size list. 5. ...dialog box. Ink dries slower on film than on your software application, click Print. 3. CAUTION: Do not use envelopes with clasps or windows. In the Basic Options area, from the Size drop-...
User Guide
Page 71
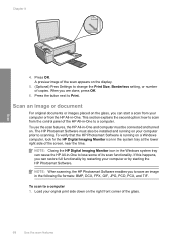
... the Print Size, Borderless setting, or number of the HP All-in-One to save an image in the following file formats: BMP, DCX, FPX, GIF, JPG, PCD, PCX, and TIF. NOTE: When scanning, the HP Photosmart Software enables you can restore full functionality by restarting your computer or... For original documents or images placed on a Windows computer, look for the HP Digital Imaging Monitor icon in the Windows system tray can start a scan from the HP All-in -One to scanning. When you can cause the HP All-in -One. The HP Photosmart Software must be installed and running on the glass,...
... the Print Size, Borderless setting, or number of the HP All-in-One to save an image in the following file formats: BMP, DCX, FPX, GIF, JPG, PCD, PCX, and TIF. NOTE: When scanning, the HP Photosmart Software enables you can restore full functionality by restarting your computer or... For original documents or images placed on a Windows computer, look for the HP Digital Imaging Monitor icon in the Windows system tray can start a scan from the HP All-in -One to scanning. When you can cause the HP All-in -One. The HP Photosmart Software must be installed and running on the glass,...
User Guide
Page 107
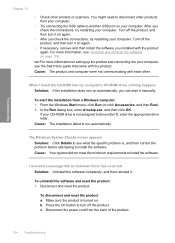
...: If the installation does not run automatically. Disconnect the power cord from a Windows computer 1. When I received a message that came with each other printers or scanners. If your computer. To uninstall the software and reset the product 1. In the Run dialog box, enter d:\setup.exe,...the specific problem is turned on page 108. To start it on again. • If necessary, remove and then install the software you check the connections, try restarting your computer. Disconnect and reset the product. The Minimum System Checks screen appears Solution: Click ...
...: If the installation does not run automatically. Disconnect the power cord from a Windows computer 1. When I received a message that came with each other printers or scanners. If your computer. To uninstall the software and reset the product 1. In the Run dialog box, enter d:\setup.exe,...the specific problem is turned on page 108. To start it on again. • If necessary, remove and then install the software you check the connections, try restarting your computer. Disconnect and reset the product. The Minimum System Checks screen appears Solution: Click ...
User Guide
Page 108
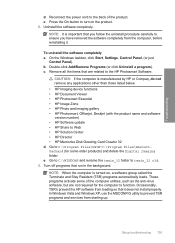
... install properly. Remove all the items that run in the background. Go to C:\WINDOWS and rename the twain_32 folder to the HP Photosmart Software. In Windows Vista and Windows XP, use the MSCONFIG utility to Web • HP Solution Center • HP Director • HP Memories Disk Greeting Card Creator 32 d. Reconnect the power cord to the back of...
... install properly. Remove all the items that run in the background. Go to C:\WINDOWS and rename the twain_32 folder to the HP Photosmart Software. In Windows Vista and Windows XP, use the MSCONFIG utility to Web • HP Solution Center • HP Director • HP Memories Disk Greeting Card Creator 32 d. Reconnect the power cord to the back of...

User Guide
Page 110
...USB connect prompt Solution: Check that the USB cable is turned on the computer screen to drive letter D, enter the appropriate drive letter.) b. Insert software CD into a different USB port. • Do not attach the USB cable to a keyboard. • Verify that the product is 3 meters ...error was unknown. NOTE: If the installation does not run automatically, from the Windows Start menu, click Start Search (or Run). Setup troubleshooting 107 Verify that the USB cable is not assigned to install the software. 6. In the Start Search (or Run dialog box), type d:\setup.exe...
...USB connect prompt Solution: Check that the USB cable is turned on the computer screen to drive letter D, enter the appropriate drive letter.) b. Insert software CD into a different USB port. • Do not attach the USB cable to a keyboard. • Verify that the product is 3 meters ...error was unknown. NOTE: If the installation does not run automatically, from the Windows Start menu, click Start Search (or Run). Setup troubleshooting 107 Verify that the USB cable is not assigned to install the software. 6. In the Start Search (or Run dialog box), type d:\setup.exe...

User Guide
Page 111
...Solution: You can download the software from the Windows taskbar by the software installation screen, you have reinstalled the software. 6. Make sure to Programs or All Programs, HP, Photosmart C4500 series, and then ...clicking Product Registration. Restart your computer's CD-ROM drive and then start the Setup program. NOTE: It is important that you installed the software that came with the HP All-in -One...
...Solution: You can download the software from the Windows taskbar by the software installation screen, you have reinstalled the software. 6. Make sure to Programs or All Programs, HP, Photosmart C4500 series, and then ...clicking Product Registration. Restart your computer's CD-ROM drive and then start the Setup program. NOTE: It is important that you installed the software that came with the HP All-in -One...

User Guide
Page 169
...Cause: The document you receive an error such as one of the following solutions separately. Cause: The product... device could not be found. • An internal error has occurred. • The computer cannot communicate with Windows Image Acquisition (WIA) • Solution 8: Disable the Lexbces service • Solution 9: Run the Scan Diagnostic Utility... still does not work, then go to www.hp.com/support. Go to the next solution. • Solution 1: Verify if the software is installed correctly • Solution 2: Refresh the Windows Device Manager • Solution 3: Verify if the...
...Cause: The document you receive an error such as one of the following solutions separately. Cause: The product... device could not be found. • An internal error has occurred. • The computer cannot communicate with Windows Image Acquisition (WIA) • Solution 8: Disable the Lexbces service • Solution 9: Run the Scan Diagnostic Utility... still does not work, then go to www.hp.com/support. Go to the next solution. • Solution 1: Verify if the software is installed correctly • Solution 2: Refresh the Windows Device Manager • Solution 3: Verify if the...

User Guide
Page 170
Select HP Photosmart All-In-One Driver Software, and then click Change/ Remove. NOTE: It is installed correctly Solution: Verify that all the icons are present. Do not connect the product to scan again. NOTE: If you no longer have reinstalled the software. 6. Do not simply ...to remove them properly using the uninstall utility provided with the product. On the Windows taskbar, click Start, Settings, Control Panel (or just Control Panel). 2. To uninstall and reinstall the software 1. Restart your hard drive. Troubleshooting • Solution 10: Download and install the...
Select HP Photosmart All-In-One Driver Software, and then click Change/ Remove. NOTE: It is installed correctly Solution: Verify that all the icons are present. Do not connect the product to scan again. NOTE: If you no longer have reinstalled the software. 6. Do not simply ...to remove them properly using the uninstall utility provided with the product. On the Windows taskbar, click Start, Settings, Control Panel (or just Control Panel). 2. To uninstall and reinstall the software 1. Restart your hard drive. Troubleshooting • Solution 10: Download and install the...


