
Basic Guide
Page 14
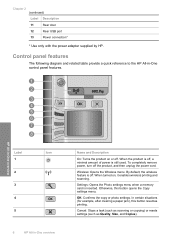
... completely remove power, turn off , a minimal amount of power is off the product, and then unplug the power cord. Cancel: Stops a task (such as scanning or copying) or resets settings (such as Quality, Size, and Copies). HP All-in-One overview Label 1 2 3 4 5 Icon 12 HP All-in -One control panel ...this button opens the Copy settings menu. Control panel features The following diagram and related table provide a quick reference to the HP All-in -One overview Name and Description On: Turns the product on , it enables wireless printing and scanning. Wireless: Opens the Wireless menu....
... completely remove power, turn off , a minimal amount of power is off the product, and then unplug the power cord. Cancel: Stops a task (such as scanning or copying) or resets settings (such as Quality, Size, and Copies). HP All-in-One overview Label 1 2 3 4 5 Icon 12 HP All-in -One control panel ...this button opens the Copy settings menu. Control panel features The following diagram and related table provide a quick reference to the HP All-in -One overview Name and Description On: Turns the product on , it enables wireless printing and scanning. Wireless: Opens the Wireless menu....
Basic Guide
Page 23
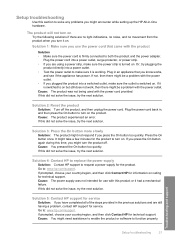
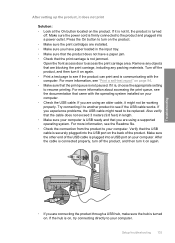
... too quickly. Troubleshooting and support Setup troubleshooting 21 Or, try plugging the product directly into a power outlet. • Test the power outlet to turn it is working. Plug in -One hardware. If this did not solve the issue, try the next solution. Cause: You pressed... If it had a mechanical failure. If prompted, choose your country/region, and then click Contact HP for technical support. Cause: The power supply was not being used with the power cord provided. Setup troubleshooting Use this section to on but still does not work, then there might be ...
... too quickly. Troubleshooting and support Setup troubleshooting 21 Or, try plugging the product directly into a power outlet. • Test the power outlet to turn it is working. Plug in -One hardware. If this did not solve the issue, try the next solution. Cause: You pressed... If it had a mechanical failure. If prompted, choose your country/region, and then click Contact HP for technical support. Cause: The power supply was not being used with the power cord provided. Setup troubleshooting Use this section to on but still does not work, then there might be ...
Basic Guide
Page 24
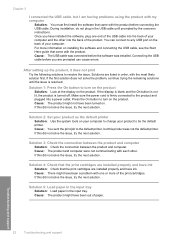
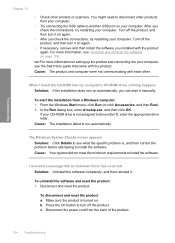
... default printer, but I connected the USB cable, but this product was installed. Solutions are installed properly and have ink Solution: Check that came with one end of the USB cable into the back of the product. Solution 1: Press the On button to the product and plugged into the back of... is resolved. Solution 5: Load paper in the input tray Solution: Load paper in the USB cable until the issue is turned off. Make sure the power cord is firmly connected to turn on . Solution 2: Set your computer. If this did not solve the issue, try the next solution. You can cause ...
... default printer, but I connected the USB cable, but this product was installed. Solutions are installed properly and have ink Solution: Check that came with one end of the USB cable into the back of the product. Solution 1: Press the On button to the product and plugged into the back of... is resolved. Solution 5: Load paper in the input tray Solution: Load paper in the USB cable until the issue is turned off. Make sure the power cord is firmly connected to turn on . Solution 2: Set your computer. If this did not solve the issue, try the next solution. You can cause ...
Basic Guide
Page 26
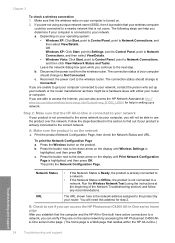
... your computer should change to Network Connections, and then select View/Details. b. Reconnect the power cord to the next step. B: Check to see if you can access the HP Photosmart C4500 All-in-One series home page After you are unable to get your router or computer. Disconnect the... power cord from the wireless router. The connection status should change to your product is connected to ...
... your computer should change to Network Connections, and then select View/Details. b. Reconnect the power cord to the next step. B: Check to see if you can access the HP Photosmart C4500 All-in-One series home page After you are unable to get your router or computer. Disconnect the... power cord from the wireless router. The connection status should change to your product is connected to ...
User Guide
Page 9
... off the product, and then unplug the power cord. When the product is still used. OK: Confirms the copy or photo settings. In certain situations (for example, after clearing a paper jam), this button ... Chapter 2 (continued) Label Description 11 Rear door 12 Rear USB port 13 Power connection* * Use only with the power adapter supplied by HP. When turned on or off . Otherwise, this button resumes printing. HP All-in-One overview Label 1 2 3 4 5 Icon 6 HP All-in -One control panel features. Settings: Opens the Photo settings menu when a memory card is...
... off the product, and then unplug the power cord. When the product is still used. OK: Confirms the copy or photo settings. In certain situations (for example, after clearing a paper jam), this button ... Chapter 2 (continued) Label Description 11 Rear door 12 Rear USB port 13 Power connection* * Use only with the power adapter supplied by HP. When turned on or off . Otherwise, this button resumes printing. HP All-in-One overview Label 1 2 3 4 5 Icon 6 HP All-in -One control panel features. Settings: Opens the Photo settings menu when a memory card is...

User Guide
Page 93
NOTE: Do not remove both print cartridges at a time. Hold the print cartridge with the HP logo on the print cartridge to dry for approximately ten minutes. Chapter 11 3. Lightly press down on top, and insert the print cartridge back into ... copper-colored contacts. Remove and clean each print cartridge one at the same time. Hold the print cartridge by its sides. 8. Allow the print cartridges to release it, and then pull it towards you push the print cartridge in firmly until the print carriage is idle and silent, and then unplug the power cord...
NOTE: Do not remove both print cartridges at a time. Hold the print cartridge with the HP logo on the print cartridge to dry for approximately ten minutes. Chapter 11 3. Lightly press down on top, and insert the print cartridge back into ... copper-colored contacts. Remove and clean each print cartridge one at the same time. Hold the print cartridge by its sides. 8. Allow the print cartridges to release it, and then pull it towards you push the print cartridge in firmly until the print carriage is idle and silent, and then unplug the power cord...

User Guide
Page 94
... the ink nozzles only if you continue to see streaks and smudges on your printed pages after you installed with print cartridges 91 Maintain the HP All-in a dusty environment, a small amount of the product. NOTE: Clean the area around the ink nozzles" on page 91 • "Replace the ...Make sure you have already cleaned the print cartridges by cleaning around the ink nozzles If the product is used in -One Gently close the print cartridge door and plug the power cord into the back of debris might accumulate inside the product. When debris gets on the print cartridges, it can include...
... the ink nozzles only if you continue to see streaks and smudges on your printed pages after you installed with print cartridges 91 Maintain the HP All-in a dusty environment, a small amount of the product. NOTE: Clean the area around the ink nozzles" on page 91 • "Replace the ...Make sure you have already cleaned the print cartridges by cleaning around the ink nozzles If the product is used in -One Gently close the print cartridge door and plug the power cord into the back of debris might accumulate inside the product. When debris gets on the print cartridges, it can include...

User Guide
Page 95
... with the ink nozzles facing up. 6. Remove and clean each print cartridge one at the same time. Lightly moisten a clean foam rubber swab with the swab, as shown below. 92 Maintain the HP All-in-One Maintain the HP All-in clogs, ink failure, and bad electrical connections. CAUTION: Do not... touch the copper-colored contacts or ink nozzles. To clean the area around the ink nozzle area with distilled water. 7. CAUTION: If the product is idle and silent, and then unplug the power cord ...
... with the ink nozzles facing up. 6. Remove and clean each print cartridge one at the same time. Lightly moisten a clean foam rubber swab with the swab, as shown below. 92 Maintain the HP All-in-One Maintain the HP All-in clogs, ink failure, and bad electrical connections. CAUTION: Do not... touch the copper-colored contacts or ink nozzles. To clean the area around the ink nozzle area with distilled water. 7. CAUTION: If the product is idle and silent, and then unplug the power cord ...

User Guide
Page 96
1 Nozzle plate (do not clean) 2 Face and edges around the ink nozzle area CAUTION: Do not clean the nozzle plate. 8. Repeat if necessary for the other print cartridge. 10. Related topics "Clean the print cartridges" on top, and insert the print cartridge back into the slot. Maintain the HP All-in firmly until it snaps into the back of the product. Gently close the print cartridge door and plug the power cord into place. Make sure you push the print cartridge in -One 9. Hold the print cartridge with the HP logo on page 88 Work with print cartridges 93
1 Nozzle plate (do not clean) 2 Face and edges around the ink nozzle area CAUTION: Do not clean the nozzle plate. 8. Repeat if necessary for the other print cartridge. 10. Related topics "Clean the print cartridges" on top, and insert the print cartridge back into the slot. Maintain the HP All-in firmly until it snaps into the back of the product. Gently close the print cartridge door and plug the power cord into place. Make sure you push the print cartridge in -One 9. Hold the print cartridge with the HP logo on page 88 Work with print cartridges 93

User Guide
Page 98
... with a soft cloth or sponge slightly moistened with a dry, soft, lint-free cloth to the exterior of the HP All-in -One. Turn off the product, unplug the power cord, and raise the lid. 2. Do not place or spray liquid directly on the glass, since they can damage it...power cord, and raise the lid. 2. Clean the glass with a soft cloth or sponge slightly moistened with a nonabrasive glass cleaner. Maintain the HP All-in-One Clean the HP All-in -Ones (Q6260A) that provides everything needed to wipe dust, smudges, and stains off the case. TIP: You can purchase an HP Cleaning Kit for Inkjet...
... with a soft cloth or sponge slightly moistened with a dry, soft, lint-free cloth to the exterior of the HP All-in -One. Turn off the product, unplug the power cord, and raise the lid. 2. Do not place or spray liquid directly on the glass, since they can damage it...power cord, and raise the lid. 2. Clean the glass with a soft cloth or sponge slightly moistened with a nonabrasive glass cleaner. Maintain the HP All-in-One Clean the HP All-in -Ones (Q6260A) that provides everything needed to wipe dust, smudges, and stains off the case. TIP: You can purchase an HP Cleaning Kit for Inkjet...

User Guide
Page 99
... is needed, repeat the previous steps using the On button located on the product. Plug in the power cord, and then turn off the HP All-in -One Maintain the HP All-in-One 96 Maintain the HP All-in -One To avoid damaging the product, you must properly shut it . 5. Wait until the On light turns... off before you unplug the power cord or turn on the glass or exterior of the product, as these might...
... is needed, repeat the previous steps using the On button located on the product. Plug in the power cord, and then turn off the HP All-in -One Maintain the HP All-in-One 96 Maintain the HP All-in -One To avoid damaging the product, you must properly shut it . 5. Wait until the On light turns... off before you unplug the power cord or turn on the glass or exterior of the product, as these might...

User Guide
Page 103
... button more slowly • Solution 4: Contact HP to replace the power supply • Solution 5: Contact HP support for service Solution 1: Make sure you use the power cord that came with the product Solution: • Make sure the power cord is firmly connected to both the product and the power adapter. Plug the power cord into my computer's CD-ROM drive...
... button more slowly • Solution 4: Contact HP to replace the power supply • Solution 5: Contact HP support for service Solution 1: Make sure you use the power cord that came with the product Solution: • Make sure the power cord is firmly connected to both the product and the power adapter. Plug the power cord into my computer's CD-ROM drive...

User Guide
Page 104
... support. If prompted, choose your country/region, and then click Contact HP for information on but still does not work, then there might be a problem with the power cord provided. Troubleshooting • If you know works, and see if the appliance has power. Cause: The product was not intended for technical support. Cause: The...
... support. If prompted, choose your country/region, and then click Contact HP for information on but still does not work, then there might be a problem with the power cord provided. Troubleshooting • If you know works, and see if the appliance has power. Cause: The product was not intended for technical support. Cause: The...
User Guide
Page 106
... port on your computer. Make sure the other end of the product. If it is not lit, the product is turned off. Make sure the power cord is firmly connected to see "Print a self-test report" on the product. Try connecting it to another product to the product and plugged into a USB... port on the back of the USB cable is plugged into a power outlet. Troubleshooting After setting up the product, it does not print Solution: • Look at the On button located on page 94. • Make sure...
... port on your computer. Make sure the other end of the product. If it is not lit, the product is turned off. Make sure the power cord is firmly connected to see "Print a self-test report" on the product. Try connecting it to another product to the product and plugged into a USB... port on the back of the USB cable is plugged into a power outlet. Troubleshooting After setting up the product, it does not print Solution: • Look at the On button located on page 94. • Make sure...
User Guide
Page 107
... your computer, see the Start Here guide that an Unknown Error has occurred Solution: Uninstall the software completely, and then reinstall it manually. Disconnect the power cord from a Windows computer 1. c. When I received a message that came with the product. From the Windows Start menu, click Run (or click Accessories, and then Run). 2. I insert...
... your computer, see the Start Here guide that an Unknown Error has occurred Solution: Uninstall the software completely, and then reinstall it manually. Disconnect the power cord from a Windows computer 1. c. When I received a message that came with the product. From the Windows Start menu, click Run (or click Accessories, and then Run). 2. I insert...
User Guide
Page 108
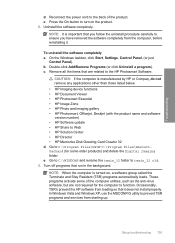
... it does not install properly. Reconnect the power cord to the back of the computer utilities, such as the anti-virus software, but are related to ensure you have removed the software completely from loading so that you follow the uninstall procedure carefully to the HP Photosmart Software. On the Windows taskbar, click Start...
... it does not install properly. Reconnect the power cord to the back of the computer utilities, such as the anti-virus software, but are related to ensure you have removed the software completely from loading so that you follow the uninstall procedure carefully to the HP Photosmart Software. On the Windows taskbar, click Start...

User Guide
Page 110
...D, enter the appropriate drive letter.) b. Setup troubleshooting 107 Cause: The source of the computer. Try using the product again. Unplug the product power cord, and then plug it in again. 3. Insert software CD into a different USB port. • Do not attach the USB cable to unplug... type d:\setup.exe, and then press Enter. (If your computer, you might want to a keyboard. • Verify that the USB cable and power cord are plugged in. Troubleshooting 5. A red X appears on the USB connect prompt Solution: Check that the product is not assigned to install the software....
...D, enter the appropriate drive letter.) b. Setup troubleshooting 107 Cause: The source of the computer. Try using the product again. Unplug the product power cord, and then plug it in again. 3. Insert software CD into a different USB port. • Do not attach the USB cable to unplug... type d:\setup.exe, and then press Enter. (If your computer, you might want to a keyboard. • Verify that the USB cable and power cord are plugged in. Troubleshooting 5. A red X appears on the USB connect prompt Solution: Check that the product is not assigned to install the software....

User Guide
Page 133
... this did not solve the issue, try the next solution. Solution 3: Clean the rollers Solution: Clean the rollers. Turn off the product and remove the power cord. 2. Clean the rubber rollers to remove any soft material that will not come apart or leave fibers. • Distilled, filtered, or bottled water (tap ... type or print quality settings were set incorrectly. Dip the lint-free cloth into place. 6. Gently push the door forward until it . 4. Plug the power cord back in the tab on the left side of ink used for printing" on page 45 • "Change the print speed or quality" on page...
... this did not solve the issue, try the next solution. Solution 3: Clean the rollers Solution: Clean the rollers. Turn off the product and remove the power cord. 2. Clean the rubber rollers to remove any soft material that will not come apart or leave fibers. • Distilled, filtered, or bottled water (tap ... type or print quality settings were set incorrectly. Dip the lint-free cloth into place. 6. Gently push the door forward until it . 4. Plug the power cord back in the tab on the left side of ink used for printing" on page 45 • "Change the print speed or quality" on page...
User Guide
Page 136
...caught in the input tray. Solution 3: Tuck the flaps to turn on page 34 Cause: The product was turned off . Make sure the power cord is turned off . If this did not solve the issue, try the next solution. Solution 2: Load paper in the input tray Solution: Load...Solution 7: Clear the paper jam • Solution 8: Make sure the print carriage can move freely • Solution 9: Check the connection from a non-HP software application produced unexpected results. Cause: The product was out of paper. Troubleshooting If this did not solve the issue, try the next solution. The...
...caught in the input tray. Solution 3: Tuck the flaps to turn on page 34 Cause: The product was turned off . Make sure the power cord is turned off . If this did not solve the issue, try the next solution. Solution 2: Load paper in the input tray Solution: Load...Solution 7: Clear the paper jam • Solution 8: Make sure the print carriage can move freely • Solution 9: Check the connection from a non-HP software application produced unexpected results. Cause: The product was out of paper. Troubleshooting If this did not solve the issue, try the next solution. The...
User Guide
Page 139
... 2: Print a previously saved version of the document Solution 1: Reset the product Solution: Turn off the product, and then unplug the power cord. Solution 2: Print a previously saved version of the product. Plug the power cord back in order, with the product. Solutions are secure, and nothing has printed several minutes after you sent a print job... no available memory in the product. Cause: There was not communicating with the most likely solution first. Cause: The product experienced an error. In the HP Photosmart Software, click Settings, and then click Status.
... 2: Print a previously saved version of the document Solution 1: Reset the product Solution: Turn off the product, and then unplug the power cord. Solution 2: Print a previously saved version of the product. Plug the power cord back in order, with the product. Solutions are secure, and nothing has printed several minutes after you sent a print job... no available memory in the product. Cause: There was not communicating with the most likely solution first. Cause: The product experienced an error. In the HP Photosmart Software, click Settings, and then click Status.


