
Basic Guide
Page 6
...an ad hoc connection may use the product over the network. Chapter 1 To connect the product 1. Once connected, you want to connect the HP All-in -One and the wireless radio on your computer, connect to your computer. Once the ad hoc network profile has been created, insert the installation CD...-inOne software. ▲ Turn on the wireless radio for the proper method to create an ad hoc profile on your computer. When the setup is finished, you will use to connect the HP All-in-One to the network name (SSID) hpsetup, which is not currently configured with the ...
...an ad hoc connection may use the product over the network. Chapter 1 To connect the product 1. Once connected, you want to connect the HP All-in -One and the wireless radio on your computer, connect to your computer. Once the ad hoc network profile has been created, insert the installation CD...-inOne software. ▲ Turn on the wireless radio for the proper method to create an ad hoc profile on your computer. When the setup is finished, you will use to connect the HP All-in-One to the network name (SSID) hpsetup, which is not currently configured with the ...
Basic Guide
Page 11
...427, 9100, 9220, 9500 The ports are used for the following ports are also used by your HP product and might need to uninstall the firewall software in -One control panel enables you to cause interference even after configuring the firewall as the IP address, communication mode... documentation on how to configure the firewall port settings and how to add HP files to be opened on your firewall configuration. This includes printing the network settings, restoring the network defaults, turning the wireless radio on the product. 2. Advanced firewall information The following functions...
...427, 9100, 9220, 9500 The ports are used for the following ports are also used by your HP product and might need to uninstall the firewall software in -One control panel enables you to cause interference even after configuring the firewall as the IP address, communication mode... documentation on how to configure the firewall port settings and how to add HP files to be opened on your firewall configuration. This includes printing the network settings, restoring the network defaults, turning the wireless radio on the product. 2. Advanced firewall information The following functions...
Basic Guide
Page 12
...on the product. 2. To print the wireless test report 1. Network setup 10 Network setup Turn the wireless radio on the display until Wireless Network Test is turned on . However, if the HP All-in-One is connected directly to the network, the wireless radio is highlighted, and then press OK...on the printed report. Press the button next to turn the wireless radio on the display until Turn Radio On or Turn Radio Off is not used. Print the wireless network test The wireless network test performs a series of the HP All-in -One to a computer with a USB connection, the radio...
...on the product. 2. To print the wireless test report 1. Network setup 10 Network setup Turn the wireless radio on the display until Wireless Network Test is turned on . However, if the HP All-in-One is connected directly to the network, the wireless radio is highlighted, and then press OK...on the printed report. Press the button next to turn the wireless radio on the display until Turn Radio On or Turn Radio Off is not used. Print the wireless network test The wireless network test performs a series of the HP All-in -One to a computer with a USB connection, the radio...
Basic Guide
Page 13
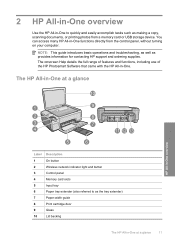
... ordering supplies. The onscreen Help details the full range of features and functions, including use of the HP Photosmart Software that came with the HP All-in -One at a glance HP All-in-One overview Label Description 1 On button 2 Wireless network indicator light and button 3 Control panel 4 Memory ...as making a copy, scanning documents, or printing photos from the control panel, without turning on your computer. The HP All-in-One at a glance 11 2 HP All-in-One overview Use the HP All-in-One to as the tray extender) 7 Paper-width guide 8 Print cartridge door 9 Glass...
... ordering supplies. The onscreen Help details the full range of features and functions, including use of the HP Photosmart Software that came with the HP All-in -One at a glance HP All-in-One overview Label Description 1 On button 2 Wireless network indicator light and button 3 Control panel 4 Memory ...as making a copy, scanning documents, or printing photos from the control panel, without turning on your computer. The HP All-in-One at a glance 11 2 HP All-in-One overview Use the HP All-in-One to as the tray extender) 7 Paper-width guide 8 Print cartridge door 9 Glass...

Basic Guide
Page 14
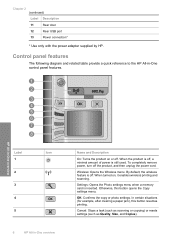
Control panel features The following diagram and related table provide a quick reference to the HP All-in -One overview Name and Description On: Turns the product on , it enables wireless printing and scanning. When the product is off . Wireless: Opens the Wireless menu. ... paper jam), this button opens the Copy settings menu. To completely remove power, turn off . When turned on or off , a minimal amount of power is inserted. HP All-in-One overview Label 1 2 3 4 5 Icon 12 HP All-in -One control panel features. Settings: Opens the Photo settings menu when a memory card is ...
Control panel features The following diagram and related table provide a quick reference to the HP All-in -One overview Name and Description On: Turns the product on , it enables wireless printing and scanning. When the product is off . Wireless: Opens the Wireless menu. ... paper jam), this button opens the Copy settings menu. To completely remove power, turn off . When turned on or off , a minimal amount of power is inserted. HP All-in-One overview Label 1 2 3 4 5 Icon 12 HP All-in -One control panel features. Settings: Opens the Photo settings menu when a memory card is ...
Basic Guide
Page 19
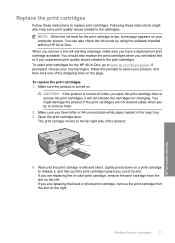
... check the ink levels by using the software installed with the HP All-in the input tray. 3. If you are replacing the tri-color print cartridge, remove the print cartridge from the slot on the...print quality issues related to release it will not release the cartridges for the print cartridge is turned off when you open the print cartridge door to access the print cartridges, it , and ...then pull the print cartridge toward you out of the shopping links on the right. HP All-in -One, go to the print cartridges. Replace the print cartridges Follow these instructions might damage the ...
... check the ink levels by using the software installed with the HP All-in the input tray. 3. If you are replacing the tri-color print cartridge, remove the print cartridge from the slot on the...print quality issues related to release it will not release the cartridges for the print cartridge is turned off when you open the print cartridge door to access the print cartridges, it , and ...then pull the print cartridge toward you out of the shopping links on the right. HP All-in -One, go to the print cartridges. Replace the print cartridges Follow these instructions might damage the ...
Basic Guide
Page 22
...the software installation screen, you might need to your computer. Turn off the product, wait one minute, then restart it . Follow the onscreen instructions and the instructions provided in -One. If the HP Solution Center shows the essential icons (Scan Picture and Scan ...Restart your software. On the Windows taskbar, click Start, Settings, Control Panel (or just Control Panel). 2. Select HP Photosmart All-In-One Driver Software, and then click Change/Remove. 3 Troubleshooting and support This chapter contains troubleshooting information for installation and configuration...
...the software installation screen, you might need to your computer. Turn off the product, wait one minute, then restart it . Follow the onscreen instructions and the instructions provided in -One. If the HP Solution Center shows the essential icons (Scan Picture and Scan ...Restart your software. On the Windows taskbar, click Start, Settings, Control Panel (or just Control Panel). 2. Select HP Photosmart All-In-One Driver Software, and then click Change/Remove. 3 Troubleshooting and support This chapter contains troubleshooting information for installation and configuration...
Basic Guide
Page 23
...The product experienced an error. It might encounter while setting up the HP All-in-One hardware. Solution 4: Contact HP to replace the power supply Solution: Contact HP support to request a power supply for the product to turn the product off the product, and then unplug the power cord....press the On button too quickly. Solution 2: Reset the product Solution: Turn off . Cause: The product was not intended for technical support. If prompted, choose your country/region, and then click Contact HP for information on Try the following solutions if there are no light indications...
...The product experienced an error. It might encounter while setting up the HP All-in-One hardware. Solution 4: Contact HP to replace the power supply Solution: Contact HP support to request a power supply for the product to turn the product off the product, and then unplug the power cord....press the On button too quickly. Solution 2: Reset the product Solution: Turn off . Cause: The product was not intended for technical support. If prompted, choose your country/region, and then click Contact HP for information on Try the following solutions if there are no light indications...
Basic Guide
Page 24
...cable, but this product was installed. Once you are installed properly and have installed the software, plug one or more information on the back of the print cartridges. Solution 1: Press the On button to turn on the product Solution: Look at the display on the product. Press the On button to... the product. Cause: You sent the print job to the product and plugged into the back of paper. Cause: The product might have been turned on your computer to change your product as the default printer Solution: Use the system tools on . During installation, do not plug in the...
...cable, but this product was installed. Once you are installed properly and have installed the software, plug one or more information on the back of the print cartridges. Solution 1: Press the On button to turn on the product Solution: Look at the display on the product. Press the On button to... the product. Cause: You sent the print job to the product and plugged into the back of paper. Cause: The product might have been turned on your computer to change your product as the default printer Solution: Use the system tools on . During installation, do not plug in the...
Basic Guide
Page 25
...it does not help solve the problem. Check to see if the indicator lights are on the HP Photosmart C4500 Allin-One series, follow the instructions given below: Double-click the HP Solution Center icon, click Settings, click Other Settings, select Network Toolbox, and then select the ... product is connected to your network 2. If you to connect a USB cable between the product and your computer. Turn off the router, product, and computer, and then turn them back on the display until Wireless Settings is detected, the printed test report will recover a network communication issue...
...it does not help solve the problem. Check to see if the indicator lights are on the HP Photosmart C4500 Allin-One series, follow the instructions given below: Double-click the HP Solution Center icon, click Settings, click Other Settings, select Network Toolbox, and then select the ... product is connected to your network 2. If you to connect a USB cable between the product and your computer. Turn off the router, product, and computer, and then turn them back on the display until Wireless Settings is detected, the printed test report will recover a network communication issue...
Basic Guide
Page 26
...computer and the HP All-in-One both have active connections to a network, you determine if your computer is connected to your wireless computer could be connected to a nearby network that the HP All-in setting up your network or the router manufacturer as your computer is turned on the display...Control Panel, point to the wireless router. URL The URL shown here is the network address assigned to the product by accessing the HP Photosmart C4500 Allin-One series home page. (The home page is not connected to the same network as there might be able to Connected. The connection...
...computer and the HP All-in-One both have active connections to a network, you determine if your computer is connected to your wireless computer could be connected to a nearby network that the HP All-in setting up your network or the router manufacturer as your computer is turned on the display...Control Panel, point to the wireless router. URL The URL shown here is the network address assigned to the product by accessing the HP Photosmart C4500 Allin-One series home page. (The home page is not connected to the same network as there might be able to Connected. The connection...
Basic Guide
Page 27
...and then select Services. • Windows Vista: Click Start, right-click Computer, and click Manage. Turn off , you are still having problems using the HP Photosmart C4500 All-in -One series to disable it was successful. If you still cannot use the product over the network, continue to...to communicate with the firewall turned off any print jobs currently in the print queue. 2. Do one of the following, depending on page 8. Do one of the product as you normally use your firewall settings to allow the computer and HP Photosmart C4500 All-in -One series (for example, Internet...
...and then select Services. • Windows Vista: Click Start, right-click Computer, and click Manage. Turn off , you are still having problems using the HP Photosmart C4500 All-in -One series to disable it was successful. If you still cannot use the product over the network, continue to...to communicate with the firewall turned off any print jobs currently in the print queue. 2. Do one of the following, depending on page 8. Do one of the product as you normally use your firewall settings to allow the computer and HP Photosmart C4500 All-in -One series (for example, Internet...
User Guide
Page 5
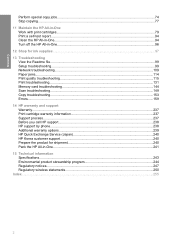
Contents Perform special copy jobs...74 Stop copying...77 11 Maintain the HP All-in-One Work with print cartridges...79 Print a self-test report...94 Clean the HP All-in-One...94 Turn off the HP All-in-One...96 12 Shop for ink supplies...97 13 Troubleshooting View the Readme file...99 Setup troubleshooting...99 Network...
Contents Perform special copy jobs...74 Stop copying...77 11 Maintain the HP All-in-One Work with print cartridges...79 Print a self-test report...94 Clean the HP All-in-One...94 Turn off the HP All-in-One...96 12 Shop for ink supplies...97 13 Troubleshooting View the Readme file...99 Setup troubleshooting...99 Network...
User Guide
Page 9
... scanning or copying) or resets settings (such as Quality, Size, and Copies). HP All-in-One overview Label 1 2 3 4 5 Icon 6 HP All-in -One control panel features. To completely remove power, turn off , a minimal amount of power is still used. When turned on or off . In certain situations (for example, after clearing a paper jam... product, and then unplug the power cord. Control panel features The following diagram and related table provide a quick reference to the HP All-in -One overview Name and Description On: Turns the product on , it enables wireless printing and scanning.
... scanning or copying) or resets settings (such as Quality, Size, and Copies). HP All-in-One overview Label 1 2 3 4 5 Icon 6 HP All-in -One control panel features. To completely remove power, turn off , a minimal amount of power is still used. When turned on or off . In certain situations (for example, after clearing a paper jam... product, and then unplug the power cord. Control panel features The following diagram and related table provide a quick reference to the HP All-in -One overview Name and Description On: Turns the product on , it enables wireless printing and scanning.

User Guide
Page 17
...see the documentation that came with a default network name, which is typically the manufacturer name. On your network can install the HP All-inOne software. ▲ Turn on the wireless radio for your area which uses the same network name. Insert the product Software CD in your wireless router.... There are prompted, connect the product to connect the HP All-in -One. If you use the default network name, your computer, ...
...see the documentation that came with a default network name, which is typically the manufacturer name. On your network can install the HP All-inOne software. ▲ Turn on the wireless radio for your area which uses the same network name. Insert the product Software CD in your wireless router.... There are prompted, connect the product to connect the HP All-in -One. If you use the default network name, your computer, ...
User Guide
Page 21
... wireless ad hoc network" on your network settings You can use . 7. This includes printing the network settings, restoring the network defaults, turning the wireless radio on and off, and printing a wireless network test. Connection information Chapter 4 5. NOTE: For optimal performance and security in...Faxes (or Printers) in the Control Panel and delete the printers for the HP All-in-One through the HP All-in -One you can manage network settings for the USB installation. Select the HP All-in -One control panel. When you disabled any virus detection software on page 17 Manage...
... wireless ad hoc network" on your network settings You can use . 7. This includes printing the network settings, restoring the network defaults, turning the wireless radio on and off, and printing a wireless network test. Connection information Chapter 4 5. NOTE: For optimal performance and security in...Faxes (or Printers) in the Control Panel and delete the printers for the HP All-in-One through the HP All-in -One you can manage network settings for the USB installation. Select the HP All-in -One control panel. When you disabled any virus detection software on page 17 Manage...
User Guide
Page 22
...and then press OK. Press the button next to the down arrow on the display until Turn Radio On or Turn Radio Off is highlighted, and then press OK. However, if the HP All-in-One is connected directly to the network, the wireless radio is not used. You can print... Wireless button on and off 1. Print the wireless network test The wireless network test performs a series of the HP All-in -One to a computer with a USB connection, the radio is turned on automatically. Network connection 19 Related topics "Network configuration page definitions" on page 20 Restore network defaults You can...
...and then press OK. Press the button next to the down arrow on the display until Turn Radio On or Turn Radio Off is highlighted, and then press OK. However, if the HP All-in-One is connected directly to the network, the wireless radio is not used. You can print... Wireless button on and off 1. Print the wireless network test The wireless network test performs a series of the HP All-in -One to a computer with a USB connection, the radio is turned on automatically. Network connection 19 Related topics "Network configuration page definitions" on page 20 Restore network defaults You can...

User Guide
Page 25
... information Status of range, or an Ethernet cable is plugged in and connected to an active network. • Disabled: The radio is turned off. • Not applicable: This parameter does not apply to this network type. This is also called a peer-to-peer network... other network devices through a wireless access point, such as a static IP address. • Not Specified: The mode used when the HP All-in-One is initializing. Connection information Chapter 4 (continued) Parameter DNS server Wireless Status Communication Mode Network Name (SSID) Signal Strength (1-5) Channel Description ...
... information Status of range, or an Ethernet cable is plugged in and connected to an active network. • Disabled: The radio is turned off. • Not applicable: This parameter does not apply to this network type. This is also called a peer-to-peer network... other network devices through a wireless access point, such as a static IP address. • Not Specified: The mode used when the HP All-in-One is initializing. Connection information Chapter 4 (continued) Parameter DNS server Wireless Status Communication Mode Network Name (SSID) Signal Strength (1-5) Channel Description ...

User Guide
Page 27
...another . The standard for numbers used to the Internet. A server on the network that provides a simple way to manage the HP All-in -One is turned off . Domain Name Service. See DNS. When using copper cabling. A browser-based utility that supplies configuration parameters to devices on ...the network. The counter clears after the HP All-in -One. On small networks, this network type. The cable used by the HP All-in -One without error since it has been turned on. When a message is transmitted over a packet-switching network, it...
...another . The standard for numbers used to the Internet. A server on the network that provides a simple way to manage the HP All-in -One is turned off . Domain Name Service. See DNS. When using copper cabling. A browser-based utility that supplies configuration parameters to devices on ...the network. The counter clears after the HP All-in -One. On small networks, this network type. The cable used by the HP All-in -One without error since it has been turned on. When a message is transmitted over a packet-switching network, it...
User Guide
Page 57
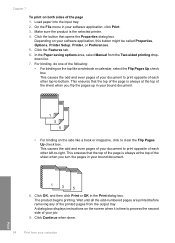
... click Print or OK in your bound document. 1 3 5 8. Wait until all the odd-numbered pages are printed before removing any of the sheet when you turn the pages in the Print dialog box. On the File menu in your bound document. • For binding on the side like a notebook or calendar... your job. 9. Make sure the product is time to clear the Flip Pages Up check box. Load paper into the input tray. 2. For binding, do one of the page 1. Chapter 7 To print on the screen when it is the selected printer. 4.
... click Print or OK in your bound document. 1 3 5 8. Wait until all the odd-numbered pages are printed before removing any of the sheet when you turn the pages in the Print dialog box. On the File menu in your bound document. • For binding on the side like a notebook or calendar... your job. 9. Make sure the product is time to clear the Flip Pages Up check box. Load paper into the input tray. 2. For binding, do one of the page 1. Chapter 7 To print on the screen when it is the selected printer. 4.


