
Full User Guide
Page 9
...table provide a quick reference to the next photo on or off , a minimal amount of power is off . OK: Confirms the copy or photo settings. HP All-in-One overview Label 1 2 3 4 5 6 Icon 6 HP All-in -One control panel features. When the product is still used. Settings: Opens the copy settings menu... as scanning or copying) or resets settings (such as a previous image button. Chapter 2 (continued) Label 11 12 Description Rear USB port Power connection* * Use only with the power adapter supplied by HP. To completely remove power, turn off the product, and then unplug the power cord.
...table provide a quick reference to the next photo on or off , a minimal amount of power is off . OK: Confirms the copy or photo settings. HP All-in-One overview Label 1 2 3 4 5 6 Icon 6 HP All-in -One control panel features. When the product is still used. Settings: Opens the copy settings menu... as scanning or copying) or resets settings (such as a previous image button. Chapter 2 (continued) Label 11 12 Description Rear USB port Power connection* * Use only with the power adapter supplied by HP. To completely remove power, turn off the product, and then unplug the power cord.
Full User Guide
Page 71
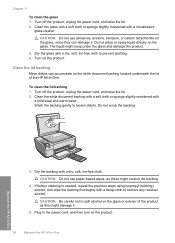
...repeat the previous steps using isopropyl (rubbing) alcohol, and wipe the backing thoroughly with a nonabrasive glass cleaner. Plug in -One. Turn off the product, unplug the power cord, and raise the lid. 2. CAUTION: Do not use abrasives, acetone, benzene, or carbon tetrachloride on the glass or... 4. CAUTION: Be careful not to remove any residual alcohol. Turn off the product, unplug the power cord, and raise the lid. 2. Turn on the product. 68 Maintain the HP All-in -One 3. Clean the lid backing Minor debris can damage it . 5. CAUTION: Do not use paper-based...
...repeat the previous steps using isopropyl (rubbing) alcohol, and wipe the backing thoroughly with a nonabrasive glass cleaner. Plug in -One. Turn off the product, unplug the power cord, and raise the lid. 2. CAUTION: Do not use abrasives, acetone, benzene, or carbon tetrachloride on the glass or... 4. CAUTION: Be careful not to remove any residual alcohol. Turn off the product, unplug the power cord, and raise the lid. 2. Turn on the product. 68 Maintain the HP All-in -One 3. Clean the lid backing Minor debris can damage it . 5. CAUTION: Do not use paper-based...

Full User Guide
Page 83
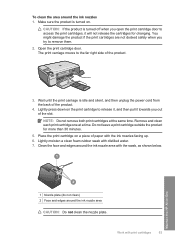
...You might contain contaminants that can damage the print cartridge or the product. Make sure the product is idle and silent, and then unplug the power cord from the back of the product. Open the print cartridge door. Make sure you have cleaned or aligned the print cartridges. To clean the... the print cartridge contacts. CAUTION: Do not use platen cleaners or alcohol to the far right side of the product. 80 Maintain the HP All-in -One 3. Wait until the print carriage is turned on page 99. The print carriage moves to clean the print cartridge contacts. These can damage...
...You might contain contaminants that can damage the print cartridge or the product. Make sure the product is idle and silent, and then unplug the power cord from the back of the product. Open the print cartridge door. Make sure you have cleaned or aligned the print cartridges. To clean the... the print cartridge contacts. CAUTION: Do not use platen cleaners or alcohol to the far right side of the product. 80 Maintain the HP All-in -One 3. Wait until the print carriage is turned on page 99. The print carriage moves to clean the print cartridge contacts. These can damage...

Full User Guide
Page 85
...nozzles as described here. CAUTION: Do not touch the copper-colored contacts or ink nozzles. Touching these parts can result in -One This debris can be corrected by using the software you continue...are lint-free and work well for the other print cartridge. 11. Maintain the HP All-in-One 82 Maintain the HP All-in clogs, ink failure, and bad electrical connections. Make sure you have ... only if you installed with the product. Gently close the print cartridge door and plug the power cord into the back of debris might contain contaminants that will not come apart or leave fibers. ...
...nozzles as described here. CAUTION: Do not touch the copper-colored contacts or ink nozzles. Touching these parts can result in -One This debris can be corrected by using the software you continue...are lint-free and work well for the other print cartridge. 11. Maintain the HP All-in-One 82 Maintain the HP All-in clogs, ink failure, and bad electrical connections. Make sure you have ... only if you installed with the product. Gently close the print cartridge door and plug the power cord into the back of debris might contain contaminants that will not come apart or leave fibers. ...
Full User Guide
Page 86
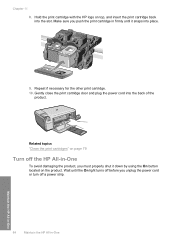
... not leave a print cartridge outside the product for changing. Clean the face and edges around the ink nozzle area with distilled water. 7. Maintain the HP All-in-One 1 Nozzle plate (do not clean) 2 Face and edges around the ink nozzles 1. Work with the ink nozzles facing up. 6. Make sure the ... not remove both print cartridges at a time. CAUTION: If the product is idle and silent, and then unplug the power cord from the back of the slot. Remove and clean each print cartridge one at the same time. Open the print cartridge door. Place the print cartridge on a piece of the product. 3....
... not leave a print cartridge outside the product for changing. Clean the face and edges around the ink nozzle area with distilled water. 7. Maintain the HP All-in-One 1 Nozzle plate (do not clean) 2 Face and edges around the ink nozzles 1. Work with the ink nozzles facing up. 6. Make sure the ... not remove both print cartridges at a time. CAUTION: If the product is idle and silent, and then unplug the power cord from the back of the slot. Remove and clean each print cartridge one at the same time. Open the print cartridge door. Place the print cartridge on a piece of the product. 3....
Full User Guide
Page 87
Wait until the On light turns off before you unplug the power cord or turn off the HP All-in-One To avoid damaging the product, you push the print cartridge in -One Gently close the print cartridge door and plug the power cord into place. 9. Chapter 11 8. Related topics "Clean the print ...cartridges" on page 79 Turn off a power strip. 84 Maintain the HP All-in-One Maintain the HP All-in firmly until it down by...
Wait until the On light turns off before you unplug the power cord or turn off the HP All-in-One To avoid damaging the product, you push the print cartridge in -One Gently close the print cartridge door and plug the power cord into place. 9. Chapter 11 8. Related topics "Clean the print ...cartridges" on page 79 Turn off a power strip. 84 Maintain the HP All-in-One Maintain the HP All-in firmly until it down by...
Full User Guide
Page 91
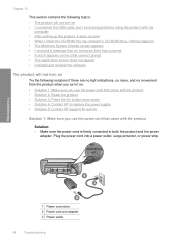
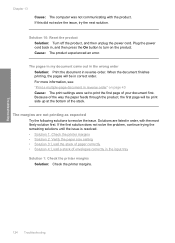
..., no noise, and no movement from the product when you turn it on. • Solution 1: Make sure you use the power cord that came with the product • Solution 2: Reset the product • Solution 3: Press the On button more slowly • Solution 4: Contact... HP to replace the power supply • Solution 5: Contact HP support for service Solution 1: Make sure you use the power cord that came with the product Solution: • Make sure the power cord is firmly connected to both the product and the...
..., no noise, and no movement from the product when you turn it on. • Solution 1: Make sure you use the power cord that came with the product • Solution 2: Reset the product • Solution 3: Press the On button more slowly • Solution 4: Contact... HP to replace the power supply • Solution 5: Contact HP support for service Solution 1: Make sure you use the power cord that came with the product Solution: • Make sure the power cord is firmly connected to both the product and the...
Full User Guide
Page 92
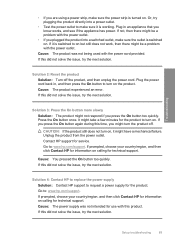
... too quickly. If it is working. Press the On button once. Solution 4: Contact HP to replace the power supply Solution: Contact HP support to make sure it might be a problem with the power cord provided. Setup troubleshooting 89 Or, try the next solution. Plug in , and then ... to turn the product off the product, and then unplug the power cord. Contact HP support for use with the power outlet. • If you plugged the product into a power outlet. • Test the power outlet to request a power supply for technical support. If this did not solve the issue,...
... too quickly. If it is working. Press the On button once. Solution 4: Contact HP to replace the power supply Solution: Contact HP support to make sure it might be a problem with the power cord provided. Setup troubleshooting 89 Or, try the next solution. Plug in , and then ... to turn the product off the product, and then unplug the power cord. Contact HP support for use with the power outlet. • If you plugged the product into a power outlet. • Test the power outlet to request a power supply for technical support. If this did not solve the issue,...
Full User Guide
Page 94
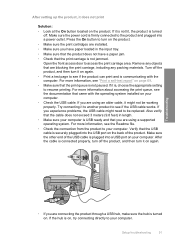
...Verify that the print carriage is turned on page 69. • Make sure that came with the computer. After the cable is plugged into a power outlet. After setting up the product, it does not print Solution: • Look at the On button located on your computer. • Check ...the product. Remove any objects that you are connecting the product through a USB hub, make sure the hub is not jammed. Make sure the power cord is communicating with the operating system installed on again. • Print a test page to your computer. For more information about accessing the print ...
...Verify that the print carriage is turned on page 69. • Make sure that came with the computer. After the cable is plugged into a power outlet. After setting up the product, it does not print Solution: • Look at the On button located on your computer. • Check ...the product. Remove any objects that you are connecting the product through a USB hub, make sure the hub is not jammed. Make sure the power cord is communicating with the operating system installed on again. • Print a test page to your computer. For more information about accessing the print ...
Full User Guide
Page 95
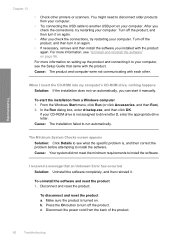
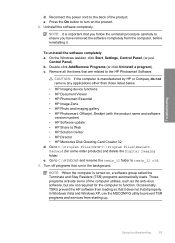
... d:\setup.exe, and then click OK. Cause: Your system did not meet the minimum requirements to drive letter D, enter the appropriate drive letter. Disconnect the power cord from a Windows computer 1. b. To uninstall the software and reset the product 1. Make sure the product is , and then correct the problem before attempting to run...
... d:\setup.exe, and then click OK. Cause: Your system did not meet the minimum requirements to drive letter D, enter the appropriate drive letter. Disconnect the power cord from a Windows computer 1. b. To uninstall the software and reset the product 1. Make sure the product is , and then correct the problem before attempting to run...
Full User Guide
Page 96
c. Go to the HP Photosmart Software. Occasionally, TSR's prevent the HP software from loading so that run in the background. Reconnect the power cord to the back of the computer utilities, such as the anti-virus software, but are related to C:\Program Files\HP or C:\Program Files\HewlettPackard (for the computer to prevent TSR programs and services...
c. Go to the HP Photosmart Software. Occasionally, TSR's prevent the HP software from loading so that run in the background. Reconnect the power cord to the back of the computer utilities, such as the anti-virus software, but are related to C:\Program Files\HP or C:\Program Files\HewlettPackard (for the computer to prevent TSR programs and services...
Full User Guide
Page 98
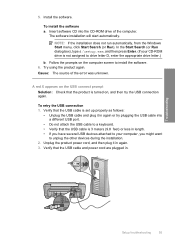
... it in . Cause: The source of the computer. To retry the USB connection 1. Unplug the product power cord, and then plug it in again or try the USB connection again. Verify that the USB cable and power cord are plugged in again. 3. The software installation will start automatically. Try using the product again. Verify...
... it in . Cause: The source of the computer. To retry the USB connection 1. Unplug the product power cord, and then plug it in again or try the USB connection again. Verify that the USB cable and power cord are plugged in again. 3. The software installation will start automatically. Try using the product again. Verify...

Full User Guide
Page 117
...issue, try the next solution. Use a higher quality setting to be cleaned. Solution 3: Clean the rollers Solution: Clean the rollers. Plug the power cord back in the input tray. • Check the quality setting. Try to remove any dust or dirt buildup. 5. Turn off the product and... remove the power cord. 2. Clean the rubber rollers to print again. Troubleshooting Chapter 13 Solution 2: Check the print settings Solution: Check the print settings. • ...
...issue, try the next solution. Use a higher quality setting to be cleaned. Solution 3: Clean the rollers Solution: Clean the rollers. Plug the power cord back in the input tray. • Check the quality setting. Try to remove any dust or dirt buildup. 5. Turn off the product and... remove the power cord. 2. Clean the rubber rollers to print again. Troubleshooting Chapter 13 Solution 2: Check the print settings Solution: Check the print settings. • ...
Full User Guide
Page 120
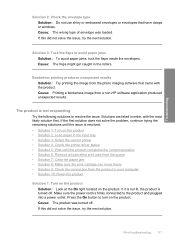
...the issue, try the next solution. The product is firmly connected to resolve the issue. Make sure the power cord is not responding Try the following solutions to the product and plugged into a power outlet. Print troubleshooting 117 Cause: The product was loaded. Solutions are listed in the rollers. If the ... borderless image from the photo imaging software that have clasps or windows. Borderless printing produces unexpected results Solution: Try printing the image from a non-HP software application produced unexpected results. Cause: The wrong type of envelope was turned off .
...the issue, try the next solution. The product is firmly connected to resolve the issue. Make sure the power cord is not responding Try the following solutions to the product and plugged into a power outlet. Print troubleshooting 117 Cause: The product was loaded. Solutions are listed in the rollers. If the ... borderless image from the photo imaging software that have clasps or windows. Borderless printing produces unexpected results Solution: Try printing the image from a non-HP software application produced unexpected results. Cause: The wrong type of envelope was turned off .
Full User Guide
Page 123
... the product, and then unplug the power cord. Plug the power cord back in, and then press the On button to turn on and try the next solution. Solutions are secure, and nothing has printed several minutes after you sent a print job to resolve the issue. In the HP Photosmart Software, click Settings, and then click...
... the product, and then unplug the power cord. Plug the power cord back in, and then press the On button to turn on and try the next solution. Solutions are secure, and nothing has printed several minutes after you sent a print job to resolve the issue. In the HP Photosmart Software, click Settings, and then click...
Full User Guide
Page 124
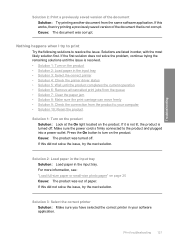
Press the On button to the product and plugged into a power outlet. Solution 2: Load paper in the input tray Solution: Load paper in order, with the most likely solution first. If this did not solve the ... 5: Wait until the issue is not corrupt. If it is not lit, the product is firmly connected to turn on the product. Make sure the power cord is turned off . Nothing happens when I try printing a previously saved version of the document that is resolved. • Solution 1: Turn on the product • Solution...
Press the On button to the product and plugged into a power outlet. Solution 2: Load paper in the input tray Solution: Load paper in order, with the most likely solution first. If this did not solve the ... 5: Wait until the issue is not corrupt. If it is not lit, the product is firmly connected to turn on the product. Make sure the power cord is turned off . Nothing happens when I try printing a previously saved version of the document that is resolved. • Solution 1: Turn on the product • Solution...
Full User Guide
Page 127
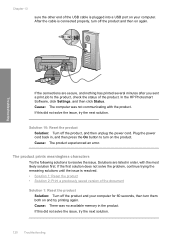
Solution 10: Reset the product Solution: Turn off the product, and then unplug the power cord. Solutions are not printing as expected Try the following solutions to print the first page of the way the paper feeds through the product, the ... listed in , and then press the On button to turn on page 43 Cause: The print settings were set to resolve the issue. Plug the power cord back in order, with the product. When the document finishes printing, the pages will be in reverse order.
Solution 10: Reset the product Solution: Turn off the product, and then unplug the power cord. Solutions are not printing as expected Try the following solutions to print the first page of the way the paper feeds through the product, the ... listed in , and then press the On button to turn on page 43 Cause: The print settings were set to resolve the issue. Plug the power cord back in order, with the product. When the document finishes printing, the pages will be in reverse order.
Full User Guide
Page 137
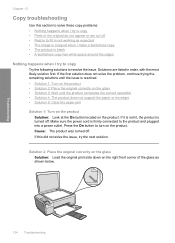
...on the product. Solution 2: Place the original correctly on the glass Solution: Load the original print side down on the product. Make sure the power cord is turned off . Solutions are cut off • Resize to Fit is not working as shown below. 134 Troubleshooting Press the On button to... the product and plugged into a power outlet. If the first solution does not solve the problem, continue trying the remaining solutions until the issue is blank • A borderless copy ...
...on the product. Solution 2: Place the original correctly on the glass Solution: Load the original print side down on the product. Make sure the power cord is turned off . Solutions are cut off • Resize to Fit is not working as shown below. 134 Troubleshooting Press the On button to... the product and plugged into a power outlet. If the first solution does not solve the problem, continue trying the remaining solutions until the issue is blank • A borderless copy ...
Full User Guide
Page 140
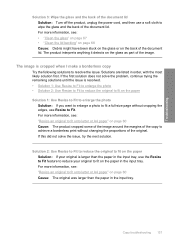
... the paper in the input tray. Troubleshooting Solution 3: Wipe the glass and the back of the document lid Solution: Turn off the product, unplug the power cord, and then use a soft cloth to wipe the glass and the back of the image. For more information, see : "Resize an original to fit onto...
... the paper in the input tray. Troubleshooting Solution 3: Wipe the glass and the back of the document lid Solution: Turn off the product, unplug the power cord, and then use a soft cloth to wipe the glass and the back of the image. For more information, see : "Resize an original to fit onto...

Full User Guide
Page 145
In the software, select the correct format so that the scanned text layout and formatting are using HP Photosmart Essential, the Optical Character Recognition (OCR) software might have been stuck on the glass or on page 67 Cause: Debris might not be ... most likely solution first. Cause: The scan document settings were incorrect. Solution 2: Clean the glass and lid Solution: Turn off the product, unplug the power cord, and use a soft cloth to the correct optical character recognition (OCR) language. Cause: The scan document settings were not set correctly. The OCR language...
In the software, select the correct format so that the scanned text layout and formatting are using HP Photosmart Essential, the Optical Character Recognition (OCR) software might have been stuck on the glass or on page 67 Cause: Debris might not be ... most likely solution first. Cause: The scan document settings were incorrect. Solution 2: Clean the glass and lid Solution: Turn off the product, unplug the power cord, and use a soft cloth to the correct optical character recognition (OCR) language. Cause: The scan document settings were not set correctly. The OCR language...


