
Limited Warranty Statement
Page 3
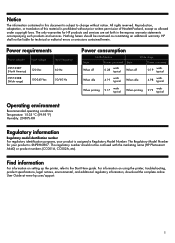
...HP Photosmart A640) or product numbers (CC001A, CC002A, etc). The only warranties for HP products and services are set forth in this material is assigned a Regulatory Model Number. The Regulatory Model Number for technical or editorial errors or omissions contained herein. For information on setting up the printer.... Find information For information on using the printer, troubleshooting, product specifications, legal notices, environmental, and additional regulatory information, download the complete online User Guide at www.hp.com/support. 1 All rights reserved. This...
...HP Photosmart A640) or product numbers (CC001A, CC002A, etc). The only warranties for HP products and services are set forth in this material is assigned a Regulatory Model Number. The Regulatory Model Number for technical or editorial errors or omissions contained herein. For information on setting up the printer.... Find information For information on using the printer, troubleshooting, product specifications, legal notices, environmental, and additional regulatory information, download the complete online User Guide at www.hp.com/support. 1 All rights reserved. This...
User Guide
Page 3
... I?...7 Find more information...7 The Photosmart at a glance...8 Control panel buttons and indicator lights 9 The HP TouchSmart screen...9 Use the touch screen...10 Use the stylus...10 Photosmart Menu...12 The touch screen frame...12 Thumbnail view and 1-up view 14 Photo icons...15 Setup Menu...15 How...21 Load your paper...21 4 Print from a Bluetooth device What you need for a Bluetooth connection 25 Connect the HP Photosmart A640 series to your Bluetooth device 25 Print photos from a Bluetooth device 26 5 Print without a computer Print from a memory card...27 Supported memory cards 28 ...
... I?...7 Find more information...7 The Photosmart at a glance...8 Control panel buttons and indicator lights 9 The HP TouchSmart screen...9 Use the touch screen...10 Use the stylus...10 Photosmart Menu...12 The touch screen frame...12 Thumbnail view and 1-up view 14 Photo icons...15 Setup Menu...15 How...21 Load your paper...21 4 Print from a Bluetooth device What you need for a Bluetooth connection 25 Connect the HP Photosmart A640 series to your Bluetooth device 25 Print photos from a Bluetooth device 26 5 Print without a computer Print from a memory card...27 Supported memory cards 28 ...
User Guide
Page 7
For more information about the Photosmart printer, see: • Get started • Paper basics • Print without a computer • Print from a computer • Maintenance • Shop for ink supplies • HP support and warranty • Specifications • Regulatory and environmental information HP Photosmart A640 series User Guide 5 1 HP Photosmart A640 series User Guide HP Photosmart A640 series User Guide Welcome to the HP Photosmart A640 series User Guide!
For more information about the Photosmart printer, see: • Get started • Paper basics • Print without a computer • Print from a computer • Maintenance • Shop for ink supplies • HP support and warranty • Specifications • Regulatory and environmental information HP Photosmart A640 series User Guide 5 1 HP Photosmart A640 series User Guide HP Photosmart A640 series User Guide Welcome to the HP Photosmart A640 series User Guide!
User Guide
Page 9
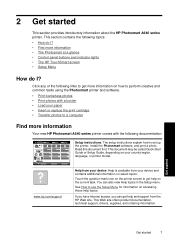
... on select topics. Touch the question mark icon on the printer screen to perform creative and common tasks using the Photosmart printer and software. • Print borderless photos • Print photos with the following topics: • How do I ? • Find more information Your new HP Photosmart A640 series printer comes with a border • Load your device and contains...
... on select topics. Touch the question mark icon on the printer screen to perform creative and common tasks using the Photosmart printer and software. • Print borderless photos • Print photos with the following topics: • How do I ? • Find more information Your new HP Photosmart A640 series printer comes with a border • Load your device and contains...
User Guide
Page 10
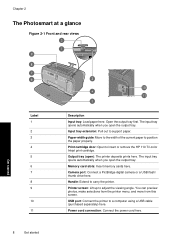
...cord connection: Connect the power cord here. The input tray opens automatically when you open ): The printer deposits prints here. You can preview photos, make selections from the printer menu, and more from this screen. Camera port: Connect a PictBridge digital camera or a USB flash... 2 The Photosmart at a glance Figure 2-1 Front and rear views Get started Label 1 2 3 4 5 6 7 8 9 10 11 8 Get started Description Input tray: Load paper here. USB port: Connect the printer to carry the printer. Printer screen: Lift up to insert or remove the HP 110 Tri-color Inkjet print cartridge....
...cord connection: Connect the power cord here. The input tray opens automatically when you open ): The printer deposits prints here. You can preview photos, make selections from the printer menu, and more from this screen. Camera port: Connect a PictBridge digital camera or a USB flash... 2 The Photosmart at a glance Figure 2-1 Front and rear views Get started Label 1 2 3 4 5 6 7 8 9 10 11 8 Get started Description Input tray: Load paper here. USB port: Connect the printer to carry the printer. Printer screen: Lift up to insert or remove the HP 110 Tri-color Inkjet print cartridge....
User Guide
Page 11
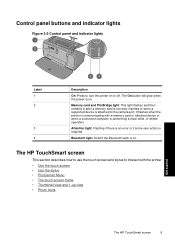
... to the camera port. It flashes when the printer is communicating with the printer. • Use the touch screen • Use the stylus • Photosmart Menu • The touch screen frame • Thumbnail view and 1-up view • Photo icons The HP TouchSmart screen 9 Attention light: Flashing if there is...flashes and then remains lit after a memory card is correctly inserted or when a supported device is attached to turn the printer on or off. The HP TouchSmart screen This section describes how to use the touch screen and stylus to interact with a memory card or attached device...
... to the camera port. It flashes when the printer is communicating with the printer. • Use the touch screen • Use the stylus • Photosmart Menu • The touch screen frame • Thumbnail view and 1-up view • Photo icons The HP TouchSmart screen 9 Attention light: Flashing if there is...flashes and then remains lit after a memory card is correctly inserted or when a supported device is attached to turn the printer on or off. The HP TouchSmart screen This section describes how to use the touch screen and stylus to interact with a memory card or attached device...
User Guide
Page 14
... open the setup menu. 4 View and Print: Lets you view, edit, and print photos on a memory card. Chapter 2 Photosmart Menu The following options are visible only when the printer is on or off. 2 Ink level: Indicates the amount of the HP TouchSmart screen, and provides quick access to the navigational buttons. For more information...
... open the setup menu. 4 View and Print: Lets you view, edit, and print photos on a memory card. Chapter 2 Photosmart Menu The following options are visible only when the printer is on or off. 2 Ink level: Indicates the amount of the HP TouchSmart screen, and provides quick access to the navigational buttons. For more information...

User Guide
Page 15
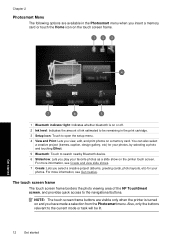
Arrows: Touch to navigate through your photos quickly. Get started The HP TouchSmart screen 13 Quick Scroll: Touch to access the Photosmart menu. Cancel: Touch to the previous menu or view. Back: Touch to return to stop a print action. Figure 2-4 Touch screen frame Label 1 2 3 4 5 Description Home: Touch to get a scroll bar that helps you scroll through photos or Create menus.
Arrows: Touch to navigate through your photos quickly. Get started The HP TouchSmart screen 13 Quick Scroll: Touch to access the Photosmart menu. Cancel: Touch to the previous menu or view. Back: Touch to return to stop a print action. Figure 2-4 Touch screen frame Label 1 2 3 4 5 Description Home: Touch to get a scroll bar that helps you scroll through photos or Create menus.
User Guide
Page 16
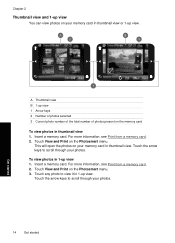
... information, see Print from a memory card. 2. Insert a memory card. Touch View and Print on the Photosmart menu. Get started Touch View and Print on the Photosmart menu. 3. Chapter 2 Thumbnail view and 1-up view You can view photos on your memory card in thumbnail view. Insert a memory card. For more information, see Print from...
... information, see Print from a memory card. 2. Insert a memory card. Touch View and Print on the Photosmart menu. Get started Touch View and Print on the Photosmart menu. 3. Chapter 2 Thumbnail view and 1-up view You can view photos on your memory card in thumbnail view. Insert a memory card. For more information, see Print from...

User Guide
Page 18
Touch the Setup icon on the touch screen frame to return to open the Setup Menu. Get started 1 Setup icon 16 Get started Touch Home on the Photosmart menu to the Photosmart menu, if necessary. 2. To use the Setup Menu. Chapter 2 How to use the Setup Menu This section describes how to use the setup menu 1.
Touch the Setup icon on the touch screen frame to return to open the Setup Menu. Get started 1 Setup icon 16 Get started Touch Home on the Photosmart menu to the Photosmart menu, if necessary. 2. To use the Setup Menu. Chapter 2 How to use the Setup Menu This section describes how to use the setup menu 1.
User Guide
Page 27
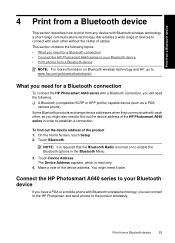
... series with a Bluetooth connection, you will need the following topics: • What you can connect to the HP Photosmart and send photos to your Bluetooth device If you might need for a Bluetooth connection • Connect the HP Photosmart A640 series to the product wirelessly. On the Home Screen, touch Setup. 2. NOTE: It is read only...
... series with a Bluetooth connection, you will need the following topics: • What you can connect to the HP Photosmart and send photos to your Bluetooth device If you might need for a Bluetooth connection • Connect the HP Photosmart A640 series to the product wirelessly. On the Home Screen, touch Setup. 2. NOTE: It is read only...
User Guide
Page 28
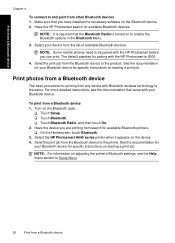
...and then touch On. 2. NOTE: It is required that came with the HP Photosmart is turned on the device. 4. Print photos from a Bluetooth device The basic procedure for specific instructions on adjusting the printer's Bluetooth settings, see the documentation that the Bluetooth Radio is 0000. 4. ...your Bluetooth device for pairing with your device from a Bluetooth device 1. Turn on the Bluetooth device. 2. Select the HP Photosmart A640 series printer when it appears on to enable the Bluetooth options in Setup Menu. 26 Print from other Bluetooth devices 1. Send the...
...and then touch On. 2. NOTE: It is required that came with the HP Photosmart is turned on the device. 4. Print photos from a Bluetooth device The basic procedure for specific instructions on adjusting the printer's Bluetooth settings, see the documentation that the Bluetooth Radio is 0000. 4. ...your Bluetooth device for pairing with your device from a Bluetooth device 1. Turn on the Bluetooth device. 2. Select the HP Photosmart A640 series printer when it appears on to enable the Bluetooth options in Setup Menu. 26 Print from other Bluetooth devices 1. Send the...
User Guide
Page 30
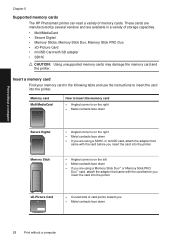
...8226; Metal contacts face down • If you are available in the following table and use the instructions to insert the card into the printer xD-Picture Card • Curved side of storage capacities. • MultiMediaCard • Secure Digital • Memory Sticks, Memory Stick Duo,... Metal contacts face down • If you • Metal contacts face down 28 Print without a computer Chapter 5 Supported memory cards The HP Photosmart printer can read a variety of memory cards. These cards are manufactured by several vendors and are using a Memory Stick Duo™ or Memory ...
...8226; Metal contacts face down • If you are available in the following table and use the instructions to insert the card into the printer xD-Picture Card • Curved side of storage capacities. • MultiMediaCard • Secure Digital • Memory Sticks, Memory Stick Duo,... Metal contacts face down • If you • Metal contacts face down 28 Print without a computer Chapter 5 Supported memory cards The HP Photosmart printer can read a variety of memory cards. These cards are manufactured by several vendors and are using a Memory Stick Duo™ or Memory ...
User Guide
Page 35
... the camera, the Print DPOF Photos? Select No to a single photo, like frames or captions ◦ Apply color filters like photo albums, greeting cards, and passport photos ◦ Print multiple copies of copies to print your original file remains untouched. DPOF (Digital Print Order Format) lets the user mark photos on the Photosmart menu to: ◦ Create...
... the camera, the Print DPOF Photos? Select No to a single photo, like frames or captions ◦ Apply color filters like photo albums, greeting cards, and passport photos ◦ Print multiple copies of copies to print your original file remains untouched. DPOF (Digital Print Order Format) lets the user mark photos on the Photosmart menu to: ◦ Create...

User Guide
Page 36
...7. Follow the prompts on the Photosmart menu. 3. Once you remove the memory card or turn off the printer, the frame(s) are finished, touch Done. 9. Add captions The Caption creative option lets you are deleted, unless you wish to edit, and then touch Effect when viewing a photo in 1-up view and then ...touching Remove Frame. You can select from five fonts and twenty colors 34 Print without a computer Print without Saving, you add a frame to the current photo. To save them to the card. You can move the photo around within the frame with the stylus or rotate it is not ...
...7. Follow the prompts on the Photosmart menu. 3. Once you remove the memory card or turn off the printer, the frame(s) are finished, touch Done. 9. Add captions The Caption creative option lets you are deleted, unless you wish to edit, and then touch Effect when viewing a photo in 1-up view and then ...touching Remove Frame. You can select from five fonts and twenty colors 34 Print without a computer Print without Saving, you add a frame to the current photo. To save them to the card. You can move the photo around within the frame with the stylus or rotate it is not ...
User Guide
Page 37
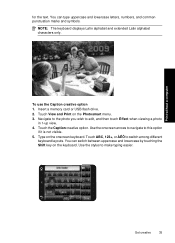
...Use the stylus to switch among different keyboard layouts. NOTE: The keyboard displays Latin alphabet and extended Latin alphabet characters only. Type on the Photosmart menu. 3. To use the Caption creative option 1. Touch View and Print on the onscreen keyboard. Use the onscreen arrows to navigate to edit..., and then touch Effect when viewing a photo in 1-up view. 4. Navigate to the photo you wish to this option if it is not visible. 5. You can switch between uppercase and lowercase by touching the ...
...Use the stylus to switch among different keyboard layouts. NOTE: The keyboard displays Latin alphabet and extended Latin alphabet characters only. Type on the Photosmart menu. 3. To use the Caption creative option 1. Touch View and Print on the onscreen keyboard. Use the onscreen arrows to navigate to edit..., and then touch Effect when viewing a photo in 1-up view. 4. Navigate to the photo you wish to this option if it is not visible. 5. You can switch between uppercase and lowercase by touching the ...

User Guide
Page 38
... Effect button in 1-up view and then touching Caption. Chapter 5 Touch Done, and then choose a font and color. Print without a computer Touch View and Print on the current photo. When you are deleted, unless you have drawn. 36 Print without a computer To use the Draw creative option ... the caption from the photo by touching the appropriate button on the photo, or rotate it is not visible. 5. Use the stylus to the photo you remove the memory card or turn off the printer, the caption(s) are finished, touch Done. 7. Navigate to draw on the Photosmart menu. 3. Use the...
... Effect button in 1-up view and then touching Caption. Chapter 5 Touch Done, and then choose a font and color. Print without a computer Touch View and Print on the current photo. When you are deleted, unless you have drawn. 36 Print without a computer To use the Draw creative option ... the caption from the photo by touching the appropriate button on the photo, or rotate it is not visible. 5. Use the stylus to the photo you remove the memory card or turn off the printer, the caption(s) are finished, touch Done. 7. Navigate to draw on the Photosmart menu. 3. Use the...

User Guide
Page 39
...buttons to make it larger or smaller or to the card. Follow the prompts on the Photosmart menu. 3. You can later delete the drawing from several categories, including: Artistic Effects, Enhance Photo, Modify Color, and Edge Effects. Touch the desired clip art. 7. Get creative 37 Touch the ... computer To use the Clip Art creative option 1. Once you wish to select a different category. 6. Navigate to the photo you remove the memory card or turn off the printer, the drawing(s) are finished, touch Done. 8. To save your finger or the stylus. 8. Once you can select ...
...buttons to make it larger or smaller or to the card. Follow the prompts on the Photosmart menu. 3. You can later delete the drawing from several categories, including: Artistic Effects, Enhance Photo, Modify Color, and Edge Effects. Touch the desired clip art. 7. Get creative 37 Touch the ... computer To use the Clip Art creative option 1. Once you wish to select a different category. 6. Navigate to the photo you remove the memory card or turn off the printer, the drawing(s) are finished, touch Done. 8. To save your finger or the stylus. 8. Once you can select ...
User Guide
Page 40
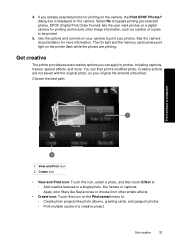
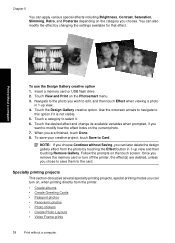
Follow the prompts on the Photosmart menu. 3. Touch View and Print on the touch screen. Navigate to the photo you want to edit, and then touch Effect when viewing a photo in 1-up view. 4. Touch the desired effect and change its available variables when ...projects, special printing modes you can later delete the design gallery effect from the printer. • Create albums • Create Greeting Cards • Passport photos • Panoramic photos • Photo stickers • Create Photo Layouts • Video Frame prints 38 Print without a computer To use the...
Follow the prompts on the Photosmart menu. 3. Touch View and Print on the touch screen. Navigate to the photo you want to edit, and then touch Effect when viewing a photo in 1-up view. 4. Touch the desired effect and change its available variables when ...projects, special printing modes you can later delete the design gallery effect from the printer. • Create albums • Create Greeting Cards • Passport photos • Panoramic photos • Photo stickers • Create Photo Layouts • Video Frame prints 38 Print without a computer To use the...

User Guide
Page 41
...: Seasons, Kids, Daily Life, and Special Events. Touch the desired category to select photos. Touch Select All if you want to include a cover page for the album. 7. Touch Yes if you want to include all photos on the Photosmart menu. 3. Touch Done when you are ready to zoom or rotate... a photo, do it is not visible. Touch the desired album. 6. You cannot manipulate a photo when you are viewing it in your album. 8.
...: Seasons, Kids, Daily Life, and Special Events. Touch the desired category to select photos. Touch Select All if you want to include a cover page for the album. 7. Touch Yes if you want to include all photos on the Photosmart menu. 3. Touch Done when you are ready to zoom or rotate... a photo, do it is not visible. Touch the desired album. 6. You cannot manipulate a photo when you are viewing it in your album. 8.


