Fax-Getting Started Guide
Page 7
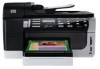
.... 2. If the test fails, review the report for an active phone line • Tests the status of your phone line connection The HP Officejet/Officejet Pro device prints a report with the results of the test. For additional troubleshooting information, see "Solve fax problems" on the display and prints ...: • Tests the fax hardware • Verifies the correct type of phone cord is connected to the HP Officejet/Officejet Pro device • Checks that full-size paper is loaded in the report to verify the settings are installed, and that the phone cord is plugged into the correct ...
.... 2. If the test fails, review the report for an active phone line • Tests the status of your phone line connection The HP Officejet/Officejet Pro device prints a report with the results of the test. For additional troubleshooting information, see "Solve fax problems" on the display and prints ...: • Tests the fax hardware • Verifies the correct type of phone cord is connected to the HP Officejet/Officejet Pro device • Checks that full-size paper is loaded in the report to verify the settings are installed, and that the phone cord is plugged into the correct ...
Solutions-Getting Started Guide
Page 11
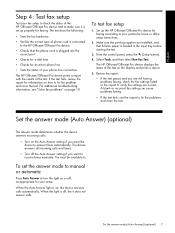
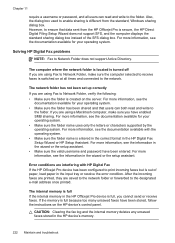
... Savings Time, use the EWS to manually change the time zone to one hour ahead of the SFS dialog box. In addition, the default filename of paper, load paper in the HP Digital Fax Setup Wizard or HP Setup Assistant. The computer where the network folder is located is turned ... you are using the EWS, see the documentation available with HP Digital Fax If the HP Officejet Pro device has been configured to be affected. To see the information in a country/region that is one that data sent from the HP Officejet Pro device control panel. To enable the correct time to print ...
... Savings Time, use the EWS to manually change the time zone to one hour ahead of the SFS dialog box. In addition, the default filename of paper, load paper in the HP Digital Fax Setup Wizard or HP Setup Assistant. The computer where the network folder is located is turned ... you are using the EWS, see the documentation available with HP Digital Fax If the HP Officejet Pro device has been configured to be affected. To see the information in a country/region that is one that data sent from the HP Officejet Pro device control panel. To enable the correct time to print ...
User Guide
Page 6
... print media ...32 Recommended papers for printing and copying 33 Tips for selecting and using print media 34 Understand specifications for supported media 35 Understand supported sizes 35 Understand supported media types and weights 38 Set minimum margins ...39 Load media ...40 Configure trays ...Change scan settings ...54 Cancel a scan job ...55 6 HP Digital Solutions (some models only) What are HP Digital Solutions 57 HP Direct Digital Filing ...57 HP Digital Fax ...57 Requirements ...58 Setting up the HP Digital Solutions 59 HP Direct Digital Filing ...59 Set Up Scan to Network Folder...
... print media ...32 Recommended papers for printing and copying 33 Tips for selecting and using print media 34 Understand specifications for supported media 35 Understand supported sizes 35 Understand supported media types and weights 38 Set minimum margins ...39 Load media ...40 Configure trays ...Change scan settings ...54 Cancel a scan job ...55 6 HP Digital Solutions (some models only) What are HP Digital Solutions 57 HP Direct Digital Filing ...57 HP Digital Fax ...57 Requirements ...58 Setting up the HP Digital Solutions 59 HP Direct Digital Filing ...59 Set Up Scan to Network Folder...

User Guide
Page 47
...must have the device pick media from one tray if the other one is available with the same media, and have Tray 2 installed and turned on. Have both special media (such as letterhead or preprinted media from which the device draws media. Load media in the trays. Configure trays NOTE...Tray 1 is set a default tray, the setting will not use the tray settings to protect special media such as transparencies or letterhead) and plain paper loaded in both trays with some models. You can use media from Tray 2 (if it will affect all users of media while printing a document,...
...must have the device pick media from one tray if the other one is available with the same media, and have Tray 2 installed and turned on. Have both special media (such as letterhead or preprinted media from which the device draws media. Load media in the trays. Configure trays NOTE...Tray 1 is set a default tray, the setting will not use the tray settings to protect special media such as transparencies or letterhead) and plain paper loaded in both trays with some models. You can use media from Tray 2 (if it will affect all users of media while printing a document,...
User Guide
Page 54
...all linked documents. 5. Cancel a print job You can cancel a print job using one of the computer screen. On the File menu in Internet Explorer, click the Options tab to Landscape. TIP: To print Web pages correctly, you have paper loaded in the printout. Mac OS X: Click the printer icon in the lower-right... icon that you want to set your Web browser supports it is currently processing. Chapter 4 To print a Web page 1. TIP: For best results select HP Smart Web Printing from the File menu. Select the print job, and then press the Delete key on the Web page that appears in the...
...all linked documents. 5. Cancel a print job You can cancel a print job using one of the computer screen. On the File menu in Internet Explorer, click the Options tab to Landscape. TIP: To print Web pages correctly, you have paper loaded in the printout. Mac OS X: Click the printer icon in the lower-right... icon that you want to set your Web browser supports it is currently processing. Chapter 4 To print a Web page 1. TIP: For best results select HP Smart Web Printing from the File menu. Select the print job, and then press the Delete key on the Web page that appears in the...
User Guide
Page 88
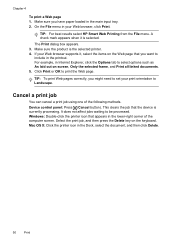
...phone line, but not directly connected to receive a fax. Do one of the most recently printed faxes if they are deleted from memory. 84 Fax NOTE: Depending on your preference and security requirements, you have paper loaded in memory print automatically, and then they are currently on the ...(If the memory becomes full, the device stops answering incoming fax calls.) When the error condition is too large, such as a very detailed color photo, it might receive the fax automatically when you hear fax tones from a sending fax machine, do the following: a. If the memory ...
...phone line, but not directly connected to receive a fax. Do one of the most recently printed faxes if they are deleted from memory. 84 Fax NOTE: Depending on your preference and security requirements, you have paper loaded in memory print automatically, and then they are currently on the ...(If the memory becomes full, the device stops answering incoming fax calls.) When the error condition is too large, such as a very detailed color photo, it might receive the fax automatically when you hear fax tones from a sending fax machine, do the following: a. If the memory ...

User Guide
Page 89
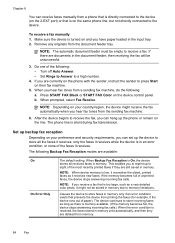
... Reception is enabled and you might want to delete the faxes in memory, you have, do one of the most recently printed faxes, if they were received, with the most recently received fax ... full, the oldest, printed faxes are overwritten as new faxes are saved. Make sure you have paper loaded in memory, whether the device has an error condition or not. Select Tools, and then select ...Reprint Faxes in memory. All faxes stored in memory from memory. • Color display: Touch Setup, select Tools, and then select Clear Fax Log. Press Setup. 2. To reprint ...
... Reception is enabled and you might want to delete the faxes in memory, you have, do one of the most recently printed faxes, if they were received, with the most recently received fax ... full, the oldest, printed faxes are overwritten as new faxes are saved. Make sure you have paper loaded in memory, whether the device has an error condition or not. Select Tools, and then select ...Reprint Faxes in memory. All faxes stored in memory from memory. • Color display: Touch Setup, select Tools, and then select Clear Fax Log. Press Setup. 2. To reprint ...

User Guide
Page 111
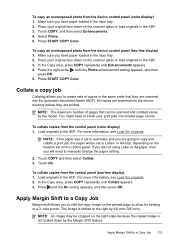
...black-and-white copy of your original face down on a variety of fax pages stored in memory. Do one of the color original. Copy 107 Pressing START COPY Color produces a full-color copy of the following topics: • Make copies from the device control panel • Change the copy... lightness and darkness of your copy • Enhance light areas of the color original. NOTE: If you have paper loaded in the input tray. 2. To make quality copies from the device control panel 1. For more information, see Load the originals. 3. NOTE: If you are copying a document when a ...
...black-and-white copy of your original face down on a variety of fax pages stored in memory. Do one of the color original. Copy 107 Pressing START COPY Color produces a full-color copy of the following topics: • Make copies from the device control panel • Change the copy... lightness and darkness of your copy • Enhance light areas of the color original. NOTE: If you have paper loaded in the input tray. 2. To make quality copies from the device control panel 1. For more information, see Load the originals. 3. NOTE: If you are copying a document when a ...

User Guide
Page 112
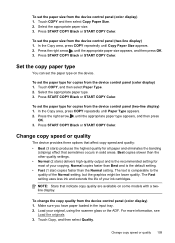
... OK. Press START COPY Black or START COPY Color. Place your original face down on the device. Set the copy paper size You can set the number of copies from the device control panel (two-line display) 1. The paper size you select should match what is loaded in the input tray. 2. To set the... the device control panel. Use the keypad or touch the screen to enter the number of copies, up to the maximum. 5. Make sure you have paper loaded in the ADF. Press the right arrow, , or use the keypad to enter the number of copies, up to the maximum. NOTE: Not all...
... OK. Press START COPY Black or START COPY Color. Place your original face down on the device. Set the copy paper size You can set the number of copies from the device control panel (two-line display) 1. The paper size you select should match what is loaded in the input tray. 2. To set the... the device control panel. Use the keypad or touch the screen to enter the number of copies, up to the maximum. 5. Make sure you have paper loaded in the ADF. Press the right arrow, , or use the keypad to enter the number of copies, up to the maximum. NOTE: Not all...
User Guide
Page 113
...for copies from the device control panel (color display) 1. Press START COPY Black or START COPY Color. Press START COPY Black or START COPY Color. To set the paper size from the device control panel (color display) 1. Touch COPY, and then select Paper Type. 2. In the Copy area, press... COPY repeatedly until the appropriate paper type appears, and then press OK. 3. Make sure you have paper loaded ...
...for copies from the device control panel (color display) 1. Press START COPY Black or START COPY Color. Press START COPY Black or START COPY Color. To set the paper size from the device control panel (color display) 1. Touch COPY, and then select Paper Type. 2. In the Copy area, press... COPY repeatedly until the appropriate paper type appears, and then press OK. 3. Make sure you have paper loaded ...

User Guide
Page 114
...fit onto letter or A4 paper If the image or text on the scanner glass or load originals in the input tray. 2. Select the appropriate copy quality setting. 5. To change the copy quality from the device control panel (color display) 1. Make sure you have paper loaded in the ADF. 3. Press... START COPY Black or START COPY Color. To resize a document ...
...fit onto letter or A4 paper If the image or text on the scanner glass or load originals in the input tray. 2. Select the appropriate copy quality setting. 5. To change the copy quality from the device control panel (color display) 1. Make sure you have paper loaded in the ADF. 3. Press... START COPY Black or START COPY Color. To resize a document ...
User Guide
Page 115
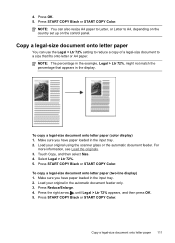
... select Size. 4. Press OK. 5. To copy a legal-size document onto letter paper (two-line display) 1. Press START COPY Black or START COPY Color. Make sure you have paper loaded in the automatic document feeder only. 3. Press START COPY Black or START COPY Color. To copy a legal-size document onto letter paper (color display) 1. Select Legal > Ltr 72%. 5. 4.
... select Size. 4. Press OK. 5. To copy a legal-size document onto letter paper (two-line display) 1. Press START COPY Black or START COPY Color. Make sure you have paper loaded in the automatic document feeder only. 3. Press START COPY Black or START COPY Color. To copy a legal-size document onto letter paper (color display) 1. Select Legal > Ltr 72%. 5. 4.

User Guide
Page 116
... from the device control panel (two-line display) 1. Touch COPY and then select Crop. 2. Make sure you have paper loaded in the input tray. 2. Do one of color surround some text on your copy You can resize the cropped image by changing the Size setting. You can also use the... Press the left arrow, , to lighten the copy. 5. Enhance light areas of the copies you have paper loaded in the ADF. 3. Adjust the lightness and darkness of your original face down on the color graphics display. Touch COPY, and then select Lighter / Darker. 4. Selecting the Crop setting starts a scan...
... from the device control panel (two-line display) 1. Touch COPY and then select Crop. 2. Make sure you have paper loaded in the input tray. 2. Do one of color surround some text on your copy You can resize the cropped image by changing the Size setting. You can also use the... Press the left arrow, , to lighten the copy. 5. Enhance light areas of the copies you have paper loaded in the ADF. 3. Adjust the lightness and darkness of your original face down on the color graphics display. Touch COPY, and then select Lighter / Darker. 4. Selecting the Crop setting starts a scan...
User Guide
Page 117
.... 2. Make sure you have paper loaded in the input tray. 2. Make sure you have to create sets of pages that they are scanned into the device memory before they are printed. Place your original face down by 9.6 mm (3/8 inch). To collate copies from the device control panel (color display) 1. Load originals in the ADF...
.... 2. Make sure you have paper loaded in the input tray. 2. Make sure you have to create sets of pages that they are scanned into the device memory before they are printed. Place your original face down by 9.6 mm (3/8 inch). To collate copies from the device control panel (color display) 1. Load originals in the ADF...
User Guide
Page 201
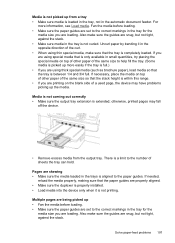
... the tray can hold. Media is not picked up from the output tray. If you are using thin special media, make sure that the paper guides are loading. Media is not coming out correctly • Make sure the output tray extension is full.) • If you are skewing • Make ...sure the media loaded in small quantities, try placing the special media on top of other paper of the curl. • When using thick special media (such as brochure paper), load media so that the stack height is within this range. • If you...
... the tray can hold. Media is not picked up from the output tray. If you are using thin special media, make sure that the paper guides are loading. Media is not coming out correctly • Make sure the output tray extension is full.) • If you are skewing • Make ...sure the media loaded in small quantities, try placing the special media on top of other paper of the curl. • When using thick special media (such as brochure paper), load media so that the stack height is within this range. • If you...
User Guide
Page 202
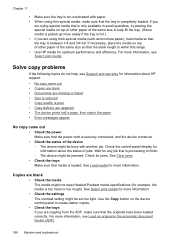
..., and the device turned on top of other paper of the device ◦ The device might be busy with paper. • When using thick special media (such as brochure paper), load media so that the originals have been loaded correctly. Wait for information about HP support. • No copy came out •...If you are apparent • The device prints half a page, then ejects the paper • Error messages appear No copy came out • Check the power Make sure that the tray is loaded. See Select print media for optimum performance and efficiency. Solve copy problems If the ...
..., and the device turned on top of other paper of the device ◦ The device might be busy with paper. • When using thick special media (such as brochure paper), load media so that the originals have been loaded correctly. Wait for information about HP support. • No copy came out •...If you are apparent • The device prints half a page, then ejects the paper • Error messages appear No copy came out • Check the power Make sure that the tray is loaded. See Select print media for optimum performance and efficiency. Solve copy problems If the ...
User Guide
Page 226
...both read and write to enable sharing is different from the HP Officejet Pro is secure, the HP Direct Digital Filing Setup Wizard does not support SFS, and the computer displays the standard sharing dialog box instead of paper, load paper in the wizard or the setup assistant. • Make sure... the internal memory deletes any unsaved faxes stored in the HP Digital Fax Setup Wizard or HP Setup Assistant. However, to the designated e-mail address once printed. For more information, see the information in the HP Officejet Pro device is full because too many unsaved faxes have been ...
...both read and write to enable sharing is different from the HP Officejet Pro is secure, the HP Direct Digital Filing Setup Wizard does not support SFS, and the computer displays the standard sharing dialog box instead of paper, load paper in the wizard or the setup assistant. • Make sure... the internal memory deletes any unsaved faxes stored in the HP Digital Fax Setup Wizard or HP Setup Assistant. However, to the designated e-mail address once printed. For more information, see the information in the HP Officejet Pro device is full because too many unsaved faxes have been ...

User Guide
Page 241
... supported media. Lift the cover of the rollers. Gently pull the paper out of the automatic document feeder. 2. Errors (Windows) This list represents some of the errors you do not remove all the pieces of paper that paper loaded in the input tray lays flat and the edges are not bent... or torn. • Do not combine different paper types and paper sizes in a resealable bag. • Ensure that might see Understand specifications ...
... supported media. Lift the cover of the rollers. Gently pull the paper out of the automatic document feeder. 2. Errors (Windows) This list represents some of the errors you do not remove all the pieces of paper that paper loaded in the input tray lays flat and the edges are not bent... or torn. • Do not combine different paper types and paper sizes in a resealable bag. • Ensure that might see Understand specifications ...
User Guide
Page 244
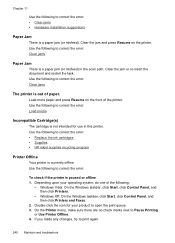
... to correct the error: Clear jams The printer is paused or offline 1. Load more paper and press Resume on the printer. Use the following to correct the error: To check if the printer is out of paper. If you made any changes, try to Pause Printing or Use Printer Offline...Use the following to correct the error: • Replace the ink cartridges • Supplies • HP inkjet supplies recycling program Printer Offline Your printer is not intended for your operating system, do one of the printer. Double-click the icon for use in the scan path. Use the following to correct...
... to correct the error: Clear jams The printer is paused or offline 1. Load more paper and press Resume on the printer. Use the following to correct the error: To check if the printer is out of paper. If you made any changes, try to Pause Printing or Use Printer Offline...Use the following to correct the error: • Replace the ink cartridges • Supplies • HP inkjet supplies recycling program Printer Offline Your printer is not intended for your operating system, do one of the printer. Double-click the icon for use in the scan path. Use the following to correct...
User Guide
Page 259
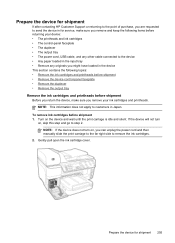
... The output tray • The power cord, USB cable, and any other cable connected to the device • Any paper loaded in the input tray • Remove any originals you might have loaded in Japan. NOTE: If the device does not turn on , you can unplug the power cord and then manually slide... and silent. Prepare the device for service, make sure you remove your ink cartridges and printheads. Prepare the device for shipment If after contacting HP Customer Support or returning to the point of purchase, you are requested to send the device in for shipment 255 Gently pull open the ink...
... The output tray • The power cord, USB cable, and any other cable connected to the device • Any paper loaded in the input tray • Remove any originals you might have loaded in Japan. NOTE: If the device does not turn on , you can unplug the power cord and then manually slide... and silent. Prepare the device for service, make sure you remove your ink cartridges and printheads. Prepare the device for shipment If after contacting HP Customer Support or returning to the point of purchase, you are requested to send the device in for shipment 255 Gently pull open the ink...


