HP 15-g029wm Hard Drive Removal
Related Manual Pages


Similar Questions

Hard Drive Problems
What do I need to do to reset hard drive?My computer s saying hard drive not found.
What do I need to do to reset hard drive?My computer s saying hard drive not found.
(Posted by MOORE65CM 8 years ago)


How To Reset Password W/o Reset Drive On A Hp-g029wm? Thanks
(Posted by dentterik 10 years ago)

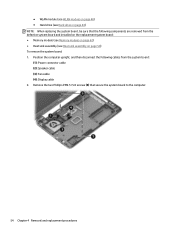
How To Remove The Bottom On The Hp 15g029wm Laptop
I need help to remove the laptop bottome so a can upgader the memorys to the rmp or the hard drive
I need help to remove the laptop bottome so a can upgader the memorys to the rmp or the hard drive
(Posted by thundertigerrccars16 10 years ago)

Remove Hard Drive
I'm replacing the keyboard in my dv7-3058dx and one of the screws for the keyboard I believe is unde...
I'm replacing the keyboard in my dv7-3058dx and one of the screws for the keyboard I believe is unde...
(Posted by twhitehouse 13 years ago)