User Guide
Page 5
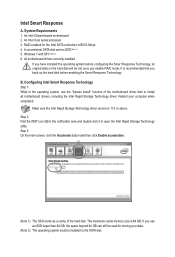
... original data on the hard disk will be installed to open the Intel Rapid Storage Technology utility. Make sure the Intel Rapid Storage Technology driver version is 64 GB. System Requirements 1. An Intel Chipset-based motherboard 2. If you have installed the operating system before enabling the Smart Response Technology. All ...be used for the Intel SATA controllers in the notification area and double-click it to the SATA disk. Step 2: Find the IRST icon in BIOS Setup 4. Step 3: On the main screen, click the Accelerate button and then click Enable acceleration.
... original data on the hard disk will be installed to open the Intel Rapid Storage Technology utility. Make sure the Intel Rapid Storage Technology driver version is 64 GB. System Requirements 1. An Intel Chipset-based motherboard 2. If you have installed the operating system before enabling the Smart Response Technology. All ...be used for the Intel SATA controllers in the notification area and double-click it to the SATA disk. Step 2: Find the IRST icon in BIOS Setup 4. Step 3: On the main screen, click the Accelerate button and then click Enable acceleration.
Manual
Page 12
Operating System ŠŠ Support for EZ Setup Bundled ŠŠ Norton Internet Security (OEM version) Software ŠŠ Intel® Smart Response Technology ŠŠ Intel® Rapid Start Technology ŠŠ LucidLogix Virtu MVP * ... without prior notice. Hardware Installation - 12 - BIOS ŠŠ 2 x 64 Mbit flash ŠŠ Use of licensed AMI EFI BIOS ŠŠ Support for DualBIOS™ ŠŠ PnP 1.0a, DMI 2.0, SM BIOS 2.6, ACPI 2.0a Unique Features ŠŠ Support for @BIOS ŠŠ Support for Q-Flash ŠŠ...
Operating System ŠŠ Support for EZ Setup Bundled ŠŠ Norton Internet Security (OEM version) Software ŠŠ Intel® Smart Response Technology ŠŠ Intel® Rapid Start Technology ŠŠ LucidLogix Virtu MVP * ... without prior notice. Hardware Installation - 12 - BIOS ŠŠ 2 x 64 Mbit flash ŠŠ Use of licensed AMI EFI BIOS ŠŠ Support for DualBIOS™ ŠŠ PnP 1.0a, DMI 2.0, SM BIOS 2.6, ACPI 2.0a Unique Features ŠŠ Support for @BIOS ŠŠ Support for Q-Flash ŠŠ...
Manual
Page 33
.... •• It is recommended that you not alter the default settings (unless you not flash the BIOS. BIOS Setup To upgrade the BIOS, use either the GIGABYTE Q-Flash or @BIOS utility. •• Q-Flash allows the user to quickly and easily upgrade or back up...potentially risky, if you do it is recommended that you need to) to boot. BIOS includes a BIOS Setup program that searches and downloads the latest version of BIOS, it with caution. Chapter 2 BIOS Setup BIOS (Basic Input and Output System) records hardware parameters of the battery/clear CMOS jumper in...
.... •• It is recommended that you not alter the default settings (unless you not flash the BIOS. BIOS Setup To upgrade the BIOS, use either the GIGABYTE Q-Flash or @BIOS utility. •• Q-Flash allows the user to quickly and easily upgrade or back up...potentially risky, if you do it is recommended that you need to) to boot. BIOS includes a BIOS Setup program that searches and downloads the latest version of BIOS, it with caution. Chapter 2 BIOS Setup BIOS (Basic Input and Output System) records hardware parameters of the battery/clear CMOS jumper in...
Manual
Page 35
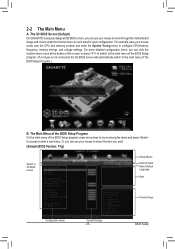
The 3D BIOS Screen (Default) On GIGABYTE's uniquely designed 3D BIOS screen, you can use your mouse to select the item you want. (Sample BIOS Version: F1g) Switch to 3D BIOS screen Setup Menus Enter Q-Flash Select Default Language Help Function Keys Configuration Items Current Settings - 35 - Or you can use your mouse...function menu icons at the bottom of the screen or press to switch to the main menu of the BIOS Setup program. (If a mouse is not connected, the 3D BIOS screen will automatically switch to enter the function menu in each area for quick configuration. The Main Menu ...
The 3D BIOS Screen (Default) On GIGABYTE's uniquely designed 3D BIOS screen, you can use your mouse to select the item you want. (Sample BIOS Version: F1g) Switch to 3D BIOS screen Setup Menus Enter Q-Flash Select Default Language Help Function Keys Configuration Items Current Settings - 35 - Or you can use your mouse...function menu icons at the bottom of the screen or press to switch to the main menu of the BIOS Setup program. (If a mouse is not connected, the 3D BIOS screen will automatically switch to enter the function menu in each area for quick configuration. The Main Menu ...
Manual
Page 36
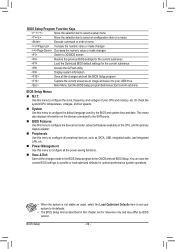
... Use this menu to configure all the power-saving functions. „„ Save & Exit Save all the changes and exit the BIOS Setup program Capture the current screen as usual, select the Load Optimized Defaults item to set your system to your CPU and memory, etc...BIOS Setup Menus „„ M.I.T. Or check the system/CPU temperatures, voltages, and fan speeds. „„ System Use this chapter are for the current submenus Access the Q-Flash utility Display system information Save all the changes made in this menu to configure the default language used by BIOS version...
... Use this menu to configure all the power-saving functions. „„ Save & Exit Save all the changes and exit the BIOS Setup program Capture the current screen as usual, select the Load Optimized Defaults item to set your system to your CPU and memory, etc...BIOS Setup Menus „„ M.I.T. Or check the system/CPU temperatures, voltages, and fan speeds. „„ System Use this chapter are for the current submenus Access the Q-Flash utility Display system information Save all the changes made in this menu to configure the default language used by BIOS version...
Manual
Page 37
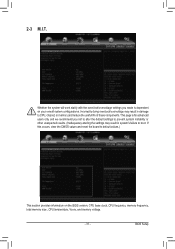
... occurs, clear the CMOS values and reset the board to boot. This page is dependent on the BIOS version, CPU base clock, CPU frequency, memory frequency, total memory size , CPU temperature, Vcore, and memory voltage. - 37 - BIOS Setup 2-3 M.I.T. Incorrectly doing overclock/overvoltage may result in damage to CPU, chipset, or memory and reduce...
... occurs, clear the CMOS values and reset the board to boot. This page is dependent on the BIOS version, CPU base clock, CPU frequency, memory frequency, total memory size , CPU temperature, Vcore, and memory voltage. - 37 - BIOS Setup 2-3 M.I.T. Incorrectly doing overclock/overvoltage may result in damage to CPU, chipset, or memory and reduce...
Manual
Page 48
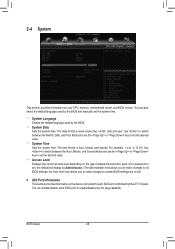
... and second. is week (read-only), month, date and year. the User level only allows you to make changes to certain BIOS settings but not all BIOS settings; The date format is 13:0:0. For example, 1 p.m. The time format is set, the default will display as Administrator.) The... or key to set the desired value. && Access Level Displays the current access level depending on your CPU, memory, motherboard model, and BIOS version. BIOS Setup - 48 - You can enable/disable each SATA port controlled by Intel Z77 Chipset. 2-4 System This section provides information on the type...
... and second. is week (read-only), month, date and year. the User level only allows you to make changes to certain BIOS settings but not all BIOS settings; The date format is 13:0:0. For example, 1 p.m. The time format is set, the default will display as Administrator.) The... or key to set the desired value. && Access Level Displays the current access level depending on your CPU, memory, motherboard model, and BIOS version. BIOS Setup - 48 - You can enable/disable each SATA port controlled by Intel Z77 Chipset. 2-4 System This section provides information on the type...
Manual
Page 62
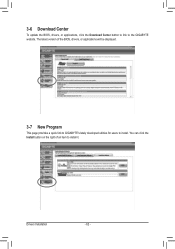
You can click the Install button on the right of the BIOS, drivers, or applications will be displayed. 3-7 New Program This page provides a quick link to GIGABYTE's lately developed utilities for users to install. 3-6 Download Center To update the BIOS, drivers, or applications, click the Download Center button to link to install it. Drivers Installation - 62 - The latest version of an item to the GIGABYTE website.
You can click the Install button on the right of the BIOS, drivers, or applications will be displayed. 3-7 New Program This page provides a quick link to GIGABYTE's lately developed utilities for users to install. 3-6 Download Center To update the BIOS, drivers, or applications, click the Download Center button to link to install it. Drivers Installation - 62 - The latest version of an item to the GIGABYTE website.
Manual
Page 67
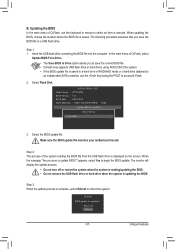
Step 1: 1. Q-Flash Utility v1.02 Model Name : Z77X-D3H BIOS Version : F1e BIOS Date : 02/07/2012 Flash Type/Size : MXIC 25L6465E/6406E 8MB Update BIOS From Drive SaSveeleBcItODSetvoicDe rive Return to begin the BIOS update. The monitor will display the update process. •• Do not turn off Reboot -...access Q-Flash. 2. The following procedure assumes that you sure to execute. Insert the USB flash drive containing the BIOS file into the computer. Q-Flash BIOS update is saved to a hard drive in RAID/AHCI mode or a hard drive attached to an independent SATA controller...
Step 1: 1. Q-Flash Utility v1.02 Model Name : Z77X-D3H BIOS Version : F1e BIOS Date : 02/07/2012 Flash Type/Size : MXIC 25L6465E/6406E 8MB Update BIOS From Drive SaSveeleBcItODSetvoicDe rive Return to begin the BIOS update. The monitor will display the update process. •• Do not turn off Reboot -...access Q-Flash. 2. The following procedure assumes that you sure to execute. Insert the USB flash drive containing the BIOS file into the computer. Q-Flash BIOS update is saved to a hard drive in RAID/AHCI mode or a hard drive attached to an independent SATA controller...
Manual
Page 78
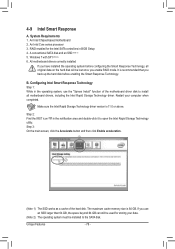
System Requirements 1. A conventional SATA disk and an SSD (Note 1) 5. Make sure the Intel Rapid Storage Technology driver version is 64 GB. Step 3: On the main screen, click the Accelerate button and then click Enable acceleration. If you use the "Xpress Install" function of .... Unique Features - 78 - It is recommended that you enable RAID mode. B. 4-9 Intel Smart Response A. An Intel Core series processor 3. Step 2: Find the IRST icon in BIOS Setup 4. j k (Note 1) The SSD works as a cache of the motherboard driver disk to the SATA disk.
System Requirements 1. A conventional SATA disk and an SSD (Note 1) 5. Make sure the Intel Rapid Storage Technology driver version is 64 GB. Step 3: On the main screen, click the Accelerate button and then click Enable acceleration. If you use the "Xpress Install" function of .... Unique Features - 78 - It is recommended that you enable RAID mode. B. 4-9 Intel Smart Response A. An Intel Core series processor 3. Step 2: Find the IRST icon in BIOS Setup 4. j k (Note 1) The SSD works as a cache of the motherboard driver disk to the SATA disk.
Manual
Page 82
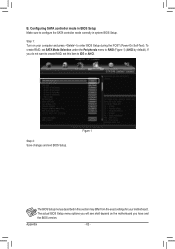
... described in this item to enter BIOS Setup during the POST (Power-On Self-Test). To create RAID, set this section may differ from the exact settings for your computer and press to IDE or AHCI. The actual BIOS Setup menu options you have and the BIOS version. Step 2: Save changes and exit... BIOS Setup. Configuring SATA controller mode in system BIOS Setup.
... described in this item to enter BIOS Setup during the POST (Power-On Self-Test). To create RAID, set this section may differ from the exact settings for your computer and press to IDE or AHCI. The actual BIOS Setup menu options you have and the BIOS version. Step 2: Save changes and exit... BIOS Setup. Configuring SATA controller mode in system BIOS Setup.
Manual
Page 89
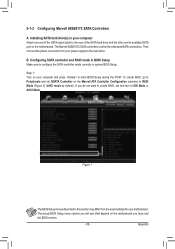
...the other end to the hard drive. If you have and the BIOS version. - 89 - Figure 1 The BIOS Setup menus described in your computer and press to configure the SATA controller mode correctly in BIOS Setup Make sure to enter BIOS Setup during the POST. 5-1-2 Configuring Marvell 88SE9172 SATA Controllers A. ...the onboard eSATA connectors. Installing SATA hard drive(s) in this item to RAID Mode (Figure 2) (AHCI mode by default). The actual BIOS Setup menu options you will see shall depend on the motherboard you do not want to create RAID, set GSATA Controller on the motherboard....
...the other end to the hard drive. If you have and the BIOS version. - 89 - Figure 1 The BIOS Setup menus described in your computer and press to configure the SATA controller mode correctly in BIOS Setup Make sure to enter BIOS Setup during the POST. 5-1-2 Configuring Marvell 88SE9172 SATA Controllers A. ...the onboard eSATA connectors. Installing SATA hard drive(s) in this item to RAID Mode (Figure 2) (AHCI mode by default). The actual BIOS Setup menu options you will see shall depend on the motherboard you do not want to create RAID, set GSATA Controller on the motherboard....
Manual
Page 90
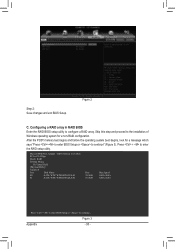
Figure 2 C. BIOS Version 1.0.1.0025 PCIe x2 5.0Gbps Mode: RAID [Virtual Disks] No Virtual Disk! [Physical Disks] Adapter 0 Port Disk Name S0 SATA: WDC WD800JD-22LSA0 S1 SATA: WDC WD800JD-22LSA0 Size 76.3GB 76.3GB Max Speed SATA 3Gb/s SATA 3Gb/s Press + to enter BIOS Setup or to enter the RAID.... Skip this step and proceed to the installation of Windows operating system for a message which says "Press + to enter BIOS Setup or to configure a RAID array. Marvell 88SE91xx Adapter - After the POST memory test begins and before the operating system boot begins, look...
Figure 2 C. BIOS Version 1.0.1.0025 PCIe x2 5.0Gbps Mode: RAID [Virtual Disks] No Virtual Disk! [Physical Disks] Adapter 0 Port Disk Name S0 SATA: WDC WD800JD-22LSA0 S1 SATA: WDC WD800JD-22LSA0 Size 76.3GB 76.3GB Max Speed SATA 3Gb/s SATA 3Gb/s Press + to enter BIOS Setup or to enter the RAID.... Skip this step and proceed to the installation of Windows operating system for a message which says "Press + to enter BIOS Setup or to configure a RAID array. Marvell 88SE91xx Adapter - After the POST memory test begins and before the operating system boot begins, look...
Manual
Page 91
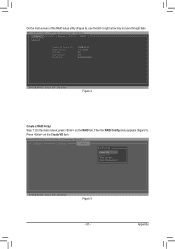
Appendix Marvell BIOS Setup (c) 2009 Marvell Technology Group Ltd. [ Adapter] [ Devices] [ RAID ] RAID Config Create VD Delete VD Wipe out disk Spare Management ENTER/SPACE: Select, ESC: Back/... of the RAID setup utility (Figure 4), use the left or right arrow key to move through tabs. Marvell BIOS Setup (c) 2009 Marvell Technology Group Ltd. [ Adapter ] [ Devices ] [ RAID ] Adapter 0 Vendor ID Device ID: BIOS Version: PCI Slot: IRQ Number: Raid Mode: 1B4B:91A2 1.0.1.0025 00 0A RAID0 RAID1 ENTER/SPACE: Select, ESC: Back...
Appendix Marvell BIOS Setup (c) 2009 Marvell Technology Group Ltd. [ Adapter] [ Devices] [ RAID ] RAID Config Create VD Delete VD Wipe out disk Spare Management ENTER/SPACE: Select, ESC: Back/... of the RAID setup utility (Figure 4), use the left or right arrow key to move through tabs. Marvell BIOS Setup (c) 2009 Marvell Technology Group Ltd. [ Adapter ] [ Devices ] [ RAID ] Adapter 0 Vendor ID Device ID: BIOS Version: PCI Slot: IRQ Number: Raid Mode: 1B4B:91A2 1.0.1.0025 00 0A RAID0 RAID1 ENTER/SPACE: Select, ESC: Back...


