Manual
Page 1
GA-H55M-S2 LGA1156 socket motherboard for Intel® Core™ i7 processors/Intel® Core™ i5 processors/Intel® Core™ i3 processors/Intel® Pentium® processors User's Manual Rev. 1301 12ME-H55MS2-1301R
GA-H55M-S2 LGA1156 socket motherboard for Intel® Core™ i7 processors/Intel® Core™ i5 processors/Intel® Core™ i3 processors/Intel® Pentium® processors User's Manual Rev. 1301 12ME-H55MS2-1301R
Manual
Page 3
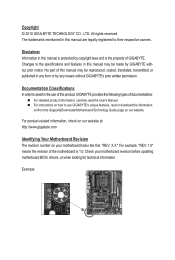
...respective owners. Check your motherboard looks like this product, GIGABYTE provides the following types of this : "REV: X.X." Disclaimer Information in this manual may be reproduced, copied, translated, transmitted, or published in this manual may be made by copyright laws and is the ...property of the motherboard is protected by GIGABYTE without GIGABYTE's prior written permission. Changes to assist in this manual is 1.0. For product-related information, check on our website at: http://www.gigabyte.com Identifying Your Motherboard Revision The revision number on our...
...respective owners. Check your motherboard looks like this product, GIGABYTE provides the following types of this : "REV: X.X." Disclaimer Information in this manual may be reproduced, copied, translated, transmitted, or published in this manual may be made by copyright laws and is the ...property of the motherboard is protected by GIGABYTE without GIGABYTE's prior written permission. Changes to assist in this manual is 1.0. For product-related information, check on our website at: http://www.gigabyte.com Identifying Your Motherboard Revision The revision number on our...

Manual
Page 5
Chapter 3 Drivers Installation 53 3-1 Installing Chipset Drivers 53 3-2 Application Software 54 3-3 Technical Manuals 54 3-4 Contact...55 3-5 System...55 3-6 Download Center 56 3-7 New Utilities...56 Chapter 4 Unique Features 57 4-1 Xpress Recovery2 57 4-2 BIOS Update Utilities 60 4-2-1 Updating the BIOS ...
Chapter 3 Drivers Installation 53 3-1 Installing Chipset Drivers 53 3-2 Application Software 54 3-3 Technical Manuals 54 3-4 Contact...55 3-5 System...55 3-6 Download Center 56 3-7 New Utilities...56 Chapter 4 Unique Features 57 4-1 Xpress Recovery2 57 4-2 BIOS Update Utilities 60 4-2-1 Updating the BIOS ...
Manual
Page 6
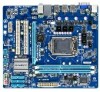
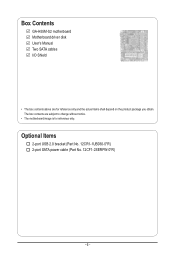
Optional Items 2-port USB 2.0 bracket (Part No. 12CR1-1UB030-5*R) 2-port SATA power cable (Part No. 12CF1-2SERPW-0*R) - 6 - The box contents are for reference only. Box Contents GA-H55M-S2 motherboard Motherboard driver disk User's Manual Two SATA cables I/O Shield • The box contents above are subject to change without notice. • The motherboard image is for reference only and the actual items shall depend on the product package you obtain.
Optional Items 2-port USB 2.0 bracket (Part No. 12CR1-1UB030-5*R) 2-port SATA power cable (Part No. 12CF1-2SERPW-0*R) - 6 - The box contents are for reference only. Box Contents GA-H55M-S2 motherboard Motherboard driver disk User's Manual Two SATA cables I/O Shield • The box contents above are subject to change without notice. • The motherboard image is for reference only and the actual items shall depend on the product package you obtain.
Manual
Page 9
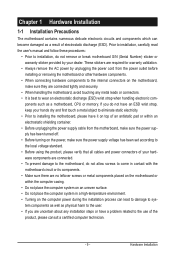
Prior to installation, carefully read the user's manual and follow these procedures: • Prior to installation, do not allow screws to come in contact with the motherboard circuit or its components. • Make ...
Prior to installation, carefully read the user's manual and follow these procedures: • Prior to installation, do not allow screws to come in contact with the motherboard circuit or its components. • Make ...

Manual
Page 14
... thermal grease on the surface of the motherboard. Check that the Male and Female push pins are joined closely. (Refer to your CPU cooler installation manual for instructions on the motherboard. Use extreme care when removing the CPU cooler because the thermal grease/tape between the CPU cooler and CPU may...
... thermal grease on the surface of the motherboard. Check that the Male and Female push pins are joined closely. (Refer to your CPU cooler installation manual for instructions on the motherboard. Use extreme care when removing the CPU cooler because the thermal grease/tape between the CPU cooler and CPU may...
Manual
Page 17
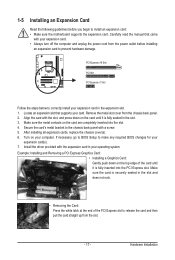
... motherboard supports the expansion card. 1-5 Installing an Expansion Card Read the following guidelines before installing an expansion card to prevent hardware damage. Carefully read the manual that supports your expansion card(s). 7. Example: Installing and Removing a PCI Express Graphics Card: • Installing a Graphics Card: Gently push down on the card are completely...
... motherboard supports the expansion card. 1-5 Installing an Expansion Card Read the following guidelines before installing an expansion card to prevent hardware damage. Carefully read the manual that supports your expansion card(s). 7. Example: Installing and Removing a PCI Express Graphics Card: • Installing a Graphics Card: Gently push down on the card are completely...
Manual
Page 25
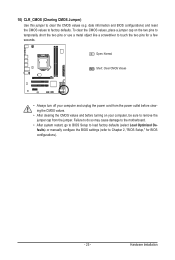
... do so may cause damage to the motherboard. • After system restart, go to BIOS Setup to load factory defaults (select Load Optimized Defaults) or manually configure the BIOS settings (refer to factory defaults. date information and BIOS configurations) and reset the CMOS values to Chapter 2, "BIOS Setup," for a few seconds...
... do so may cause damage to the motherboard. • After system restart, go to BIOS Setup to load factory defaults (select Load Optimized Defaults) or manually configure the BIOS settings (refer to factory defaults. date information and BIOS configurations) and reset the CMOS values to Chapter 2, "BIOS Setup," for a few seconds...
Manual
Page 33
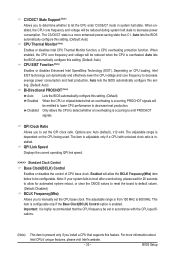
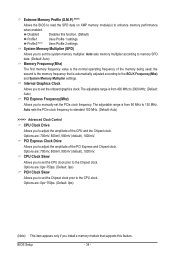
... be configurable. The item is adjustable only if a CPU with the CPU specifications. (Note) This item is present only if you to determine whether to manually set the QPI clock ratio. QPI Link Speed Displays the current operating QPI link speed. >>>>> Standard Clock Control Base Clock(BCLK) Control Enables or disables...
... be configurable. The item is adjustable only if a CPU with the CPU specifications. (Note) This item is present only if you to determine whether to manually set the QPI clock ratio. QPI Link Speed Displays the current operating QPI link speed. >>>>> Standard Clock Control Base Clock(BCLK) Control Enables or disables...
Manual
Page 34
... are : 700mV, 800mV, 900mV (default), 1000mV. The adjustable range is from 400 MHz to 2000 MHz. (Default: Auto) PCI Express Frequency(Mhz) Allows you to manually set the PCIe clock frequency. Profile2 (Note) Uses Profile 2 settings. Options are : 0ps~750ps. (Default: 0ps) (Note) This item appears only if you to 150...
... are : 700mV, 800mV, 900mV (default), 1000mV. The adjustable range is from 400 MHz to 2000 MHz. (Default: Auto) PCI Express Frequency(Mhz) Allows you to manually set the PCIe clock frequency. Profile2 (Note) Uses Profile 2 settings. Options are : 0ps~750ps. (Default: 0ps) (Note) This item appears only if you to 150...
Manual
Page 39
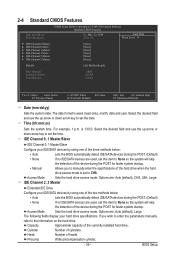
... 13:0:0. Select the desired field and use the up arrow or down arrow key to set this item to manually enter the specifications of the two methods below : • Auto • None Manual Access Mode Lets the BIOS automatically detect IDE/SATA devices during the POST. (Default) If no IDE/SATA devices...
... 13:0:0. Select the desired field and use the up arrow or down arrow key to set this item to manually enter the specifications of the two methods below : • Auto • None Manual Access Mode Lets the BIOS automatically detect IDE/SATA devices during the POST. (Default) If no IDE/SATA devices...
Manual
Page 53
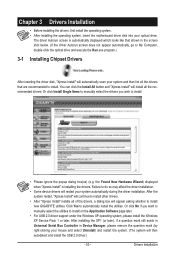
... execute the Run.exe program.) 3-1 Installing Chipset Drivers After inserting the driver disk, "Xpress Install" will appear asking whether to install new GIGABYTE utilities. Failure to do so may affect the driver installation. • Some device drivers will then autodetect and install the USB 2.0 driver.)... you wish to install. • Please ignore the popup dialog box(es) (e.g. Or click Install Single Items to manually select the drivers you want to manually select the utilities to install on the Application Software page later. • For USB 2.0 driver support under the Windows...
... execute the Run.exe program.) 3-1 Installing Chipset Drivers After inserting the driver disk, "Xpress Install" will appear asking whether to install new GIGABYTE utilities. Failure to do so may affect the driver installation. • Some device drivers will then autodetect and install the USB 2.0 driver.)... you wish to install. • Please ignore the popup dialog box(es) (e.g. Or click Install Single Items to manually select the drivers you want to manually select the utilities to install on the Application Software page later. • For USB 2.0 driver support under the Windows...

Manual
Page 54
You can click the Install button on the right of an item to install it. 3-3 Technical Manuals This page provides GIGABYTE's application guides, content descriptions for this driver disk, and the motherboard manuals. Drivers Installation - 54 - 3-2 Application Software This page displays all the utilities and applications that GIGABYTE develops and some free software.
You can click the Install button on the right of an item to install it. 3-3 Technical Manuals This page provides GIGABYTE's application guides, content descriptions for this driver disk, and the motherboard manuals. Drivers Installation - 54 - 3-2 Application Software This page displays all the utilities and applications that GIGABYTE develops and some free software.
Manual
Page 60
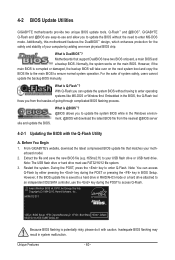
... you can access Q-Flash by adding one more physical BIOS chip. Unique Features - 60 - 4-2 BIOS Update Utilities GIGABYTE motherboards provide two unique BIOS update tools, Q-Flash™ and @BIOS™. H55M-S2 E11 . . . . : BIOS Setup : XpressRecovery2 : Boot Menu : Qflash 05/27/2010-H55-7A89TG0GC-00... features the DualBIOS™ design, which enhances protection for the safety and stability of system safety, users cannot update the backup BIOS manually. What is saved to a hard drive in RAID/AHCI mode or a hard drive attached to enter operating systems like MS-DOS ...
... you can access Q-Flash by adding one more physical BIOS chip. Unique Features - 60 - 4-2 BIOS Update Utilities GIGABYTE motherboards provide two unique BIOS update tools, Q-Flash™ and @BIOS™. H55M-S2 E11 . . . . : BIOS Setup : XpressRecovery2 : Boot Menu : Qflash 05/27/2010-H55-7A89TG0GC-00... features the DualBIOS™ design, which enhances protection for the safety and stability of system safety, users cannot update the backup BIOS manually. What is saved to a hard drive in RAID/AHCI mode or a hard drive attached to enter operating systems like MS-DOS ...
Manual
Page 63
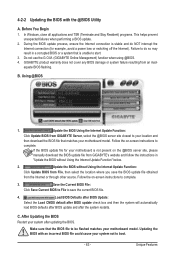
...BIOS or a system that the BIOS file to start. 3. Make sure that is not present on the @BIOS server site, please manually download the BIOS update file from the Internet or through other source. Failure to complete. 3. After Updating the BIOS Restart your system... after the system restarts. Do not use the G.O.M. (GIGABYTE Online Management) function when using @BIOS. 4. Follow the on -screen instructions to do NOT interrupt the Internet connection (for your motherboard ...
...BIOS or a system that the BIOS file to start. 3. Make sure that is not present on the @BIOS server site, please manually download the BIOS update file from the Internet or through other source. Failure to complete. 3. After Updating the BIOS Restart your system... after the system restarts. Do not use the G.O.M. (GIGABYTE Online Management) function when using @BIOS. 4. Follow the on -screen instructions to do NOT interrupt the Internet connection (for your motherboard ...
Manual
Page 67
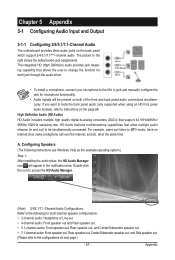
Line In Front Speaker Out Mic In • To install a microphone, connect your microphone to the Mic in jack and manually configure the jack for multi-channel speaker configurations. • 2-channel audio: Headphone or Line out. • 4-channel audio: Front speaker out and Rear speaker out. &#...
Line In Front Speaker Out Mic In • To install a microphone, connect your microphone to the Mic in jack and manually configure the jack for multi-channel speaker configurations. • 2-channel audio: Headphone or Line out. • 4-channel audio: Front speaker out and Rear speaker out. &#...
Manual
Page 76
... The separate collection and recycling of your electrical or electronic equipment is recycled in a manner that the information in your product's user's manual and we at the time of disposal will fulfill the national laws as interpreted from hazardous substances (Cd, Pb, Hg, Cr+6, PBDE ...and PBB). w When your waste equipment at GIGABYTE are continuing our efforts to develop products that this product must be taken to you purchased the product for activation of environmentally safe recycling...
... The separate collection and recycling of your electrical or electronic equipment is recycled in a manner that the information in your product's user's manual and we at the time of disposal will fulfill the national laws as interpreted from hazardous substances (Cd, Pb, Hg, Cr+6, PBDE ...and PBB). w When your waste equipment at GIGABYTE are continuing our efforts to develop products that this product must be taken to you purchased the product for activation of environmentally safe recycling...


