
Manual
Page 5
... 53 3-1 Installing Chipset Drivers 53 3-2 Application Software 54 3-3 Technical Manuals 54 3-4 Contact...55 3-5 System...55 3-6 Download Center 56 3-7 New Utilities...56 Chapter 4 Unique Features 57 4-1 Xpress Recovery2 57 4-2 ...64 4-4 Q-Share...65 4-5 Auto Green...66 Chapter 5 Appendix...67 5-1 Configuring Audio Input and Output 67 5-1-1 Configuring 2/4/5.1/7.1-Channel Audio 67 5-1-2 Configuring Microphone Recording 70 5-1-3 Using the Sound Recorder 72 5-2 Troubleshooting 73 5-2-1 Frequently Asked Questions 73 5-2-2 Troubleshooting Procedure 74 5-3 Regulatory Statements 76 - 5 -
... 53 3-1 Installing Chipset Drivers 53 3-2 Application Software 54 3-3 Technical Manuals 54 3-4 Contact...55 3-5 System...55 3-6 Download Center 56 3-7 New Utilities...56 Chapter 4 Unique Features 57 4-1 Xpress Recovery2 57 4-2 ...64 4-4 Q-Share...65 4-5 Auto Green...66 Chapter 5 Appendix...67 5-1 Configuring Audio Input and Output 67 5-1-1 Configuring 2/4/5.1/7.1-Channel Audio 67 5-1-2 Configuring Microphone Recording 70 5-1-3 Using the Sound Recorder 72 5-2 Troubleshooting 73 5-2-1 Frequently Asked Questions 73 5-2-2 Troubleshooting Procedure 74 5-3 Regulatory Statements 76 - 5 -

Manual
Page 70
... recorded during the recording process, do not mute the playback volume. It is recommended that you want to change the current sound input default device to record the sound. Double-click the icon to the Microphone screen. Step 3: Go to access the HD Audio Manager. Appendix - 70 - 5-1-2 ...Configuring Microphone Recording Step 1: After installing the audio driver, the HD Audio Manager icon will appear in jack (pink) on the front panel. ...
... recorded during the recording process, do not mute the playback volume. It is recommended that you want to change the current sound input default device to record the sound. Double-click the icon to the Microphone screen. Step 3: Go to access the HD Audio Manager. Appendix - 70 - 5-1-2 ...Configuring Microphone Recording Step 1: After installing the audio driver, the HD Audio Manager icon will appear in jack (pink) on the front panel. ...
Manual
Page 73
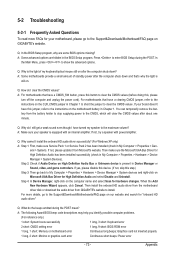
... For motherboards that have a clearing CMOS jumper, refer to the instructions on the CLR_CMOS jumper in Chapter 1. Q: Why do I still get a weak sound even though I clear the CMOS values? If not, try a speaker with an internal amplifier. Step 4: In Device Manager, right-click on the computer ...to the maximum volume? Q: How do the beeps emitted during the POST. Then install the onboard HD audio driver from the motherboard driver disk or download the audio driver from GIGABYTE's website to show the advanced options. When the Add New Hardware Wizard appears, click Cancel. Q: In the ...
... For motherboards that have a clearing CMOS jumper, refer to the instructions on the CLR_CMOS jumper in Chapter 1. Q: Why do I still get a weak sound even though I clear the CMOS values? If not, try a speaker with an internal amplifier. Step 4: In Device Manager, right-click on the computer ...to the maximum volume? Q: How do the beeps emitted during the POST. Then install the onboard HD audio driver from the motherboard driver disk or download the audio driver from GIGABYTE's website to show the advanced options. When the Add New Hardware Wizard appears, click Cancel. Q: In the ...


