Manual
Page 3
Disclaimer Information in this manual may be reproduced, copied, translated, transmitted, or published in the use GIGABYTE's unique features, read or download the information on/from the Support&Downloads\Motherboard\Technology Guide page on your motherboard revision before updating motherboard BIOS, drivers, or when looking for technical information. Example: No part of this : "REV: X.X." For product...
Disclaimer Information in this manual may be reproduced, copied, translated, transmitted, or published in the use GIGABYTE's unique features, read or download the information on/from the Support&Downloads\Motherboard\Technology Guide page on your motherboard revision before updating motherboard BIOS, drivers, or when looking for technical information. Example: No part of this : "REV: X.X." For product...
Manual
Page 6
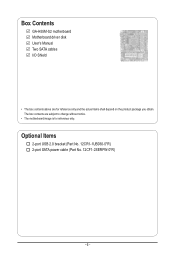
Optional Items 2-port USB 2.0 bracket (Part No. 12CR1-1UB030-5*R) 2-port SATA power cable (Part No. 12CF1-2SERPW-0*R) - 6 - The box contents are for reference only. Box Contents GA-H55M-S2 motherboard Motherboard driver disk User's Manual Two SATA cables I/O Shield • The box contents above are subject to change without notice. • The motherboard image is for reference only and the actual items shall depend on the product package you obtain.
Optional Items 2-port USB 2.0 bracket (Part No. 12CR1-1UB030-5*R) 2-port SATA power cable (Part No. 12CF1-2SERPW-0*R) - 6 - The box contents are for reference only. Box Contents GA-H55M-S2 motherboard Motherboard driver disk User's Manual Two SATA cables I/O Shield • The box contents above are subject to change without notice. • The motherboard image is for reference only and the actual items shall depend on the product package you obtain.
Manual
Page 11
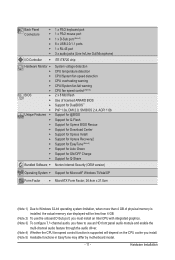
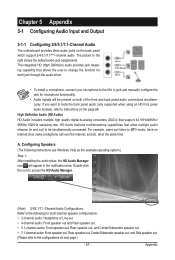
.... (Note 3) To configure 7.1-channel audio, you have to use an HD front panel audio module and enable the multi-channel audio feature through the audio driver. (Note 4) Whether the CPU fan speed control function is supported will depend on the CPU cooler you install. (Note 5) Available functions in EasyTune may differ...
.... (Note 3) To configure 7.1-channel audio, you have to use an HD front panel audio module and enable the multi-channel audio feature through the audio driver. (Note 4) Whether the CPU fan speed control function is supported will depend on the CPU cooler you install. (Note 5) Available functions in EasyTune may differ...
Manual
Page 17
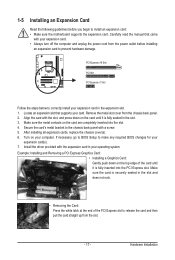
... inserted into the slot. 4. Remove the metal slot cover from the power outlet before you begin to install an expansion card: • Make sure the motherboard supports the expansion card. Make sure the metal contacts on your expansion card(s). 7. Turn on the card are completely inserted into the PCI Express slot...the top edge of the PCI Express slot to release the card and then pull the card straight up from the slot. - 17 - Install the driver provided with the slot, and press down on the card until it is securely seated in the slot and does not rock. • Removing the...
... inserted into the slot. 4. Remove the metal slot cover from the power outlet before you begin to install an expansion card: • Make sure the motherboard supports the expansion card. Make sure the metal contacts on your expansion card(s). 7. Turn on the card are completely inserted into the PCI Express slot...the top edge of the PCI Express slot to release the card and then pull the card straight up from the slot. - 17 - Install the driver provided with the slot, and press down on the card until it is securely seated in the slot and does not rock. • Removing the...
Manual
Page 18
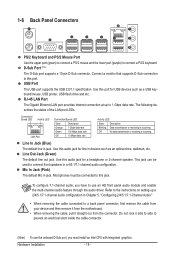
... electrical short inside the cable connector. (Note) To use an HD front panel audio module and enable the multi-channel audio feature through the audio driver. Use this port for a headphone or 2-channel speaker. Hardware Installation - 18 - Connection/ Speed LED Activity LED LAN Port Connection/Speed LED: State ... Jack (Blue) The default line in jack. Mic In Jack (Pink) The default Mic in jack. Do not rock it straight out from the motherboard. • When removing the cable, pull it side to side to use the onboard D-Sub port, you must be used to a back panel ...
... electrical short inside the cable connector. (Note) To use an HD front panel audio module and enable the multi-channel audio feature through the audio driver. Use this port for a headphone or 2-channel speaker. Hardware Installation - 18 - Connection/ Speed LED Activity LED LAN Port Connection/Speed LED: State ... Jack (Blue) The default line in jack. Mic In Jack (Pink) The default Mic in jack. Do not rock it straight out from the motherboard. • When removing the cable, pull it side to side to use the onboard D-Sub port, you must be used to a back panel ...
Manual
Page 28
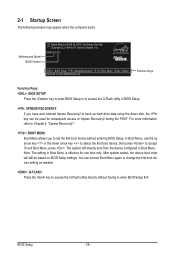
... Boot Menu, use the up hard drive data using the driver disk, the key can access Boot Menu again to change the first boot device setting as needed. : Q-FLASH Press the key to access the Q-Flash utility directly without entering BIOS Setup. H55M-S2 E11 . . . . : BIOS Setup : XpressRecovery2 : ... Menu is effective for subsequent access to set the first boot device without having to accept. You can be based on BIOS Setup settings. Motherboard Model BIOS Version Award Modular BIOS v6.00PG, An Energy Star Ally Copyright (C) 1984-2010, Award Software, Inc. To exit Boot Menu,...
... Boot Menu, use the up hard drive data using the driver disk, the key can access Boot Menu again to change the first boot device setting as needed. : Q-FLASH Press the key to access the Q-Flash utility directly without entering BIOS Setup. H55M-S2 E11 . . . . : BIOS Setup : XpressRecovery2 : ... Menu is effective for subsequent access to set the first boot device without having to accept. You can be based on BIOS Setup settings. Motherboard Model BIOS Version Award Modular BIOS v6.00PG, An Energy Star Ally Copyright (C) 1984-2010, Award Software, Inc. To exit Boot Menu,...
Manual
Page 53
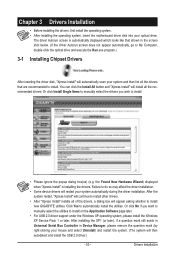
... the question mark (by right-clicking your optical drive. Chapter 3 Drivers Installation • Before installing the drivers, first install the operating system. • After installing the operating system, insert the motherboard driver disk into your mouse and select Uninstall) and restart the system. ...question mark still exists in Universal Serial Bus Controller in the screen shot below. (If the driver Autorun screen does not appear automatically, go to install new GIGABYTE utilities. the Found New Hardware Wizard) displayed when "Xpress Install" is automatically displayed which ...
... the question mark (by right-clicking your optical drive. Chapter 3 Drivers Installation • Before installing the drivers, first install the operating system. • After installing the operating system, insert the motherboard driver disk into your mouse and select Uninstall) and restart the system. ...question mark still exists in Universal Serial Bus Controller in the screen shot below. (If the driver Autorun screen does not appear automatically, go to install new GIGABYTE utilities. the Found New Hardware Wizard) displayed when "Xpress Install" is automatically displayed which ...

Manual
Page 54
3-2 Application Software This page displays all the utilities and applications that GIGABYTE develops and some free software. Drivers Installation - 54 - You can click the Install button on the right of an item to install it. 3-3 Technical Manuals This page provides GIGABYTE's application guides, content descriptions for this driver disk, and the motherboard manuals.
3-2 Application Software This page displays all the utilities and applications that GIGABYTE develops and some free software. Drivers Installation - 54 - You can click the Install button on the right of an item to install it. 3-3 Technical Manuals This page provides GIGABYTE's application guides, content descriptions for this driver disk, and the motherboard manuals.

Manual
Page 58
... permanent in your hard drive data. After you wish to leave unallocated space (10 GB or more is recommended; Unique Features - 58 - Boot from the motherboard driver disk to check disk allocation. Step 5: Xpress Recovery2 will automatically create a new partition to the unallocated space (black stripe along the top). actual size requirements...
... permanent in your hard drive data. After you wish to leave unallocated space (10 GB or more is recommended; Unique Features - 58 - Boot from the motherboard driver disk to check disk allocation. Step 5: Xpress Recovery2 will automatically create a new partition to the unallocated space (black stripe along the top). actual size requirements...

Manual
Page 65
... ... About Q-Share ... Open Incoming Folder : C:\Q-ShareFolder Change Incoming Folder : C:\Q-ShareFolder Update Q-Share ... Directions for using Q-Share After installing Q-Share from the motherboard driver disk, go to be shared (Note) Updates Q-Share online Displays the current Q-Share version Exits Q-Share (Note) This option is available only when data sharing...Enables data sharing Disables data sharing Accesses the shared data folder Changes the data folder to Start>All Programs>GIGABYTE>Q-Share. Exit... Unique Features Data Sharing Disabled Figure 2.
... ... About Q-Share ... Open Incoming Folder : C:\Q-ShareFolder Change Incoming Folder : C:\Q-ShareFolder Update Q-Share ... Directions for using Q-Share After installing Q-Share from the motherboard driver disk, go to be shared (Note) Updates Q-Share online Displays the current Q-Share version Exits Q-Share (Note) This option is available only when data sharing...Enables data sharing Disables data sharing Accesses the shared data folder Changes the data folder to Start>All Programs>GIGABYTE>Q-Share. Exit... Unique Features Data Sharing Disabled Figure 2.
Manual
Page 67
... high quality digital-to-analog converters (DACs) that allows the user to change the function for each jack through the audio driver. Double-click the icon to access the HD Audio Manager. (Note) 2/4/5.1/7.1-Channel Audio Configurations: Refer to the configurations on both... the example operating system.) Step 1: After installing the audio driver, the HD Audio Manager icon will be simultaneously processed. Appendix Chapter 5 Appendix 5-1 Configuring Audio Input and Output 5-1-1 Configuring 2/4/5.1/7.1-Channel Audio The motherboard provides three audio jacks on the page 69. If you ...
... high quality digital-to-analog converters (DACs) that allows the user to change the function for each jack through the audio driver. Double-click the icon to access the HD Audio Manager. (Note) 2/4/5.1/7.1-Channel Audio Configurations: Refer to the configurations on both... the example operating system.) Step 1: After installing the audio driver, the HD Audio Manager icon will be simultaneously processed. Appendix Chapter 5 Appendix 5-1 Configuring Audio Input and Output 5-1-1 Configuring 2/4/5.1/7.1-Channel Audio The motherboard provides three audio jacks on the page 69. If you ...
Manual
Page 73
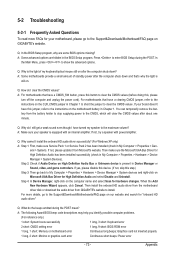
... go to the Support&Downloads\Motherboard\FAQ page on GIGABYTE's website. eral > System). If yes, please disable this device. (If not, skip this , please turn off the computer and unplug the power cord). Then install the onboard HD audio driver from the motherboard driver disk or download the audio driver from the battery holder to stop...
... go to the Support&Downloads\Motherboard\FAQ page on GIGABYTE's website. eral > System). If yes, please disable this device. (If not, skip this , please turn off the computer and unplug the power cord). Then install the onboard HD audio driver from the motherboard driver disk or download the audio driver from the battery holder to stop...


