
Manual
Page 7
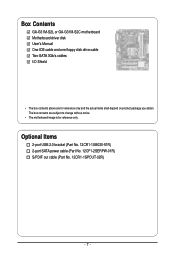
Optional Items 2-port USB 2.0 bracket (Part No. 12CR1-1UB030-51R) 2-port SATA power cable (Part No. 12CF1-2SERPW-01R) S/PDIF out cable (Part No. 12CR1-1SPOUT-02R) - 7 - The box contents are for reference only. Box Contents GA-G31M-S2L or GA-G31M-S2C motherboard Motherboard driver disk User's Manual One IDE cable and one floppy disk drive cable Two SATA 3Gb/s cables I/O Shield • The box contents above are subject to change without notice. • The motherboard image is for reference only and the actual items shall depend on product package you obtain.
Optional Items 2-port USB 2.0 bracket (Part No. 12CR1-1UB030-51R) 2-port SATA power cable (Part No. 12CF1-2SERPW-01R) S/PDIF out cable (Part No. 12CR1-1SPOUT-02R) - 7 - The box contents are for reference only. Box Contents GA-G31M-S2L or GA-G31M-S2C motherboard Motherboard driver disk User's Manual One IDE cable and one floppy disk drive cable Two SATA 3Gb/s cables I/O Shield • The box contents above are subject to change without notice. • The motherboard image is for reference only and the actual items shall depend on product package you obtain.
Manual
Page 20
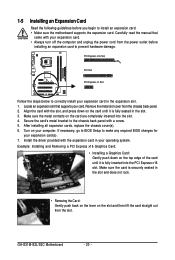
...completely inserted into the PCI Express x16 slot. If necessary, go to BIOS Setup to make any required BIOS changes for your computer. GA-G31M-S2L/S2C Motherboard - 20 - Turn on the card until it is fully seated in your expansion card. • Always turn off the ...on your expansion card(s). 7. Align the card with your operating system. After installing all expansion cards, replace the chassis cover(s). 6. Install the driver provided with a screw. 5. Secure the card's metal bracket to the chassis back panel with the expansion card in the slot. 3. PCI Express...
...completely inserted into the PCI Express x16 slot. If necessary, go to BIOS Setup to make any required BIOS changes for your computer. GA-G31M-S2L/S2C Motherboard - 20 - Turn on the card until it is fully seated in your expansion card. • Always turn off the ...on your expansion card(s). 7. Align the card with your operating system. After installing all expansion cards, replace the chassis cover(s). 6. Install the driver provided with a screw. 5. Secure the card's metal bracket to the chassis back panel with the expansion card in the slot. 3. PCI Express...

Manual
Page 34
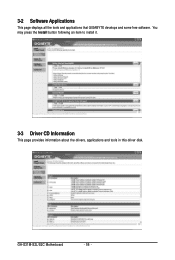
GA-G31M-S2L/S2C Motherboard - 34 - In Boot Menu, use the up hard drive data using the motherboard driver disk, the key can access Boot Menu again to change the first boot device setting as needed. : Q-Flash Press the key to access the Q-Flash ... system restart, the device boot order will directly boot from the device configured in Boot Menu. To exit Boot Menu, press . Intel G31 BIOS for G31M-S2L D9a . . . . : BIOS Setup/Q-Flash : XpressRecovery2 : Boot Menu : Qflash 08/21/2007-G31-ICH7-6A79OG0VC-00 Function Keys Function Keys: : BIOS Setup/Q-Flash Press the key...
GA-G31M-S2L/S2C Motherboard - 34 - In Boot Menu, use the up hard drive data using the motherboard driver disk, the key can access Boot Menu again to change the first boot device setting as needed. : Q-Flash Press the key to access the Q-Flash ... system restart, the device boot order will directly boot from the device configured in Boot Menu. To exit Boot Menu, press . Intel G31 BIOS for G31M-S2L D9a . . . . : BIOS Setup/Q-Flash : XpressRecovery2 : Boot Menu : Qflash 08/21/2007-G31-ICH7-6A79OG0VC-00 Function Keys Function Keys: : BIOS Setup/Q-Flash Press the key...
Manual
Page 56
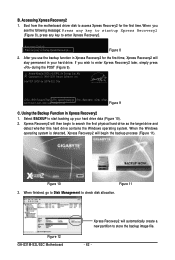
GA-G31M-S2L/S2C Motherboard - 56 - You may press the Install button following an item to install it. 3-3 Driver CD Information This page provides information about the drivers, applications and tools in this driver disk. 3-2 Software Applications This page displays all the tools and applications that GIGABYTE develops and some free software.
GA-G31M-S2L/S2C Motherboard - 56 - You may press the Install button following an item to install it. 3-3 Driver CD Information This page provides information about the drivers, applications and tools in this driver disk. 3-2 Software Applications This page displays all the tools and applications that GIGABYTE develops and some free software.
Manual
Page 62
Boot from CD/DVD: Press any key to access Xpress Recovery2 for G31M-S2L D9a . . . . : BIOS Setup/Q-Flash : XpressRecovery2 : Boot Menu : Qflash 08/21/2007-G31-ICH7-6A79OG0VC-00 Figure 9 C. Boot from the motherboard driver disk to enter Xpress Recovery2. . . Using the Backup Function ...Xpress Recovery2 (Figure 8), press any key to start backing up your hard drive. Select BACKUP to startup XpressRecovery2..... Figure 12 GA-G31M-S2L/S2C Motherboard Xpress Recovery2 will then begin the backup process (Figure 11). Award Modular BIOS v6.00PG, An Energy Star Ally ...
Boot from CD/DVD: Press any key to access Xpress Recovery2 for G31M-S2L D9a . . . . : BIOS Setup/Q-Flash : XpressRecovery2 : Boot Menu : Qflash 08/21/2007-G31-ICH7-6A79OG0VC-00 Figure 9 C. Boot from the motherboard driver disk to enter Xpress Recovery2. . . Using the Backup Function ...Xpress Recovery2 (Figure 8), press any key to start backing up your hard drive. Select BACKUP to startup XpressRecovery2..... Figure 12 GA-G31M-S2L/S2C Motherboard Xpress Recovery2 will then begin the backup process (Figure 11). Award Modular BIOS v6.00PG, An Energy Star Ally ...
Manual
Page 76
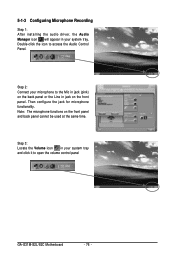
... Line in jack on the front panel and back panel cannot be used at the same time. 5-1-3 Configuring Microphone Recording Step 1: After installing the audio driver, the Audio Manager icon will appear in your system tray and click it to open the volume control panel GA-G31M-S2L/S2C Motherboard - 76 -
... Line in jack on the front panel and back panel cannot be used at the same time. 5-1-3 Configuring Microphone Recording Step 1: After installing the audio driver, the Audio Manager icon will appear in your system tray and click it to open the volume control panel GA-G31M-S2L/S2C Motherboard - 76 -


