
Manual
Page 6
...Driver CD Information 56 3-4 Hardware Information 57 3-5 Contact Us ...57 Chapter 4 Unique Features 59 4-1 Xpress Recovery2 59 4-2 BIOS Update Utilities 64 4-2-1 Updating the BIOS with the Q-Flash Utility 64 4-2-2 Updating the BIOS with the @BIOS Utility 67 4-3 EasyTune 5 Pro 69 Chapter 5 Appendix ...71 5-1 Configuring Audio... Input and Output 71 5-1-1 Configuring 2/4/5.1-Channel Audio 71 5-1-2 Installing the S/PDIFOut Cable (Optional 74 5-1-3 Configuring Microphone Recording 76 5-1-4 Using ...
...Driver CD Information 56 3-4 Hardware Information 57 3-5 Contact Us ...57 Chapter 4 Unique Features 59 4-1 Xpress Recovery2 59 4-2 BIOS Update Utilities 64 4-2-1 Updating the BIOS with the Q-Flash Utility 64 4-2-2 Updating the BIOS with the @BIOS Utility 67 4-3 EasyTune 5 Pro 69 Chapter 5 Appendix ...71 5-1 Configuring Audio... Input and Output 71 5-1-1 Configuring 2/4/5.1-Channel Audio 71 5-1-2 Installing the S/PDIFOut Cable (Optional 74 5-1-3 Configuring Microphone Recording 76 5-1-4 Using ...
Manual
Page 71
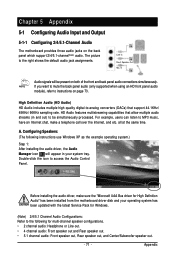
... will appear in and out) to the following instructions use Windows XP as the example operating system.) Step 1: After installing the audio driver, the Audio Manager icon will be simultaneously processed. HD Audio features multistreaming capabilities that support 44.1KHz/ 48KHz/ 96KHz sampling rate. Double-click the icon to the right shows the default...
... will appear in and out) to the following instructions use Windows XP as the example operating system.) Step 1: After installing the audio driver, the Audio Manager icon will be simultaneously processed. HD Audio features multistreaming capabilities that support 44.1KHz/ 48KHz/ 96KHz sampling rate. Double-click the icon to the right shows the default...
Manual
Page 76
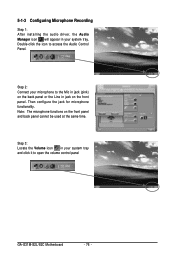
Double-click the icon to open the volume control panel GA-G31M-S2L/S2C Motherboard - 76 - Step 3: Locate the Volume icon in jack on the front panel. Then configure the jack for microphone functionality. Note: The microphone functions on ... Mic in jack (pink) on the front panel and back panel cannot be used at the same time. 5-1-3 Configuring Microphone Recording Step 1: After installing the audio driver, the Audio Manager icon will appear in your system tray and click it to access the...
Double-click the icon to open the volume control panel GA-G31M-S2L/S2C Motherboard - 76 - Step 3: Locate the Volume icon in jack on the front panel. Then configure the jack for microphone functionality. Note: The microphone functions on ... Mic in jack (pink) on the front panel and back panel cannot be used at the same time. 5-1-3 Configuring Microphone Recording Step 1: After installing the audio driver, the Audio Manager icon will appear in your system tray and click it to access the...


