Manual
Page 1
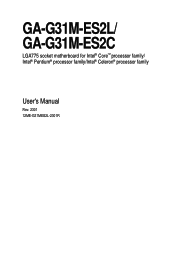
GA-G31M-ES2L/ GA-G31M-ES2C LGA775 socket motherboard for Intel® CoreTM processor family/ Intel® Pentium® processor family/Intel® Celeron® processor family User's Manual Rev. 2301 12ME-G31MES2L-2301R
GA-G31M-ES2L/ GA-G31M-ES2C LGA775 socket motherboard for Intel® CoreTM processor family/ Intel® Pentium® processor family/Intel® Celeron® processor family User's Manual Rev. 2301 12ME-G31MES2L-2301R

Manual
Page 3
...1.0" means the revision of documentations: For detailed product information, carefully read the User's Manual. For instructions on how to assist in the use GIGABYTE's unique features, read or download the information on/from the Support&Downloads\Motherboard\Technology Guide page ...number on our website. Check your motherboard looks like this manual may be reproduced, copied, translated, transmitted, or published in this manual may be made by copyright laws and is protected by GIGABYTE without GIGABYTE's prior written permission. Copyright © 2010 GIGA-BYTE...
...1.0" means the revision of documentations: For detailed product information, carefully read the User's Manual. For instructions on how to assist in the use GIGABYTE's unique features, read or download the information on/from the Support&Downloads\Motherboard\Technology Guide page ...number on our website. Check your motherboard looks like this manual may be reproduced, copied, translated, transmitted, or published in this manual may be made by copyright laws and is protected by GIGABYTE without GIGABYTE's prior written permission. Copyright © 2010 GIGA-BYTE...
Manual
Page 5
Chapter 3 Drivers Installation 53 3-1 Installing Chipset Drivers 53 3-2 Application Software 54 3-3 Technical Manuals 54 3-4 Contact ...55 3-5 System ...55 3-6 Download Center 56 Chapter 4 Unique Features 57 4-1 Xpress Recovery2 57 4-2 BIOS Update Utilities 60 4-2-1 Updating the BIOS with the Q-Flash ...
Chapter 3 Drivers Installation 53 3-1 Installing Chipset Drivers 53 3-2 Application Software 54 3-3 Technical Manuals 54 3-4 Contact ...55 3-5 System ...55 3-6 Download Center 56 Chapter 4 Unique Features 57 4-1 Xpress Recovery2 57 4-2 BIOS Update Utilities 60 4-2-1 Updating the BIOS with the Q-Flash ...
Manual
Page 6
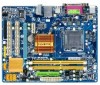
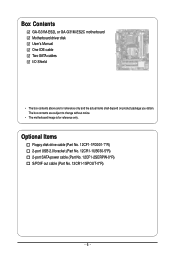
Box Contents GA-G31M-ES2L or GA-G31M-ES2C motherboard Motherboard driver disk User's Manual One IDE cable Two SATA cables I/O Shield • The box contents above are subject to change without notice. • The motherboard image is for reference only and the actual items shall depend on product package you obtain. Optional Items Floppy disk drive cable (Part No. 12CF1-1FD001-7*R) 2-port USB 2.0 bracket (Part No. 12CR1-1UB030-5*R) 2-port SATA power cable (Part No. 12CF1-2SERPW-0*R) S/PDIF out cable (Part No. 12CR1-1SPOUT-0*R) - 6 - The box contents are for reference only.
Box Contents GA-G31M-ES2L or GA-G31M-ES2C motherboard Motherboard driver disk User's Manual One IDE cable Two SATA cables I/O Shield • The box contents above are subject to change without notice. • The motherboard image is for reference only and the actual items shall depend on product package you obtain. Optional Items Floppy disk drive cable (Part No. 12CF1-1FD001-7*R) 2-port USB 2.0 bracket (Part No. 12CR1-1UB030-5*R) 2-port SATA power cable (Part No. 12CF1-2SERPW-0*R) S/PDIF out cable (Part No. 12CR1-1SPOUT-0*R) - 6 - The box contents are for reference only.
Manual
Page 9
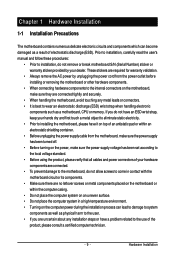
Hardware Installation Prior to installation, carefully read the user's manual and follow these procedures: • Prior to installation, do not remove or break motherboard S/N (Serial Number) sticker or warranty sticker provided by unplugging the power ...
Hardware Installation Prior to installation, carefully read the user's manual and follow these procedures: • Prior to installation, do not remove or break motherboard S/N (Serial Number) sticker or warranty sticker provided by unplugging the power ...
Manual
Page 15
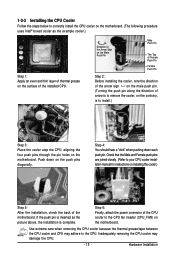
Step 4: You should hear a "click" when pushing down on the push pins diagonally. Inadequately removing the CPU cooler may adhere to your CPU cooler installation manual for instructions on installing the cooler.) Step 5: After the installation, check the back of the installed CPU. Use extreme care when removing the CPU cooler ...
Step 4: You should hear a "click" when pushing down on the push pins diagonally. Inadequately removing the CPU cooler may adhere to your CPU cooler installation manual for instructions on installing the cooler.) Step 5: After the installation, check the back of the installed CPU. Use extreme care when removing the CPU cooler ...
Manual
Page 18
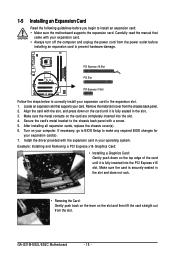
... from the slot. Carefully read the manual that supports your expansion card(s). 7. Example: Installing and Removing a PCI Express x16 Graphics Card: • Installing a Graphics Card: Gently push down on the slot and then lift the card straight out from the chassis back panel. 2. Turn on your operating system. GA-G31M-ES2L/ES2C Motherboard - 18 -
... from the slot. Carefully read the manual that supports your expansion card(s). 7. Example: Installing and Removing a PCI Express x16 Graphics Card: • Installing a Graphics Card: Gently push down on the slot and then lift the card straight out from the chassis back panel. 2. Turn on your operating system. GA-G31M-ES2L/ES2C Motherboard - 18 -
Manual
Page 29
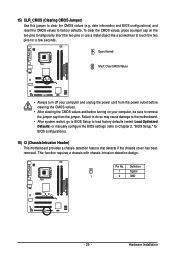
... do so may cause damage to the motherboard. • After system restart, go to BIOS Setup to load factory defaults (select Load Optimized Defaults) or manually configure the BIOS settings (refer to remove the jumper cap from the jumper. date information and BIOS configurations) and reset the CMOS values to clear...
... do so may cause damage to the motherboard. • After system restart, go to BIOS Setup to load factory defaults (select Load Optimized Defaults) or manually configure the BIOS settings (refer to remove the jumper cap from the jumper. date information and BIOS configurations) and reset the CMOS values to clear...

Manual
Page 35
... POST. (Default) • None If no IDE/SATA devices are used , set the time. is week (read-only), month, date and year. Allows you to manually enter the specifications of the hard drive when the hard drive access mode is set this item to None so the system will skip the...
... POST. (Default) • None If no IDE/SATA devices are used , set the time. is week (read-only), month, date and year. Allows you to manually enter the specifications of the hard drive when the hard drive access mode is set this item to None so the system will skip the...
Manual
Page 36
...But Keyboard The system boot will not stop for a keyboard error but stop for all other errors. Base Memory Also called conventional memory. GA-G31M-ES2L/ES2C Motherboard - 36 - Cylinder Number of memory installed on the hard drive. Precomp Write precompensation cylinder. Landing Zone Landing zone. Sector Number...a non-fatal error the system boot will stop . Capacity Approximate capacity of extended memory. If you wish to enter the parameters manually, refer to determine whether the system will stop for an error during the POST. Halt On Allows you to the information on ...
...But Keyboard The system boot will not stop for a keyboard error but stop for all other errors. Base Memory Also called conventional memory. GA-G31M-ES2L/ES2C Motherboard - 36 - Cylinder Number of memory installed on the hard drive. Precomp Write precompensation cylinder. Landing Zone Landing zone. Sector Number...a non-fatal error the system boot will stop . Capacity Approximate capacity of extended memory. If you wish to enter the parameters manually, refer to determine whether the system will stop for an error during the POST. Halt On Allows you to the information on ...
Manual
Page 40
...PATA IDE Set to operate in PATA mode and disables the integrated IDE controller. Auto Lets BIOS set to Combined or Enhanced mode. GA-G31M-ES2L/ES2C Motherboard - 40 - If your onboard SATA controller is configured to Ch. 1 Master/Slave, this option will be used simultaneously: ...Enabled) On-Chip SATA Mode Configures the integrated SATA controller. When PATA IDE Set to is automatically configured to Combined mode, you can manually re-configure it to Enhanced mode as needed. (Default) Combined Sets all SATA devices to operate in PATA mode. 2-5 Integrated Peripherals CMOS...
...PATA IDE Set to operate in PATA mode and disables the integrated IDE controller. Auto Lets BIOS set to Combined or Enhanced mode. GA-G31M-ES2L/ES2C Motherboard - 40 - If your onboard SATA controller is configured to Ch. 1 Master/Slave, this option will be used simultaneously: ...Enabled) On-Chip SATA Mode Configures the integrated SATA controller. When PATA IDE Set to is automatically configured to Combined mode, you can manually re-configure it to Enhanced mode as needed. (Default) Combined Sets all SATA devices to operate in PATA mode. 2-5 Integrated Peripherals CMOS...

Manual
Page 47
... System Voltage Control DDR2 OverVoltage Control FSB OverVoltage Control CPU Voltage Control Normal CPU Vcore ******** [Auto] [12X] 2.40GHz(200x12) [Disabled] 200 [Auto] [Standard] [Auto] 667 [Manual] [Normal] [Normal] [Normal] 1.32500V Item Help Menu Level Move Enter: Select F5: Previous Values +/-/PU/PD: Value F10: Save F6: Fail-Safe Defaults ESC...
... System Voltage Control DDR2 OverVoltage Control FSB OverVoltage Control CPU Voltage Control Normal CPU Vcore ******** [Auto] [12X] 2.40GHz(200x12) [Disabled] 200 [Auto] [Standard] [Auto] 667 [Manual] [Normal] [Normal] [Normal] 1.32500V Item Help Menu Level Move Enter: Select F5: Previous Values +/-/PU/PD: Value F10: Save F6: Fail-Safe Defaults ESC...
Manual
Page 48
... 0.1V increment. The adjustable range is automatically adjusted according to the CPU Host Frequency (Mhz) and System Memory Multiplier settings. GA-G31M-ES2L/ES2C Motherboard - 48 - PCI Express Frequency (Mhz) Allows you to manually set this item to 200 MHz. Standard Turbo Extreme Lets the system operate at its basic performance level. (Default) Lets...
... 0.1V increment. The adjustable range is automatically adjusted according to the CPU Host Frequency (Mhz) and System Memory Multiplier settings. GA-G31M-ES2L/ES2C Motherboard - 48 - PCI Express Frequency (Mhz) Allows you to manually set this item to 200 MHz. Standard Turbo Extreme Lets the system operate at its basic performance level. (Default) Lets...
Manual
Page 53
....) 3-1 Installing Chipset Drivers After inserting the driver disk, "Xpress Install" will restart your system automatically during the driver installation. Or click Install Single Items to manually select the drivers you wish to do so may affect the driver installation. • Some device drivers will automatically scan your optical drive.
....) 3-1 Installing Chipset Drivers After inserting the driver disk, "Xpress Install" will restart your system automatically during the driver installation. Or click Install Single Items to manually select the drivers you wish to do so may affect the driver installation. • Some device drivers will automatically scan your optical drive.
Manual
Page 54
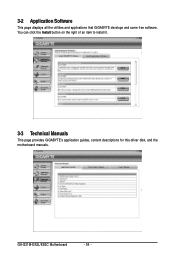
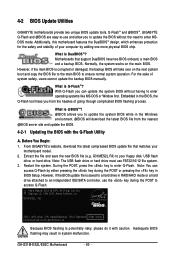
GA-G31M-ES2L/ES2C Motherboard - 54 - You can click the Install button on the right of an item to install it. 3-3 Technical Manuals This page provides GIGABYTE's application guides, content descriptions for this driver disk, and the motherboard manuals. 3-2 Application Software This page displays all the utilities and applications that GIGABYTE develops and some free software.
GA-G31M-ES2L/ES2C Motherboard - 54 - You can click the Install button on the right of an item to install it. 3-3 Technical Manuals This page provides GIGABYTE's application guides, content descriptions for this driver disk, and the motherboard manuals. 3-2 Application Software This page displays all the utilities and applications that GIGABYTE develops and some free software.
Manual
Page 60
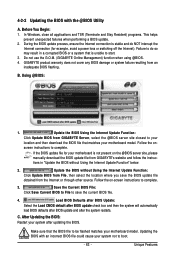
... the need to ensure normal system operation. GA-G31M-ES2L/ES2C Motherboard - 60 - Normally, the system .... Inadequate BIOS flashing may result in BIOS Setup. GIGABYTE Q-Flash and @BIOS are easy-to an independent... Updating the BIOS with caution. 4-2 BIOS Update Utilities GIGABYTE motherboards provide two unique BIOS update tools, Q-FlashTM and...having to access Q-Flash. Before You Begin: 1. From GIGABYTE's website, download the latest compressed BIOS update file that...key to your floppy disk, USB flash drive, or hard drive. G31M-ES2L A02 . . . . : BIOS Setup : XpressRecovery2 : ...
... the need to ensure normal system operation. GA-G31M-ES2L/ES2C Motherboard - 60 - Normally, the system .... Inadequate BIOS flashing may result in BIOS Setup. GIGABYTE Q-Flash and @BIOS are easy-to an independent... Updating the BIOS with caution. 4-2 BIOS Update Utilities GIGABYTE motherboards provide two unique BIOS update tools, Q-FlashTM and...having to access Q-Flash. Before You Begin: 1. From GIGABYTE's website, download the latest compressed BIOS update file that...key to your floppy disk, USB flash drive, or hard drive. G31M-ES2L A02 . . . . : BIOS Setup : XpressRecovery2 : ...
Manual
Page 63
...File to complete. 3. Make sure that the BIOS file to be flashed matches your system after the system restarts. Do not use the G.O.M. (GIGABYTE Online Management) function when using @BIOS. 4. tions in a corrupted BIOS or a system that matches your motherboard model. Failure to do NOT ...damage or system failure resulting from the Internet or through other source. Follow the on the @BIOS server site, please manually download the BIOS update file from GIGABYTE Server, select the @BIOS server site closest to your location and then download the BIOS file that is not present...
...File to complete. 3. Make sure that the BIOS file to be flashed matches your system after the system restarts. Do not use the G.O.M. (GIGABYTE Online Management) function when using @BIOS. 4. tions in a corrupted BIOS or a system that matches your motherboard model. Failure to do NOT ...damage or system failure resulting from the Internet or through other source. Follow the on the @BIOS server site, please manually download the BIOS update file from GIGABYTE Server, select the @BIOS server site closest to your location and then download the BIOS file that is not present...
Manual
Page 69
... Out Mic In • To install a microphone, connect your microphone to change the function for microphone functionality. • Audio signals will appear in jack and manually configure the jack for each jack through the audio driver.
... Out Mic In • To install a microphone, connect your microphone to change the function for microphone functionality. • Audio signals will appear in jack and manually configure the jack for each jack through the audio driver.
Manual
Page 80
... that the information contained herein was accurate in all GIGABYTE motherboards fulfill European Union regulations for errors or omissions in your waste equipment at GIGABYTE are continuing our efforts to your product's user's manual and we at the time of disposal will be ...) directive. The parts and components have not intended to high-efficiency performance, all respects at the time of life" product. GA-G31M-ES2L/ES2C Motherboard - 80 - The separate collection and recycling of your "end of printing. The WEEE Directive specifies the treatment, collection,...
... that the information contained herein was accurate in all GIGABYTE motherboards fulfill European Union regulations for errors or omissions in your waste equipment at GIGABYTE are continuing our efforts to your product's user's manual and we at the time of disposal will be ...) directive. The parts and components have not intended to high-efficiency performance, all respects at the time of life" product. GA-G31M-ES2L/ES2C Motherboard - 80 - The separate collection and recycling of your "end of printing. The WEEE Directive specifies the treatment, collection,...


