Manual
Page 4
... 2-5 PnP/PCI Configurations 41 2-6 PC Health Status 42 2-7 MB Intelligent Tweaker(M.I /O Back Panel Introduction 17 1-7 Connectors Introduction 18 Chapter 2 BIOS Setup 29 The Main Menu (For example: GA-945P-DS3 BIOS Ver. Table of Contents ItemChecklist ...6 OptionalAccessories ...6 GA-945P-DS3/GA-945P-S3 Motherboard Layout 7 Block Diagram ...8 Chapter 1 Hardware Installation 9 1-1 Considerations Prior to Installation 9 1-2 Feature Summary 10 1-3 Installation of the CPU...
... 2-5 PnP/PCI Configurations 41 2-6 PC Health Status 42 2-7 MB Intelligent Tweaker(M.I /O Back Panel Introduction 17 1-7 Connectors Introduction 18 Chapter 2 BIOS Setup 29 The Main Menu (For example: GA-945P-DS3 BIOS Ver. Table of Contents ItemChecklist ...6 OptionalAccessories ...6 GA-945P-DS3/GA-945P-S3 Motherboard Layout 7 Block Diagram ...8 Chapter 1 Hardware Installation 9 1-1 Considerations Prior to Installation 9 1-2 Feature Summary 10 1-3 Installation of the CPU...
Manual
Page 7
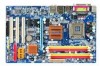
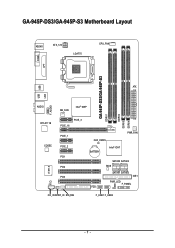
GA-945P-DS3/GA-945P-S3 Motherboard Layout KB_MS ATX_12V LGA775 CPU_FAN COMA LPT GA-945P-DS3/GA-945P-S3 DDRII1 DDRII2 DDRII3 DDRII4 USB USB LAN ATX F_AUDIO AUDIO NB_FAN Intel® 945P RTL8111B CODEC CI IT8718 PCIE_16 PCIE_3 PCIE_1 PCIE_2 PCI1 PCI2 PCI3 CD_IN SPDIF_IO SYS_FAN CLR_CMOS BATTERY Intel® ICH7 PWR_FAN SATAII0 SATAII2 BIOS SATAII1 SATAII3 IDE1 PWR_LED F_PANEL FDD F_USB1 F_USB2 - 7 -
GA-945P-DS3/GA-945P-S3 Motherboard Layout KB_MS ATX_12V LGA775 CPU_FAN COMA LPT GA-945P-DS3/GA-945P-S3 DDRII1 DDRII2 DDRII3 DDRII4 USB USB LAN ATX F_AUDIO AUDIO NB_FAN Intel® 945P RTL8111B CODEC CI IT8718 PCIE_16 PCIE_3 PCIE_1 PCIE_2 PCI1 PCI2 PCI3 CD_IN SPDIF_IO SYS_FAN CLR_CMOS BATTERY Intel® ICH7 PWR_FAN SATAII0 SATAII2 BIOS SATAII1 SATAII3 IDE1 PWR_LED F_PANEL FDD F_USB1 F_USB2 - 7 -
Manual
Page 12
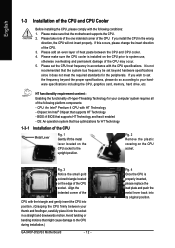
...the functionality of Hyper-Threading Technology for your thumb and forefinger, carefully place it into the socket in a straight and downwards motion. BIOS: A BIOS that has optimizations for the peripherals. Please make sure the CPU cooler is properly inserted, please replace the load plate and push the... Installation of the CPU Metal Lever Fig. 1 Gently lift the metal lever located on the CPU prior to the CPU during installation.) GA-945P-DS3/S3 Motherboard - 12 - If you install the CPU in accordance with the CPU specifications. Align the indented corner of the CPU with the ...
...the functionality of Hyper-Threading Technology for your thumb and forefinger, carefully place it into the socket in a straight and downwards motion. BIOS: A BIOS that has optimizations for the peripherals. Please make sure the CPU cooler is properly inserted, please replace the load plate and push the... Installation of the CPU Metal Lever Fig. 1 Gently lift the metal lever located on the CPU prior to the CPU during installation.) GA-945P-DS3/S3 Motherboard - 12 - If you install the CPU in accordance with the CPU specifications. Align the indented corner of the CPU with the ...
Manual
Page 14
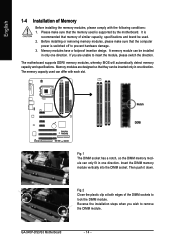
... steps when you are designed so that the computer power is supported by the motherboard. The motherboard supports DDRII memory modules, whereby BIOS will automatically detect memory capacity and specifications. GA-945P-DS3/S3 Motherboard - 14 - Then push it down. Please make sure that they can be inserted only in only one direction. English 1-4 Installation...
... steps when you are designed so that the computer power is supported by the motherboard. The motherboard supports DDRII memory modules, whereby BIOS will automatically detect memory capacity and specifications. GA-945P-DS3/S3 Motherboard - 14 - Then push it down. Please make sure that they can be inserted only in only one direction. English 1-4 Installation...
Manual
Page 16
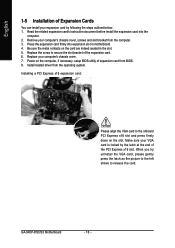
...down on the card are indeed seated in motherboard. 4. Installing a PCI Express x16 expansion card: Please align the VGA card to release the card. GA-945P-DS3/S3 Motherboard - 16 - Press the expansion card firmly into the computer. 2. Make sure your VGA card is locked by following the steps outlined below:...by the latch at the end of the PCI Express x16 slot. Replace the screw to secure the slot bracket of expansion card from BIOS. 8. Replace your computer's chassis cover, screws and slot bracket from the operating system. Read the related expansion card's instruction document ...
...down on the card are indeed seated in motherboard. 4. Installing a PCI Express x16 expansion card: Please align the VGA card to release the card. GA-945P-DS3/S3 Motherboard - 16 - Press the expansion card firmly into the computer. 2. Make sure your VGA card is locked by following the steps outlined below:...by the latch at the end of the PCI Express x16 slot. Replace the screw to secure the slot bracket of expansion card from BIOS. 8. Replace your computer's chassis cover, screws and slot bracket from the operating system. Read the related expansion card's instruction document ...
Manual
Page 22
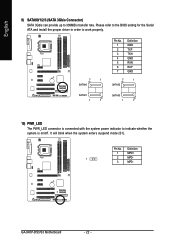
Pin No. It will blink when the system enters suspend mode (S1). GA-945P-DS3/S3 Motherboard - 22 - English 9) SATAII0/1/2/3 (SATA 3Gb/s Connector) SATA 3Gb/s can provide up to indicate whether the system is on/off. Definition 1 MPD+ 1 2 MPD- 3 MPD- Please refer to the BIOS setting for the Serial ATA and install the proper driver in...
Pin No. It will blink when the system enters suspend mode (S1). GA-945P-DS3/S3 Motherboard - 22 - English 9) SATAII0/1/2/3 (SATA 3Gb/s Connector) SATA 3Gb/s can provide up to indicate whether the system is on/off. Definition 1 MPD+ 1 2 MPD- 3 MPD- Please refer to the BIOS setting for the Serial ATA and install the proper driver in...
Manual
Page 26
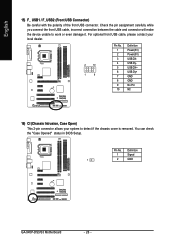
... check the "Case Opened" status in BIOS Setup. Pin No. Check the pin assignment carefully while you connect the front USB cable, incorrect connection between the cable and connector will make the device unable to detect if the chassis cover is removed. Definition 1 Signal 1 2 GND GA-945P-DS3/S3 Motherboard - 26 - For optional front USB...
... check the "Case Opened" status in BIOS Setup. Pin No. Check the pin assignment carefully while you connect the front USB cable, incorrect connection between the cable and connector will make the device unable to detect if the chassis cover is removed. Definition 1 Signal 1 2 GND GA-945P-DS3/S3 Motherboard - 26 - For optional front USB...

Manual
Page 30
... Defaults item in this chapter are for reference only and may differ from the exact settings for stability. 3. GA-945P-DS3/S3 Motherboard - 30 - CMOS Setup Utility-Copyright (C) 1984-2007 Award Software ` Standard CMOS Features ` Advanced BIOS Features ` Integrated Peripherals ` Power Management Setup ` PnP/PCI Configurations ` PC Health Status ` MB Intelligent Tweaker(M.I.T.) Load Fail-Safe...
... Defaults item in this chapter are for reference only and may differ from the exact settings for stability. 3. GA-945P-DS3/S3 Motherboard - 30 - CMOS Setup Utility-Copyright (C) 1984-2007 Award Software ` Standard CMOS Features ` Advanced BIOS Features ` Integrated Peripherals ` Power Management Setup ` PnP/PCI Configurations ` PC Health Status ` MB Intelligent Tweaker(M.I.T.) Load Fail-Safe...
Manual
Page 32
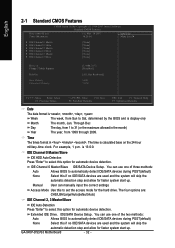
...and the system will skip the automatic detection step and allow for faster system start up . You can use one of three methods: Auto Allows BIOS to 31 (or the maximum allowed in . English 2-1 Standard CMOS Features Date (mm:dd:yy) Time (hh:mm:ss) CMOS Setup Utility.../Auto(default:Auto) IDE Channel 2, 3 Master/Slave IDE Auto-Detection Press "Enter" to Sat, determined by the BIOS and is calculated base on the 24-hour military-time clock. GA-945P-DS3/S3 Motherboard - 32 - Time The times format in the month) Year The year, from Sun to select this option...
...and the system will skip the automatic detection step and allow for faster system start up . You can use one of three methods: Auto Allows BIOS to 31 (or the maximum allowed in . English 2-1 Standard CMOS Features Date (mm:dd:yy) Time (hh:mm:ss) CMOS Setup Utility.../Auto(default:Auto) IDE Channel 2, 3 Master/Slave IDE Auto-Detection Press "Enter" to Sat, determined by the BIOS and is calculated base on the 24-hour military-time clock. GA-945P-DS3/S3 Motherboard - 32 - Time The times format in the month) Year The year, from Sun to select this option...
Manual
Page 34
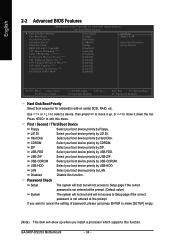
... priority by CDROM. USB-CDROM Select your boot device priority by USB-CDROM. LAN Select your boot device priority by LAN. GA-945P-DS3/S3 Motherboard - 34 - Press to Setup page if the correct password is not entered at the prompt. (Default value) System...Hard Disk Select your boot device priority by Hard Disk. Disabled Disable this function. English 2-2 Advanced BIOS Features CMOS Setup Utility-Copyright (C) 1984-2007 Award Software Advanced BIOS Features ` Hard Disk Boot Priority First Boot Device Second Boot Device Third Boot Device Password Check HDD...
... priority by CDROM. USB-CDROM Select your boot device priority by USB-CDROM. LAN Select your boot device priority by LAN. GA-945P-DS3/S3 Motherboard - 34 - Press to Setup page if the correct password is not entered at the prompt. (Default value) System...Hard Disk Select your boot device priority by Hard Disk. Disabled Disable this function. English 2-2 Advanced BIOS Features CMOS Setup Utility-Copyright (C) 1984-2007 Award Software Advanced BIOS Features ` Hard Disk Boot Priority First Boot Device Second Boot Device Third Boot Device Password Check HDD...
Manual
Page 36
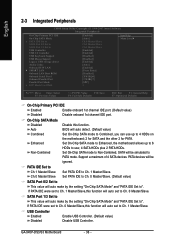
...Chip SATA mode to Non-Combined, SATA will be ignored. USB Controller Enabled Enable USB Controller. (Default value) Disabled Disable USB Controller. GA-945P-DS3/S3 Motherboard - 36 - PATA IDE Set to Ch.1 Master/Slave Ch.0 Master/Slave Set PATA IDE to PATA mode. SATA Port 1/3 Set...to Ch. 0 Master/Slave. If PATA IDE were set to Ch. 1 Master/Slave,this function. Support a maximum of 4 SATA devices. BIOS will be simulated to Ch. 1 Master/Slave. English 2-3 Integrated Peripherals CMOS Setup Utility-Copyright (C) 1984-2007 Award Software Integrated Peripherals On-Chip ...
...Chip SATA mode to Non-Combined, SATA will be ignored. USB Controller Enabled Enable USB Controller. (Default value) Disabled Disable USB Controller. GA-945P-DS3/S3 Motherboard - 36 - PATA IDE Set to Ch.1 Master/Slave Ch.0 Master/Slave Set PATA IDE to PATA mode. SATA Port 1/3 Set...to Ch. 0 Master/Slave. If PATA IDE were set to Ch. 1 Master/Slave,this function. Support a maximum of 4 SATA devices. BIOS will be simulated to Ch. 1 Master/Slave. English 2-3 Integrated Peripherals CMOS Setup Utility-Copyright (C) 1984-2007 Award Software Integrated Peripherals On-Chip ...
Manual
Page 38
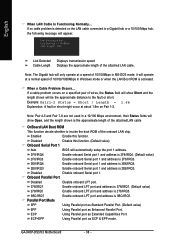
... ROM of 10/100Mbps in Windows mode or when the LAN Boot ROM is activated. Enabled Enable this function. (Default value) Onboard Serial Port 1 Auto BIOS will appear: Start detecting at a speed of the onboard LAN chip. it will operate at about 1.6m on a specified pair of the attached LAN cable... problem occurs on Pair 1-2. Parallel Port Mode SPP Using Parallel port as Standard Parallel Port. (Default value) EPP Using Parallel port as Enhanced Parallel Port. GA-945P-DS3/S3 Motherboard - 38 -
... ROM of 10/100Mbps in Windows mode or when the LAN Boot ROM is activated. Enabled Enable this function. (Default value) Onboard Serial Port 1 Auto BIOS will appear: Start detecting at a speed of the onboard LAN chip. it will operate at about 1.6m on a specified pair of the attached LAN cable... problem occurs on Pair 1-2. Parallel Port Mode SPP Using Parallel port as Standard Parallel Port. (Default value) EPP Using Parallel port as Enhanced Parallel Port. GA-945P-DS3/S3 Motherboard - 38 -
Manual
Page 39
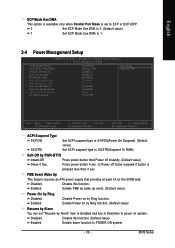
... General Help F7: Optimized Defaults ACPI Suspend Type S1(POS) Set ACPI suspend type to S1/POS(Power On Suspend). (Default value) S3(STR) Set ACPI suspend type to S3/STR(Suspend To RAM). Enabled Enable Power on by Ring function. (Default value) Resume by Alarm You can set to ECP or... function. to POWER ON system. - 39 - Enable PME as wake up event. (Default value) Power On by Ring Disabled Disable Power on the 5VSB lead. BIOS Setup PME Event Wake Up This feature requires an ATX power supply that provides at least 1A on by PWR-BTTN Instant-Off Delay 4 Sec...
... General Help F7: Optimized Defaults ACPI Suspend Type S1(POS) Set ACPI suspend type to S1/POS(Power On Suspend). (Default value) S3(STR) Set ACPI suspend type to S3/STR(Suspend To RAM). Enabled Enable Power on by Ring function. (Default value) Resume by Alarm You can set to ECP or... function. to POWER ON system. - 39 - Enable PME as wake up event. (Default value) Power On by Ring Disabled Disable Power on the 5VSB lead. BIOS Setup PME Event Wake Up This feature requires an ATX power supply that provides at least 1A on by PWR-BTTN Instant-Off Delay 4 Sec...
Manual
Page 46
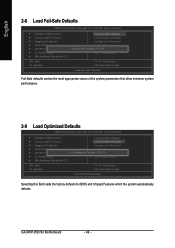
... CMOS Features Load Fail-Safe Defaults ` Advanced BIOS Features Load Optimized Defaults ` Integrated Peripherals Set Supervisor Password ` Power Management Setup Set User Password ` PnP/PCI Configurations Load Fail-Safe DefaultsS(aYv/eN&)? GA-945P-DS3/S3 Motherboard - 46 - NExit Setup ` PC... Defaults CMOS Setup Utility-Copyright (C) 1984-2007 Award Software ` Standard CMOS Features Load Fail-Safe Defaults ` Advanced BIOS Features Load Optimized Defaults ` Integrated Peripherals Set Supervisor Password ` Power Management Setup Set User Password ` PnP/PCI Configurations...
... CMOS Features Load Fail-Safe Defaults ` Advanced BIOS Features Load Optimized Defaults ` Integrated Peripherals Set Supervisor Password ` Power Management Setup Set User Password ` PnP/PCI Configurations Load Fail-Safe DefaultsS(aYv/eN&)? GA-945P-DS3/S3 Motherboard - 46 - NExit Setup ` PC... Defaults CMOS Setup Utility-Copyright (C) 1984-2007 Award Software ` Standard CMOS Features Load Fail-Safe Defaults ` Advanced BIOS Features Load Optimized Defaults ` Integrated Peripherals Set Supervisor Password ` Power Management Setup Set User Password ` PnP/PCI Configurations...
Manual
Page 48
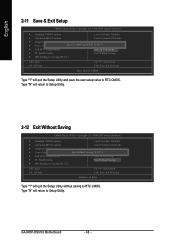
... Data to CMOS Type "Y" will quit the Setup Utility without saving to RTC CMOS. GA-945P-DS3/S3 Motherboard - 48 - English 2-11 Save & Exit Setup CMOS Setup Utility-Copyright (C) 1984-2007 Award Software ` Standard CMOS Features Load Fail-Safe Defaults ` Advanced BIOS Features Load Optimized Defaults ` Integrated Peripherals Set Supervisor Password ` Power Management Setup Save...
... Data to CMOS Type "Y" will quit the Setup Utility without saving to RTC CMOS. GA-945P-DS3/S3 Motherboard - 48 - English 2-11 Save & Exit Setup CMOS Setup Utility-Copyright (C) 1984-2007 Award Software ` Standard CMOS Features Load Fail-Safe Defaults ` Advanced BIOS Features Load Optimized Defaults ` Integrated Peripherals Set Supervisor Password ` Power Management Setup Save...
Manual
Page 54
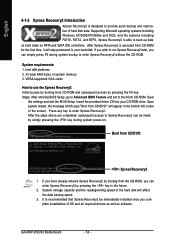
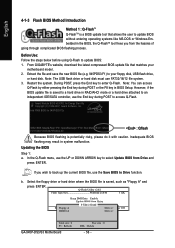
...are completed, subsequent access to Xpress Recovery2 can simply press F9 during system power-on PATA and SATA IDE controllers. Boot from CD-ROM. GA-945P-DS3/S3 Motherboard . . . . - 54 - System requirements: 1. VESA-supported VGA cards How to use the Xpress Recovery2 Initial access by booting...is executed from CD/DVD: Press any key to enter Xpress Recovery2. Save the settings and exit the BIOS Setup. Intel x86 platforms 2. Boot from CD-ROM for 945P-DS3 F2c . . . . :BIOS Setup/Q-Flash : XpressRecovery2 : Boot Menu : Qflash 01/31/2007-I945-6A79TG0AC-00 : Xpress Recovery2 1....
...are completed, subsequent access to Xpress Recovery2 can simply press F9 during system power-on PATA and SATA IDE controllers. Boot from CD-ROM. GA-945P-DS3/S3 Motherboard . . . . - 54 - System requirements: 1. VESA-supported VGA cards How to use the Xpress Recovery2 Initial access by booting...is executed from CD/DVD: Press any key to enter Xpress Recovery2. Save the settings and exit the BIOS Setup. Intel x86 platforms 2. Boot from CD-ROM for 945P-DS3 F2c . . . . :BIOS Setup/Q-Flash : XpressRecovery2 : Boot Menu : Qflash 01/31/2007-I945-6A79TG0AC-00 : Xpress Recovery2 1....
Manual
Page 56
... a hard drive attached to an independent IDE/SATA controller, use the Save BIOS to enter Q-Flash. Updating the BIOS Step 1: a. From GIGABYTE's website, download the latest compressed BIOS update file that allows the user to access Q-Flash. Note: The USB...56 - Extract the file and save the new BIOS file (e.g. 945PDS3.F1) to select Update BIOS from Drive Sa0vefilBeI(Os)SfotounDdrive EnteFr l:oRppuyn A :Move ESC:Reset :Power Off HDD 0-0 Total size : 0 F5 : Refresh GA-945P-DS3/S3 Motherboard . . . . Award Modular BIOS v6.00PG, An Energy Star Ally Copyright (C) 1984...
... a hard drive attached to an independent IDE/SATA controller, use the Save BIOS to enter Q-Flash. Updating the BIOS Step 1: a. From GIGABYTE's website, download the latest compressed BIOS update file that allows the user to access Q-Flash. Note: The USB...56 - Extract the file and save the new BIOS file (e.g. 945PDS3.F1) to select Update BIOS from Drive Sa0vefilBeI(Os)SfotounDdrive EnteFr l:oRppuyn A :Move ESC:Reset :Power Off HDD 0-0 Total size : 0 F5 : Refresh GA-945P-DS3/S3 Motherboard . . . . Award Modular BIOS v6.00PG, An Energy Star Ally Copyright (C) 1984...
Manual
Page 58
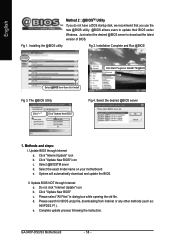
..." icon b. Select @BIOSTM sever d. System will automatically download and update the BIOS. Just select the desired @BIOS server to update their BIOS under Windows. Click "Internet Update" icon b. Click "Update New BIOS" c. GA-945P-DS3/S3 Motherboard . . . . - 58 - Update BIOS NOT through Internet a. Installation Complete and Run @BIOS Click Start/ Programs/ GIGABYTE/@BIOS Select @BIOS item than click Install Fig 3. Please search for...
..." icon b. Select @BIOSTM sever d. System will automatically download and update the BIOS. Just select the desired @BIOS server to update their BIOS under Windows. Click "Internet Update" icon b. Click "Update New BIOS" c. GA-945P-DS3/S3 Motherboard . . . . - 58 - Update BIOS NOT through Internet a. Installation Complete and Run @BIOS Click Start/ Programs/ GIGABYTE/@BIOS Select @BIOS item than click Install Fig 3. Please search for...


