
Manual
Page 6
Channel Audio Function Introduction 64 4-2 Troubleshooting 69 - 6 - Chapter 3 Install Drivers 53 3-1 Install Chipset Drivers 53 3-2 SoftwareApplications 54 3-3 Driver CD Information 54 3-4 Hardware Information 55 3-5 Contact Us ...55 Chapter 4 Appendix 57 4-1 Unique Software Utilities 57 4-1-1 EasyTune 5 Introduction 57 4-1-2 Xpress Recovery2 Introduction 58 4-1-3 Flash BIOS Method Introduction 60 4-1-4 2- / 4- / 6- / 8-
Channel Audio Function Introduction 64 4-2 Troubleshooting 69 - 6 - Chapter 3 Install Drivers 53 3-1 Install Chipset Drivers 53 3-2 SoftwareApplications 54 3-3 Driver CD Information 54 3-4 Hardware Information 55 3-5 Contact Us ...55 Chapter 4 Appendix 57 4-1 Unique Software Utilities 57 4-1-1 EasyTune 5 Introduction 57 4-1-2 Xpress Recovery2 Introduction 58 4-1-3 Flash BIOS Method Introduction 60 4-1-4 2- / 4- / 6- / 8-
Manual
Page 18
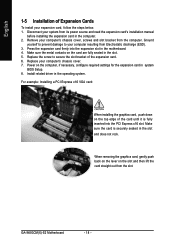
... the expansion card's installation manual before installing the expansion card in the operating system. Press the expansion card firmly into the PCI Express x16 slot. GA-945GCM(X)-S2 Motherboard - 18 - Disconnect your computer's chassis cover. 7. For example: Installing a PCI Express x16 VGA card: When installing the graphics card, push down on the slot... and then lift the card straight out from the computer. Remove your computer's chassis cover, screws and slot bracket from the slot. Install related driver in the computer. 2.
... the expansion card's installation manual before installing the expansion card in the operating system. Press the expansion card firmly into the PCI Express x16 slot. GA-945GCM(X)-S2 Motherboard - 18 - Disconnect your computer's chassis cover. 7. For example: Installing a PCI Express x16 VGA card: When installing the graphics card, push down on the slot... and then lift the card straight out from the computer. Remove your computer's chassis cover, screws and slot bracket from the slot. Install related driver in the computer. 2.

Manual
Page 19
... you connect your device(s) into USB connector(s), please make sure your OS does not support USB controller, please contact OS vendor for possible patch or driver upgrade. Parallel Port The parallel port allows connection of 10/100/ 1000 Mbps. D-Sub Port Monitor can be connected to Line Out (Front Speaker Out...
... you connect your device(s) into USB connector(s), please make sure your OS does not support USB controller, please contact OS vendor for possible patch or driver upgrade. Parallel Port The parallel port allows connection of 10/100/ 1000 Mbps. D-Sub Port Monitor can be connected to Line Out (Front Speaker Out...

Manual
Page 23
One IDE connector can connect to one IDE device as Master and the other as Slave (for the SATA 3Gb/s and install the proper driver in the IDE connector. 40 39 2 1 7) SATAII0 / 1 / 2 / 3 (SATA 3Gb/s Connector, Controlled by ICH7) SATA 3Gb/s can then connect to two IDE devices (hard drive or ...
One IDE connector can connect to one IDE device as Master and the other as Slave (for the SATA 3Gb/s and install the proper driver in the IDE connector. 40 39 2 1 7) SATAII0 / 1 / 2 / 3 (SATA 3Gb/s Connector, Controlled by ICH7) SATA 3Gb/s can then connect to two IDE devices (hard drive or ...

Manual
Page 26
..., the audio driver is configured to work or even damage it. Pin No. English 11) F_AUDIO (Front Audio Connector) This connector supports either HD (High Definition) or AC'97 front panel audio module. To connect an AC'97 front panel audio module to the connector. Definition 1 CD-L 1 2 GND 3 GND 4 CD-R GA-945GCM(X)-S2 Motherboard...
..., the audio driver is configured to work or even damage it. Pin No. English 11) F_AUDIO (Front Audio Connector) This connector supports either HD (High Definition) or AC'97 front panel audio module. To connect an AC'97 front panel audio module to the connector. Definition 1 CD-L 1 2 GND 3 GND 4 CD-R GA-945GCM(X)-S2 Motherboard...
Manual
Page 53
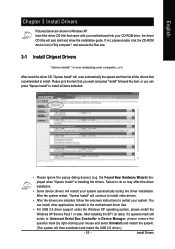
...then list all items defaulted. • Please ignore the popup dialog box(es) (e.g. played when "Xpress Install" is installing the drivers. or you want and press "install" followed the item; You can press "Xpress Install" to install other applications included in Windows... the Run.exe. 3-1 Install Chipset Drivers After insert the driver CD, "Xpress Install" will continue to install all the drivers that you can install other drivers. • After the drivers are shown in the motherboard driver disk. • For USB 2.0 driver support under the Windows XP operating system...
...then list all items defaulted. • Please ignore the popup dialog box(es) (e.g. played when "Xpress Install" is installing the drivers. or you want and press "install" followed the item; You can press "Xpress Install" to install other applications included in Windows... the Run.exe. 3-1 Install Chipset Drivers After insert the driver CD, "Xpress Install" will continue to install all the drivers that you can install other drivers. • After the drivers are shown in the motherboard driver disk. • For USB 2.0 driver support under the Windows XP operating system...

Manual
Page 54
English 3-2 Software Applications This page displays all the tools that Gigabyte developed and some free software, you can choose anyone you want and press "install" to install them. 3-3 Driver CD Information This page lists the contents of software and drivers in this CD-title. GA-945GCM(X)-S2 Motherboard - 54 -
English 3-2 Software Applications This page displays all the tools that Gigabyte developed and some free software, you can choose anyone you want and press "install" to install them. 3-3 Driver CD Information This page lists the contents of software and drivers in this CD-title. GA-945GCM(X)-S2 Motherboard - 54 -

Manual
Page 55
English 3-4 Hardware Information This page lists all device you have for this motherboard. 3-5 Contact Us Please see the last page for details. - 55 - Install Drivers
English 3-4 Hardware Information This page lists all device you have for this motherboard. 3-5 Contact Us Please see the last page for details. - 55 - Install Drivers

Manual
Page 58
...subsequent access to Xpress Recovery2 can be immediately installed once you can enter Xpress Recovery2 by pressing the key in your CD-ROM drive. GA-945GCM(X)-S2 Motherboard - 58 - If you wish to run Xpress Recovery2 later, you complete installations of hard disk data. English 4-1-2 Xpress Recovery2 Introduction...Recovery2 be made by simply pressing the key during system bootup to enter Xpress Recovery2 without the CD-ROM. Insert the provided driver CD into your hard disk. If you can simply press F9 during system power-on PATA and SATA IDE controllers. System storage...
...subsequent access to Xpress Recovery2 can be immediately installed once you can enter Xpress Recovery2 by pressing the key in your CD-ROM drive. GA-945GCM(X)-S2 Motherboard - 58 - If you wish to run Xpress Recovery2 later, you complete installations of hard disk data. English 4-1-2 Xpress Recovery2 Introduction...Recovery2 be made by simply pressing the key during system bootup to enter Xpress Recovery2 without the CD-ROM. Insert the provided driver CD into your hard disk. If you can simply press F9 during system power-on PATA and SATA IDE controllers. System storage...

Manual
Page 59
... sure to execute the EnableBigLba.exe program from hard disk. 3. Hard disks detection sequence is no backup file.) 4. Capable of backing up data from the driver CD before data backup. 2. PATA IDE secondary channel c . BACKUP: Back up hard disks installed with the GPL regulations. 4. USB hard disks are currently not supported...
... sure to execute the EnableBigLba.exe program from hard disk. 3. Hard disks detection sequence is no backup file.) 4. Capable of backing up data from the driver CD before data backup. 2. PATA IDE secondary channel c . BACKUP: Back up hard disks installed with the GPL regulations. 4. USB hard disks are currently not supported...

Manual
Page 64
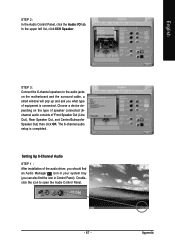
... wish to connect a microphone, you use the speaker with amplifier to acquire the best sound effect if the stereo output is able to work correctly. GA-945GCM(X)-S2 Motherboard - 64 - English 4-1-4 2- / 4- / 6- / 8- For example, if a rear speaker is plugged into the center/subwoofer speaker out jack, you can , for each ... (in your system tray (you can change the function for instance, listen to the right. STEP 1 : After installation of the audio driver, you should find the icon in high quality digital-to-analog converters (DACs) that support audio output at the same time.
... wish to connect a microphone, you use the speaker with amplifier to acquire the best sound effect if the stereo output is able to work correctly. GA-945GCM(X)-S2 Motherboard - 64 - English 4-1-4 2- / 4- / 6- / 8- For example, if a rear speaker is plugged into the center/subwoofer speaker out jack, you can , for each ... (in your system tray (you can change the function for instance, listen to the right. STEP 1 : After installation of the audio driver, you should find the icon in high quality digital-to-analog converters (DACs) that support audio output at the same time.

Manual
Page 65
..., a small window will pop up and ask you can also find an Audio Manager icon in your system tray (you what type of the audio driver, you should find the icon in Control Panel). The 2-channel audio setup is connected. English STEP 2: In the Audio Control Panel, click the Audio I/O tab...
..., a small window will pop up and ask you can also find an Audio Manager icon in your system tray (you what type of the audio driver, you should find the icon in Control Panel). The 2-channel audio setup is connected. English STEP 2: In the Audio Control Panel, click the Audio I/O tab...

Manual
Page 66
... list, click 4CH Speaker. STEP 3: Connect the 4-channel speakers to open the Audio Control Panel. Setting Up 6-Channel Audio STEP 1 : After installation of the audio driver, you should find an Audio Manager icon in Control Panel). GA-945GCM(X)-S2 Motherboard - 66 - English STEP 2: In the Audio Control Panel, click the Audio I/O tab.
... list, click 4CH Speaker. STEP 3: Connect the 4-channel speakers to open the Audio Control Panel. Setting Up 6-Channel Audio STEP 1 : After installation of the audio driver, you should find an Audio Manager icon in Control Panel). GA-945GCM(X)-S2 Motherboard - 66 - English STEP 2: In the Audio Control Panel, click the Audio I/O tab.
Manual
Page 67
... is connected. Choose a device depending on the motherboard and the surround cable, a small window will pop up and ask you what type of the audio driver, you should find an Audio Manager icon in your system tray (you can also find the icon in Control Panel). English STEP 2: In the Audio...
... is connected. Choose a device depending on the motherboard and the surround cable, a small window will pop up and ask you what type of the audio driver, you should find an Audio Manager icon in your system tray (you can also find the icon in Control Panel). English STEP 2: In the Audio...


