Manual
Page 4
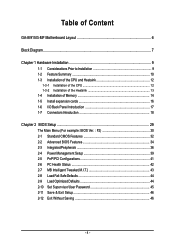
...GA-8I915G-MF Motherboard Layout 6 Block Diagram ...7 Chapter 1 Hardware Installation 9 1-1 Considerations Prior to Installation 9 1-2 Feature Summary 10 1-3 Installation of the CPU and Heatsink 12 1-3-1 Installation of the CPU 12 1-3-2 Installation of the Heatsink 13 1-4 Installation of Memory 14 1-5 Install expansion cards 16 1-6 I/O Back Panel Introduction 17 1-7 Connectors Introduction 18 Chapter 2 BIOS... Setup 29 The Main Menu (For example: BIOS Ver. : F2 30 2-1 Standard CMOS Features 32 2-2 Advanced BIOS Features 34 2-3 IntegratedPeripherals ...
...GA-8I915G-MF Motherboard Layout 6 Block Diagram ...7 Chapter 1 Hardware Installation 9 1-1 Considerations Prior to Installation 9 1-2 Feature Summary 10 1-3 Installation of the CPU and Heatsink 12 1-3-1 Installation of the CPU 12 1-3-2 Installation of the Heatsink 13 1-4 Installation of Memory 14 1-5 Install expansion cards 16 1-6 I/O Back Panel Introduction 17 1-7 Connectors Introduction 18 Chapter 2 BIOS... Setup 29 The Main Menu (For example: BIOS Ver. : F2 30 2-1 Standard CMOS Features 32 2-2 Advanced BIOS Features 34 2-3 IntegratedPeripherals ...
Manual
Page 6
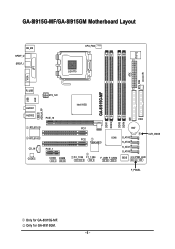
GA-8I915G-MF/GA-8I915GM Motherboard Layout IT8712 KB_MS SPDIF_O SPDIF_I CPU_FAN LGA775 SYS_FAN IR ATX VGA LPT R_USB ATX_12V USB LAN AZALIA_FP AUDIO1 AUDIO2 PCIE_16 RTL8110S RTL8100C CD_IN CODEC PCIE_1 COMA COMB GA-8I915G-MF DDR1 DDR2 Intel 915G IDE FDD DDR3 DDR4 PCI1 PCI2 ICH6 TSB43AB23 F2_1394 F1_1394 F_USB1 F_USB2 BAT S_ATA3 S_ATA2 S_ATA1 S_ATA0 CLR_CMOS BIOS PWR_LED F_PANEL Only for GA-8I915GM. - 6 - Only for GA-8I915G-MF.
GA-8I915G-MF/GA-8I915GM Motherboard Layout IT8712 KB_MS SPDIF_O SPDIF_I CPU_FAN LGA775 SYS_FAN IR ATX VGA LPT R_USB ATX_12V USB LAN AZALIA_FP AUDIO1 AUDIO2 PCIE_16 RTL8110S RTL8100C CD_IN CODEC PCIE_1 COMA COMB GA-8I915G-MF DDR1 DDR2 Intel 915G IDE FDD DDR3 DDR4 PCI1 PCI2 ICH6 TSB43AB23 F2_1394 F1_1394 F_USB1 F_USB2 BAT S_ATA3 S_ATA2 S_ATA1 S_ATA0 CLR_CMOS BIOS PWR_LED F_PANEL Only for GA-8I915GM. - 6 - Only for GA-8I915G-MF.
Manual
Page 7
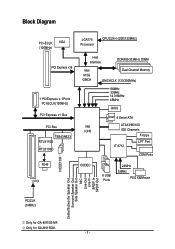
... 2 PCI LGA775 Processor CPUCLK+/-(200/133MHz) Host Interface DDR400/333MHz DIMM Intel 915G GMCH Dual Channel Memory GMCHCLK (133/200MHz) 66MHz 33MHz 14.318MHz 48MHz BIOS 4 Serial ATA Intel ATA33/66/100 ICH6 IDE Channels Floppy IT 8712 LPT Port COM Ports CODEC 8 USB Ports 24MHz 33MHz PS/2 KB/Mouse 3 IEEE1394... Center/Subwoofer Speaker Out Surround Speaker Out Side Speaker Out MIC Line-Out Line-In SPDIF In SPDIF Out PCICLK (33MHz) Only for GA-8I915GM. - 7 - Only for GA-8I915G-MF.
... 2 PCI LGA775 Processor CPUCLK+/-(200/133MHz) Host Interface DDR400/333MHz DIMM Intel 915G GMCH Dual Channel Memory GMCHCLK (133/200MHz) 66MHz 33MHz 14.318MHz 48MHz BIOS 4 Serial ATA Intel ATA33/66/100 ICH6 IDE Channels Floppy IT 8712 LPT Port COM Ports CODEC 8 USB Ports 24MHz 33MHz PS/2 KB/Mouse 3 IEEE1394... Center/Subwoofer Speaker Out Surround Speaker Out Side Speaker Out MIC Line-Out Line-In SPDIF In SPDIF Out PCICLK (33MHz) Only for GA-8I915GM. - 7 - Only for GA-8I915G-MF.
Manual
Page 12
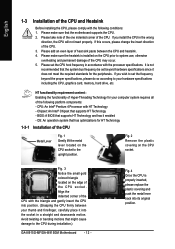
...the upright position. It is properly inserted, please replace the plastic covering and push the metal lever back into its original position. BIOS: A BIOS that might cause damage to set the CPU host frequency in the wrong direction, the CPU will not insert properly. Avoid twisting...CPU Metal Lever Fig. 1 Gently lift the metal lever located on the CPU socket. If you wish to the CPU during installation.) GA-8I915G-MF/GA-8I915GM Motherboard - 12 - Please set the frequency beyond hardware specifications since it does not meet the required standards for your thumb and ...
...the upright position. It is properly inserted, please replace the plastic covering and push the metal lever back into its original position. BIOS: A BIOS that might cause damage to set the CPU host frequency in the wrong direction, the CPU will not insert properly. Avoid twisting...CPU Metal Lever Fig. 1 Gently lift the metal lever located on the CPU socket. If you wish to the CPU during installation.) GA-8I915G-MF/GA-8I915GM Motherboard - 12 - Please set the frequency beyond hardware specifications since it does not meet the required standards for your thumb and ...
Manual
Page 14
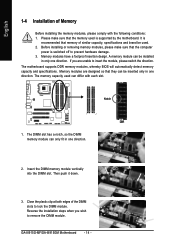
... DIMM memory module vertically into the DIMM slot. Then push it down. 3. The memory capacity used can only fit in only one direction. GA-8I915G-MF/GA-8I915GM Motherboard - 14 - Notch DDR 1. Memory modules have a foolproof insertion design. The DIMM slot has a notch, so the DIMM memory...Close the plastic clip at both edges of the DIMM slots to remove the DIMM module. The motherboard supports DDR memory modules, whereby BIOS will automatically detect memory capacity and specifications. A memory module can be inserted only in one direction. 2. Please make sure that memory...
... DIMM memory module vertically into the DIMM slot. Then push it down. 3. The memory capacity used can only fit in only one direction. GA-8I915G-MF/GA-8I915GM Motherboard - 14 - Notch DDR 1. Memory modules have a foolproof insertion design. The DIMM slot has a notch, so the DIMM memory...Close the plastic clip at both edges of the DIMM slots to remove the DIMM module. The motherboard supports DDR memory modules, whereby BIOS will automatically detect memory capacity and specifications. A memory module can be inserted only in one direction. 2. Please make sure that memory...

Manual
Page 16
...computer. 2. Please align the VGA card to install/Uninstall the VGA card. Install related driver from BIOS. 8. Power on the card are indeed seated in motherboard. 4. GA-8I915G-MF/GA-8I915GM Motherboard - 16 - Replace your computer's chassis cover, screws and slot bracket from the computer.... 3. Be sure the metal contacts on the computer, if necessary, setup BIOS utility of the expansion card. 6. English 1-5...
...computer. 2. Please align the VGA card to install/Uninstall the VGA card. Install related driver from BIOS. 8. Power on the card are indeed seated in motherboard. 4. GA-8I915G-MF/GA-8I915GM Motherboard - 16 - Replace your computer's chassis cover, screws and slot bracket from the computer.... 3. Be sure the metal contacts on the computer, if necessary, setup BIOS utility of the expansion card. 6. English 1-5...

Manual
Page 30
... indicates the value of the system parameters which the system would be in the BIOS when somehow the system works not stable as figure below) will appear on the screen. GA-8I915G-MF/GA-8I915GM Motherboard - 30 - CMOS Setup Utility-Copyright (C) 1984-2004 Award Software ...` Standard CMOS Features ` Advanced BIOS Features ` Integrated Peripherals ` Power Management Setup ` PnP/PCI Configurations ` PC Health...
... indicates the value of the system parameters which the system would be in the BIOS when somehow the system works not stable as figure below) will appear on the screen. GA-8I915G-MF/GA-8I915GM Motherboard - 30 - CMOS Setup Utility-Copyright (C) 1984-2004 Award Software ...` Standard CMOS Features ` Advanced BIOS Features ` Integrated Peripherals ` Power Management Setup ` PnP/PCI Configurations ` PC Health...
Manual
Page 32
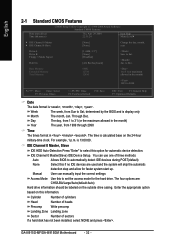
...day, from 1 to 31 (or the maximum allowed in the month) Year The year, from Sun to Sat, determined by the BIOS and is , , , . For example, 1 p.m. GA-8I915G-MF/GA-8I915GM Motherboard - 32 - English 2-1 Standard CMOS Features Date (mm:dd:yy) Time (hh:mm:ss) CMOS Setup Utility-Copyright ... Cylinder Number of cylinders Head Number of heads Precomp Write precomp Landing Zone Landing zone Sector Number of three methods: Auto Allows BIOS to 31 (or maximum allowed in . Base Memory Extended Memory Total Memory 640K 127M 128M 1 to automatically detect IDE devices ...
...day, from 1 to 31 (or the maximum allowed in the month) Year The year, from Sun to Sat, determined by the BIOS and is , , , . For example, 1 p.m. GA-8I915G-MF/GA-8I915GM Motherboard - 32 - English 2-1 Standard CMOS Features Date (mm:dd:yy) Time (hh:mm:ss) CMOS Setup Utility-Copyright ... Cylinder Number of cylinders Head Number of heads Precomp Write precomp Landing Zone Landing zone Sector Number of three methods: Auto Allows BIOS to 31 (or maximum allowed in . Base Memory Extended Memory Total Memory 640K 127M 128M 1 to automatically detect IDE devices ...
Manual
Page 34
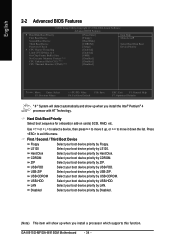
... priority by CDROM. USB-CDROM Select your boot device priority by USB-FDD. GA-8I915G-MF/GA-8I915GM Motherboard - 34 - USB-HDD Select your boot device priority by Hard Disk. English 2-2 Advanced BIOS Features CMOS Setup Utility-Copyright (C) 1984-2004 Award Software Advanced BIOS Features ` Hard Disk Boot Priority First Boot Device Second Boot Device Third...
... priority by CDROM. USB-CDROM Select your boot device priority by USB-FDD. GA-8I915G-MF/GA-8I915GM Motherboard - 34 - USB-HDD Select your boot device priority by Hard Disk. English 2-2 Advanced BIOS Features CMOS Setup Utility-Copyright (C) 1984-2004 Award Software Advanced BIOS Features ` Hard Disk Boot Priority First Boot Device Second Boot Device Third...
Manual
Page 36
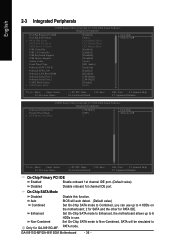
..., SATA will auto detect. (Default value) Set On-Chip SATA mode to 4 HDDs on the motherboard; 2 for SATA and the other for GA-8I915G-MF. English 2-3 Integrated Peripherals CMOS Setup Utility-Copyright (C) 1984-2004 Award Software Integrated Peripherals On-Chip Primary PCI IDE On-Chip SATA Mode x PATA ...PATA IDE. Set On-Chip SATA mode to Enhanced, the motherboard allows up to 6 HDDs to use up to Combined, you can use . BIOS will be simulated to USB Controller USB 2.0 Controller USB Keyboard Support USB Mouse Support Azalia Codec Front Panel Type Onboard H/W 1394 1 Onboard H/W LAN...
..., SATA will auto detect. (Default value) Set On-Chip SATA mode to 4 HDDs on the motherboard; 2 for SATA and the other for GA-8I915G-MF. English 2-3 Integrated Peripherals CMOS Setup Utility-Copyright (C) 1984-2004 Award Software Integrated Peripherals On-Chip Primary PCI IDE On-Chip SATA Mode x PATA ...PATA IDE. Set On-Chip SATA mode to Enhanced, the motherboard allows up to 6 HDDs to use up to Combined, you can use . BIOS will be simulated to USB Controller USB 2.0 Controller USB Keyboard Support USB Mouse Support Azalia Codec Front Panel Type Onboard H/W 1394 1 Onboard H/W LAN...
Manual
Page 37
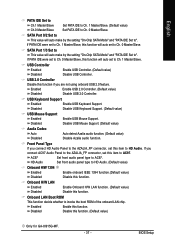
... Audio. Onboard H/W LAN Enabled Enable Onboard H/W LAN function. (Default value) Disabled Disable this item to Ch. 1 Master/Slave. BIOS Setup English PATA IDE Set to Ch.1 Master/Slave Set PATA IDE to Ch. 1 Master/Slave. (Default value) Ch.0 Master/... (Default value) Onboard H/W 1394 Enabled Enable onboard IEEE 1394 function.(Default value) Disabled Disable this function. (Default value) Only for GA-8I915G-MF. - 37 - Disabled Disable this function. USB Controller Enabled Disabled Enable USB Controller. (Default value) Disable USB Controller. Set front audio...
... Audio. Onboard H/W LAN Enabled Enable Onboard H/W LAN function. (Default value) Disabled Disable this item to Ch. 1 Master/Slave. BIOS Setup English PATA IDE Set to Ch.1 Master/Slave Set PATA IDE to Ch. 1 Master/Slave. (Default value) Ch.0 Master/... (Default value) Onboard H/W 1394 Enabled Enable onboard IEEE 1394 function.(Default value) Disabled Disable this function. (Default value) Only for GA-8I915G-MF. - 37 - Disabled Disable this function. USB Controller Enabled Disabled Enable USB Controller. (Default value) Disable USB Controller. Set front audio...
Manual
Page 38
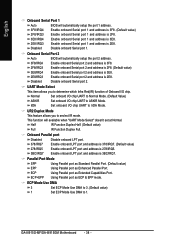
...Normal Set onboard I/O chip UART to Normal Mode. (Default Value) ASKIR IrDA Set onboard I /O chip. English Onboard Serial Port 1 Auto BIOS will automatically setup the port 1 address. 3F8/IRQ4 2F8/IRQ3 Enable onboard Serial port 1 and address is 3F8. (Default value) Enable onboard ... Enable onboard Serial port 1 and address is 3BC/IRQ7. This function will available when "UART Mode Select" doesn't set at Normal. GA-8I915G-MF/GA-8I915GM Motherboard - 38 - Disabled Disable onboard Serial port 1. Half IR Function Duplex Half. (Default value) Full IR Function Duplex Full...
...Normal Set onboard I/O chip UART to Normal Mode. (Default Value) ASKIR IrDA Set onboard I /O chip. English Onboard Serial Port 1 Auto BIOS will automatically setup the port 1 address. 3F8/IRQ4 2F8/IRQ3 Enable onboard Serial port 1 and address is 3F8. (Default value) Enable onboard ... Enable onboard Serial port 1 and address is 3BC/IRQ7. This function will available when "UART Mode Select" doesn't set at Normal. GA-8I915G-MF/GA-8I915GM Motherboard - 38 - Disabled Disable onboard Serial port 1. Half IR Function Duplex Half. (Default value) Full IR Function Duplex Full...

Manual
Page 44
...CMOS Features Load Fail-Safe Defaults ` Advanced BIOS Features Load Optimized Defaults ` Integrated Peripherals Set Supervisor Password ` Power Management Setup Set User Password ` PnP/PCI Configurations Load Fail-Safe DefaultsS(aYv/eN&)? GA-8I915G-MF/GA-8I915GM Motherboard - 44 - ENxit Setup `... Defaults CMOS Setup Utility-Copyright (C) 1984-2004 Award Software ` Standard CMOS Features Load Fail-Safe Defaults ` Advanced BIOS Features Load Optimized Defaults ` Integrated Peripherals Set Supervisor Password ` Power Management Setup Set User Password ` PnP/PCI ...
...CMOS Features Load Fail-Safe Defaults ` Advanced BIOS Features Load Optimized Defaults ` Integrated Peripherals Set Supervisor Password ` Power Management Setup Set User Password ` PnP/PCI Configurations Load Fail-Safe DefaultsS(aYv/eN&)? GA-8I915G-MF/GA-8I915GM Motherboard - 44 - ENxit Setup `... Defaults CMOS Setup Utility-Copyright (C) 1984-2004 Award Software ` Standard CMOS Features Load Fail-Safe Defaults ` Advanced BIOS Features Load Optimized Defaults ` Integrated Peripherals Set Supervisor Password ` Power Management Setup Set User Password ` PnP/PCI ...

Manual
Page 46
...Setup Utility without saving to RTC CMOS. GA-8I915G-MF/GA-8I915GM Motherboard - 46 - Type "N" will return to Setup Utility. 2-12 Exit Without Saving CMOS Setup Utility-Copyright (C) 1984-2004 Award Software ` Standard CMOS Features ` Advanced BIOS Features ` Integrated Peripherals ` Power Management ... Exit Setup CMOS Setup Utility-Copyright (C) 1984-2004 Award Software ` Standard CMOS Features Load Fail-Safe Defaults ` Advanced BIOS Features Load Optimized Defaults ` Integrated Peripherals Set Supervisor Password ` Power Management Setup Set User Password ` PnP/PCI Configurations ...
...Setup Utility without saving to RTC CMOS. GA-8I915G-MF/GA-8I915GM Motherboard - 46 - Type "N" will return to Setup Utility. 2-12 Exit Without Saving CMOS Setup Utility-Copyright (C) 1984-2004 Award Software ` Standard CMOS Features ` Advanced BIOS Features ` Integrated Peripherals ` Power Management ... Exit Setup CMOS Setup Utility-Copyright (C) 1984-2004 Award Software ` Standard CMOS Features Load Fail-Safe Defaults ` Advanced BIOS Features Load Optimized Defaults ` Integrated Peripherals Set Supervisor Password ` Power Management Setup Set User Password ` PnP/PCI Configurations ...
Manual
Page 54
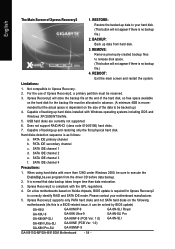
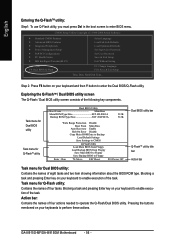
...following motherboards (As this is a BIOS-related issue, it can be solved by BIOS update) GA-K8U GA-K8U-9 GA-K8NXP-SLI GA-K8N Ultra-SLI GA-K8N Pro-SLI GA-K8NXP-9 GA-K8N Ultra-9 GA-K8NF-9 (PCB Ver. 1.0) GA-K8NE (PCB Ver. 1.0) GA-K8NMF-9 GA-8N-SLI Royal GA-8N-SLI Pro GA-8N-SLI GA-8I915G-MF/GA-8I915GM Motherboard - 54 - SATA IDE...only PATA hard disks and not SATA hard disks on the size of the hard disk, so free space available on Nvidia chipsets, BIOS update is required for the backup file must be allocated in advance. (A minimum 4GB is no backup file.) 4. REMOVE: Remove ...
...following motherboards (As this is a BIOS-related issue, it can be solved by BIOS update) GA-K8U GA-K8U-9 GA-K8NXP-SLI GA-K8N Ultra-SLI GA-K8N Pro-SLI GA-K8NXP-9 GA-K8N Ultra-9 GA-K8NF-9 (PCB Ver. 1.0) GA-K8NE (PCB Ver. 1.0) GA-K8NMF-9 GA-8N-SLI Royal GA-8N-SLI Pro GA-8N-SLI GA-8I915G-MF/GA-8I915GM Motherboard - 54 - SATA IDE...only PATA hard disks and not SATA hard disks on the size of the hard disk, so free space available on Nvidia chipsets, BIOS update is required for the backup file must be allocated in advance. (A minimum 4GB is no backup file.) 4. REMOVE: Remove ...
Manual
Page 56
...to Floppy Enter : Run :Move ESC:Reset F10:Power Off Dual BIOS utility bar Q-FlashTM utility title bar Action bar Task menu for Q-Flash utility: Contains the names of the task. GA-8I915G-MF/GA-8I915GM Motherboard - 56 - CMOS Setup Utility-Copyright (C) 1984-2004... Award Software Standard CMOS Features Advanced BIOS Features Integrated Peripherals Power Management Setup PnP/PCI Configurations PC Health Status MB Intelligent...
...to Floppy Enter : Run :Move ESC:Reset F10:Power Off Dual BIOS utility bar Q-FlashTM utility title bar Action bar Task menu for Q-Flash utility: Contains the names of the task. GA-8I915G-MF/GA-8I915GM Motherboard - 56 - CMOS Setup Utility-Copyright (C) 1984-2004... Award Software Standard CMOS Features Advanced BIOS Features Integrated Peripherals Power Management Setup PnP/PCI Configurations PC Health Status MB Intelligent...
Manual
Page 58
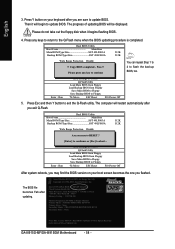
... apirneRssOaMnyDkaetya tto cBoanctkiunpue Load Default Settings Save Settings to CMOS Q-Flash Utility Load Main BIOS from Floppy Load Backup BIOS from Floppy Save Main BIOS to Floppy Save Backup BIOS to flash the backup BIOS, too. 5. Award Modular BIOS v6.00PG, An Energy Star Ally Copyright (C) 1984-2003, Award Software, Inc....MPE3170AT ED-03-08 Primary Slave : None Secondary Master : CREATIVEDVD-RM DVD1242E BC101 Secondary Slave : None Press DEL to enter SETUP / Dual BIOS / Q-Flash / F9 For Xpress Recovery 09/23/2003-i875P-6A79BG03C-00 GA-8I915G-MF/GA-8I915GM Motherboard - 58 -
... apirneRssOaMnyDkaetya tto cBoanctkiunpue Load Default Settings Save Settings to CMOS Q-Flash Utility Load Main BIOS from Floppy Load Backup BIOS from Floppy Save Main BIOS to Floppy Save Backup BIOS to flash the backup BIOS, too. 5. Award Modular BIOS v6.00PG, An Energy Star Ally Copyright (C) 1984-2003, Award Software, Inc....MPE3170AT ED-03-08 Primary Slave : None Secondary Master : CREATIVEDVD-RM DVD1242E BC101 Secondary Slave : None Press DEL to enter SETUP / Dual BIOS / Q-Flash / F9 For Xpress Recovery 09/23/2003-i875P-6A79BG03C-00 GA-8I915G-MF/GA-8I915GM Motherboard - 58 -

Manual
Page 60
... Flash Type/Size SST 49LF003A 256K Reading BIOKSeefpileDfMroImDfaltoappyE.n..able U>p>d.a..t.e...B..I..O..S...f..r.o..m Floppy Save BIOS to Floppy EnteDr o: nR'tunTurn Off P:oMwoevr eor ReseEt SyCs:tRemeset F10:Power Off Do not trun off power or reset your keyboards to operate the Q-Flash utility. GA-8I915G-MF/GA-8I915GM Motherboard - 60 - Q-Flash Utility V1.30 Flash Type/Size SST...
... Flash Type/Size SST 49LF003A 256K Reading BIOKSeefpileDfMroImDfaltoappyE.n..able U>p>d.a..t.e...B..I..O..S...f..r.o..m Floppy Save BIOS to Floppy EnteDr o: nR'tunTurn Off P:oMwoevr eor ReseEt SyCs:tRemeset F10:Power Off Do not trun off power or reset your keyboards to operate the Q-Flash utility. GA-8I915G-MF/GA-8I915GM Motherboard - 60 - Q-Flash Utility V1.30 Flash Type/Size SST...
Manual
Page 62
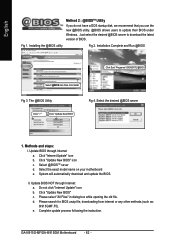
Installation Complete and Run @BIOS Click Sart/ Programs/ GIGABYTE/@BIOS Select @BIOS item than click Install Fig 3. System will automatically download and update the BIOS. Please select "All Files" in dialog box while opening the old file. GA-8I915G-MF/GA-8I915GM Motherboard - 62 - Fig 1. Click "Internet Update" icon b. Select @BIOSTM sever d. Update BIOS NOT through Internet a. English Method 2 : @BIOSTM Utility...
Installation Complete and Run @BIOS Click Sart/ Programs/ GIGABYTE/@BIOS Select @BIOS item than click Install Fig 3. System will automatically download and update the BIOS. Please select "All Files" in dialog box while opening the old file. GA-8I915G-MF/GA-8I915GM Motherboard - 62 - Fig 1. Click "Internet Update" icon b. Select @BIOSTM sever d. Update BIOS NOT through Internet a. English Method 2 : @BIOSTM Utility...
Manual
Page 64
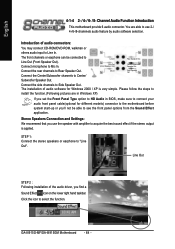
...software for different models) connector to the motherboard before system start-up or you set the Front Panel Type option to HD Audio in BIOS, make sure to connect your audio front panel cable(optional for Windows 2000 / XP is applied. Line Out STEP 2 : Following .../DVD-ROM, walkman or others audio input to Line Out (Front Speaker Out). Connect microphone to select the function. Click the icon to Mic In. GA-8I915G-MF/GA-8I915GM Motherboard - 64 - English 4-1-4 2- / 4- / 6- / 8- The front channels or earphone can be able to acquire the best sound effect if...
...software for different models) connector to the motherboard before system start-up or you set the Front Panel Type option to HD Audio in BIOS, make sure to connect your audio front panel cable(optional for Windows 2000 / XP is applied. Line Out STEP 2 : Following .../DVD-ROM, walkman or others audio input to Line Out (Front Speaker Out). Connect microphone to select the function. Click the icon to Mic In. GA-8I915G-MF/GA-8I915GM Motherboard - 64 - English 4-1-4 2- / 4- / 6- / 8- The front channels or earphone can be able to acquire the best sound effect if...


