SAR Specific Absorption Rate Statement
Page 1
... NOTE: In the United States and Canada, the SAR limit for transmitting devices used by independent scientific organizations through periodic and thorough evaluation of the radio while operating ... its highest certified power level in measurements. © 2008 Garmin Ltd. Your wireless radio is a radio transmitter and receiver. The exposure standard for wireless radios employs a unit of safety... government for safe exposure. The SAR limit set by Industry Canada. Product Rino 110 Rino 120 Rino 130 Rino 520HCx Rino 530HCx Face-held position and when worn on the body) reported to the...
... NOTE: In the United States and Canada, the SAR limit for transmitting devices used by independent scientific organizations through periodic and thorough evaluation of the radio while operating ... its highest certified power level in measurements. © 2008 Garmin Ltd. Your wireless radio is a radio transmitter and receiver. The exposure standard for wireless radios employs a unit of safety... government for safe exposure. The SAR limit set by Industry Canada. Product Rino 110 Rino 120 Rino 130 Rino 520HCx Rino 530HCx Face-held position and when worn on the body) reported to the...
Owner's Manual
Page 2
...express prior written consent of this manual onto a hard drive or other Garmin products. E Printed in any storage medium, for current updates and supplemental information concerning the use and operation of this manual may not be viewed and to print one... Rev. or its subsidiaries Garmin International, Inc. 1200 East 151st Street Olathe, Kansas 66062, U.S.A. Garmin hereby grants permission to download a single copy of Garmin. Garmin®, AutoLocate®, Personal Navigator®, MapSource®, TracBack®, BlueChart®, and Rino® are registered trademarks...
...express prior written consent of this manual onto a hard drive or other Garmin products. E Printed in any storage medium, for current updates and supplemental information concerning the use and operation of this manual may not be viewed and to print one... Rev. or its subsidiaries Garmin International, Inc. 1200 East 151st Street Olathe, Kansas 66062, U.S.A. Garmin hereby grants permission to download a single copy of Garmin. Garmin®, AutoLocate®, Personal Navigator®, MapSource®, TracBack®, BlueChart®, and Rino® are registered trademarks...
Owner's Manual
Page 3
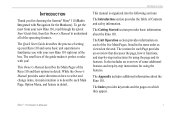
INTRODUCTION Thank you for choosing the Garmin® Rino® 110 (Radio Integrated with your new Rino 110 right out of the box. INTRODUCTION This manual is organized into the following sections: The Introduction section provides the Table of some additional features and ... features. It also includes an overview of Contents and safety information. The small size of the Rino 110 and their options in the same order as viewed on how to take with you with Navigation for using the features. This Owner's Manual describes the Main Pages of the guide makes it functions, and...
INTRODUCTION Thank you for choosing the Garmin® Rino® 110 (Radio Integrated with your new Rino 110 right out of the box. INTRODUCTION This manual is organized into the following sections: The Introduction section provides the Table of some additional features and ... features. It also includes an overview of Contents and safety information. The small size of the Rino 110 and their options in the same order as viewed on how to take with you with Navigation for using the features. This Owner's Manual describes the Main Pages of the guide makes it functions, and...
Owner's Manual
Page 4
... Radio Page Option Menu 14 Setup Radio 14 Setup Tones 15 Setup Scanlist 16 Turn Radio/GPS On/Off 16 Informational Picture 16 GPS Status 16 Radio Transmission Status 16 Mark Waypoint's Indicators 17 ii Using the Rino 110 Radio Features 18 Peer-to-Peer Positioning 18 New Contact Page Overview 18 Sending a Location 21...
... Radio Page Option Menu 14 Setup Radio 14 Setup Tones 15 Setup Scanlist 16 Turn Radio/GPS On/Off 16 Informational Picture 16 GPS Status 16 Radio Transmission Status 16 Mark Waypoint's Indicators 17 ii Using the Rino 110 Radio Features 18 Peer-to-Peer Positioning 18 New Contact Page Overview 18 Sending a Location 21...
Owner's Manual
Page 5
...Route Page 49 Creating and Using a Route 49 Editing a Route 50 Adding or Editing from the Route Map Page 53 Navigating a Route 54 Stopping Navigation 55 Data Fields for the Route Page 55 Data field options for Route Page 55 Tracks Page 56 Rino® 110 Owner's Manual INTRODUCTION > ...TABLE OF CONTENTS Using the TracBack Feature 57 Setting up the Track Log 58 Proximity Page 59 Satellite Page 60 Sky View graphic 60 WAAS...
...Route Page 49 Creating and Using a Route 49 Editing a Route 50 Adding or Editing from the Route Map Page 53 Navigating a Route 54 Stopping Navigation 55 Data Fields for the Route Page 55 Data field options for Route Page 55 Tracks Page 56 Rino® 110 Owner's Manual INTRODUCTION > ...TABLE OF CONTENTS Using the TracBack Feature 57 Setting up the Track Log 58 Proximity Page 59 Satellite Page 60 Sky View graphic 60 WAAS...
Owner's Manual
Page 7
... 500 waypoints with up to start navigating with your Rino 110 with you 're going. Garmin designed your new GPS in mind. Garmin's user-friendly interface allows you to 20 tracks with a 10-character name and graphic symbol. Using MapSource® Points of Interest (not included), the Rino 110 can display up to do: explore the great outdoors...
... 500 waypoints with up to start navigating with your Rino 110 with you 're going. Garmin designed your new GPS in mind. Garmin's user-friendly interface allows you to 20 tracks with a 10-character name and graphic symbol. Using MapSource® Points of Interest (not included), the Rino 110 can display up to do: explore the great outdoors...
Owner's Manual
Page 8
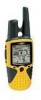
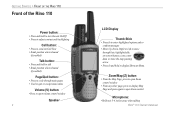
GETTING STARTED > FRONT OF THE RINO 110 Front of the Rino 110 Power button: • Press and hold to turn the unit On/Off • Press to adjust contrast and backlighting...and hold to talk • Sends position when released (if enabled) Page/Quit button: • Press to cycle through main pages • Used to quit or escape menu items Volume (V) button: • Press to open volume control window Speaker 2 LCD Display Thumb Stick • Press...: • From the Map Page, press to open Zoom control Microphone: • Hold unit 3-4 inches away when talking Rino® 110 Owner's Manual
GETTING STARTED > FRONT OF THE RINO 110 Front of the Rino 110 Power button: • Press and hold to turn the unit On/Off • Press to adjust contrast and backlighting...and hold to talk • Sends position when released (if enabled) Page/Quit button: • Press to cycle through main pages • Used to quit or escape menu items Volume (V) button: • Press to open volume control window Speaker 2 LCD Display Thumb Stick • Press...: • From the Map Page, press to open Zoom control Microphone: • Hold unit 3-4 inches away when talking Rino® 110 Owner's Manual

Owner's Manual
Page 11
...to the Right. The Talk key is displayed (about 5 seconds). To unlock, press and hold to open the menu. Operating the Rino 110 For best results, you use it the first time. Press the Thumb Stick In to acknowledge a message and return to activate the option. 3. To ...the keys: 1. Press and hold the Thumb Stick In to the "Initializing the Rino 110" section later in your Rino 110 unit before you should initialize the GPS receiver in this manual for instructions on initializing the unit. To use the page Option Menu: 1. Refer to access the Shortcuts Menu. Keylock Pop-up...
...to the Right. The Talk key is displayed (about 5 seconds). To unlock, press and hold to open the menu. Operating the Rino 110 For best results, you use it the first time. Press the Thumb Stick In to acknowledge a message and return to activate the option. 3. To ...the keys: 1. Press and hold the Thumb Stick In to the "Initializing the Rino 110" section later in your Rino 110 unit before you should initialize the GPS receiver in this manual for instructions on initializing the unit. To use the page Option Menu: 1. Refer to access the Shortcuts Menu. Keylock Pop-up...

Owner's Manual
Page 12
...displays on the Status Bar are fully discharged. As you use your Rino. The current settings and operational icons on all the available Main Pages. Install new batteries or recharge batteries. Using External Power Receiving Radio signal 6 Transmitting Radio signal Backlight On Radio On ...Peer-To-Peer On/Location Ready to Send Keylock On Alarm Clock On GPS On, Position Ready GPS On, Position Not Ready Rino® 110 Owner's Manual GETTING STARTED > ...
...displays on the Status Bar are fully discharged. As you use your Rino. The current settings and operational icons on all the available Main Pages. Install new batteries or recharge batteries. Using External Power Receiving Radio signal 6 Transmitting Radio signal Backlight On Radio On ...Peer-To-Peer On/Location Ready to Send Keylock On Alarm Clock On GPS On, Position Ready GPS On, Position Not Ready Rino® 110 Owner's Manual GETTING STARTED > ...
Owner's Manual
Page 13
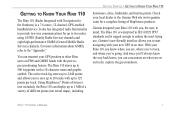
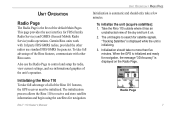
...The Radio Page is the first of the Rino 110 features, the GPS receiver must be initialized. Initializing the Rino 110 To take no more than five minutes. To initialize the unit (acquire satellites): 1. Take the Rino 110 outside where it on the Radio Page. "Tracking ...informational graphics of the unit's operation. When the GPS is initialized and ready for FRS (Family Radio Service) and GMRS (General Mobile Radio Service) radio operations. Radio Page 7 Garmin Rino units work with other radios use the Radio Page to search for navigation. Initialization ...
...The Radio Page is the first of the Rino 110 features, the GPS receiver must be initialized. Initializing the Rino 110 To take no more than five minutes. To initialize the unit (acquire satellites): 1. Take the Rino 110 outside where it on the Radio Page. "Tracking ...informational graphics of the unit's operation. When the GPS is initialized and ready for FRS (Family Radio Service) and GMRS (General Mobile Radio Service) radio operations. Radio Page 7 Garmin Rino units work with other radios use the Radio Page to search for navigation. Initialization ...
Owner's Manual
Page 14
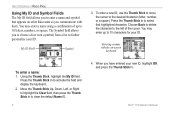
... the My ID field. My ID Field Symbol 3. Press the Thumb Stick In to the desired character (letter, number, or a space). Rino® 110 Owner's Manual To enter a new ID, use the Thumb Stick to move the cursor to activate the field and display the keyboard. 2. You may enter a name...letters, numbers, or spaces. Choose Back to delete the character to select that appears on other Rino units as you communicate with the on-screen keyboard To enter a name: 1. UNIT OPERATION > RADIO PAGE Using My ID and Symbol Fields The My ID field allows you to clear the default ...
... the My ID field. My ID Field Symbol 3. Press the Thumb Stick In to the desired character (letter, number, or a space). Rino® 110 Owner's Manual To enter a new ID, use the Thumb Stick to move the cursor to activate the field and display the keyboard. 2. You may enter a name...letters, numbers, or spaces. Choose Back to delete the character to select that appears on other Rino units as you communicate with the on-screen keyboard To enter a name: 1. UNIT OPERATION > RADIO PAGE Using My ID and Symbol Fields The My ID field allows you to clear the default ...
Owner's Manual
Page 15
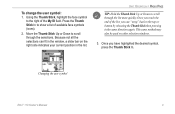
... through the list more quickly. Once you can fit in the window, a slider bar on other selection windows. 3. Changing the user symbol Rino® 110 Owner's Manual 9 Using the Thumb Stick, highlight the face symbol to show a list of available face symbols (icons). 2. To change the user symbol: 1. Press the... Up or Down to the top or bottom by releasing the Thumb Stick then pressing in the list. This same method may also be used on the right side indicates your current position in the same direction again. Because not all the selections can "wrap" back to scroll...
... through the list more quickly. Once you can fit in the window, a slider bar on other selection windows. 3. Changing the user symbol Rino® 110 Owner's Manual 9 Using the Thumb Stick, highlight the face symbol to show a list of available face symbols (icons). 2. To change the user symbol: 1. Press the... Up or Down to the top or bottom by releasing the Thumb Stick then pressing in the list. This same method may also be used on the right side indicates your current position in the same direction again. Because not all the selections can "wrap" back to scroll...
Owner's Manual
Page 16
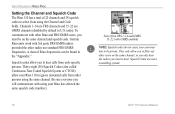
...: Squelch codes do not cause your Rino 110 to hear. They only allow you will communicate with using your Rino has selected the same squelch code (number). 10 Select from FRS 1-14 and GMRS 15-22 (with other persons using the Channel and Code fields. Garmin Rino units work with 3rd party FRS/GMRS... radios, provided the other users on the same channel, so you only hear the radios you want to ignore unwanted calls from other Rino and FRS/GMRS users, you to...
...: Squelch codes do not cause your Rino 110 to hear. They only allow you will communicate with using your Rino has selected the same squelch code (number). 10 Select from FRS 1-14 and GMRS 15-22 (with other persons using the Channel and Code fields. Garmin Rino units work with 3rd party FRS/GMRS... radios, provided the other users on the same channel, so you only hear the radios you want to ignore unwanted calls from other Rino and FRS/GMRS users, you to...
Owner's Manual
Page 17
.... Choose from 38 squelch codes. Setting the unit to zero will allow you to hear all transmissions on that you change the main channels, the Rino 110 remembers the last channel/squelch code combination that channel, but you must be set the unit channel to 5 and squelch code to show a list ...the "Appendix" for a table listing all the items fit in the window, a slider bar on the right side indicates your current position in the list. 3. Using the Thumb Stick, highlight the Channel or Code field and then press In to 21, then change the Channel and/or Squelch Code: 1. Scroll...
.... Choose from 38 squelch codes. Setting the unit to zero will allow you to hear all transmissions on that you change the main channels, the Rino 110 remembers the last channel/squelch code combination that channel, but you must be set the unit channel to 5 and squelch code to show a list ...the "Appendix" for a table listing all the items fit in the window, a slider bar on the right side indicates your current position in the list. 3. Using the Thumb Stick, highlight the Channel or Code field and then press In to 21, then change the Channel and/or Squelch Code: 1. Scroll...
Owner's Manual
Page 18
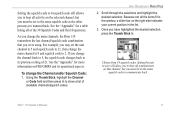
...few seconds, then continues scanning. As the unit scans and receives a signal (or if you transmit), it stops on that unit. The Rino 110 then uses that Squelch Code when it receives an incoming signal, the Rino 110 automatically decodes the Squelch Code used by the incoming signal. The Code field is ... > RADIO PAGE Scanning and Monitoring The Scan option allows you to scan through the all activity on channel. You may use the Set Scanlist option to pick which channels/squelch codes to scan. When the Rino 110 is scanning or monitoring channels. Rino® 110 Owner's Manual
...few seconds, then continues scanning. As the unit scans and receives a signal (or if you transmit), it stops on that unit. The Rino 110 then uses that Squelch Code when it receives an incoming signal, the Rino 110 automatically decodes the Squelch Code used by the incoming signal. The Code field is ... > RADIO PAGE Scanning and Monitoring The Scan option allows you to scan through the all activity on channel. You may use the Set Scanlist option to pick which channels/squelch codes to scan. When the Rino 110 is scanning or monitoring channels. Rino® 110 Owner's Manual
Owner's Manual
Page 19
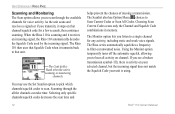
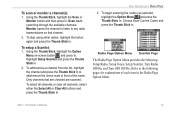
...: Setup Radio, Setup Tones, Setup Scanlist, Turn Radio Off/On, and Turn GPS Off/On. To setup a Scanlist: 1. Refer to any radio transmissions on -screen button and press In. Rino® 110 Owner's Manual 13 To stop using either the Select All or Clear All buttons and press the Thumb Stick In... Stick In. 2. To select all channels or clear all channels, select either option, highlight the button again and press the Thumb Stick In. Using the Thumb Stick, highlight the Scan or Monitor button and then press In. Only channels that channel. 2. Radio Page Option Menu Scanlist Page The...
...: Setup Radio, Setup Tones, Setup Scanlist, Turn Radio Off/On, and Turn GPS Off/On. To setup a Scanlist: 1. Refer to any radio transmissions on -screen button and press In. Rino® 110 Owner's Manual 13 To stop using either the Select All or Clear All buttons and press the Thumb Stick In... Stick In. 2. To select all channels or clear all channels, select either option, highlight the button again and press the Thumb Stick In. Using the Thumb Stick, highlight the Scan or Monitor button and then press In. Only channels that channel. 2. Radio Page Option Menu Scanlist Page The...
Owner's Manual
Page 20
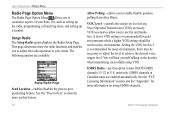
VOX Level-controls the sensitivity level of your needs. VOX accessories allow you to adjust the radio operation to your Rino 110, such as setting up the radio, programming call and ring tones, and setting up a scanlist. You will hear yourself talking in U.S. ...This page determines how the radio functions and enables you to use this feature. Allow Polling-allows you to customize aspects of any Voice Operated Transmission (VOX) accessory. units only. GMRS channels in noisy environments....
VOX Level-controls the sensitivity level of your needs. VOX accessories allow you to adjust the radio operation to your Rino 110, such as setting up the radio, programming call and ring tones, and setting up a scanlist. You will hear yourself talking in U.S. ...This page determines how the radio functions and enables you to use this feature. Allow Polling-allows you to customize aspects of any Voice Operated Transmission (VOX) accessory. units only. GMRS channels in noisy environments....
Owner's Manual
Page 21
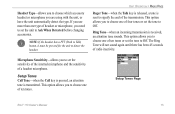
... Sensitivity-allows you to choose one of the transmission. UNIT OPERATION > RADIO PAGE Roger Tone-when the Talk key is released, a tone is received, an attention tone sounds. Setup Tones Call Tone-when the Call key is pressed, an attention tone is transmitted. This option allows you to choose...to Off. The Ring Tone will not sound again until there has been 45 seconds of ten tones. Setup Tones Page Rino® 110 Owner's Manual 15 If you use more than one of radio inactivity. Headset Type-allows you to choose which accessory headset or microphone you need to set ...
... Sensitivity-allows you to choose one of the transmission. UNIT OPERATION > RADIO PAGE Roger Tone-when the Talk key is released, a tone is received, an attention tone sounds. Setup Tones Call Tone-when the Call key is pressed, an attention tone is transmitted. This option allows you to choose...to Off. The Ring Tone will not sound again until there has been 45 seconds of ten tones. Setup Tones Page Rino® 110 Owner's Manual 15 If you use more than one of radio inactivity. Headset Type-allows you to choose which accessory headset or microphone you need to set ...

Owner's Manual
Page 24
... enabled (see page 14) and a GPS position (see the "Setup Radio" section). 2. Your Rino 110 responds to polling requests from another Rino, which is called Peer-to-Peer positioning...30 seconds due to ignore this contact. UNIT OPERATION > USING THE RINO 110 RADIO FEATURES Using the Rino 110 Radio Features Your Rino 110 unit provides many features to enhance your contact list (select...the "Initializing the Rino 110" section), whenever you to all other Rino users that a signal is received from other units more frequently. Peer-to-Peer Positioning The Rino 110's most unique feature ...
... enabled (see page 14) and a GPS position (see the "Setup Radio" section). 2. Your Rino 110 responds to polling requests from another Rino, which is called Peer-to-Peer positioning...30 seconds due to ignore this contact. UNIT OPERATION > USING THE RINO 110 RADIO FEATURES Using the Rino 110 Radio Features Your Rino 110 unit provides many features to enhance your contact list (select...the "Initializing the Rino 110" section), whenever you to all other Rino users that a signal is received from other units more frequently. Peer-to-Peer Positioning The Rino 110's most unique feature ...

Owner's Manual
Page 25
...GPS location on the last transmission, a ? (question mark) appears below the flag. Highlight OK and press the Thumb Stick In. Contacts behave like waypoints and count towards the 500 maximum waypoint total. Rino® 110 Owner's Manual 19 A Track Log of your map (see the "Map Page" section). UNIT OPERATION > USING THE RINO 110... RADIO FEATURES Press Left or Right on the Map Page (see the "Track Logs" section). To accept a new contact: 1. If you receive a signal from a contact, your map is updated showing their movement is received, the...
...GPS location on the last transmission, a ? (question mark) appears below the flag. Highlight OK and press the Thumb Stick In. Contacts behave like waypoints and count towards the 500 maximum waypoint total. Rino® 110 Owner's Manual 19 A Track Log of your map (see the "Map Page" section). UNIT OPERATION > USING THE RINO 110... RADIO FEATURES Press Left or Right on the Map Page (see the "Track Logs" section). To accept a new contact: 1. If you receive a signal from a contact, your map is updated showing their movement is received, the...


