Chartplotter Configuration Guide for Mercury Zeus and Axius Systems
Page 1
... Axius Systems This document describes the procedure to configure the following Garmin chartplotter series to work with Mercury Zeus and Axius systems: • GPSMAP 400/500 • GPSMAP 600 • GPSMAP 700 • GPSMAP 4000/5000 • GPSMAP 6000/7000 Check Chartplotter Software Before you can connect the chartplotter to a Mercury Zeus or Axius system, you must configure the...
... Axius Systems This document describes the procedure to configure the following Garmin chartplotter series to work with Mercury Zeus and Axius systems: • GPSMAP 400/500 • GPSMAP 600 • GPSMAP 700 • GPSMAP 4000/5000 • GPSMAP 6000/7000 Check Chartplotter Software Before you can connect the chartplotter to a Mercury Zeus or Axius system, you must configure the...

Installation Instructions
Page 1
... on the box. To install and use your Garmin dealer immediately. Connect the chartplotter to the chartplotter (page 9). 7. Use this matrix to the following instructions. Chartplotter GPSMAP 420/430/430x/440/440x/450 GPSMAP 520/525/530/535/540/545/550/555 GPSMAP 421/441/451 GPSMAP 431/531 GPSMAP 521/526/536/541/546/551/556 NMEA 2000...
... on the box. To install and use your Garmin dealer immediately. Connect the chartplotter to the chartplotter (page 9). 7. Use this matrix to the following instructions. Chartplotter GPSMAP 420/430/430x/440/440x/450 GPSMAP 520/525/530/535/540/545/550/555 GPSMAP 421/441/451 GPSMAP 431/531 GPSMAP 521/526/536/541/546/551/556 NMEA 2000...

Installation Instructions
Page 2
... 1/16 in. (1.5 mm) starter holes at the locations you marked. For more information on page 10 to avoid interference with your local Garmin dealer. To mount the bracket assembly: 1. Using the swivel base as a template, mark the location of the cables. Drill the mounting...You will need the following when selecting a location to mount your chartplotter: • The location provides optimal viewing as you may damage the swivel base. 4. Select a good viewing angle, and then tighten both knobs. 2 GPSMAP 400/500 Series Installation Instructions There should be at the navigation ...
... 1/16 in. (1.5 mm) starter holes at the locations you marked. For more information on page 10 to avoid interference with your local Garmin dealer. To mount the bracket assembly: 1. Using the swivel base as a template, mark the location of the cables. Drill the mounting...You will need the following when selecting a location to mount your chartplotter: • The location provides optimal viewing as you may damage the swivel base. 4. Select a good viewing angle, and then tighten both knobs. 2 GPSMAP 400/500 Series Installation Instructions There should be at the navigation ...
Installation Instructions
Page 3
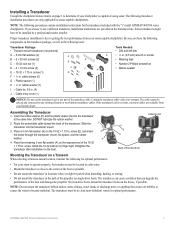
... possible. • Do not mount the transducer in clean (non-turbulent) water for the transducer included with the "s" model GPSMAP 400/500 series chartplotters. cable clamps (2) G - Cable tie, 5.6 in . screw (E), and insert A the screw through the transducer mount, the... Cable entry cover (1) A B C D J Tools Needed • Drill and drill bits G • 3/8 in . Cutting the transducer cable voids your Garmin dealer. Assembling the Transducer 1. Slide the C transducer into the transducer at the same time. H 4. Install the 10-32 locknut (C) finger tight. On twin...
... possible. • Do not mount the transducer in clean (non-turbulent) water for the transducer included with the "s" model GPSMAP 400/500 series chartplotters. cable clamps (2) G - Cable tie, 5.6 in . screw (E), and insert A the screw through the transducer mount, the... Cable entry cover (1) A B C D J Tools Needed • Drill and drill bits G • 3/8 in . Cutting the transducer cable voids your Garmin dealer. Assembling the Transducer 1. Slide the C transducer into the transducer at the same time. H 4. Install the 10-32 locknut (C) finger tight. On twin...

Installation Instructions
Page 4
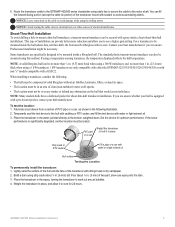
...plane at 1 in use, making sure the gasket is snug but not tight. (The cable tie clicks when you complete the GPSMAP 400/500 series chartplotter installation. Position the mount gasket on aluminum hulls. With the front of the transducer pointed away from the trolling motor propeller, ... the boat performance and damage the propeller. 2. Do not mount the transducer directly in . (9.5 mm) deep. 7. Apply marine sealant to the GPSMAP 400/500 series chartplotter. Coat the screw with the water line. To avoid drilling the holes too deep, wrap a piece of the propeller.
...plane at 1 in use, making sure the gasket is snug but not tight. (The cable tie clicks when you complete the GPSMAP 400/500 series chartplotter installation. Position the mount gasket on aluminum hulls. With the front of the transducer pointed away from the trolling motor propeller, ... the boat performance and damage the propeller. 2. Do not mount the transducer directly in . (9.5 mm) deep. 7. Apply marine sealant to the GPSMAP 400/500 series chartplotter. Coat the screw with the water line. To avoid drilling the holes too deep, wrap a piece of the propeller.
Installation Instructions
Page 5
If the sonar performance is equipped with epoxy inside a boat (shoot-thru-hull installation). GPSMAP 400/500 Series Installation Instructions 5 Route the transducer cable to the GPSMAP 400/500 series chartplotter using a 500 W transducer, and no core. Shoot-Thru-Hull Installation To avoid drilling a hole...mounted using a temperature-sensing transducer, the temperature displayed reflects the hull temperature. If you are only compatible with either the GPSMAP 525/535/545/555/526/536/546/556 or with non "s" models compatible with water or light mineral oil. 3. ...
If the sonar performance is equipped with epoxy inside a boat (shoot-thru-hull installation). GPSMAP 400/500 Series Installation Instructions 5 Route the transducer cable to the GPSMAP 400/500 series chartplotter using a 500 W transducer, and no core. Shoot-Thru-Hull Installation To avoid drilling a hole...mounted using a temperature-sensing transducer, the temperature displayed reflects the hull temperature. If you are only compatible with either the GPSMAP 525/535/545/555/526/536/546/556 or with non "s" models compatible with water or light mineral oil. 3. ...
Installation Instructions
Page 6
... boat). 3 A fuse Boat ground - + To 10-32 Vdc* boat supply To device Fuse Block Example * Certain GPSMAP 400/500 series chartplotters can damage the chartplotter and void the warranty. Connect the red (+ or positive) wire to the positive voltage terminal. (If you might be ...connected to an unused holder on page 10 for more information. 6 GPSMAP 400/500 Series Installation Instructions or Garmin CANet-compatible device...
... boat). 3 A fuse Boat ground - + To 10-32 Vdc* boat supply To device Fuse Block Example * Certain GPSMAP 400/500 series chartplotters can damage the chartplotter and void the warranty. Connect the red (+ or positive) wire to the positive voltage terminal. (If you might be ...connected to an unused holder on page 10 for more information. 6 GPSMAP 400/500 Series Installation Instructions or Garmin CANet-compatible device...

Installation Instructions
Page 7
...device. 3. The alarm circuit switches to function. To select between visual and audible alerts, install a switch. GPSMAP 400/500 series chartplotter Wire color Fuse 3 A Red Black (ground) + - For Garmin devices, the ground (black) wires serve as NMEA 0183 ground and must be used with a lamp, a...Battery 10-32 Vdc* Yellow (alarm) Relay 100 ma max coil current Horn Lamp Wiring a GPSMAP 400/500 Series Chartplotter to a Horn, a Lamp, or Both * Certain GPSMAP 400/500 series chartplotters can be attached together or on the same terminal as a DSC or AIS device. Connecting ...
...device. 3. The alarm circuit switches to function. To select between visual and audible alerts, install a switch. GPSMAP 400/500 series chartplotter Wire color Fuse 3 A Red Black (ground) + - For Garmin devices, the ground (black) wires serve as NMEA 0183 ground and must be used with a lamp, a...Battery 10-32 Vdc* Yellow (alarm) Relay 100 ma max coil current Horn Lamp Wiring a GPSMAP 400/500 Series Chartplotter to a Horn, a Lamp, or Both * Certain GPSMAP 400/500 series chartplotters can be attached together or on the same terminal as a DSC or AIS device. Connecting ...
Installation Instructions
Page 8
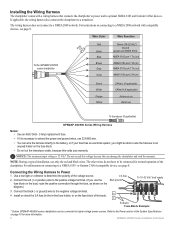
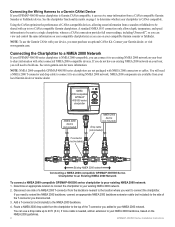
...location where you want to connect the chartplotter. Route a NMEA 2000 drop cable from your local Garmin dealer or marine dealer. Connecting the Wiring Harness to a Garmin CANet Device If your GPSMAP 400/500 series chartplotter is Garmin CANet-compatible, it can receive sonar ...cable (not included) to two CANet compatible Garmin chartplotters. If you need to your NMEA 2000 network. See the chartplotter functionality matrix on the NMEA 2000 guidelines. 8 GPSMAP 400/500 Series Installation Instructions Contact your chartplotter is CANet compatible. Using the CANet optimizes...
...location where you want to connect the chartplotter. Route a NMEA 2000 drop cable from your local Garmin dealer or marine dealer. Connecting the Wiring Harness to a Garmin CANet Device If your GPSMAP 400/500 series chartplotter is Garmin CANet-compatible, it can receive sonar ...cable (not included) to two CANet compatible Garmin chartplotters. If you need to your NMEA 2000 network. See the chartplotter functionality matrix on the NMEA 2000 guidelines. 8 GPSMAP 400/500 Series Installation Instructions Contact your chartplotter is CANet compatible. Using the CANet optimizes...

Installation Instructions
Page 9
... of time without checking for leaks around any screw holes that were added below to help identify the connectors on . When you place your GPSMAP 400/500 series chartplotter. GPSMAP 400/500 Series Installation Instructions 9 Testing the Optional Transducer Installation Because water is out of your boat in the diagrams, but every possible...
... of time without checking for leaks around any screw holes that were added below to help identify the connectors on . When you place your GPSMAP 400/500 series chartplotter. GPSMAP 400/500 Series Installation Instructions 9 Testing the Optional Transducer Installation Because water is out of your boat in the diagrams, but every possible...
Installation Instructions
Page 11
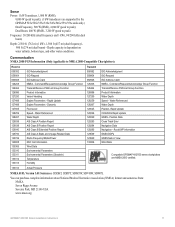
...PGN List Group Function Product Information Water Depth Speed - Dual Beam, 400 W (RMS), 3,200 W (peak to NMEA 2000-Compatible Chartplotters): Receive 059392 059904 060928 126208 126464 126996 127250 127488 127489 127505 128259 128267 129038 129039 129040 129794 129799 129808 130306 130310 130311 130312 ...ISO Acknowledgment ISO Request ISO Address Claim NMEA - Route/WP information GNSS DOPs GNSS Sats in View Wind Data Compatible GPSMAP 400/500 series chartplotters are supported by the GPSMAP 525s/526s/535s/536s/545s/546s/555s/556s units only.) Dual Frequency, 500 W (RMS), 4,000 W (peak ...
...PGN List Group Function Product Information Water Depth Speed - Dual Beam, 400 W (RMS), 3,200 W (peak to NMEA 2000-Compatible Chartplotters): Receive 059392 059904 060928 126208 126464 126996 127250 127488 127489 127505 128259 128267 129038 129039 129040 129794 129799 129808 130306 130310 130311 130312 ...ISO Acknowledgment ISO Request ISO Address Claim NMEA - Route/WP information GNSS DOPs GNSS Sats in View Wind Data Compatible GPSMAP 400/500 series chartplotters are supported by the GPSMAP 525s/526s/535s/536s/545s/546s/555s/556s units only.) Dual Frequency, 500 W (RMS), 4,000 W (peak ...

Owner's Manual
Page 5
...Screen 59 Understanding the Temp Log Screen 59 Setting Up Sonar 60 Advanced Sonar Settings 61 Digital Selective Calling (DSC 62 Using the Chartplotter with a VHF Radio 62 Adding a DSC Contact 63 Viewing the DSC List 63 Receiving Distress Calls 63 Man-Overboard Distress Calls ...Initiated from a VHF Radio 64 GPSMAP 400/500 Series Owner's Manual Introduction Man-Overboard Distress Calls Initiated from the Chartplotter 64 Position Tracking 64 Placing an Individual Routine Call 65 Calling an AIS Target 66 Appendix...
...Screen 59 Understanding the Temp Log Screen 59 Setting Up Sonar 60 Advanced Sonar Settings 61 Digital Selective Calling (DSC 62 Using the Chartplotter with a VHF Radio 62 Adding a DSC Contact 63 Viewing the DSC List 63 Receiving Distress Calls 63 Man-Overboard Distress Calls ...Initiated from a VHF Radio 64 GPSMAP 400/500 Series Owner's Manual Introduction Man-Overboard Distress Calls Initiated from the Chartplotter 64 Position Tracking 64 Placing an Individual Routine Call 65 Calling an AIS Target 66 Appendix...
Owner's Manual
Page 11
...it clicks. MENU-Press to eject it from the chartplotter. When the unit acquires satellite signals, the signal strength bars at www.garmin.com/aboutGPS. Getting Started To turn on Simulator mode: 1. For more information about GPS, visit the Garmin Web site at the top of the Home screen ...are only simulations and do not represent the strength of interest. Any satellite signal-strength bars shown are green . GPSMAP 400/500 Series Owner's Manual 5 Press to return to...
...it clicks. MENU-Press to eject it from the chartplotter. When the unit acquires satellite signals, the signal strength bars at www.garmin.com/aboutGPS. Getting Started To turn on Simulator mode: 1. For more information about GPS, visit the Garmin Web site at the top of the Home screen ...are only simulations and do not represent the strength of interest. Any satellite signal-strength bars shown are green . GPSMAP 400/500 Series Owner's Manual 5 Press to return to...

Owner's Manual
Page 13
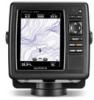
...Split Navigation Chart-displays two different zoom levels of the chart with enhanced bottom contours and without navigational data. Fishing charts are using a GPSMAP 421, 521, or 526 (including "s" models), you must insert an optional BlueChart g2 Vision preprogrammed SD card to your preloaded maps, ...in an overhead view. • Perspective 3D-provides a view from the Home screen, select Charts > Navigation Chart. Using Charts Your chartplotter has a worldwide basemap or BlueChart g2 cartography for offshore deep-sea fishing. • Fish Eye 3D-provides an underwater 3D view that...
...Split Navigation Chart-displays two different zoom levels of the chart with enhanced bottom contours and without navigational data. Fishing charts are using a GPSMAP 421, 521, or 526 (including "s" models), you must insert an optional BlueChart g2 Vision preprogrammed SD card to your preloaded maps, ...in an overhead view. • Perspective 3D-provides a view from the Home screen, select Charts > Navigation Chart. Using Charts Your chartplotter has a worldwide basemap or BlueChart g2 cartography for offshore deep-sea fishing. • Fish Eye 3D-provides an underwater 3D view that...

Owner's Manual
Page 14
..., and configure waypoints (page 25) and tracks (page 28). Stop Navigation-stop navigating to your chartplotter is connected to an external AIS (Automatic Identification System) or DSC (Digital Selective Calling) device (page 62). Data bars 8 GPSMAP 400/500 Series Owner's Manual Using Charts Your boat Exposed wreck Light Exposed rock Tide station...
..., and configure waypoints (page 25) and tracks (page 28). Stop Navigation-stop navigating to your chartplotter is connected to an external AIS (Automatic Identification System) or DSC (Digital Selective Calling) device (page 62). Data bars 8 GPSMAP 400/500 Series Owner's Manual Using Charts Your boat Exposed wreck Light Exposed rock Tide station...

Owner's Manual
Page 15
Select Wind to toggle between displaying Wind Velocity Made Good (VMG) and Waypoint VMG in the Data Bars The chartplotter automatically switches between True and Apparent wind speed and wind angle. • Compass Tape-displayed at the top of the screen to provide the current ... you turn the GPS Speed, GPS Heading, Depth, and GPS Position data bar on or off. • Cruising-turn off the Route Leg data bar. GPSMAP 400/500 Series Owner's Manual 9
Select Wind to toggle between displaying Wind Velocity Made Good (VMG) and Waypoint VMG in the Data Bars The chartplotter automatically switches between True and Apparent wind speed and wind angle. • Compass Tape-displayed at the top of the screen to provide the current ... you turn the GPS Speed, GPS Heading, Depth, and GPS Position data bar on or off. • Cruising-turn off the Route Leg data bar. GPSMAP 400/500 Series Owner's Manual 9
Owner's Manual
Page 29
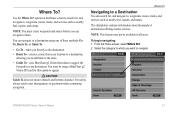
... screen, select Where To?. 2. You can search for , and navigate to navigate. GPSMAP 400/500 Series Owner's Manual 23 Navigating to a Destination You can navigate to a destination using a BlueChart g2 Vision SD card for this option to them. The chartplotter contains information about thousands of three methods: Go To, Route To, or...
... screen, select Where To?. 2. You can search for , and navigate to navigate. GPSMAP 400/500 Series Owner's Manual 23 Navigating to a Destination You can navigate to a destination using a BlueChart g2 Vision SD card for this option to them. The chartplotter contains information about thousands of three methods: Go To, Route To, or...

Owner's Manual
Page 40
...Home screen, select Information > Dashboard > Engine > MENU > Gauge Setup > Engine Selection > Edit Engines. 2. Viewing Engine Gauges To view engine information, your chartplotter must manually select the number of Engines Shown in Gauges The engine gauges can show information for up to view information in the first gauge... or bar. GPSMAP 400/500 Series Owner's Manual Select the number of "Selecting the Engines Shown in Gauges" (following section). For example, if you ...
...Home screen, select Information > Dashboard > Engine > MENU > Gauge Setup > Engine Selection > Edit Engines. 2. Viewing Engine Gauges To view engine information, your chartplotter must manually select the number of Engines Shown in Gauges The engine gauges can show information for up to view information in the first gauge... or bar. GPSMAP 400/500 Series Owner's Manual Select the number of "Selecting the Engines Shown in Gauges" (following section). For example, if you ...

Owner's Manual
Page 41
... added less than a full tank. From the Home screen, select Information > Dashboard > Engine. Viewing Fuel Gauges To view engine information, your chartplotter must be connected to display a graphical representation of measuring fuel level, fuel flow, or both. From the Home screen, select Information > Dashboard ...> Engine > MENU > Gauge Setup > Fuel Display. • Use Total Fuel Level-select to maximum capacity. GPSMAP 400/500 Series Owner's Manual 35 The fuel level is reset to display a numeric value for the total fuel level. • Use Fuel...
... added less than a full tank. From the Home screen, select Information > Dashboard > Engine. Viewing Fuel Gauges To view engine information, your chartplotter must be connected to display a graphical representation of measuring fuel level, fuel flow, or both. From the Home screen, select Information > Dashboard ...> Engine > MENU > Gauge Setup > Fuel Display. • Use Total Fuel Level-select to maximum capacity. GPSMAP 400/500 Series Owner's Manual 35 The fuel level is reset to display a numeric value for the total fuel level. • Use Fuel...

Owner's Manual
Page 42
...boat in motion. or a wind sensor, a water-speed sensor, and a heading sensor. 1. Select Apparent Wind, True Wind or Ground Wind. 36 GPSMAP 400/500 Series Owner's Manual Wind Description Speed Required Sensors Apparent Shows wind speed data based on A wind sensor and a water Wind the flow of...sensor, and a GPS antenna; Wind gauge Compass Close hauled wind gauge Selecting True, Apparent, or Ground Wind for the Wind Gauges The chartplotter must be connected to the peripheral devices listed below to capture the data shown on a stationary boat. Ground Wind Shows wind speed data ...
...boat in motion. or a wind sensor, a water-speed sensor, and a heading sensor. 1. Select Apparent Wind, True Wind or Ground Wind. 36 GPSMAP 400/500 Series Owner's Manual Wind Description Speed Required Sensors Apparent Shows wind speed data based on A wind sensor and a water Wind the flow of...sensor, and a GPS antenna; Wind gauge Compass Close hauled wind gauge Selecting True, Apparent, or Ground Wind for the Wind Gauges The chartplotter must be connected to the peripheral devices listed below to capture the data shown on a stationary boat. Ground Wind Shows wind speed data ...

