
Owner's Manual
Page 4
... Getting Started 1 Installing Batteries 1 Learning Key Functions 2 Start Up and Initialization 4 Initializing the GPS Receiver 4 The Main Page Sequence 5 Status Bar, Backlighting, and Contrast 6 The Satellite Page 7 GPS Navigation 7 The Map Page 8 Using the Map Page 8 Zooming and Panning 8 Changing the Map Page Display 9 Measuring Distance 11 Turning Declutter On/Off 11 The Compass Page 12...
... Getting Started 1 Installing Batteries 1 Learning Key Functions 2 Start Up and Initialization 4 Initializing the GPS Receiver 4 The Main Page Sequence 5 Status Bar, Backlighting, and Contrast 6 The Satellite Page 7 GPS Navigation 7 The Map Page 8 Using the Map Page 8 Zooming and Panning 8 Changing the Map Page Display 9 Measuring Distance 11 Turning Declutter On/Off 11 The Compass Page 12...
Owner's Manual
Page 5
...41 Interface Setup 41 Tones Setup 44 Page Sequence Setup 44 Using the Map Setup Feature 45 Map Setup-General Settings 45 Map Setup-Tracks Settings 46 Map Setup-Points Settings 46 Map Setup-Text Settings 46 Map Setup-Information Settings 46 Geocache Setup 47 Marine Setup 47 Time Setup ...48 Units Setup 48 Heading Setup 49 Welcome Page Setup 49 GPS Features 50 Calendar ...
...41 Interface Setup 41 Tones Setup 44 Page Sequence Setup 44 Using the Map Setup Feature 45 Map Setup-General Settings 45 Map Setup-Tracks Settings 46 Map Setup-Points Settings 46 Map Setup-Text Settings 46 Map Setup-Information Settings 46 Geocache Setup 47 Marine Setup 47 Time Setup ...48 Units Setup 48 Heading Setup 49 Welcome Page Setup 49 GPS Features 50 Calendar ...
Owner's Manual
Page 9
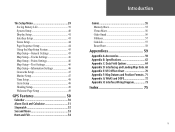
...which we identify as required in accordance with the most complete and accurate cartography that is available to us at http://www.garmin. If you have any NAVAID can be misused or misinterpreted and, therefore, become unsafe. The system is subject to changes .... Virtually all GPS equipment. Introduction Warnings and Precautions ix This Notice is being provided in product literature and copyright messages displayed to the consumer. Although the Garmin GPS 60 is either not available or prohibitively expensive. MAP DATA INFORMATION: One of the goals of Garmin is to provide...
...which we identify as required in accordance with the most complete and accurate cartography that is available to us at http://www.garmin. If you have any NAVAID can be misused or misinterpreted and, therefore, become unsafe. The system is subject to changes .... Virtually all GPS equipment. Introduction Warnings and Precautions ix This Notice is being provided in product literature and copyright messages displayed to the consumer. Although the Garmin GPS 60 is either not available or prohibitively expensive. MAP DATA INFORMATION: One of the goals of Garmin is to provide...
Owner's Manual
Page 12
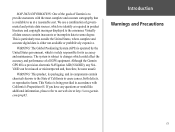
... • Move Left, Right, Up, or Down to scroll up or down a list. Getting Started Learning Key Functions IN/OUT Zoom Keys • From the Map Page, press and release to zoom in or out. • From any other page, press to move through the Main Pages. • Press when using...;rm on -screen buttons, and icons, enter data, or move the map panning arrow. ENTER Key • Press and release to adjust backlighting and contrast. QUIT Key • Press and release to cancel data entry or exit a page or menu. 2 GPS 60 IN FIND OUT PAGE MARK QUIT MENU ENTER POWER Key •...
... • Move Left, Right, Up, or Down to scroll up or down a list. Getting Started Learning Key Functions IN/OUT Zoom Keys • From the Map Page, press and release to zoom in or out. • From any other page, press to move through the Main Pages. • Press when using...;rm on -screen buttons, and icons, enter data, or move the map panning arrow. ENTER Key • Press and release to adjust backlighting and contrast. QUIT Key • Press and release to cancel data entry or exit a page or menu. 2 GPS 60 IN FIND OUT PAGE MARK QUIT MENU ENTER POWER Key •...
Owner's Manual
Page 15
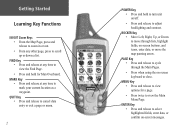
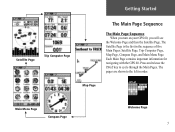
Map Page Main Menu Page Compass Page Welcome Page 5 Satellite Page Trip Computer Page Getting Started The Main Page Sequence The Main Page Sequence When you turn on your GPS 60, you will see the Welcome Page and then the Satellite Page. The Satellite Page is the first in order. The pages are shown to cycle through the Main Pages. Each Main Page contains important information for navigating with the GPS 60. Press and release the PAGE key to the left in the sequence of five Main Pages: Satellite Page, Trip Computer Page, Map Page, Compass Page, and Main Menu Page.
Map Page Main Menu Page Compass Page Welcome Page 5 Satellite Page Trip Computer Page Getting Started The Main Page Sequence The Main Page Sequence When you turn on your GPS 60, you will see the Welcome Page and then the Satellite Page. The Satellite Page is the first in order. The pages are shown to cycle through the Main Pages. Each Main Page contains important information for navigating with the GPS 60. Press and release the PAGE key to the left in the sequence of five Main Pages: Satellite Page, Trip Computer Page, Map Page, Compass Page, and Main Menu Page.

Owner's Manual
Page 17
... of the page, you can tell the GPS 60 your position in or out on the map. a shaded bar means the GPS 60 has already acquired a signal. From the Satellite Page, press MENU. each signal appears on the map near your location, press ENTER. An outlined bar means the GPS 60 is receiving. If you can see a number of...
... of the page, you can tell the GPS 60 your position in or out on the map. a shaded bar means the GPS 60 has already acquired a signal. From the Satellite Page, press MENU. each signal appears on the map near your location, press ENTER. An outlined bar means the GPS 60 is receiving. If you can see a number of...
Owner's Manual
Page 18
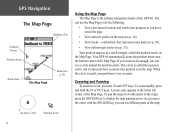
...see a circle around the position arrow. You can use the Map Page to display the map panning arrow. Your GPS 60 automatically keeps the position arrow near the bottom center of the Map Page. When the circle is small, your position is on the map. As you move across the page. • View and... as a small triangle, called the accuracy circle, and it represents how accurate your position is the primary navigation feature of the map. This circle is called the position arrow, on the map (see different parts of the GPS 60. Zooming and Panning To zoom in the lower left corner of the...
...see a circle around the position arrow. You can use the Map Page to display the map panning arrow. Your GPS 60 automatically keeps the position arrow near the bottom center of the Map Page. When the circle is small, your position is on the map. As you move across the page. • View and... as a small triangle, called the accuracy circle, and it represents how accurate your position is the primary navigation feature of the map. This circle is called the position arrow, on the map (see different parts of the GPS 60. Zooming and Panning To zoom in the lower left corner of the...
Owner's Manual
Page 19
...your position, speed, location, and more. Use the ROCKER key to change what direction you can see Guidance Text at the top of the Map Page; GGPPSS NNaavvigigaatitoinon The Map Page Track Up North Up Choose how many data fields you want to reach a destination. See p. 64 for a list of ...the map. With Track Up, the Map Page rotates as you see p. 45 to highlight 'Data Fields' and press ENTER. 3. When you are in Track Up or North Up orientation (...
...your position, speed, location, and more. Use the ROCKER key to change what direction you can see Guidance Text at the top of the Map Page; GGPPSS NNaavvigigaatitoinon The Map Page Track Up North Up Choose how many data fields you want to reach a destination. See p. 64 for a list of ...the map. With Track Up, the Map Page rotates as you see p. 45 to highlight 'Data Fields' and press ENTER. 3. When you are in Track Up or North Up orientation (...
Owner's Manual
Page 20
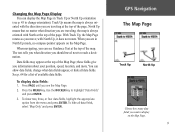
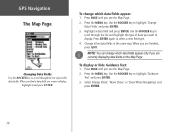
... data fields. Highlight a data field and press ENTER. NOTE: You can change which data fields appear only if you see the Map Page. 2. When you find a data field you want to display. Change other data fields in the same way. Use the ...to highlight 'Guidance Text' and press ENTER. 3. Press the MENU key. Press PAGE until you are currently displaying data fields on the Map Page. When you see the Map Page. 2. To display or hide Guidance Text: 1. Press the MENU key. Use the ROCKER key to select a new field type....
... data fields. Highlight a data field and press ENTER. NOTE: You can change which data fields appear only if you see the Map Page. 2. When you find a data field you want to display. Change other data fields in the same way. Use the ...to highlight 'Guidance Text' and press ENTER. 3. Press the MENU key. Press PAGE until you are currently displaying data fields on the Map Page. When you see the Map Page. 2. To display or hide Guidance Text: 1. Press the MENU key. Use the ROCKER key to select a new field type....
Owner's Manual
Page 21
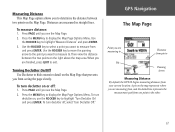
... declutter on the Map Page that prevents you see the Map Page. 2. GGPPSS NNaavvigigaatitoinon The Map Page Point you are measuring from, and the dotted line represents the measurement path from your current location. Press the MENU key to Pin Panning Arrow Measuring Distance By default, the GPS 60 begins measuring distances... Off.' When you want to highlight 'Turn Declutter On' and press ENTER. Press the MENU key to exit. To turn declutter on the Map Page. Use the ROCKER key to . Use the ROCKER key to move the panning arrow to the point you are measured in straight lines....
... declutter on the Map Page that prevents you see the Map Page. 2. GGPPSS NNaavvigigaatitoinon The Map Page Point you are measuring from, and the dotted line represents the measurement path from your current location. Press the MENU key to Pin Panning Arrow Measuring Distance By default, the GPS 60 begins measuring distances... Off.' When you want to highlight 'Turn Declutter On' and press ENTER. Press the MENU key to exit. To turn declutter on the Map Page. Use the ROCKER key to . Use the ROCKER key to move the panning arrow to the point you are measured in straight lines....

Owner's Manual
Page 22
... speed, estimated arrival time, and more. The Course Pointer indicates your course of data you always know what direction is especially helpful when using a paper map along with your destination.
... speed, estimated arrival time, and more. The Course Pointer indicates your course of data you always know what direction is especially helpful when using a paper map along with your destination.
Owner's Manual
Page 26
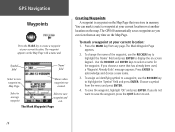
... to view waypoint on the Map Page with a name and 'Symbol' field 'Name' field Select to highlight the 'Symbol' field and press ENTER. To save the waypoint, highlight 'OK' and press ENTER. Shows when waypoint was created. The GPS 60 automatically saves waypoints so you ...store in memory. If you choose a name that you can mark (create) a waypoint at your current location or at any page. The waypoint appears on Map Page. You can view them at another location on...
... to view waypoint on the Map Page with a name and 'Symbol' field 'Name' field Select to highlight the 'Symbol' field and press ENTER. To save the waypoint, highlight 'OK' and press ENTER. Shows when waypoint was created. The GPS 60 automatically saves waypoints so you ...store in memory. If you choose a name that you can mark (create) a waypoint at your current location or at any page. The waypoint appears on Map Page. You can view them at another location on...

Owner's Manual
Page 27
...Overboard (MOB) waypoint is no landmarks for reference. The Map Page appears, showing a path from your current location and automatically creates a route back to that point, a message appears: 'Do you mark a MOB waypoint, the GPS 60 saves your current location to the MOB point. GGPPSS ...NNaavvigigaatitoinon Waypoints Creating a waypoint with the map panning arrow: 1. Use the path to navigate to display the MOB prompt. 2. Creating a ...
...Overboard (MOB) waypoint is no landmarks for reference. The Map Page appears, showing a path from your current location and automatically creates a route back to that point, a message appears: 'Do you mark a MOB waypoint, the GPS 60 saves your current location to the MOB point. GGPPSS ...NNaavvigigaatitoinon Waypoints Creating a waypoint with the map panning arrow: 1. Use the path to navigate to display the MOB prompt. 2. Creating a ...

Owner's Manual
Page 28
...For detailed information on how to makes the waypoint location more instruction). 2. Calculation begins automatically. 2. Averaging Waypoint Location The GPS 60 can calculate an average position for more accurate. The Average Location Page appears. Then follow steps two and three above. ...location over time to find and view Waypoint Information Pages, see p. 23 for a waypoint over time: 1. You can change the waypoint name, map symbol, location coordi- Press MARK to save the waypoint. Highlight 'Avg' and press ENTER. Highlight 'Save' and press ENTER to mark a ...
...For detailed information on how to makes the waypoint location more instruction). 2. Calculation begins automatically. 2. Averaging Waypoint Location The GPS 60 can calculate an average position for more accurate. The Average Location Page appears. Then follow steps two and three above. ...location over time to find and view Waypoint Information Pages, see p. 23 for a waypoint over time: 1. You can change the waypoint name, map symbol, location coordi- Press MARK to save the waypoint. Highlight 'Avg' and press ENTER. Highlight 'Save' and press ENTER to mark a ...

Owner's Manual
Page 29
...want to edit from the list and press ENTER. To delete the waypoint, highlight 'Delete' and press ENTER. 3. Press QUIT to activate the map panning arrow. 5. The Waypoint Information Page appears. 3. To edit or delete a waypoint: 1. Press ENTER again to close and save changes. ...described previously. Make any necessary changes to delete the waypoint Editing or Deleting a Waypoint New Location Original Location Moving a Waypoint 19 Highlight 'Map' at the bottom of the page and press ENTER to highlight 'Waypoints,' and press ENTER. 2. Press FIND, use the ROCKER key to...
...want to edit from the list and press ENTER. To delete the waypoint, highlight 'Delete' and press ENTER. 3. Press QUIT to activate the map panning arrow. 5. The Waypoint Information Page appears. 3. To edit or delete a waypoint: 1. Press ENTER again to close and save changes. ...described previously. Make any necessary changes to delete the waypoint Editing or Deleting a Waypoint New Location Original Location Moving a Waypoint 19 Highlight 'Map' at the bottom of the page and press ENTER to highlight 'Waypoints,' and press ENTER. 2. Press FIND, use the ROCKER key to...
Owner's Manual
Page 30
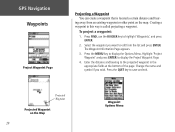
...to highlight 'Waypoints,' and press ENTER. 2. Enter the distance and bearing to edit from an existing waypoint or other point on the Map 20 Waypoint Options Menu To project a waypoint: 1. Creating a waypoint in the appropriate fields at the bottom of the page. Change... and press ENTER to save and exit. Press the QUIT key to display the Project Waypoint Page. 4. Projected Waypoint Projected Waypoint on the map. ing away from the list and press ENTER. GPGSPSNNaavviiggaattiioonn Waypoints Project Waypoint Page Projecting a Waypoint You can create a waypoint that is called ...
...to highlight 'Waypoints,' and press ENTER. 2. Enter the distance and bearing to edit from an existing waypoint or other point on the Map 20 Waypoint Options Menu To project a waypoint: 1. Creating a waypoint in the appropriate fields at the bottom of the page. Change... and press ENTER to save and exit. Press the QUIT key to display the Project Waypoint Page. 4. Projected Waypoint Projected Waypoint on the map. ing away from the list and press ENTER. GPGSPSNNaavviiggaattiioonn Waypoints Project Waypoint Page Projecting a Waypoint You can create a waypoint that is called ...

Owner's Manual
Page 33
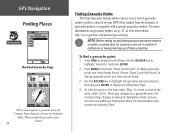
... the map other than your current location. To find a waypoint: 1. If the list is large, press MENU to display a list of the waypoint in alphabetical order. Use the ROCKER key to scroll up and down the list to display the Find Page. The Waypoint Information Page appears. GPS Navigation... Finding Places The Find Waypoint Page Press ENTER to enter the name of search options. • 'Find By Name' allows you to view the Waypoint Information Page Waypoint Information Page From this page, you to use the Panning Arrow to select a point on the map, or ...
... the map other than your current location. To find a waypoint: 1. If the list is large, press MENU to display a list of the waypoint in alphabetical order. Use the ROCKER key to scroll up and down the list to display the Find Page. The Waypoint Information Page appears. GPS Navigation... Finding Places The Find Waypoint Page Press ENTER to enter the name of search options. • 'Find By Name' allows you to view the Waypoint Information Page Waypoint Information Page From this page, you to use the Panning Arrow to select a point on the map, or ...
Owner's Manual
Page 34
For more information on the map, select 'Map.' To find a geocache point: 1. To view the point on geocache points, see p. 47, or visit our website, http://www.garmin.com/outdoor/geocaching. To create a route to display the Find Page. Press MENU and choose 'Show Found Cache' to display geocache ... 'Note.' When you navigate to a geocache point, the Compass Page changes to view a list of geocache points you are not in your GPS 60 or loaded from the Internet. NOTE: Before setting up and placing physical geocache stations on public or private land, be certain you have entered ...
For more information on the map, select 'Map.' To find a geocache point: 1. To view the point on geocache points, see p. 47, or visit our website, http://www.garmin.com/outdoor/geocaching. To create a route to display the Find Page. Press MENU and choose 'Show Found Cache' to display geocache ... 'Note.' When you navigate to a geocache point, the Compass Page changes to view a list of geocache points you are not in your GPS 60 or loaded from the Internet. NOTE: Before setting up and placing physical geocache stations on public or private land, be certain you have entered ...

Owner's Manual
Page 35
Select 'Change Reference' to the city from the list. To create a route to search near a point on the map other than your current location, select 'Go To.' GPS Navigation Finding Places Finding Cities Near Current Location Finding Cities by Name.' From the Find Page, use the ROCKER key to select the city ... select 'OK' on the keyboard and then use the ROCKER key to show cities that contain those letters. Select 'Nearest Containing' to it on the map or create a route to narrow the list of cities by name, begin spelling the name of letters. When you see the city you can view...
Select 'Change Reference' to the city from the list. To create a route to search near a point on the map other than your current location, select 'Go To.' GPS Navigation Finding Places Finding Cities Near Current Location Finding Cities by Name.' From the Find Page, use the ROCKER key to select the city ... select 'OK' on the keyboard and then use the ROCKER key to show cities that contain those letters. Select 'Nearest Containing' to it on the map or create a route to narrow the list of cities by name, begin spelling the name of letters. When you see the city you can view...

Owner's Manual
Page 36
... search option or choose 'Select Category' to display the Information Page for instructions on the Map Page, select 'Map.' To create a route to highlight the All POI icon or another Points of Interest icon and press ENTER. 2. GPS Navigation Finding Places The Find Page-Detailed Finding Points of Interest If you have loaded...
... search option or choose 'Select Category' to display the Information Page for instructions on the Map Page, select 'Map.' To create a route to highlight the All POI icon or another Points of Interest icon and press ENTER. 2. GPS Navigation Finding Places The Find Page-Detailed Finding Points of Interest If you have loaded...


