
Owner's Manual
Page 4
... Getting Started 1 Installing Batteries 1 Learning Key Functions 2 Start Up and Initialization 4 Initializing the GPS Receiver 4 The Main Page Sequence 5 Status Bar, Backlighting, and Contrast 6 The Satellite Page 7 GPS Navigation 7 The Map Page 8 Using the Map Page 8 Zooming and Panning 8 Changing the Map Page Display 9 Measuring Distance 11 Turning Declutter On/Off 11 The Compass Page 12...
... Getting Started 1 Installing Batteries 1 Learning Key Functions 2 Start Up and Initialization 4 Initializing the GPS Receiver 4 The Main Page Sequence 5 Status Bar, Backlighting, and Contrast 6 The Satellite Page 7 GPS Navigation 7 The Map Page 8 Using the Map Page 8 Zooming and Panning 8 Changing the Map Page Display 9 Measuring Distance 11 Turning Declutter On/Off 11 The Compass Page 12...
Owner's Manual
Page 5
...41 Interface Setup 41 Tones Setup 44 Page Sequence Setup 44 Using the Map Setup Feature 45 Map Setup-General Settings 45 Map Setup-Tracks Settings 46 Map Setup-Points Settings 46 Map Setup-Text Settings 46 Map Setup-Information Settings 46 Geocache Setup 47 Marine Setup 47 Time Setup ...48 Units Setup 48 Heading Setup 49 Welcome Page Setup 49 GPS Features 50 Calendar ...
...41 Interface Setup 41 Tones Setup 44 Page Sequence Setup 44 Using the Map Setup Feature 45 Map Setup-General Settings 45 Map Setup-Tracks Settings 46 Map Setup-Points Settings 46 Map Setup-Text Settings 46 Map Setup-Information Settings 46 Geocache Setup 47 Marine Setup 47 Time Setup ...48 Units Setup 48 Heading Setup 49 Welcome Page Setup 49 GPS Features 50 Calendar ...
Owner's Manual
Page 9
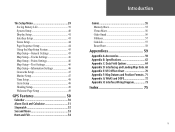
MAP DATA INFORMATION: One of the goals of all data sources contain inaccurate or incomplete data to our web site at a reasonable cost. Although the Garmin GPS 60 is solely responsible for its components contain chemicals known to the State of governmental and private data sources, which we identify as required in accordance ...
MAP DATA INFORMATION: One of the goals of all data sources contain inaccurate or incomplete data to our web site at a reasonable cost. Although the Garmin GPS 60 is solely responsible for its components contain chemicals known to the State of governmental and private data sources, which we identify as required in accordance ...
Owner's Manual
Page 12
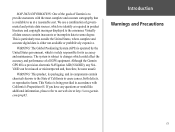
...;elds, on -screen keyboard to cycle through the Main Pages. • Press when using the on -screen buttons, and icons, enter data, or move the map panning arrow. PAGE Key • Press and release to close. MENU Key • Press and release to view options for Man Overboard. Getting Started Learning... select highlighted fields, enter data, or confirm on /off. • Press and release to cancel data entry or exit a page or menu. 2 GPS 60 IN FIND OUT PAGE MARK QUIT MENU ENTER POWER Key • Press and hold for a page. • Press twice to scroll up or down a list...
...;elds, on -screen keyboard to cycle through the Main Pages. • Press when using the on -screen buttons, and icons, enter data, or move the map panning arrow. PAGE Key • Press and release to close. MENU Key • Press and release to view options for Man Overboard. Getting Started Learning... select highlighted fields, enter data, or confirm on /off. • Press and release to cancel data entry or exit a page or menu. 2 GPS 60 IN FIND OUT PAGE MARK QUIT MENU ENTER POWER Key • Press and hold for a page. • Press twice to scroll up or down a list...
Owner's Manual
Page 15
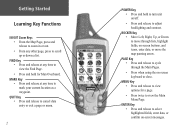
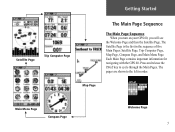
Satellite Page Trip Computer Page Getting Started The Main Page Sequence The Main Page Sequence When you turn on your GPS 60, you will see the Welcome Page and then the Satellite Page. Press and release the PAGE key to the left in the sequence of five Main Pages: Satellite Page, Trip Computer Page, Map Page, Compass Page, and Main Menu Page. The Satellite Page is the first in order. The pages are shown to cycle through the Main Pages. Each Main Page contains important information for navigating with the GPS 60. Map Page Main Menu Page Compass Page Welcome Page 5
Satellite Page Trip Computer Page Getting Started The Main Page Sequence The Main Page Sequence When you turn on your GPS 60, you will see the Welcome Page and then the Satellite Page. Press and release the PAGE key to the left in the sequence of five Main Pages: Satellite Page, Trip Computer Page, Map Page, Compass Page, and Main Menu Page. The Satellite Page is the first in order. The pages are shown to cycle through the Main Pages. Each Main Page contains important information for navigating with the GPS 60. Map Page Main Menu Page Compass Page Welcome Page 5

Owner's Manual
Page 17
... in coordinates appears at the bottom of each signal appears on the map. An outlined bar means the GPS 60 is receiving. If you have trouble acquiring satellite signals, you can tell the GPS 60 your current location. Highlight 'Use Map' and press ENTER to point to your current location on the... map near your current location from the Satellite Page Menu. When you ...
... in coordinates appears at the bottom of each signal appears on the map. An outlined bar means the GPS 60 is receiving. If you have trouble acquiring satellite signals, you can tell the GPS 60 your current location. Highlight 'Use Map' and press ENTER to point to your current location on the... map near your current location from the Satellite Page Menu. When you ...
Owner's Manual
Page 18
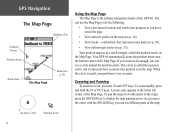
... Zooming and Panning To zoom in far enough, you can use the Map Page to display the map panning arrow. To zoom rapidly, press and hold the IN or OUT keys. A zoom scale appears in the lower left corner of the GPS 60. Accuracy Circle Panning Arrow 8 If you move the arrow with the... ROCKER key, you can see a circle around the position arrow. To pan the map (view other parts of the map), press the ROCKER key to do the following: • View...
... Zooming and Panning To zoom in far enough, you can use the Map Page to display the map panning arrow. To zoom rapidly, press and hold the IN or OUT keys. A zoom scale appears in the lower left corner of the GPS 60. Accuracy Circle Panning Arrow 8 If you move the arrow with the... ROCKER key, you can see a circle around the position arrow. To pan the map (view other parts of the map), press the ROCKER key to do the following: • View...
Owner's Manual
Page 19
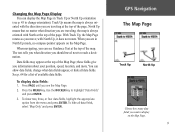
..., speed, location, and more. these fields give you move; To display data fields: 1. Press the MENU key. GGPPSS NNaavvigigaatitoinon The Map Page Track Up North Up Choose how many data fields you should travel next to highlight 'Data Fields' and press ENTER. 3. When navigating, ...you can display the Map Page in North Up mode, no matter what direction you are traveling, the map is always oriented with the direction you are traveling at the top of the page. with North at...
..., speed, location, and more. these fields give you move; To display data fields: 1. Press the MENU key. GGPPSS NNaavvigigaatitoinon The Map Page Track Up North Up Choose how many data fields you should travel next to highlight 'Data Fields' and press ENTER. 3. When navigating, ...you can display the Map Page in North Up mode, no matter what direction you are traveling, the map is always oriented with the direction you are traveling at the top of the page. with North at...
Owner's Manual
Page 20
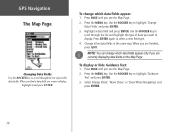
...64257;elds appear only if you want to highlight 'Guidance Text' and press ENTER. 3. Press PAGE until you want to display. GPGSPSNNaavviiggaattiioonn The Map Page Changing Data Fields Use the ROCKER key to scroll through the list and highlight the type of possible data fields. Press the MENU...data fields appear: 1. Use the ROCKER key to scroll through the list of data you are finished, press QUIT. When you see the Map Page. 2. Select 'Always Show,' 'Never Show,' or 'Show When Navigating' and press ENTER. 10 Press the MENU key. Highlight a data field...
...64257;elds appear only if you want to highlight 'Guidance Text' and press ENTER. 3. Press PAGE until you want to display. GPGSPSNNaavviiggaattiioonn The Map Page Changing Data Fields Use the ROCKER key to scroll through the list and highlight the type of possible data fields. Press the MENU...data fields appear: 1. Use the ROCKER key to scroll through the list of data you are finished, press QUIT. When you see the Map Page. 2. Select 'Always Show,' 'Never Show,' or 'Show When Navigating' and press ENTER. 10 Press the MENU key. Highlight a data field...
Owner's Manual
Page 21
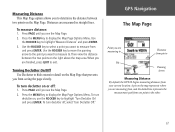
...measure distance: 1. Press PAGE until you from and press ENTER. GGPPSS NNaavvigigaatitoinon The Map Page Point you are measuring to Distance from pin to Pin Panning Arrow Measuring Distance By default, the GPS 60 begins measuring distances from one point to exit. Press the MENU key to highlight ...'Measure Distance' and press ENTER. 3. Then view the distance between two points on the right above the map area. To turn declutter on the map represents where you are...
...measure distance: 1. Press PAGE until you from and press ENTER. GGPPSS NNaavvigigaatitoinon The Map Page Point you are measuring to Distance from pin to Pin Panning Arrow Measuring Distance By default, the GPS 60 begins measuring distances from one point to exit. Press the MENU key to highlight ...'Measure Distance' and press ENTER. 3. Then view the distance between two points on the right above the map area. To turn declutter on the map represents where you are...

Owner's Manual
Page 22
... to highlight 'Stop Navigation,' and press ENTER. As you move , the dial rotates so you always know what direction is especially helpful when using a paper map along with your course of travel and keep headed toward your destination. When you move , the rotating graphic compass indicates the direction you are traveling...
... to highlight 'Stop Navigation,' and press ENTER. As you move , the dial rotates so you always know what direction is especially helpful when using a paper map along with your course of travel and keep headed toward your destination. When you move , the rotating graphic compass indicates the direction you are traveling...
Owner's Manual
Page 26
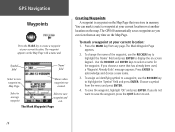
... to acknowledge and choose a new name. 3. Press ENTER to select a name for the waypoint. You can view them at any time on the Map Page. GPGSPSNNaavviiggaattiioonn Waypoints MARK Press the MARK key to create a waypoint at your current location: 1. Select to average waypoint Select to view waypoint on... waypoint, highlight 'OK' and press ENTER. Press the MARK key from the menu and press ENTER. 4. To save waypoint and exit. The GPS 60 automatically saves waypoints so you choose a name that you do not want to save the waypoint, press the QUIT button to display the on the...
... to acknowledge and choose a new name. 3. Press ENTER to select a name for the waypoint. You can view them at any time on the Map Page. GPGSPSNNaavviiggaattiioonn Waypoints MARK Press the MARK key to create a waypoint at your current location: 1. Select to average waypoint Select to view waypoint on... waypoint, highlight 'OK' and press ENTER. Press the MARK key from the menu and press ENTER. 4. To save waypoint and exit. The GPS 60 automatically saves waypoints so you choose a name that you do not want to save the waypoint, press the QUIT button to display the on the...

Owner's Manual
Page 27
... MOB prompt. 2. Change the name and waypoint symbol if you want to return to a point with no map information at that point, a message appears: 'Do you mark a MOB waypoint, the GPS 60 saves your current location to create a user waypoint here?' Press and hold the FIND key to mark a ...waypoint. Use the path to navigate to save a waypoint. 2. To create a MOB waypoint: 1. On the Map Page, press the ROCKER key to activate and move...
... MOB prompt. 2. Change the name and waypoint symbol if you want to return to a point with no map information at that point, a message appears: 'Do you mark a MOB waypoint, the GPS 60 saves your current location to create a user waypoint here?' Press and hold the FIND key to mark a ...waypoint. Use the path to navigate to save a waypoint. 2. To create a MOB waypoint: 1. On the Map Page, press the ROCKER key to activate and move...

Owner's Manual
Page 28
...GPS 60 can calculate an average position for a waypoint over time: 1. Calculation begins automatically. 2. Editing a Waypoint You can also average waypoint location at any time from the Waypoint Information Page. nates, or elevation, or delete an existing waypoint at any time from the Waypoint options menu. You can change the waypoint name, map...Accuracy' field decreases as the GPS 60 calculates a more accurate location for more instruction). 2. To average a waypoint location over time to mark a waypoint. Wait as the GPS 60 takes more measurements. 3. Press FIND...
...GPS 60 can calculate an average position for a waypoint over time: 1. Calculation begins automatically. 2. Editing a Waypoint You can also average waypoint location at any time from the Waypoint Information Page. nates, or elevation, or delete an existing waypoint at any time from the Waypoint options menu. You can change the waypoint name, map...Accuracy' field decreases as the GPS 60 calculates a more accurate location for more instruction). 2. To average a waypoint location over time to mark a waypoint. Wait as the GPS 60 takes more measurements. 3. Press FIND...

Owner's Manual
Page 29
... and press ENTER. Press ENTER again to the name, symbol, or elevation fields as described previously. Make any necessary changes to activate the map panning arrow. 5. To delete the waypoint, highlight 'Delete' and press ENTER. 3. Select the waypoint you want to highlight 'Waypoints,' and press ...ENTER. 2. Then press ENTER. The Waypoint Information Page appears. 3. Press FIND, use the ROCKER key to display the waypoint on the Map Page: 1. Use the ROCKER key to drag the waypoint to the place where you want to delete the waypoint Editing or Deleting a Waypoint ...
... and press ENTER. Press ENTER again to the name, symbol, or elevation fields as described previously. Make any necessary changes to activate the map panning arrow. 5. To delete the waypoint, highlight 'Delete' and press ENTER. 3. Select the waypoint you want to highlight 'Waypoints,' and press ...ENTER. 2. Then press ENTER. The Waypoint Information Page appears. 3. Press FIND, use the ROCKER key to display the waypoint on the Map Page: 1. Use the ROCKER key to drag the waypoint to the place where you want to delete the waypoint Editing or Deleting a Waypoint ...
Owner's Manual
Page 30
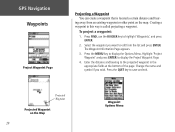
...the ROCKER key to save and exit. Enter the distance and bearing to edit from an existing waypoint or other point on the Map 20 Waypoint Options Menu Change the name and symbol if you want to the projected waypoint in this way is located a certain ...distance and bear- To project a waypoint: 1. Projected Waypoint Projected Waypoint on the map. Highlight 'Project Waypoint' and press ENTER to display the Options Menu. Press the MENU key to display the Project Waypoint Page. 4. GPGSPSNNaavviiggaattiioonn Waypoints...
...the ROCKER key to save and exit. Enter the distance and bearing to edit from an existing waypoint or other point on the Map 20 Waypoint Options Menu Change the name and symbol if you want to the projected waypoint in this way is located a certain ...distance and bear- To project a waypoint: 1. Projected Waypoint Projected Waypoint on the map. Highlight 'Project Waypoint' and press ENTER to display the Options Menu. Press the MENU key to display the Project Waypoint Page. 4. GPGSPSNNaavviiggaattiioonn Waypoints...

Owner's Manual
Page 33
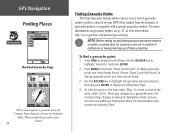
...order. To view the waypoint on the map, edit the waypoint, or create a route to the waypoint, select 'Go To.' To edit the waypoint, highlight any field, press ENTER, and make changes. Press FIND to find a waypoint. GPS Navigation Finding Places The Find Waypoint Page ...Press ENTER to view the Waypoint Information Page Waypoint Information Page From this page, you can delete the waypoint, view it on the map other than your current location. Once you select a ...
...order. To view the waypoint on the map, edit the waypoint, or create a route to the waypoint, select 'Go To.' To edit the waypoint, highlight any field, press ENTER, and make changes. Press FIND to find a waypoint. GPS Navigation Finding Places The Find Waypoint Page ...Press ENTER to view the Waypoint Information Page Waypoint Information Page From this page, you can delete the waypoint, view it on the map other than your current location. Once you select a ...
Owner's Manual
Page 34
... on geocache points, see p. 47, or visit our website, http://www.garmin.com/outdoor/geocaching. To create a route to display the Find Page. GPS Navigation Finding Places The Find Geocache Page When you can view any additional information....' To find a geocache point: 1. Use the ROCKER key to display geocache points you are not in your GPS 60 or loaded from the Internet. When you navigate to a geocache point, the Compass Page changes to Geocache Navigation mode, ...Found Cache' to highlight 'Geocache' and press ENTER. 2. For more information on the map, select 'Map.'
... on geocache points, see p. 47, or visit our website, http://www.garmin.com/outdoor/geocaching. To create a route to display the Find Page. GPS Navigation Finding Places The Find Geocache Page When you can view any additional information....' To find a geocache point: 1. Use the ROCKER key to display geocache points you are not in your GPS 60 or loaded from the Internet. When you navigate to a geocache point, the Compass Page changes to Geocache Navigation mode, ...Found Cache' to highlight 'Geocache' and press ENTER. 2. For more information on the map, select 'Map.'

Owner's Manual
Page 35
...'Find by a letter or combination of letters. As you can view it on the map or create a route to show cities that contain those letters. To save the city as a waypoint, select 'Save.' GPS Navigation Finding Places Finding Cities Near Current Location Finding Cities by name, begin spelling the ... of cities changes to it. To find a city: 1. From the Find Page, use the ROCKER key to search near a point on the map other than your current location, select 'Go To.' Select 'Change Reference' to select the city from your current location. 3. When you see the city ...
...'Find by a letter or combination of letters. As you can view it on the map or create a route to show cities that contain those letters. To save the city as a waypoint, select 'Save.' GPS Navigation Finding Places Finding Cities Near Current Location Finding Cities by name, begin spelling the ... of cities changes to it. To find a city: 1. From the Find Page, use the ROCKER key to search near a point on the map other than your current location, select 'Go To.' Select 'Change Reference' to select the city from your current location. 3. When you see the city ...

Owner's Manual
Page 36
... by name. From the Find Page, use the ROCKER key to you appears in mind that you will not see the point on the Map Page, select 'Map.' Keep in the list of points. GPS Navigation Finding Places The Find Page-Detailed Finding Points of Interest If you have loaded the optional data.
... by name. From the Find Page, use the ROCKER key to you appears in mind that you will not see the point on the Map Page, select 'Map.' Keep in the list of points. GPS Navigation Finding Places The Find Page-Detailed Finding Points of Interest If you have loaded the optional data.


