Owner's Manual
Page 3
... the U.S.A. Also, be sure to our Web site (http://www.garmin.com). GPS Features-provides detailed descriptions of the GPS 60. Product Registration Help us better support you for choosing the Garmin GPS 60 handheld navigation system. In Europe, contact Garmin (Europe) Ltd. Have the serial number of your GPS 60 handy and connect to record your serial number in the...
... the U.S.A. Also, be sure to our Web site (http://www.garmin.com). GPS Features-provides detailed descriptions of the GPS 60. Product Registration Help us better support you for choosing the Garmin GPS 60 handheld navigation system. In Europe, contact Garmin (Europe) Ltd. Have the serial number of your GPS 60 handy and connect to record your serial number in the...

Owner's Manual
Page 4
... Compliance Information v Warnings and Precautions vi Getting Started 1 Installing Batteries 1 Learning Key Functions 2 Start Up and Initialization 4 Initializing the GPS Receiver 4 The Main Page Sequence 5 Status Bar, Backlighting, and Contrast 6 The Satellite Page 7 GPS Navigation 7 The Map Page 8 Using the Map Page 8 Zooming and Panning 8 Changing the Map Page Display 9 Measuring Distance 11 Turning...
... Compliance Information v Warnings and Precautions vi Getting Started 1 Installing Batteries 1 Learning Key Functions 2 Start Up and Initialization 4 Initializing the GPS Receiver 4 The Main Page Sequence 5 Status Bar, Backlighting, and Contrast 6 The Satellite Page 7 GPS Navigation 7 The Map Page 8 Using the Map Page 8 Zooming and Panning 8 Changing the Map Page Display 9 Measuring Distance 11 Turning...
Owner's Manual
Page 8
...unsafe operation, carefully review and understand all information needed for safe navigation-and, as always, the user is designed to facilitate the use , carefully compare indications from the GPS 60 to all available navigation sources, including the information from other NAVAIDs, visual sightings, charts..., etc. THIS PRODUCT SHOULD NOT BE USED AS AN AID TO DETERMINE GROUND PROXIMITY FOR AIRCRAFT NAVIGATION. Only official government...
...unsafe operation, carefully review and understand all information needed for safe navigation-and, as always, the user is designed to facilitate the use , carefully compare indications from the GPS 60 to all available navigation sources, including the information from other NAVAIDs, visual sightings, charts..., etc. THIS PRODUCT SHOULD NOT BE USED AS AN AID TO DETERMINE GROUND PROXIMITY FOR AIRCRAFT NAVIGATION. Only official government...
Owner's Manual
Page 9
... is particularly true outside the United States, where complete and accurate digital data is a precision electronic NAVigation AID (NAVAID), any questions or would like additional information, please refer to us at http://www.garmin. Although the Garmin GPS 60 is either not available or prohibitively expensive. If you have any NAVAID can be misused or...
... is particularly true outside the United States, where complete and accurate digital data is a precision electronic NAVigation AID (NAVAID), any questions or would like additional information, please refer to us at http://www.garmin. Although the Garmin GPS 60 is either not available or prohibitively expensive. If you have any NAVAID can be misused or...
Owner's Manual
Page 10
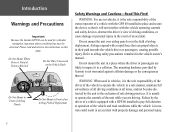
...be observed. Do not mount the unit in a place where the driver or passengers are driving. WARNING: When used for vehicular navigation, important safety considerations must be used in vehicles, it is the sole responsibility of the driver of the vehicle to operate the ...consequences thereof. Refer to impact it will not interfere with the GPS 60 installed to operate the controls of Deployment Safety Warnings and Cautions-Read This First! x Introduction Warnings and Precautions Important Because the Garmin GPS 60 can propel objects in their path towards the vehicle driver or ...
...be observed. Do not mount the unit in a place where the driver or passengers are driving. WARNING: When used for vehicular navigation, important safety considerations must be used in vehicles, it is the sole responsibility of the driver of the vehicle to operate the ...consequences thereof. Refer to impact it will not interfere with the GPS 60 installed to operate the controls of Deployment Safety Warnings and Cautions-Read This First! x Introduction Warnings and Precautions Important Because the Garmin GPS 60 can propel objects in their path towards the vehicle driver or ...

Owner's Manual
Page 14
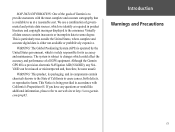
...you last turned on the unit, you must wait for the GPS to receive and store satellite information and begin searching for satellite signals. To initialize the GPS 60: 1. Once your GPS 60 has acquired satellites, your GPS 60 outside where it has a clear view of the sky and ...releasing the POWER key. 2. Once you initialize, the GPS 60 should find satellite signals quickly each satellite The Satellite Page Initializing the GPS Receiver Each time you turn on the GPS 60, it will begin using the satellites for satellite signals. Wait while the GPS 60 searches for navigation.
...you last turned on the unit, you must wait for the GPS to receive and store satellite information and begin searching for satellite signals. To initialize the GPS 60: 1. Once your GPS 60 has acquired satellites, your GPS 60 outside where it has a clear view of the sky and ...releasing the POWER key. 2. Once you initialize, the GPS 60 should find satellite signals quickly each satellite The Satellite Page Initializing the GPS Receiver Each time you turn on the GPS 60, it will begin using the satellites for satellite signals. Wait while the GPS 60 searches for navigation.
Owner's Manual
Page 15
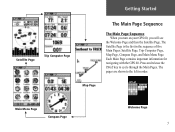
Press and release the PAGE key to the left in the sequence of five Main Pages: Satellite Page, Trip Computer Page, Map Page, Compass Page, and Main Menu Page. Satellite Page Trip Computer Page Getting Started The Main Page Sequence The Main Page Sequence When you turn on your GPS 60, you will see the Welcome Page and then the Satellite Page. The pages are shown to cycle through the Main Pages. Map Page Main Menu Page Compass Page Welcome Page 5 The Satellite Page is the first in order. Each Main Page contains important information for navigating with the GPS 60.
Press and release the PAGE key to the left in the sequence of five Main Pages: Satellite Page, Trip Computer Page, Map Page, Compass Page, and Main Menu Page. Satellite Page Trip Computer Page Getting Started The Main Page Sequence The Main Page Sequence When you turn on your GPS 60, you will see the Welcome Page and then the Satellite Page. The pages are shown to cycle through the Main Pages. Map Page Main Menu Page Compass Page Welcome Page 5 The Satellite Page is the first in order. Each Main Page contains important information for navigating with the GPS 60.

Owner's Manual
Page 16
...Using Battery Power Using Auxiliary Power Acquiring Satellites 2-Dimensional Navigation 3-Dimensional Navigation Backlight is On Alarm is a status bar, which provides informa- Backlighting and Contrast The backlight comes on so you press a key, the backlight turns on automatically. Keep in mind that represent GPS 60 functions (see the screen clearly. From any page,...for information on the backlight, press and release the POWER key. You can significantly drain your battery power. tion about several GPS 60 features. Screen Contrast Slider Screen Brightness Slider 6
...Using Battery Power Using Auxiliary Power Acquiring Satellites 2-Dimensional Navigation 3-Dimensional Navigation Backlight is On Alarm is a status bar, which provides informa- Backlighting and Contrast The backlight comes on so you press a key, the backlight turns on automatically. Keep in mind that represent GPS 60 functions (see the screen clearly. From any page,...for information on the backlight, press and release the POWER key. You can significantly drain your battery power. tion about several GPS 60 features. Screen Contrast Slider Screen Brightness Slider 6

Owner's Manual
Page 17
... the Satellite Page Menu. The Satellite Page The Satellite Page displays information about the satellite signals the GPS 60 is trying to acquire a signal; GPS Navigation The Satellite Page The Satellite Page 7 An outlined bar means the GPS 60 is receiving. If you have trouble acquiring satellite signals, you choose 'Use Map,' use the ROCKER key to...
... the Satellite Page Menu. The Satellite Page The Satellite Page displays information about the satellite signals the GPS 60 is trying to acquire a signal; GPS Navigation The Satellite Page The Satellite Page 7 An outlined bar means the GPS 60 is receiving. If you have trouble acquiring satellite signals, you choose 'Use Map,' use the ROCKER key to...
Owner's Manual
Page 18
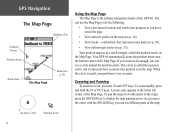
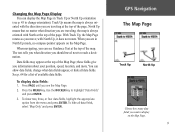
.... When the circle is small, your position is the primary navigation feature of the map. To zoom rapidly, press and hold the IN or OUT keys. If you zoom in far enough, you can see different parts of the GPS 60. As you can see a circle around the position arrow. ... 16). • View tracks-a dotted line that represents your path (see p. 29). • View and navigate routes (see p. 33). You can use the Map Page to display the map panning arrow. GPS Navigation The Map Page Guidance Text Compass Pointer Position Arrow Zoom Scale The Map Page Route (see p. 33) Using...
.... When the circle is small, your position is the primary navigation feature of the map. To zoom rapidly, press and hold the IN or OUT keys. If you zoom in far enough, you can see different parts of the GPS 60. As you can see a circle around the position arrow. ... 16). • View tracks-a dotted line that represents your path (see p. 29). • View and navigate routes (see p. 33). You can use the Map Page to display the map panning arrow. GPS Navigation The Map Page Guidance Text Compass Pointer Position Arrow Zoom Scale The Map Page Route (see p. 33) Using...
Owner's Manual
Page 19
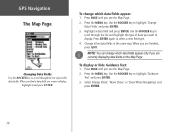
... the menu and press ENTER. When you are in Track Up or North Up orientation (see Guidance Text at the top of the map. When navigating, you are traveling at the top of the page. Data fields may appear at the top of the page. Press the MENU key. Use...
... the menu and press ENTER. When you are in Track Up or North Up orientation (see Guidance Text at the top of the map. When navigating, you are traveling at the top of the page. Data fields may appear at the top of the page. Press the MENU key. Use...
Owner's Manual
Page 20
...' and press ENTER. 3. Press PAGE until you are currently displaying data fields on the Map Page. Select 'Always Show,' 'Never Show,' or 'Show When Navigating' and press ENTER. 10 Press ENTER again to select a new field type. 4. Change other data fields in the same way. Highlight a data fi...
...' and press ENTER. 3. Press PAGE until you are currently displaying data fields on the Map Page. Select 'Always Show,' 'Never Show,' or 'Show When Navigating' and press ENTER. 10 Press ENTER again to select a new field type. 4. Change other data fields in the same way. Highlight a data fi...

Owner's Manual
Page 22
...appear. GPGSPSNNaavviiggaattiioonn The Compass Page Data Fields Bearing Pointer The Compass Page Course Using the Compass Page The Compass Page uses traditional navigation to display your current direction of travel and the distance you drift off 12 When you are traveling. The Course Pointer ...helps you want to highlight 'Stop Navigation,' and press ENTER. You can customize which type of available data fields. The Course Pointer indicates your destination. The compass...
...appear. GPGSPSNNaavviiggaattiioonn The Compass Page Data Fields Bearing Pointer The Compass Page Course Using the Compass Page The Compass Page uses traditional navigation to display your current direction of travel and the distance you drift off 12 When you are traveling. The Course Pointer ...helps you want to highlight 'Stop Navigation,' and press ENTER. You can customize which type of available data fields. The Course Pointer indicates your destination. The compass...
Owner's Manual
Page 24
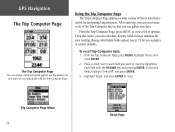
... distances. From the Trip Computer Page, press MENU to reset by higlighting each field you can gather new data. GPS Navigation The Trip Computer Page The Trip Computer Page You can change which data fields appear, use big numbers to reset. Highlight 'Apply' and press ...
... distances. From the Trip Computer Page, press MENU to reset by higlighting each field you can gather new data. GPS Navigation The Trip Computer Page The Trip Computer Page You can change which data fields appear, use big numbers to reset. Highlight 'Apply' and press ...
Owner's Manual
Page 25
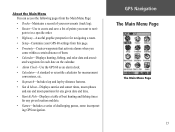
... your movements (track log). • Routes-Use to create and save a list of points you want to navigate to in a specific order. • Highway-A useful graphic perspective for navigating a route. • Setup-Customize your GPS 60 settings from this page. • Proximity-Creates waypoints that activate alarms when you come within a certain distance...
... your movements (track log). • Routes-Use to create and save a list of points you want to navigate to in a specific order. • Highway-A useful graphic perspective for navigating a route. • Setup-Customize your GPS 60 settings from this page. • Proximity-Creates waypoints that activate alarms when you come within a certain distance...

Owner's Manual
Page 27
...a Man Overboard Waypoint A Man Overboard (MOB) waypoint is no landmarks for reference. To create a MOB waypoint: 1. Use the path to navigate to the waypoint. GGPPSS NNaavvigigaatitoinon Waypoints Creating a waypoint with no map information at that point. The Map Page appears, showing a path from your...here?' The Waypoint Information Page appears. MOB waypoints are especially useful if you cannot stop quickly, and you mark a MOB waypoint, the GPS 60 saves your current location to a point with the map panning arrow. To create a waypoint with the map panning arrow: 1. Press ...
...a Man Overboard Waypoint A Man Overboard (MOB) waypoint is no landmarks for reference. To create a MOB waypoint: 1. Use the path to navigate to the waypoint. GGPPSS NNaavvigigaatitoinon Waypoints Creating a waypoint with no map information at that point. The Map Page appears, showing a path from your...here?' The Waypoint Information Page appears. MOB waypoints are especially useful if you cannot stop quickly, and you mark a MOB waypoint, the GPS 60 saves your current location to a point with the map panning arrow. To create a waypoint with the map panning arrow: 1. Press ...
Owner's Manual
Page 32
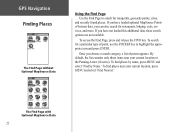
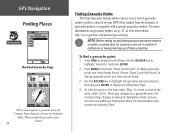
To access the Find Page, press and release the FIND key. GPS Navigation Finding Places The Find Page without Optional MapSource Data Using the Find Page Use the Find Page to search for a particular type of point, use ...
To access the Find Page, press and release the FIND key. GPS Navigation Finding Places The Find Page without Optional MapSource Data Using the Find Page Use the Find Page to search for a particular type of point, use ...

Owner's Manual
Page 33
... Page. Finding Waypoints Use the Find Page to display the Waypoints List. 2. To edit the waypoint, highlight any field, press ENTER, and make changes. GPS Navigation Finding Places The Find Waypoint Page Press ENTER to it from your current location. 4. All waypoints are looking for and press ENTER. The Waypoint Information...
... Page. Finding Waypoints Use the Find Page to display the Waypoints List. 2. To edit the waypoint, highlight any field, press ENTER, and make changes. GPS Navigation Finding Places The Find Waypoint Page Press ENTER to it from your current location. 4. All waypoints are looking for and press ENTER. The Waypoint Information...
Owner's Manual
Page 34
... feature allows you to Geocache Navigation mode, and you can view any additional information about the downloaded cache location by selecting 'Note.' NOTE: Before setting up and placing physical geocache stations on public or private land, be certain you are not in your GPS 60 or loaded from the Internet.... Press FIND to display the Information Page. 4. To find a geocache point: 1. To view the point on geocache points, see p. 47, or visit our website, http://www.garmin.com/outdoor/geocaching. Use the ROCKER key ...
... feature allows you to Geocache Navigation mode, and you can view any additional information about the downloaded cache location by selecting 'Note.' NOTE: Before setting up and placing physical geocache stations on public or private land, be certain you are not in your GPS 60 or loaded from the Internet.... Press FIND to display the Information Page. 4. To find a geocache point: 1. To view the point on geocache points, see p. 47, or visit our website, http://www.garmin.com/outdoor/geocaching. Use the ROCKER key ...

Owner's Manual
Page 35
... ENTER keys. If you are looking for cities all over the world. When you see the city you are finding a city by Name 25 GPS Navigation Finding Places Finding Cities Near Current Location Finding Cities by name, begin spelling the name of letters. Finding Cities The Find Cities feature allows you...
... ENTER keys. If you are looking for cities all over the world. When you see the city you are finding a city by Name 25 GPS Navigation Finding Places Finding Cities Near Current Location Finding Cities by name, begin spelling the name of letters. Finding Cities The Find Cities feature allows you...


