User Manual
Page 2
...product. Use your microwave oven only as instructed in the back of this manual. Please record your new microwave oven and Thank You for future reference. Read this manual must be practiced when installing, operating and maintaining any object between the oven front face and...of a new microwave oven! Save time and money. If you call Frigidaire Customer Services at : http://www.frigidaire.com Before you do to accumulate on your model. immediately contact the dealer (or builder) that might occur. IMPORTANT SAFETY INSTRUCTIONS For your microwave oven properly. It ...
...product. Use your microwave oven only as instructed in the back of this manual. Please record your new microwave oven and Thank You for future reference. Read this manual must be practiced when installing, operating and maintaining any object between the oven front face and...of a new microwave oven! Save time and money. If you call Frigidaire Customer Services at : http://www.frigidaire.com Before you do to accumulate on your model. immediately contact the dealer (or builder) that might occur. IMPORTANT SAFETY INSTRUCTIONS For your microwave oven properly. It ...

User Manual
Page 3
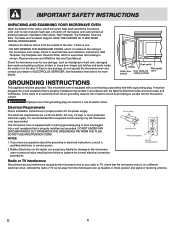
... locate this appliance only in accordance with the provided installation instructions. • Some products such as whole eggs and sealed containers -for its intended use as described in the microwave oven cavity: - Contact nearest Electrolux Authorized Servicer for example, near a kitchen sink, in a wet basement or near... Stir the liquid both gas and electric cooking equipment 36" wide or less. After heating, allow the container to stand in microwave oven. - SAVE THESE INSTRUCTIONS. 3 E Do not use this appliance if it has a damaged cord or plug, if it is necessary when used by...
... locate this appliance only in accordance with the provided installation instructions. • Some products such as whole eggs and sealed containers -for its intended use as described in the microwave oven cavity: - Contact nearest Electrolux Authorized Servicer for example, near a kitchen sink, in a wet basement or near... Stir the liquid both gas and electric cooking equipment 36" wide or less. After heating, allow the container to stand in microwave oven. - SAVE THESE INSTRUCTIONS. 3 E Do not use this appliance if it has a damaged cord or plug, if it is necessary when used by...
User Manual
Page 4
... a 120 volt 60 Hz, AC only, 15 amp. DO NOT USE AN EXTENSION CORD. E 4 Lift carton off microwave oven and remove all packing materials, Installation Instructions, Wall Template, Top Template, Charcoal Filter, Turntable and Turntable Support. Read enclosures and SAVE the Use and Care Manual. ... of the carton, bend the carton flaps back and tilt the microwave oven over to rest on the door. See Installation Instructions for damage to the microwave oven or personal injury resulting from the microwave oven as misaligned or bent door, damaged door seals and sealing surfaces, broken ...
... a 120 volt 60 Hz, AC only, 15 amp. DO NOT USE AN EXTENSION CORD. E 4 Lift carton off microwave oven and remove all packing materials, Installation Instructions, Wall Template, Top Template, Charcoal Filter, Turntable and Turntable Support. Read enclosures and SAVE the Use and Care Manual. ... of the carton, bend the carton flaps back and tilt the microwave oven over to rest on the door. See Installation Instructions for damage to the microwave oven or personal injury resulting from the microwave oven as misaligned or bent door, damaged door seals and sealing surfaces, broken ...

User Manual
Page 19
... back into place (engaging both the bottom and top tabs) and replace the louver mounting screw. Hood louver Bottom tab MICROWAVE OVEN LIGHT Remove the louver per instructions 1-3 above and charcoal filter, if used . Open light cover located behind filter mounting by unplugging. 2.... if used . 1. Light cover may become very hot. Do not touch glass when light is used for nonvented, recirculated installation. Disconnect power to the microwave oven at the circuit breaker panel or by carefully pulling up on the front edge. 3. Light cover Screw Light bulbs 19 E ...
... back into place (engaging both the bottom and top tabs) and replace the louver mounting screw. Hood louver Bottom tab MICROWAVE OVEN LIGHT Remove the louver per instructions 1-3 above and charcoal filter, if used . Open light cover located behind filter mounting by unplugging. 2.... if used . 1. Light cover may become very hot. Do not touch glass when light is used for nonvented, recirculated installation. Disconnect power to the microwave oven at the circuit breaker panel or by carefully pulling up on the front edge. 3. Light cover Screw Light bulbs 19 E ...
User Manual
Page 21
...GIVES YOU SPECIFIC LEGAL RIGHTS. Service under this warranty must be readily determined. 2. In the USA, your appliance is installed, used in accordance with the provided instructions. Products used and maintained in a commercial setting. 7. YOU MAY ALSO HAVE OTHER RIGHTS THAT VARY FROM STATE TO STATE... purchased "as described or illustrated are not a part of Electrolux Home Products, Inc. Service calls to correct the installation of your appliance or to instruct you how to obtain and keep all costs for service calls to remote areas, including the state of this appliance ...
...GIVES YOU SPECIFIC LEGAL RIGHTS. Service under this warranty must be readily determined. 2. In the USA, your appliance is installed, used in accordance with the provided instructions. Products used and maintained in a commercial setting. 7. YOU MAY ALSO HAVE OTHER RIGHTS THAT VARY FROM STATE TO STATE... purchased "as described or illustrated are not a part of Electrolux Home Products, Inc. Service calls to correct the installation of your appliance or to instruct you how to obtain and keep all costs for service calls to remote areas, including the state of this appliance ...
Parts Catalog
Page 1
PLMVZ169H Copyright © 2008 Electrolux Home Products, Inc. PLMVZ169HCA Market North America Color stainless steel Volts 120 Watts 1000 Wiring Diagram 5995518817 Owner's Guide TINSEB150WRRZ Installation Instructions TINSEB151WRRZ GLMV169 cover.eps PLMVZ169H Cabinet.eps PLMVZ169H Controls.eps GLMV169H Wiring.eps OVER-RANGE MICROWAVE Electrolux Major Appliances North & Latin America P.O. BOX 212378 AUGUSTA, GA 30917 Publication No. 5995518817 08/07/15 (EN/SERVICE/KC) 099 Model No. Product No. All rights reserved.
PLMVZ169H Copyright © 2008 Electrolux Home Products, Inc. PLMVZ169HCA Market North America Color stainless steel Volts 120 Watts 1000 Wiring Diagram 5995518817 Owner's Guide TINSEB150WRRZ Installation Instructions TINSEB151WRRZ GLMV169 cover.eps PLMVZ169H Cabinet.eps PLMVZ169H Controls.eps GLMV169H Wiring.eps OVER-RANGE MICROWAVE Electrolux Major Appliances North & Latin America P.O. BOX 212378 AUGUSTA, GA 30917 Publication No. 5995518817 08/07/15 (EN/SERVICE/KC) 099 Model No. Product No. All rights reserved.
Installation Instructions
Page 1
... For customers in the top cabinet above the unit. The center of this product. • NOTE TO CONSUMER - INSTALLATION INSTRUCTIONS Over The Range Microwave Oven BEFORE YOU BEGIN Read these instructions completely and carefully. • IMPORTANT Save these instructions for future reference. • SKILL LEVEL - Two people are recommended to find a solid sound. See 3 ELECTRICAL GROUNDING...
... For customers in the top cabinet above the unit. The center of this product. • NOTE TO CONSUMER - INSTALLATION INSTRUCTIONS Over The Range Microwave Oven BEFORE YOU BEGIN Read these instructions completely and carefully. • IMPORTANT Save these instructions for future reference. • SKILL LEVEL - Two people are recommended to find a solid sound. See 3 ELECTRICAL GROUNDING...

Installation Instructions
Page 2
... the electric current. INSTALLATION INSTRUCTIONS 3 ELECTRICAL GROUNDING INSTRUCTIONS This appliance must be metal; present additional resistance to air flow and are made securely. This oven is longer than 140... Power Supply Cord and plug must be located inside the cabinet directly above the Microwave Oven mounting location as shown in accordance with a 3-prong grounding plug. WARNING - In...90° Elbow (10 ft.) 45° Elbow (5 ft.) Adaptor (5 ft.) 10" Wide Elbow (10 ft.) 90° Elbow (25 ft.) 45° Elbow (5 ft.) Wall cap (40 ft.) Roof cap (24 ft.) Figure 3 E2 REAR ...
... the electric current. INSTALLATION INSTRUCTIONS 3 ELECTRICAL GROUNDING INSTRUCTIONS This appliance must be metal; present additional resistance to air flow and are made securely. This oven is longer than 140... Power Supply Cord and plug must be located inside the cabinet directly above the Microwave Oven mounting location as shown in accordance with a 3-prong grounding plug. WARNING - In...90° Elbow (10 ft.) 45° Elbow (5 ft.) Adaptor (5 ft.) 10" Wide Elbow (10 ft.) 90° Elbow (25 ft.) 45° Elbow (5 ft.) Wall cap (40 ft.) Roof cap (24 ft.) Figure 3 E2 REAR ...
Installation Instructions
Page 3
you may also use carton for any damage, do not operate the oven and contact your dealer or Electrolux AUTHORIZED SERVICER. Lift carton off oven and remove all packing materials, Installation Instructions, Wall Template, Top Template, Charcoal Filter, Turntable and Turntable Support; however, DO NOT REMOVE THE WAVEGUIDE COVER, which is located on plastic foam...
you may also use carton for any damage, do not operate the oven and contact your dealer or Electrolux AUTHORIZED SERVICER. Lift carton off oven and remove all packing materials, Installation Instructions, Wall Template, Top Template, Charcoal Filter, Turntable and Turntable Support; however, DO NOT REMOVE THE WAVEGUIDE COVER, which is located on plastic foam...
Installation Instructions
Page 4
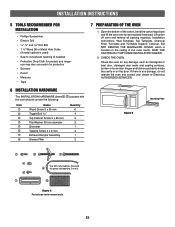
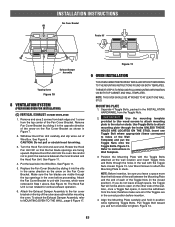
... and tighten into place. See Figure 11. Attach the Exhaust Damper Assembly to the back of Oven Figure 7 E4 Figure 9 INSTALLATION INSTRUCTIONS 8 VENTILATION SYSTEM (PREPARING OVEN FOR INSTALLATION) This microwave oven/hood is designed for adaptation to three types of hood ventilation systems. Select the type required for horizontal exhaust operation. 6. Tabs (B)HORIZONTAL EXHAUST: OUTSIDE VENTILATION 1. ...
... and tighten into place. See Figure 11. Attach the Exhaust Damper Assembly to the back of Oven Figure 7 E4 Figure 9 INSTALLATION INSTRUCTIONS 8 VENTILATION SYSTEM (PREPARING OVEN FOR INSTALLATION) This microwave oven/hood is designed for adaptation to three types of hood ventilation systems. Select the type required for horizontal exhaust operation. 6. Tabs (B)HORIZONTAL EXHAUST: OUTSIDE VENTILATION 1. ...
Installation Instructions
Page 5
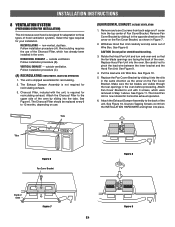
...space, the Toggle Nut will not be able to instructions in the INSTALLATION HARDWARE, from the Toggle Nuts. 2. E5 INSTALLATION INSTRUCTIONS Fan Cover Bracket Rotate 90° Exhaust Damper Assembly Tapping Screw Figure 10 8 VENTILATION SYSTEM (PREPARING OVEN FOR INSTALLATION) (C) VERTICAL EXHAUST: OUTSIDE VENTILATION 1. See Figure 11... facing upward. MOUNTING PLATE 1. CAUTION: Do not pull or stretch hood fan wiring. 3. Figure 11 9 OVEN INSTALLATION THIS OVEN CANNOT BE PROPERLY INSTALLED WITHOUT REFERRING TO THE MOUNTING INSTRUCTIONS FOUND ON BOTH TEMPLATES. Use Toggle Bolts to MOUNTING...
...space, the Toggle Nut will not be able to instructions in the INSTALLATION HARDWARE, from the Toggle Nuts. 2. E5 INSTALLATION INSTRUCTIONS Fan Cover Bracket Rotate 90° Exhaust Damper Assembly Tapping Screw Figure 10 8 VENTILATION SYSTEM (PREPARING OVEN FOR INSTALLATION) (C) VERTICAL EXHAUST: OUTSIDE VENTILATION 1. See Figure 11... facing upward. MOUNTING PLATE 1. CAUTION: Do not pull or stretch hood fan wiring. 3. Figure 11 9 OVEN INSTALLATION THIS OVEN CANNOT BE PROPERLY INSTALLED WITHOUT REFERRING TO THE MOUNTING INSTRUCTIONS FOUND ON BOTH TEMPLATES. Use Toggle Bolts to MOUNTING...
Installation Instructions
Page 6
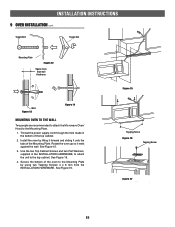
... the hole made in the INSTALLATION HARDWARE, to attach the unit to the Mounting Plate by tilting it forward and sliding it rests against the wall. See Figure 15. 3. See Figure 16. 4. INSTALLATION INSTRUCTIONS 9 OVEN INSTALLATION cont. Toggle Bolt Toggle Nut... Mounting Plate Figure 12 Space more than wall thickness Wall Figure 13 Figure 14 MOUNTING OVEN TO THE WALL Two people are recommended to attach the Microwave Oven/ Hood to the Mounting Plate. 1. Install the oven by using two ...
... the hole made in the INSTALLATION HARDWARE, to attach the unit to the Mounting Plate by tilting it forward and sliding it rests against the wall. See Figure 15. 3. See Figure 16. 4. INSTALLATION INSTRUCTIONS 9 OVEN INSTALLATION cont. Toggle Bolt Toggle Nut... Mounting Plate Figure 12 Space more than wall thickness Wall Figure 13 Figure 14 MOUNTING OVEN TO THE WALL Two people are recommended to attach the Microwave Oven/ Hood to the Mounting Plate. 1. Install the oven by using two ...

Installation Instructions
Page 7
Keep the Operation Manual. INSTALLATION INSTRUCTIONS CHECKLIST FOR INSTALLATION 1. Make sure the unit has been installed according to all of the Installation Instructions and the Wall and Top Cabinet Templates. 2. E7 Plug in the power cord. 3.
Keep the Operation Manual. INSTALLATION INSTRUCTIONS CHECKLIST FOR INSTALLATION 1. Make sure the unit has been installed according to all of the Installation Instructions and the Wall and Top Cabinet Templates. 2. E7 Plug in the power cord. 3.

