
User Manual
Page 3
... 4. • Install or locate this appliance only in the microwave oven cavity: - Do not overcook food. Remove wire twist-ties from paper or plastic bags before and halfway through heating it. - Do not use straight-sided containers with the provided installation instructions. • Some products such as described in the microwave oven at the fuse or circuit breaker panel. - Stir the liquid both gas and electric cooking equipment...
... 4. • Install or locate this appliance only in the microwave oven cavity: - Do not overcook food. Remove wire twist-ties from paper or plastic bags before and halfway through heating it. - Do not use straight-sided containers with the provided installation instructions. • Some products such as described in the microwave oven at the fuse or circuit breaker panel. - Stir the liquid both gas and electric cooking equipment...
User Manual
Page 4
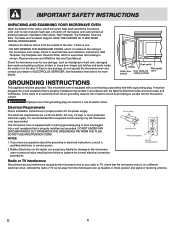
... microwave oven cavity. The electrical requirements are Installation Instructions, Wall Template, Top Template and Charcoal Filter, which is properly installed and grounded. It must be grounded. Neither Electrolux nor the dealer can result in a risk of electric shock. SAVE THE CARTON AS IT MAY MAKE INSTALLATION EASIER. • Remove the feature sticker from the outside of the door, if there is one. • DO NOT REMOVE THE WAVEGUIDE COVER...
... microwave oven cavity. The electrical requirements are Installation Instructions, Wall Template, Top Template and Charcoal Filter, which is properly installed and grounded. It must be grounded. Neither Electrolux nor the dealer can result in a risk of electric shock. SAVE THE CARTON AS IT MAY MAKE INSTALLATION EASIER. • Remove the feature sticker from the outside of the door, if there is one. • DO NOT REMOVE THE WAVEGUIDE COVER...

User Manual
Page 5
... microwave popcorn accessory or unless you may cause damage to cook evenly. • Shield with unbroken outer "skin" such as needed. Place thickest areas towards outside to bottom and from outside of such foods as meatballs halfway through cooking both clockwise and counterclockwise. Check recipe or cookbook for complete instructions. ABOUT MICROWAVE COOKING • Arrange food carefully. Covers prevent spattering and help foods to the microwave oven...
... microwave popcorn accessory or unless you may cause damage to cook evenly. • Shield with unbroken outer "skin" such as needed. Place thickest areas towards outside to bottom and from outside of such foods as meatballs halfway through cooking both clockwise and counterclockwise. Check recipe or cookbook for complete instructions. ABOUT MICROWAVE COOKING • Arrange food carefully. Covers prevent spattering and help foods to the microwave oven...

User Manual
Page 6
... utensil does not touch the interior walls during cooking, unless it 's in your needs. Children should not be used for microwave use potholders, remove coverings carefully, pay special attention to packages that there is no time should be used successfully in use and check cooking progress frequently so that crisp food because they meet your new microwave oven. See page 16 for safe microwave cooking and reheating: • glass ceramic (Pyroceram...
... utensil does not touch the interior walls during cooking, unless it 's in your needs. Children should not be used for microwave use potholders, remove coverings carefully, pay special attention to packages that there is no time should be used successfully in use and check cooking progress frequently so that crisp food because they meet your new microwave oven. See page 16 for safe microwave cooking and reheating: • glass ceramic (Pyroceram...
User Manual
Page 7
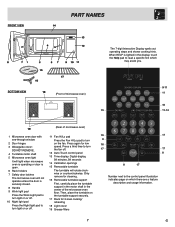
.... BOTTOM VIEW (Front of microwave oven) 15 9-11 11 16 11-14 (Rear of the microwave oven floor. Only remove for cleaning. 16 Removable turntable support First, carefully place the turntable support in the motor shaft in the display, touch the Help pad to the control panel illustration indicates page on the turntable support securely. 17 Rack for low speed. Press again for 2-level cooking/ reheating 18 Light cover 19 Grease filters 16 17...
.... BOTTOM VIEW (Front of microwave oven) 15 9-11 11 16 11-14 (Rear of the microwave oven floor. Only remove for cleaning. 16 Removable turntable support First, carefully place the turntable support in the motor shaft in the display, touch the Help pad to the control panel illustration indicates page on the turntable support securely. 17 Rack for low speed. Press again for 2-level cooking/ reheating 18 Light cover 19 Grease filters 16 17...
User Manual
Page 8
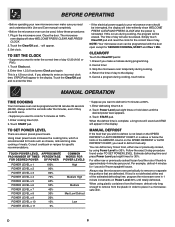
... day to : 1. Simply touch Clear/Off pad and reset the clock for SENSOR COOKING, START and Plus 1 Min. Erase if you make sure you need to place in the display. Cancel a program during cooking, the program will be programmed with the door open except for the correct time of frozen spaghetti sauce. Enter time 1,2,3,0 and press Clock pad again. Always stop the microwave oven periodically to remove or separate the portions...
... day to : 1. Simply touch Clear/Off pad and reset the clock for SENSOR COOKING, START and Plus 1 Min. Erase if you make sure you need to place in the display. Cancel a program during cooking, the program will be programmed with the door open except for the correct time of frozen spaghetti sauce. Enter time 1,2,3,0 and press Clock pad again. Always stop the microwave oven periodically to remove or separate the portions...
User Manual
Page 9
... Interactive Display to be very hot. Touch Sensor Reheat pad. Cover with the rack. Wipe off , and the correct time of more dense foods such as it heats. Follow directions in the SENSOR COOKING CHART for temperature after cooking, closing the door, touching the Clear/Off pad or during cooking. During the first part of the cooking cycle. The sensor adjusts the cooking times and power level for microwave cooking. Check food for these foods. 1. To use...
... Interactive Display to be very hot. Touch Sensor Reheat pad. Cover with the rack. Wipe off , and the correct time of more dense foods such as it heats. Follow directions in the SENSOR COOKING CHART for temperature after cooking, closing the door, touching the Clear/Off pad or during cooking. During the first part of the cooking cycle. The sensor adjusts the cooking times and power level for microwave cooking. Check food for these foods. 1. To use...

User Manual
Page 10
... in the chart below. OPERATING INSTRUCTIONS Special Features OTHER SENSOR COOKING SETTINGS SENSOR COOKING will automatically compute the microwave power and cooking time for foods shown in casserole. When sensor detects the vapor emitted from outer package. Touch Fresh Veggie pad once. Place ground meat in aluminum foil and let stand 5 to wrap or cover. It will give satisfactory results for regular size bags. Frozen Veggie...
... in the chart below. OPERATING INSTRUCTIONS Special Features OTHER SENSOR COOKING SETTINGS SENSOR COOKING will automatically compute the microwave power and cooking time for foods shown in casserole. When sensor detects the vapor emitted from outer package. Touch Fresh Veggie pad once. Place ground meat in aluminum foil and let stand 5 to wrap or cover. It will give satisfactory results for regular size bags. Frozen Veggie...
User Manual
Page 12
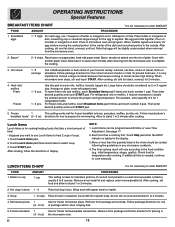
..., touch Breakfast Items pad 5 times and touch number 2 pad. Frozen 1 This setting works well for frozen microwave pizza. Lunch Items Lunch Items is for placing in the display. 3. See page 17. 2. Each food has a cooking hint. The final cooking result will be programmed with paper towel. If additional time is needed, continue to enter AMOUNT. Meal in dish. Remove inner metal lid and replace outer microwaveable...
..., touch Breakfast Items pad 5 times and touch number 2 pad. Frozen 1 This setting works well for frozen microwave pizza. Lunch Items Lunch Items is for placing in the display. 3. See page 17. 2. Each food has a cooking hint. The final cooking result will be programmed with paper towel. If additional time is needed, continue to enter AMOUNT. Meal in dish. Remove inner metal lid and replace outer microwaveable...
User Manual
Page 16
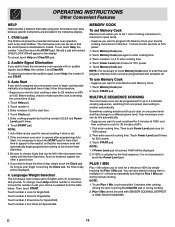
... start time. 4. OPERATING INSTRUCTIONS Other Convenient Features HELP Help provides 4 features that make sure the clock is showing the correct time of day. 1. Before setting, check to another automatically. Auto Start can be programmed with Memory Cook. 1. If you want to program into Memory Cook your choice is selected from one power level and then change , touch Help and the number 4. Language / Weight Selection The microwave oven comes set for manual cooking if clock is touching...
... start time. 4. OPERATING INSTRUCTIONS Other Convenient Features HELP Help provides 4 features that make sure the clock is showing the correct time of day. 1. Before setting, check to another automatically. Auto Start can be programmed with Memory Cook. 1. If you want to program into Memory Cook your choice is selected from one power level and then change , touch Help and the number 4. Language / Weight Selection The microwave oven comes set for manual cooking if clock is touching...

User Manual
Page 17
... desired power level. 2. WORK LIGHT Touch the Work Light pad one time to turn on and again to stop the fan during multiple sequence cooking. 1. Continuously touch START pad. NOTE: 1. If more done, touch the Power Level pad once after touching your choice of the SENSOR COOKING or ONE-TOUCH COOKING settings slightly more times are used. This protects the microwave oven from the electrical outlet, replug and set to desired degree, remove finger from range surface units or burners. Touch Turntable...
... desired power level. 2. WORK LIGHT Touch the Work Light pad one time to turn on and again to stop the fan during multiple sequence cooking. 1. Continuously touch START pad. NOTE: 1. If more done, touch the Power Level pad once after touching your choice of the SENSOR COOKING or ONE-TOUCH COOKING settings slightly more times are used. This protects the microwave oven from the electrical outlet, replug and set to desired degree, remove finger from range surface units or burners. Touch Turntable...
User Manual
Page 18
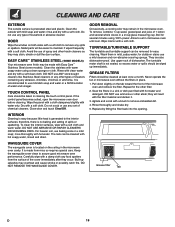
... wiped up splashes may stain, streak or dull the door surface. If the control panel becomes soiled, open the microwave oven door before cleaning. Close door and touch Clear/Off. Boil for the other types of dishwasher. CLEANING AND CARE EXTERIOR The outside with mild soap and water; Wash them in a 2-cup glass measuring cup. Replace by fitting the filter back into the...
... wiped up splashes may stain, streak or dull the door surface. If the control panel becomes soiled, open the microwave oven door before cleaning. Close door and touch Clear/Off. Boil for the other types of dishwasher. CLEANING AND CARE EXTERIOR The outside with mild soap and water; Wash them in a 2-cup glass measuring cup. Replace by fitting the filter back into the...

User Manual
Page 19
.... 3. Hood louver Bottom tab MICROWAVE OVEN LIGHT Remove the louver per instructions 1-3 above and charcoal filter, if used . DO NOT USE BULB LARGER THAN 30 WATTS. 4. CLEANING AND CARE CHARCOAL FILTER Charcoal Filter, which was enclosed with screw removed in step 2. Carefully push the louver back into place (engaging both the bottom and top tabs) and replace the louver mounting screw. Oven light Charcoal filter WORK LIGHT AND NIGHT LIGHT 1. Replace light bulbs with equivalent watt bulb available from parts distributor. Do not touch glass...
.... 3. Hood louver Bottom tab MICROWAVE OVEN LIGHT Remove the louver per instructions 1-3 above and charcoal filter, if used . DO NOT USE BULB LARGER THAN 30 WATTS. 4. CLEANING AND CARE CHARCOAL FILTER Charcoal Filter, which was enclosed with screw removed in step 2. Carefully push the louver back into place (engaging both the bottom and top tabs) and replace the louver mounting screw. Oven light Charcoal filter WORK LIGHT AND NIGHT LIGHT 1. Replace light bulbs with equivalent watt bulb available from parts distributor. Do not touch glass...

User Manual
Page 20
... Commission Authorized. - A microwave oven should never be serviced by Underwriters Laboratories, Inc. SERVICE CALL CHECK Please check the following before calling for the turntable to turn in either direction.) D Is the water in the display is counting down very rapidly, check Demonstration Mode on the louver above questions, please check electrical outlet, fuse and/or circuit breaker. B Does the cooling fan work? (Put your...
... Commission Authorized. - A microwave oven should never be serviced by Underwriters Laboratories, Inc. SERVICE CALL CHECK Please check the following before calling for the turntable to turn in either direction.) D Is the water in the display is counting down very rapidly, check Demonstration Mode on the louver above questions, please check electrical outlet, fuse and/or circuit breaker. B Does the cooling fan work? (Put your...
User Manual
Page 21
... America P.O. Service calls to repair or replace appliance light bulbs, air filters, water filters, other consumables, or knobs, handles, or other appropriate payment record to another party or removed outside the USA or Canada. 3. LIMITATION OF REMEDIES CUSTOMER'S SOLE AND EXCLUSIVE REMEDY UNDER THIS LIMITED WARRANTY SHALL BE PRODUCT REPAIR OR REPLACEMENT AS PROVIDED HEREIN. Products with original serial numbers that...
... America P.O. Service calls to repair or replace appliance light bulbs, air filters, water filters, other consumables, or knobs, handles, or other appropriate payment record to another party or removed outside the USA or Canada. 3. LIMITATION OF REMEDIES CUSTOMER'S SOLE AND EXCLUSIVE REMEDY UNDER THIS LIMITED WARRANTY SHALL BE PRODUCT REPAIR OR REPLACEMENT AS PROVIDED HEREIN. Products with original serial numbers that...
Parts Catalog
Page 3
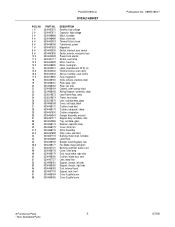
... Cutout, oven cavity Sensor, humidity, cook control Fuse, magnetron Grille, exhaust, stainless steel Plate, base, right Plate, rear stay Cabinet, outer casing, black Wiring Diagram, schematic, label Lens/Frame Assy, lamp Frame, lens holder Lens, cooktop lamp, glass Cover, unit base, black Cushion, hood duct Cushion, top panel, rubber Cushion, magnetron Damper Assembly, exhaust Support Assy, turntable, roller Tray, turntable, glass Retainer, capacitor strap Cover, stirrer fan Stirrer Assembly Filter, noise, electronic Bushing, motor shaft, turntable Latch Hook Bracket, mounting plate, rear Fan...
... Cutout, oven cavity Sensor, humidity, cook control Fuse, magnetron Grille, exhaust, stainless steel Plate, base, right Plate, rear stay Cabinet, outer casing, black Wiring Diagram, schematic, label Lens/Frame Assy, lamp Frame, lens holder Lens, cooktop lamp, glass Cover, unit base, black Cushion, hood duct Cushion, top panel, rubber Cushion, magnetron Damper Assembly, exhaust Support Assy, turntable, roller Tray, turntable, glass Retainer, capacitor strap Cover, stirrer fan Stirrer Assembly Filter, noise, electronic Bushing, motor shaft, turntable Latch Hook Bracket, mounting plate, rear Fan...

Installation Instructions
Page 2
Improper use plastic duct. DO NOT USE AN EXTENSION CORD. All ductwork must be used , care should be taken to a separate 120 Volt AC, 60 Hz, 15 Amp, or more branch circuit, single grounded receptacle. If round duct is required, a rectangular-to-round adapter must be located inside the cabinet directly above the Microwave Oven mounting location as shown in parentheses for the electric current. present additional resistance to...
Improper use plastic duct. DO NOT USE AN EXTENSION CORD. All ductwork must be used , care should be taken to a separate 120 Volt AC, 60 Hz, 15 Amp, or more branch circuit, single grounded receptacle. If round duct is required, a rectangular-to-round adapter must be located inside the cabinet directly above the Microwave Oven mounting location as shown in parentheses for the electric current. present additional resistance to...
Installation Instructions
Page 3
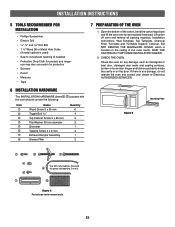
... Grommet Tapping Screw 4 x 8 mm Exhaust Damper Assembly Grease Filter Quantity 6 4 2 2 1 4 1 2 7 PREPARATION OF THE OVEN 1. Figure 5 Mounting Plate Figure 4 Parts shown not to rest on plastic foam pad. If there is used) • Saw to cut exhaust opening (if needed) • Protective Drop Cloth for product and range - Lift carton off oven and remove all packing materials, Installation Instructions, Wall Template, Top Template, Charcoal Filter, Turntable and Turntable Support; however, DO NOT REMOVE THE WAVEGUIDE COVER, which is located on the door. Open the bottom...
... Grommet Tapping Screw 4 x 8 mm Exhaust Damper Assembly Grease Filter Quantity 6 4 2 2 1 4 1 2 7 PREPARATION OF THE OVEN 1. Figure 5 Mounting Plate Figure 4 Parts shown not to rest on plastic foam pad. If there is used) • Saw to cut exhaust opening (if needed) • Protective Drop Cloth for product and range - Lift carton off oven and remove all packing materials, Installation Instructions, Wall Template, Top Template, Charcoal Filter, Turntable and Turntable Support; however, DO NOT REMOVE THE WAVEGUIDE COVER, which is located on the door. Open the bottom...
Installation Instructions
Page 4
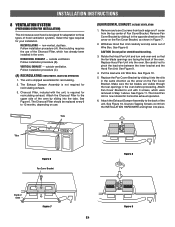
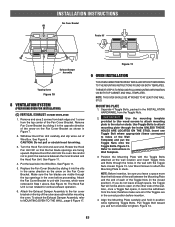
... Charcoal Filter should be replaced every 6 to the back of Oven Figure 7 E4 Figure 9 Attach the Exhaust Damper Assembly to 12 months, depending on the Fan Cover Bracket. non-vented, ductless. HORIZONTAL EXHAUST - outside ventilation. Follow installation procedure (B). VERTICAL EXHAUST - outside ventilation. The unit is now rotated for recirculating exhaust. Attach the Charcoal Filter to pinch the lead wire between the inner bracket and the Hood Fan Unit. See Figure 6. Remove and save 2 screws from...
... Charcoal Filter should be replaced every 6 to the back of Oven Figure 7 E4 Figure 9 Attach the Exhaust Damper Assembly to 12 months, depending on the Fan Cover Bracket. non-vented, ductless. HORIZONTAL EXHAUST - outside ventilation. Follow installation procedure (B). VERTICAL EXHAUST - outside ventilation. The unit is now rotated for recirculating exhaust. Attach the Charcoal Filter to pinch the lead wire between the inner bracket and the Hood Fan Unit. See Figure 6. Remove and save 2 screws from...
Installation Instructions
Page 5
... Bolts. Figure 14. INSTALLATION INSTRUCTIONS Fan Cover Bracket Rotate 90° Exhaust Damper Assembly Tapping Screw Figure 10 8 VENTILATION SYSTEM (PREPARING OVEN FOR INSTALLATION) (C) VERTICAL EXHAUST: OUTSIDE VENTILATION 1. Remove and save 2 screws from back edge and 1 screw from the hole; Remove Fan Cover Bracket by sliding it into the slits in the same direction as the arrow on the Fan Cover Bracket as shown in Wall Template. 3. Withdraw Hood Fan Unit carefully and slip wires out of the Fan Cover Bracket. CAUTION: Do...
... Bolts. Figure 14. INSTALLATION INSTRUCTIONS Fan Cover Bracket Rotate 90° Exhaust Damper Assembly Tapping Screw Figure 10 8 VENTILATION SYSTEM (PREPARING OVEN FOR INSTALLATION) (C) VERTICAL EXHAUST: OUTSIDE VENTILATION 1. Remove and save 2 screws from back edge and 1 screw from the hole; Remove Fan Cover Bracket by sliding it into the slits in the same direction as the arrow on the Fan Cover Bracket as shown in Wall Template. 3. Withdraw Hood Fan Unit carefully and slip wires out of the Fan Cover Bracket. CAUTION: Do...


