
User Manual
Page 1
Microwave Oven Visit the Frigidaire Web Site at: http://www.frigidaire.com READ AND SAVE THESE INSTRUCTIONS Welcome & Congratulation....... 2 Important Safety Instructions... 2-6 Part Names 7 Before Operating 8 Manual Operation 8 Operating Instructions 9-17 Cleaning and Care 18-19 Specifications 20 Service Call Check 20 Warranty 21 P/N316495001 TINSEB150WRRZ-EL82 E
Microwave Oven Visit the Frigidaire Web Site at: http://www.frigidaire.com READ AND SAVE THESE INSTRUCTIONS Welcome & Congratulation....... 2 Important Safety Instructions... 2-6 Part Names 7 Before Operating 8 Manual Operation 8 Operating Instructions 9-17 Cleaning and Care 18-19 Specifications 20 Service Call Check 20 Warranty 21 P/N316495001 TINSEB150WRRZ-EL82 E

User Manual
Page 5
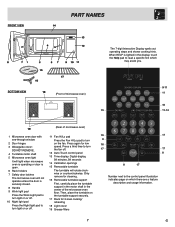
...preparation only. When using the microwave oven at power levels below 100%, you use popcorn labeled for the exterior of the microwave oven could be placed in a microwave oven. It is normal for use of the microwave oven to absorb the microwave energy. The microwave oven is opaque and flakes.... • Spontaneous boiling-Under certain special circumstances, liquids may hear the magnetron cycling on to be blocked. Your microwave oven is a normal part of meat or poultry to dry clothes or newspapers. In using the IEC Test Procedure. Place thickest areas towards outside...
...preparation only. When using the microwave oven at power levels below 100%, you use popcorn labeled for the exterior of the microwave oven could be placed in a microwave oven. It is normal for use of the microwave oven to absorb the microwave energy. The microwave oven is opaque and flakes.... • Spontaneous boiling-Under certain special circumstances, liquids may hear the magnetron cycling on to be blocked. Your microwave oven is a normal part of meat or poultry to dry clothes or newspapers. In using the IEC Test Procedure. Place thickest areas towards outside...
User Manual
Page 7
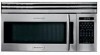
... Rack for low speed. BOTTOM VIEW (Front of microwave oven) 15 9-11 11 16 11-14 (Rear of the microwave oven floor. When HELP is lighted in the center of microwave oven) 1 Microwave oven door with see-through window 2 Door hinges 3 ...Waveguide cover: DO NOT REMOVE. 4 Turntable motor shaft 5 Microwave oven light It will light when microwave oven is operating or door is open. 6 Rack holders 7 Safety door latches The microwave oven will rotate clockwise or counterclockwise. FRONT VIEW PART...
... Rack for low speed. BOTTOM VIEW (Front of microwave oven) 15 9-11 11 16 11-14 (Rear of the microwave oven floor. When HELP is lighted in the center of microwave oven) 1 Microwave oven door with see-through window 2 Door hinges 3 ...Waveguide cover: DO NOT REMOVE. 4 Turntable motor shaft 5 Microwave oven light It will light when microwave oven is operating or door is open. 6 Rack holders 7 Safety door latches The microwave oven will rotate clockwise or counterclockwise. FRONT VIEW PART...
User Manual
Page 9
... not detect vapor properly when cooking other foods, ERROR will appear. 2. Touch HELP pad when the HELP indicator is plugged in the microwave oven. • Using any covering to allow steam to cover. Casserole lid. 2. allow approximately 1/2 inch to remain uncovered to allow steam...page 17. 5. During the first part of space around and between the dishes. Flatten, if possible. Touch START. Follow directions in better cooking/reheating uniformity. If the sensor does not detect vapor properly when popping popcorn, the microwave oven will appear. fold excess wrap under dish...
... not detect vapor properly when cooking other foods, ERROR will appear. 2. Touch HELP pad when the HELP indicator is plugged in the microwave oven. • Using any covering to allow steam to cover. Casserole lid. 2. allow approximately 1/2 inch to remain uncovered to allow steam...page 17. 5. During the first part of space around and between the dishes. Flatten, if possible. Touch START. Follow directions in better cooking/reheating uniformity. If the sensor does not detect vapor properly when popping popcorn, the microwave oven will appear. fold excess wrap under dish...
User Manual
Page 18
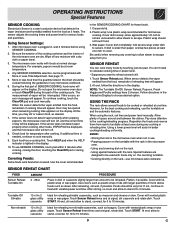
... soft cloth. therefore, there is located on the tab toward the front of the cover immediately after they may be taken in the microwave oven. Carefully wipe with a damp cloth any abrasive, chlorides, chlorines or ammonia. TURNTABLE/TURNTABLE SUPPORT The turntable and turntable support can be ... lemon and several minutes using a clean sponge or cloth. rinse thoroughly with hot water. Use upper rack of spills or spattering. Metal parts will react with the filter material and darken it. 3. ODOR REMOVAL Occasionally, a cooking odor may overheat and cause smoke or possibly...
... soft cloth. therefore, there is located on the tab toward the front of the cover immediately after they may be taken in the microwave oven. Carefully wipe with a damp cloth any abrasive, chlorides, chlorines or ammonia. TURNTABLE/TURNTABLE SUPPORT The turntable and turntable support can be ... lemon and several minutes using a clean sponge or cloth. rinse thoroughly with hot water. Use upper rack of spills or spattering. Metal parts will react with the filter material and darken it. 3. ODOR REMOVAL Occasionally, a cooking odor may overheat and cause smoke or possibly...

User Manual
Page 19
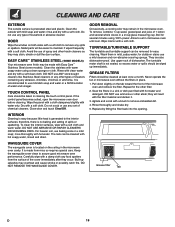
...light bulbs, first disconnect power to the microwave oven at most hardware stores or lighting centers. Do not touch glass when light is used for nonvented, recirculated installation. Pull the louver away from parts distributor. Close light cover and secure with equivalent ...watt bulb available from the unit. 4. Hood louver Bottom tab MICROWAVE OVEN LIGHT Remove the louver per instructions 1-3 above and charcoal fi...
...light bulbs, first disconnect power to the microwave oven at most hardware stores or lighting centers. Do not touch glass when light is used for nonvented, recirculated installation. Pull the louver away from parts distributor. Close light cover and secure with equivalent ...watt bulb available from the unit. 4. Hood louver Bottom tab MICROWAVE OVEN LIGHT Remove the louver per instructions 1-3 above and charcoal fi...
User Manual
Page 21
... Electrolux Canada Corp. In the USA, your appliance is " are subject to use your receipt, delivery slip, or some other cosmetic parts. 11. USA 1.800.944.9044 Electrolux Major Appliances North America P.O. Rust on the interior or exterior of this warranty. 5. Products ...of Alaska. 12. Damages caused by: services performed by a one year from persons other than genuine Electrolux parts or parts obtained from your best interest to any parts of the unit. 4. THIS WRITTEN WARRANTY GIVES YOU SPECIFIC LEGAL RIGHTS. Service under this warranty. Product features...
... Electrolux Canada Corp. In the USA, your appliance is " are subject to use your receipt, delivery slip, or some other cosmetic parts. 11. USA 1.800.944.9044 Electrolux Major Appliances North America P.O. Rust on the interior or exterior of this warranty. 5. Products ...of Alaska. 12. Damages caused by: services performed by a one year from persons other than genuine Electrolux parts or parts obtained from your best interest to any parts of the unit. 4. THIS WRITTEN WARRANTY GIVES YOU SPECIFIC LEGAL RIGHTS. Service under this warranty. Product features...
Parts Catalog
Page 3
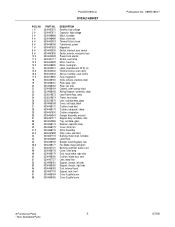
PLMVZ169HCA OVEN,CABINET POS. NO 1 # 2 # 3 # 4 # 5 # 6 # 7 # 8 # 9 # 10 # 11 # 12 # 13 # 14 15 # 16 # 17 # 18 19 20 21 22 23 24 25 26 27 28 29 36 37 38 39 40 41 # 42 # 43 44 45 46 # 47 48 49 50 51 52 53 54 55 57 58 PART NO. 5304467670 5304467671 5304448488 ...Stirrer Assembly Filter, noise, electronic Bushing, motor shaft, turntable Latch Hook Bracket, mounting plate, rear Fan Blade, mag cooling fan Bushing, grommet, power cord Cover, oven lamp Duct, hood intake, right side Cushion, intake duct, seal Lens, lamp filter Support, chassis, left side Support, chassis, right side Duct, exhaust hood ...
PLMVZ169HCA OVEN,CABINET POS. NO 1 # 2 # 3 # 4 # 5 # 6 # 7 # 8 # 9 # 10 # 11 # 12 # 13 # 14 15 # 16 # 17 # 18 19 20 21 22 23 24 25 26 27 28 29 36 37 38 39 40 41 # 42 # 43 44 45 46 # 47 48 49 50 51 52 53 54 55 57 58 PART NO. 5304467670 5304467671 5304448488 ...Stirrer Assembly Filter, noise, electronic Bushing, motor shaft, turntable Latch Hook Bracket, mounting plate, rear Fan Blade, mag cooling fan Bushing, grommet, power cord Cover, oven lamp Duct, hood intake, right side Cushion, intake duct, seal Lens, lamp filter Support, chassis, left side Support, chassis, right side Duct, exhaust hood ...
Parts Catalog
Page 7
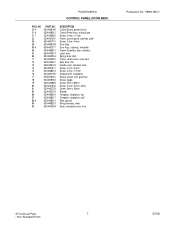
...35 56 63 # 65 67 69 71 72 73 74 75 76 77 78 79 80 81 82 86 87 88 # 89 95 PART NO. 5304468192 5304468212 5304456930 5304461361 5304467710 5304468199 5304461371 5304468210 5304440314 5304440316 5304440320 5304440321 5304456145 5304451517 5304468213 5304467765 5303318761 5303318762 5304453895 5304451552 5304453723 5304453724 5304468216...5mm x 85mm Screw, 4 mm x 8 mm, white Screw, 5mm x 35mm Washer Template, installation, top Template, installation, wall Wire, ground Wiring Harness, main Rack, microwave oven, wire Publication No: 5995518817 # Functional Parts 7 * Non-Illustrated Parts 07/08
...35 56 63 # 65 67 69 71 72 73 74 75 76 77 78 79 80 81 82 86 87 88 # 89 95 PART NO. 5304468192 5304468212 5304456930 5304461361 5304467710 5304468199 5304461371 5304468210 5304440314 5304440316 5304440320 5304440321 5304456145 5304451517 5304468213 5304467765 5303318761 5303318762 5304453895 5304451552 5304453723 5304453724 5304468216...5mm x 85mm Screw, 4 mm x 8 mm, white Screw, 5mm x 35mm Washer Template, installation, top Template, installation, wall Wire, ground Wiring Harness, main Rack, microwave oven, wire Publication No: 5995518817 # Functional Parts 7 * Non-Illustrated Parts 07/08

Installation Instructions
Page 2
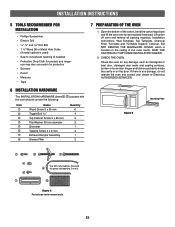
... ductwork parts. In the event of an electrical short circuit, grounding reduces risk of straight duct which is constructed by providing an escape wire for calculating air flow resistance equivalent, which should be located inside the cabinet directly above the Microwave Oven mounting ...you have any liability for Power Cord Figure 2 90° Elbow (10 ft.) 45° Elbow (5 ft.) Adaptor (5 ft.) 10" Wide Elbow (10 ft.) 90° Elbow (25 ft.) 45° Elbow (5 ft.) Wall cap (40 ft.) Roof cap (24 ft.) Figure 3 E2 present additional resistance to the outside, a hood exhaust duct...
... ductwork parts. In the event of an electrical short circuit, grounding reduces risk of straight duct which is constructed by providing an escape wire for calculating air flow resistance equivalent, which should be located inside the cabinet directly above the Microwave Oven mounting ...you have any liability for Power Cord Figure 2 90° Elbow (10 ft.) 45° Elbow (5 ft.) Adaptor (5 ft.) 10" Wide Elbow (10 ft.) 90° Elbow (25 ft.) 45° Elbow (5 ft.) Wall cap (40 ft.) Roof cap (24 ft.) Figure 3 E2 present additional resistance to the outside, a hood exhaust duct...
Installation Instructions
Page 3
...CHECK THE OVEN. however, DO NOT REMOVE THE WAVEGUIDE COVER, which is any damage, such as misaligned or bent door, damaged door seals and sealing surfaces, broken or loose door hinges and latches and dents inside the cavity or on the door. Figure 5 Mounting Plate Figure 4 Parts shown not ...to rest on the ceiling in the oven cavity. Check the oven for product and range - you may also use carton for protection • Scissors • Pencil • Measure...
...CHECK THE OVEN. however, DO NOT REMOVE THE WAVEGUIDE COVER, which is any damage, such as misaligned or bent door, damaged door seals and sealing surfaces, broken or loose door hinges and latches and dents inside the cavity or on the door. Figure 5 Mounting Plate Figure 4 Parts shown not ...to rest on the ceiling in the oven cavity. Check the oven for product and range - you may also use carton for protection • Scissors • Pencil • Measure...


